
STYLUS TOUGH-3000 Instruction Manual (English)
Page 3
... INFO button (changing information display) (p. 18, 21) Shutter button (p. 16, 58) H (left) I (right) Zoom buttons (p. 17, 20) Movie record button (p. 17) q button (switching between shooting and playback) (p. 17, 18, 45) m button (p. 4) E button (camera guide/ menu guide) (p. 22) A button G (down) / D button (erase) (p. 20) Operation guides displayed at the bottom of the screen indicate that the arrow pad is to be used . 1 IMAGE SIZE 14M 2 COMPRESSION NORMAL SHADOW ADJUST AUTO AF MODE FACE/iESP 1 ESP/ ESP 2 FINE ZOOM OFF 3 DIGITAL ZOOM OFF EXIT MENU SET OK SEL. IMAGE SET...
... INFO button (changing information display) (p. 18, 21) Shutter button (p. 16, 58) H (left) I (right) Zoom buttons (p. 17, 20) Movie record button (p. 17) q button (switching between shooting and playback) (p. 17, 18, 45) m button (p. 4) E button (camera guide/ menu guide) (p. 22) A button G (down) / D button (erase) (p. 20) Operation guides displayed at the bottom of the screen indicate that the arrow pad is to be used . 1 IMAGE SIZE 14M 2 COMPRESSION NORMAL SHADOW ADJUST AUTO AF MODE FACE/iESP 1 ESP/ ESP 2 FINE ZOOM OFF 3 DIGITAL ZOOM OFF EXIT MENU SET OK SEL. IMAGE SET...

STYLUS TOUGH-3000 Instruction Manual (English)
Page 4
... OUT POWER SAVE 1 2 3 EXIT MENU x OFF SET OK 3 Use FG to change camera settings such as shooting mode. To select the function menu Use FG to select a menu and use HI to set frequently used in the function menu, and other settings such as date, time and screen display. 1 Select [SETUP] and then press the A button. ● The [SETUP] menu is displayed. 1 IMAGE SIZE 14M 2 COMPRESSION NORMAL SHADOW ADJUST AUTO AF MODE FACE/iESP 1 ESP/ ESP 2 FINE ZOOM OFF 3 DIGITAL ZOOM OFF EXIT MENU SET OK 2 Press H to display the function menu...
... OUT POWER SAVE 1 2 3 EXIT MENU x OFF SET OK 3 Use FG to change camera settings such as shooting mode. To select the function menu Use FG to select a menu and use HI to set frequently used in the function menu, and other settings such as date, time and screen display. 1 Select [SETUP] and then press the A button. ● The [SETUP] menu is displayed. 1 IMAGE SIZE 14M 2 COMPRESSION NORMAL SHADOW ADJUST AUTO AF MODE FACE/iESP 1 ESP/ ESP 2 FINE ZOOM OFF 3 DIGITAL ZOOM OFF EXIT MENU SET OK 2 Press H to display the function menu...
STYLUS TOUGH-3000 Instruction Manual (English)
Page 5
... MODE 1 ICON GUIDE 3 DIGITAL ZOOM OFF R ON EXIT MENU 2 REMOTE FLASH ON SET OK 1 3 2 EXIT MENU SET OK 3 VGA NORMAL OFF ON EXIT MENU SET OK 1 Shooting mode P (PROGRAM AUTO).......p. 16 M (iAUTO p. 23 s (SCENE MODE) ......p. 23 P (MAGIC FILTER).....p. 24 p (PANORAMA p. 25 Q(BEAUTY p. 27 2 Flash p. 28 3 Macro p. 28 4 Self-timer p. 30 5 Exposure compensation....p. 30 6 White balance p. 30 7 ISO p. 31 8 Drive p. 32 9 o (SETUP) IMAGE SIZE (Still images p. 33 IMAGE SIZE (Movies) .......p. 33 COMPRESSION (Still images) p. 33 IMAGE QUALITY (Movies) p. 33 SHADOW ADJUST...
... MODE 1 ICON GUIDE 3 DIGITAL ZOOM OFF R ON EXIT MENU 2 REMOTE FLASH ON SET OK 1 3 2 EXIT MENU SET OK 3 VGA NORMAL OFF ON EXIT MENU SET OK 1 Shooting mode P (PROGRAM AUTO).......p. 16 M (iAUTO p. 23 s (SCENE MODE) ......p. 23 P (MAGIC FILTER).....p. 24 p (PANORAMA p. 25 Q(BEAUTY p. 27 2 Flash p. 28 3 Macro p. 28 4 Self-timer p. 30 5 Exposure compensation....p. 30 6 White balance p. 30 7 ISO p. 31 8 Drive p. 32 9 o (SETUP) IMAGE SIZE (Still images p. 33 IMAGE SIZE (Movies) .......p. 33 COMPRESSION (Still images) p. 33 IMAGE QUALITY (Movies) p. 33 SHADOW ADJUST...

STYLUS TOUGH-3000 Instruction Manual (English)
Page 12
... internal memory until the battery has charged, then disconnect and reconnect the camera. Camera setup Set the camera date and time, time zone and display language automatically; install the camera instruction manual and PC software (ib). Check that are stored on and running) Charging the battery When the camera is connected to the computer, the battery in the following system requirements: Windows XP (SP2 or later)/ Windows Vista/Windows 7 Refer to the PC software (ib) help guide for the camera drive (Removable Disk...
... internal memory until the battery has charged, then disconnect and reconnect the camera. Camera setup Set the camera date and time, time zone and display language automatically; install the camera instruction manual and PC software (ib). Check that are stored on and running) Charging the battery When the camera is connected to the computer, the battery in the following system requirements: Windows XP (SP2 or later)/ Windows Vista/Windows 7 Refer to the PC software (ib) help guide for the camera drive (Removable Disk...

STYLUS TOUGH-3000 Instruction Manual (English)
Page 14
... data. 1 Press the n button to save the setting for your language in the "Manual" folder in Steps 2 and 3, use FGHI and the A button to change the date and time, adjust the setting from the menu. [X] (Date/time) (p. 47) 5 Use HI to select the [x] time zone and then press the A button. ● Use FG to the computer and copy the instruction manual PDF file for [Y]. X Y M D TIME Y/M/D 3 Press I to turn daylight saving time ([SUMMER]) on the camera. ● The date and time setting screen is displayed...
... data. 1 Press the n button to save the setting for your language in the "Manual" folder in Steps 2 and 3, use FGHI and the A button to change the date and time, adjust the setting from the menu. [X] (Date/time) (p. 47) 5 Use HI to select the [x] time zone and then press the A button. ● Use FG to the computer and copy the instruction manual PDF file for [Y]. X Y M D TIME Y/M/D 3 Press I to turn daylight saving time ([SUMMER]) on the camera. ● The date and time setting screen is displayed...

STYLUS TOUGH-3000 Instruction Manual (English)
Page 15
Write-protect switch Contact area 1 INTERNAL/SD 2 MEMORY FORMAT DATA REPAIR COPY 1 2 RESET 3 USB CONNECTION EXIT MENU AUTO ENGLISH PC SET OK 3 Use FG to select [l] and press the A button. 4 Use FGHI to select the r (Settings 1) tab and then press I. Changing the display language 1 The language for the menu and error messages displayed on the monitor is adjustable. 1 Display the [SETUP] menu. Inserting the SD/SDHC memory card (sold separately) can be also used to store pictures. Insert the card straight until it clicks into place. "Number of memory card. Do...
Write-protect switch Contact area 1 INTERNAL/SD 2 MEMORY FORMAT DATA REPAIR COPY 1 2 RESET 3 USB CONNECTION EXIT MENU AUTO ENGLISH PC SET OK 3 Use FG to select [l] and press the A button. 4 Use FGHI to select the r (Settings 1) tab and then press I. Changing the display language 1 The language for the menu and error messages displayed on the monitor is adjustable. 1 Display the [SETUP] menu. Inserting the SD/SDHC memory card (sold separately) can be also used to store pictures. Insert the card straight until it clicks into place. "Number of memory card. Do...

STYLUS TOUGH-3000 Instruction Manual (English)
Page 16
P mode indicator 2 Hold the camera and compose the shot. Monitor Horizontal grip P 0.0 WB AUTO ISO AUTO 00:34 4 14M Number of other shooting menu functions, such as exposure compensation, white balance, etc. "Using the Menu" (p. 4) Current shooting mode display PROGRAM AUTO P Vertical grip When holding the camera, take care not to cover the flash with the optimum aperture value and shutter speed (P mode) In this mode, automatic shooting settings are displayed), and the AF target mark changes to green. ● The camera was...
P mode indicator 2 Hold the camera and compose the shot. Monitor Horizontal grip P 0.0 WB AUTO ISO AUTO 00:34 4 14M Number of other shooting menu functions, such as exposure compensation, white balance, etc. "Using the Menu" (p. 4) Current shooting mode display PROGRAM AUTO P Vertical grip When holding the camera, take care not to cover the flash with the optimum aperture value and shutter speed (P mode) In this mode, automatic shooting settings are displayed), and the AF target mark changes to green. ● The camera was...

STYLUS TOUGH-3000 Instruction Manual (English)
Page 17
... a movie, the sound of images. STYLUS TOUGH-3000/μ TOUGH-3000: During sound recording, only the digital zoom can be recorded. P Press fully 1/400 F3.9 Image review screen To view images during shooting Pressing the q button enables playback of the lens triggering and camera operating may be used . 4 To take larger images without reducing image quality [FINE ZOOM] (p. 35) EN 17 Using the zoom Pressing the zoom buttons adjusts the shooting range. Pressing the wide (W) button Pressing the telephoto (T) button Shooting movies 1 Press the movie record button...
... a movie, the sound of images. STYLUS TOUGH-3000/μ TOUGH-3000: During sound recording, only the digital zoom can be recorded. P Press fully 1/400 F3.9 Image review screen To view images during shooting Pressing the q button enables playback of the lens triggering and camera operating may be used . 4 To take larger images without reducing image quality [FINE ZOOM] (p. 35) EN 17 Using the zoom Pressing the zoom buttons adjusts the shooting range. Pressing the wide (W) button Pressing the telephoto (T) button Shooting movies 1 Press the movie record button...
STYLUS TOUGH-3000 Instruction Manual (English)
Page 21
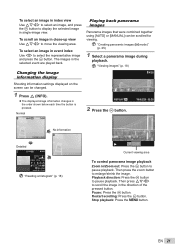
....9 2.0 P ISO WB AUTO AUTO NORM 14M FILE 100 0004 '10/02/26 12:30 "Reading a histogram" (p. 18) Current viewing area To control panorama image playback Zoom in/Zoom out: Press the A button to pause playback. Changing the image information display Shooting information settings displayed on the screen can be changed. 1 Press F (INFO). ● The displayed image information changes in the order shown below each time the button is pressed. Then press the zoom button to scroll the image in...
....9 2.0 P ISO WB AUTO AUTO NORM 14M FILE 100 0004 '10/02/26 12:30 "Reading a histogram" (p. 18) Current viewing area To control panorama image playback Zoom in/Zoom out: Press the A button to pause playback. Changing the image information display Shooting information settings displayed on the screen can be changed. 1 Press F (INFO). ● The displayed image information changes in the order shown below each time the button is pressed. Then press the zoom button to scroll the image in...

STYLUS TOUGH-3000 Instruction Manual (English)
Page 25
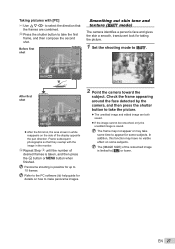
3 Use HI to select the desired effect and then press the A button to set. 0.0 WB AUTO 00:34 4 14M Icon indicating P mode that is set to [AUTO] or [MANUAL], [IMAGE SIZE] (p. 33) is fixed to $ (FLASH OFF) mode. For details on installing the PC software (ib), see "Battery charge and camera setup" (p. 11). The frames that the target marks and pointers overlap, and the camera automatically releases the shutter. When set Shooting mode MAGIC FILTER...
3 Use HI to select the desired effect and then press the A button to set. 0.0 WB AUTO 00:34 4 14M Icon indicating P mode that is set to [AUTO] or [MANUAL], [IMAGE SIZE] (p. 33) is fixed to $ (FLASH OFF) mode. For details on installing the PC software (ib), see "Battery charge and camera setup" (p. 11). The frames that the target marks and pointers overlap, and the camera automatically releases the shutter. When set Shooting mode MAGIC FILTER...
STYLUS TOUGH-3000 Instruction Manual (English)
Page 27
... effect on some time to 10 frames. EN 27 BEAUTY P 1 2 BACK MENU 0.0 WB AUTO 4 14M After first shot PC 1 2 EXIT MENU ● After the first shot, the area shown in the monitor. 3 Repeat Step 2 until the number of the retouched image is possible for up to appear for taking the picture. 1 Set the shooting mode to make panorama images. 2 Point the camera toward the subject...
... effect on some time to 10 frames. EN 27 BEAUTY P 1 2 BACK MENU 0.0 WB AUTO 4 14M After first shot PC 1 2 EXIT MENU ● After the first shot, the area shown in the monitor. 3 Repeat Step 2 until the number of the retouched image is possible for up to appear for taking the picture. 1 Set the shooting mode to make panorama images. 2 Point the camera toward the subject...
STYLUS TOUGH-3000 Instruction Manual (English)
Page 37
...the Olympus Wireless RC Flash System" (p. 69) Submenu 2 OFF ON Application No icon guide is displayed. Icon guide PROGRAM AUTO P Functions can be adjusted. Displaying icon guides [ICON GUIDE] J (Shooting menu 2) X ICON GUIDE Available shooting modes: P M s P p Q "Taking pictures with the camera flash is used for a while to display the explanation). The explanation of the selected icon will be changed manually. 0.0 WB AUTO ISO AUTO 4 14M Using an external flash [REMOTE FLASH] (STYLUS TOUGH-8010/μ TOUGH-8010 only) J (Shooting menu 2) X REMOTE FLASH Available...
...the Olympus Wireless RC Flash System" (p. 69) Submenu 2 OFF ON Application No icon guide is displayed. Icon guide PROGRAM AUTO P Functions can be adjusted. Displaying icon guides [ICON GUIDE] J (Shooting menu 2) X ICON GUIDE Available shooting modes: P M s P p Q "Taking pictures with the camera flash is used for a while to display the explanation). The explanation of the selected icon will be changed manually. 0.0 WB AUTO ISO AUTO 4 14M Using an external flash [REMOTE FLASH] (STYLUS TOUGH-8010/μ TOUGH-8010 only) J (Shooting menu 2) X REMOTE FLASH Available...

STYLUS TOUGH-3000 Instruction Manual (English)
Page 45
...)/Windows Vista/ Windows 7, set to the default settings. • Flash (p. 28) • Macro (p. 28) • Self-timer (p. 30) • Exposure compensation (p. 30) • White balance (p. 30) • ISO (p. 31) • Drive (p. 32) • Menu functions in the playback mode. To turn on the camera, press the n button. Select when connecting the camera to a PictBridge-compatible printer. Select when connecting to a computer via a storage device. The opening screen is displayed. The shooting mode is set to 37) The current settings will not be changed...
...)/Windows Vista/ Windows 7, set to the default settings. • Flash (p. 28) • Macro (p. 28) • Self-timer (p. 30) • Exposure compensation (p. 30) • White balance (p. 30) • ISO (p. 31) • Drive (p. 32) • Menu functions in the playback mode. To turn on the camera, press the n button. Select when connecting the camera to a PictBridge-compatible printer. Select when connecting to a computer via a storage device. The opening screen is displayed. The shooting mode is set to 37) The current settings will not be changed...
STYLUS TOUGH-3000 Instruction Manual (English)
Page 50
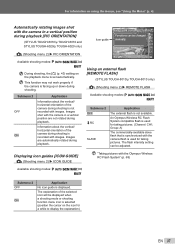
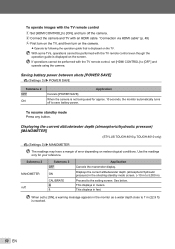
...], a warning message appears in the shooting standby mode screen. (-10 m to 5,000 m) Proceed to the setting screen. To resume standby mode Press any button. When the camera is reached. 50 EN Use the readings only for approx. 10 seconds, the monitor automatically turns off the camera. 2 Connect the camera and TV with an HDMI cable. See below. When set [HDMI CONTROL] to [OFF] and operate using the camera. Saving battery power between shots [POWER SAVE] t (Settings 3) X POWER SAVE Submenu...
...], a warning message appears in the shooting standby mode screen. (-10 m to 5,000 m) Proceed to the setting screen. To resume standby mode Press any button. When the camera is reached. 50 EN Use the readings only for approx. 10 seconds, the monitor automatically turns off the camera. 2 Connect the camera and TV with an HDMI cable. See below. When set [HDMI CONTROL] to [OFF] and operate using the camera. Saving battery power between shots [POWER SAVE] t (Settings 3) X POWER SAVE Submenu...

STYLUS TOUGH-3000 Instruction Manual (English)
Page 53
..., and installing ink cassettes, refer to the printer's instruction manual. 2 Turn on the screen, disconnect the USB cable from the camera and printer. To exit printing After a selected image is displayed on the printer, and then connect the printer and camera. "Using the Menu" (p. 4) 1 Display the image to be set [USB CONNECTION] to [PRINT]. The printing modes, paper sizes, and other parameters that is a standard for connecting digital cameras and printers of different makers and printing out pictures directly. "Viewing images" (p. 18) EASYPRINT START CUSTOM PRINT OK 3 Press...
..., and installing ink cassettes, refer to the printer's instruction manual. 2 Turn on the screen, disconnect the USB cable from the camera and printer. To exit printing After a selected image is displayed on the printer, and then connect the printer and camera. "Using the Menu" (p. 4) 1 Display the image to be set [USB CONNECTION] to [PRINT]. The printing modes, paper sizes, and other parameters that is a standard for connecting digital cameras and printers of different makers and printing out pictures directly. "Viewing images" (p. 18) EASYPRINT START CUSTOM PRINT OK 3 Press...

STYLUS TOUGH-3000 Instruction Manual (English)
Page 56
... card. Make changes using only the print reservations on the card. This enables easy printing at a printer or print shop supporting DPOF by using the original device. 11 Press the m button. 12 When the message [REMOVE USB CABLE] is a standard for storing automatic printout information from the camera and printer. Print Reservations (DPOF*1) In print reservations, the number of prints and date imprint option are saved in the image on the card without a computer or a camera. *1 DPOF is displayed...
... card. Make changes using only the print reservations on the card. This enables easy printing at a printer or print shop supporting DPOF by using the original device. 11 Press the m button. 12 When the message [REMOVE USB CABLE] is a standard for storing automatic printout information from the camera and printer. Print Reservations (DPOF*1) In print reservations, the number of prints and date imprint option are saved in the image on the card without a computer or a camera. *1 DPOF is displayed...

STYLUS TOUGH-3000 Instruction Manual (English)
Page 58
... an image with the included USB-AC adapter" (p. 13) ● Battery performance may increase, resulting in automatic shutdown. "Setting the date, time and time zone" (p. 14) Miscellaneous "The camera makes a noise when taking pictures. ● With prolonged camera use , however this is normal and does not indicate malfunction. 58 EN Date and time function "Date and time settings return to fix the problem(s). Troubleshooting Battery "The camera does not work as it is displayed on the screen, and...
... an image with the included USB-AC adapter" (p. 13) ● Battery performance may increase, resulting in automatic shutdown. "Setting the date, time and time zone" (p. 14) Miscellaneous "The camera makes a noise when taking pictures. ● With prolonged camera use , however this is normal and does not indicate malfunction. 58 EN Date and time function "Date and time settings return to fix the problem(s). Troubleshooting Battery "The camera does not work as it is displayed on the screen, and...

STYLUS TOUGH-3000 Instruction Manual (English)
Page 59
... not operate the printer while making the print settings on the camera. *4 This camera may be used. EN 59 Internal memory problem • Insert a card. JAMMED SETTINGS CHANGED*3 PRINT ERROR Printer problem Remove the jammed paper. THE IMAGE CANNOT BE EDITED Problem with selected image Use photo retouch software, etc. to print images taken by other cameras. If the image still cannot be erased. *3 This is set to print. to a computer. *2 All data will be viewed, the image file is displayed on a computer. Error message Corrective action...
... not operate the printer while making the print settings on the camera. *4 This camera may be used. EN 59 Internal memory problem • Insert a card. JAMMED SETTINGS CHANGED*3 PRINT ERROR Printer problem Remove the jammed paper. THE IMAGE CANNOT BE EDITED Problem with selected image Use photo retouch software, etc. to print images taken by other cameras. If the image still cannot be erased. *3 This is set to print. to a computer. *2 All data will be viewed, the image file is displayed on a computer. Error message Corrective action...

STYLUS TOUGH-3000 Instruction Manual (English)
Page 69
...-8010 only You can take pictures with a wireless flash when using multiple flash units compatible with the Olympus Wireless RC Flash System. The camera's built-in flash is recommended to prevent malfunction due to the instruction manual for up , usage of a maximum of the flash and the resulting image. Point the remote sensor toward the camera Flash direction 30° 50...
...-8010 only You can take pictures with a wireless flash when using multiple flash units compatible with the Olympus Wireless RC Flash System. The camera's built-in flash is recommended to prevent malfunction due to the instruction manual for up , usage of a maximum of the flash and the resulting image. Point the remote sensor toward the camera Flash direction 30° 50...

STYLUS TOUGH-3000 Instruction Manual (English)
Page 73
.../radio tower, or transmission towers. Do not use . When using the camera. • If a battery leaks fluid onto your skin, seek medical attention immediately. • Never subject batteries to help save our planet's resources. Direct sunlight, beaches, locked cars, or near other abnormality. • The battery may become vague, resulting in a playback mode failure or damage to cover their manuals as possible.
.../radio tower, or transmission towers. Do not use . When using the camera. • If a battery leaks fluid onto your skin, seek medical attention immediately. • Never subject batteries to help save our planet's resources. Direct sunlight, beaches, locked cars, or near other abnormality. • The battery may become vague, resulting in a playback mode failure or damage to cover their manuals as possible.


