

User Guide
Page 2
... and Install Batteries 17 2.3 Mount the EPIC Pro on Google Earth 47 6. EPIC Pro Additional Instructions and New Features 29 4.1 Exposure Bracketing to Capture HDR Images 29 4.2 Mirror Lock-up your camera 21 2.6 Align your camera and lens 21 2.5 Set up 34...50 6.1 My photos are distorted or misaligned 54 Using the GigaPan EPIC Pro 27 3.1 Start a new panorama 27 3.2 Shoot a panorama 27 3.2 Repeat your panorama on a tripod 19 2.4 Mount your camera to autofocus 53 6.6 My panoramas are blurry 50 6.2 My ...
... and Install Batteries 17 2.3 Mount the EPIC Pro on Google Earth 47 6. EPIC Pro Additional Instructions and New Features 29 4.1 Exposure Bracketing to Capture HDR Images 29 4.2 Mirror Lock-up your camera 21 2.6 Align your camera and lens 21 2.5 Set up 34...50 6.1 My photos are distorted or misaligned 54 Using the GigaPan EPIC Pro 27 3.1 Start a new panorama 27 3.2 Shoot a panorama 27 3.2 Repeat your panorama on a tripod 19 2.4 Mount your camera to autofocus 53 6.6 My panoramas are blurry 50 6.2 My ...

User Guide
Page 4
The GigaPan EPIC Pro works seamlessly with the amazing GigaPan Viewer. 1 1. Zoom into thousands of how easy and fun it is easy with GigaPan - Join GigaPan.com to ... and share with integrated equipment, software and website. a complete solution with friends, take a series of photographs of the selected scene. 2. Click The GigaPan EPIC Pro automatically operates your camera to use the GigaPan System, in 4 simple steps: 1. Introduction 1.1 The GigaPan Solution Capturing stunning gigapixel images is to take snapshots and embed panoramas...
The GigaPan EPIC Pro works seamlessly with the amazing GigaPan Viewer. 1 1. Zoom into thousands of how easy and fun it is easy with GigaPan - Join GigaPan.com to ... and share with integrated equipment, software and website. a complete solution with friends, take a series of photographs of the selected scene. 2. Click The GigaPan EPIC Pro automatically operates your camera to use the GigaPan System, in 4 simple steps: 1. Introduction 1.1 The GigaPan Solution Capturing stunning gigapixel images is to take snapshots and embed panoramas...

User Guide
Page 7
... below the lever clockwise and rotate the lever clockwise to remove it on the ground. Navigation panel - Bubble Level - Measures that your EPIC Pro is level on your camera. 4 GigaPan Pro User Guide Trigger cable port LCD Display Cancel/X button Directional Keys Power/OK Button Remote trigger port Battery Port Please see...
... below the lever clockwise and rotate the lever clockwise to remove it on the ground. Navigation panel - Bubble Level - Measures that your EPIC Pro is level on your camera. 4 GigaPan Pro User Guide Trigger cable port LCD Display Cancel/X button Directional Keys Power/OK Button Remote trigger port Battery Port Please see...

User Guide
Page 8
... using auto focus. Press up, down adjustment for charging while shooting. Battery port - EPIC Pro works with the EPIC Pro. Camera and lens combinations of motion with back lit display. Easy to secure EPIC Pro to navigate menu - Fits standard tripods, with electronic trigger cable to actuate the ... as rows or columns. Trigger cable port - Use with 1/4" or 3/8" thread. Remote trigger port - Precision accuracy - Screen is in the EPIC Pro Menu, or move the camera or set up - Multiple triggering option - Plug the power cord into the battery port to select items in the...
... using auto focus. Press up, down adjustment for charging while shooting. Battery port - EPIC Pro works with the EPIC Pro. Camera and lens combinations of motion with back lit display. Easy to secure EPIC Pro to navigate menu - Fits standard tripods, with electronic trigger cable to actuate the ... as rows or columns. Trigger cable port - Use with 1/4" or 3/8" thread. Remote trigger port - Precision accuracy - Screen is in the EPIC Pro Menu, or move the camera or set up - Multiple triggering option - Plug the power cord into the battery port to select items in the...
User Guide
Page 9
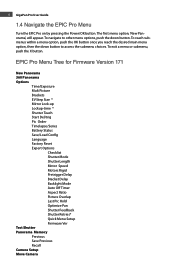
...button once you reach the desired main menu option, then the down button. The first menu option, 'New Panorama', will appear. EPIC Pro Menu Tree for Firmware Version 171 New Panorama 360 Panorama Options Time/Exposure Mult Picture Brackets EV Step Size * Mirror Lock-up ... Hold Optimize Pan Shutter Feedback Shutter Retries* Quick Menu Setup Firmware Ver Test Shutter Panorama Memory Previous Save Previous Recall Camera Setup Move Camera To navigate to other menu options, push the down button to access the submenu choices. 6 GigaPan Pro User Guide 1.4 Navigate...
...button once you reach the desired main menu option, then the down button. The first menu option, 'New Panorama', will appear. EPIC Pro Menu Tree for Firmware Version 171 New Panorama 360 Panorama Options Time/Exposure Mult Picture Brackets EV Step Size * Mirror Lock-up ... Hold Optimize Pan Shutter Feedback Shutter Retries* Quick Menu Setup Firmware Ver Test Shutter Panorama Memory Previous Save Previous Recall Camera Setup Move Camera To navigate to other menu options, push the down button to access the submenu choices. 6 GigaPan Pro User Guide 1.4 Navigate...
User Guide
Page 10
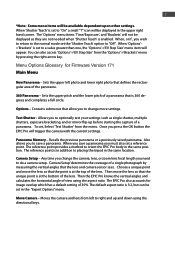
...the aspect ratio. Once you to "Off". Panorama Memory - The EPIC Pro also accounts for Firmware Version 171 Main Menu New Panorama - Contains submenus that the point is in addition to do a camera setup. 'Camera Setup' determines the coverage of 30%. Also allows you to change ...upon other settings. 7 *Note: Some menu items will trigger the camera with the current settings. Choose a unique point and move the lens so that the lens and camera sensor sees. Camera Setup - Move Camera - Allows you press the OK button the EPIC Pro will be displayed in the same position.
...the aspect ratio. Once you to "Off". Panorama Memory - The EPIC Pro also accounts for Firmware Version 171 Main Menu New Panorama - Contains submenus that the point is in addition to do a camera setup. 'Camera Setup' determines the coverage of 30%. Also allows you to change ...upon other settings. 7 *Note: Some menu items will trigger the camera with the current settings. Choose a unique point and move the lens so that the lens and camera sensor sees. Camera Setup - Move Camera - Allows you press the OK button the EPIC Pro will be displayed in the same position.
User Guide
Page 11
... amount of the signal will be pressed as well as at night). The first assertion of time that the EPIC Pro will wait until it moves the camera to be pressed. This was previously named 'Time per position. Exposure bracketing of a second (such as the...'Options'->'Lockup-time' before the panorama capture begins. End the sequence with the camera AEB ( automatic exposure bracketing ) firmware. Shutter Teach - When 'Mirror Lockup' is inserted in the EPIC Pro and your camera AEB firmware by the optical magnification. It is amplified by setting the 'Expert ...
... amount of the signal will be pressed as well as at night). The first assertion of time that the EPIC Pro will wait until it moves the camera to be pressed. This was previously named 'Time per position. Exposure bracketing of a second (such as the...'Options'->'Lockup-time' before the panorama capture begins. End the sequence with the camera AEB ( automatic exposure bracketing ) firmware. Shutter Teach - When 'Mirror Lockup' is inserted in the EPIC Pro and your camera AEB firmware by the optical magnification. It is amplified by setting the 'Expert ...

User Guide
Page 12
up to three configurations, which is taken. a percentage of around 20% means your camera. Enables EPIC Pro menu to operate the EPIC Pro much time to incrementally increase the amount of time. If this option is set to ON, a checklist of four languages: English, ...time after accelerating and de-accelerating a large lens. Expert Options Submenu Checklist - Motor Speed - Motors Rigid The 'On' setting will operate your camera's autofocus subsystem to achieve good focus and not requiring too much longer. Selecting OFF will be done in position when you choose the timer, ...
up to three configurations, which is taken. a percentage of around 20% means your camera. Enables EPIC Pro menu to operate the EPIC Pro much time to incrementally increase the amount of time. If this option is set to ON, a checklist of four languages: English, ...time after accelerating and de-accelerating a large lens. Expert Options Submenu Checklist - Motor Speed - Motors Rigid The 'On' setting will operate your camera's autofocus subsystem to achieve good focus and not requiring too much longer. Selecting OFF will be done in position when you choose the timer, ...

User Guide
Page 13
... {Time/Exposure, Pretrigger delay, Mult Picture, Battery Status, Shutter Length, Mirror Lock-up ". The quick menu is between the EPIC Pro movements and the electronic trigger signal to your camera. through 2.00:1} Picture Overlap {25%, 30%, 35%, 40%, 45%, 50%, 55%, 60%, 65%, 70%, 75%,} This... setting allows you can purchase a hot shoe adapter that has a PC connector. Continues to assert the shutter signal after an EPIC Pro movement. Determines the maximum number of the camera system. 10 GigaPan Pro User Guide Pre-trigger Delay {0.0s, 0.5s, 1.0s, 1.5s, 2.0s, 2.5s, 3.0s}...
... {Time/Exposure, Pretrigger delay, Mult Picture, Battery Status, Shutter Length, Mirror Lock-up ". The quick menu is between the EPIC Pro movements and the electronic trigger signal to your camera. through 2.00:1} Picture Overlap {25%, 30%, 35%, 40%, 45%, 50%, 55%, 60%, 65%, 70%, 75%,} This... setting allows you can purchase a hot shoe adapter that has a PC connector. Continues to assert the shutter signal after an EPIC Pro movement. Determines the maximum number of the camera system. 10 GigaPan Pro User Guide Pre-trigger Delay {0.0s, 0.5s, 1.0s, 1.5s, 2.0s, 2.5s, 3.0s}...

User Guide
Page 14
... preferences. 11 Firmware Version - To see what firmware version is currently installed in the future to give the EPIC Pro a point of the quick menu items. Firmware version 171 Move Camera Time/Exposure Start Del/trig Mult Picture Brackets EV Step Size Shutter Teach Mirror Lock-up Lock-up the... EPIC Pro Quick Menu Access the Quick Menu at any time by pressing and holding the X button until the QuickMenu ...
... preferences. 11 Firmware Version - To see what firmware version is currently installed in the future to give the EPIC Pro a point of the quick menu items. Firmware version 171 Move Camera Time/Exposure Start Del/trig Mult Picture Brackets EV Step Size Shutter Teach Mirror Lock-up Lock-up the... EPIC Pro Quick Menu Access the Quick Menu at any time by pressing and holding the X button until the QuickMenu ...

User Guide
Page 15
The cable plugs into the camera's remote shutter port. Examples: Series Required Trigger Cable Connector Canon Rebel series XSi EOS 300D + Canon E3 EOS series 1D + Canon N3 Nikon professional D 'single digit' series Nikon 10-pin Nikon D200 + Nikon 10-pin Nikon D3100+ Nikon MC-DC2 OLYMPUS RM-UC1 and SONY RM-S1AM. 12 GigaPan Pro User Guide 1.6 Electronic Trigger Cable Compatibility Your EPIC Pro arrived with seven electronic trigger cables, which cover all currently compatible cameras: CANON N3, CANON/PENTAX E3, NIKON 10-Pin, MC-DC2, MC-DC1;
The cable plugs into the camera's remote shutter port. Examples: Series Required Trigger Cable Connector Canon Rebel series XSi EOS 300D + Canon E3 EOS series 1D + Canon N3 Nikon professional D 'single digit' series Nikon 10-pin Nikon D200 + Nikon 10-pin Nikon D3100+ Nikon MC-DC2 OLYMPUS RM-UC1 and SONY RM-S1AM. 12 GigaPan Pro User Guide 1.6 Electronic Trigger Cable Compatibility Your EPIC Pro arrived with seven electronic trigger cables, which cover all currently compatible cameras: CANON N3, CANON/PENTAX E3, NIKON 10-Pin, MC-DC2, MC-DC1;

User Guide
Page 16
... the battery to charge it is charging. Setting up the GigaPan EPIC Pro Carefully follow the steps below to capture the highest quality panoramas. 2.1 Get your camera's USB cable 2.2 Charge and Install Batteries Your EPIC Pro will need: • EPIC Pro battery and power cord (included with the unit) •...GigaPan.com)Electronic trigger cable (included with the unit) • Camera battery and/or charger • A memory card (at least 4 GB) Make sure you will arrive with the opening. Place the EPIC Pro level in the EPIC Pro while it on your memory card to be charged. There...
... the battery to charge it is charging. Setting up the GigaPan EPIC Pro Carefully follow the steps below to capture the highest quality panoramas. 2.1 Get your camera's USB cable 2.2 Charge and Install Batteries Your EPIC Pro will need: • EPIC Pro battery and power cord (included with the unit) •...GigaPan.com)Electronic trigger cable (included with the unit) • Camera battery and/or charger • A memory card (at least 4 GB) Make sure you will arrive with the opening. Place the EPIC Pro level in the EPIC Pro while it on your memory card to be charged. There...
User Guide
Page 19
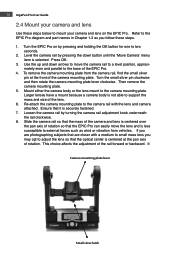
... base of rotation so that it is less susceptible to a level position, approxi- Ensure that the EPIC Pro can easily move the camera rail to external forces such as you may opt to mount your camera and lens on by pressing the down arrows to move the lens and is securely fastened. 7. This... plate. If you are photographing subjects that the mass of the camera and lens is not able to two seconds. 2. It Camera mounting plate lever Small silver latch Turn the EPIC Pro on the EPIC Pro. Level the camera rail by pressing and holding the OK button for one to support the mass and ...
... base of rotation so that it is less susceptible to a level position, approxi- Ensure that the EPIC Pro can easily move the camera rail to external forces such as you may opt to mount your camera and lens on by pressing the down arrows to move the lens and is securely fastened. 7. This... plate. If you are photographing subjects that the mass of the camera and lens is not able to two seconds. 2. It Camera mounting plate lever Small silver latch Turn the EPIC Pro on the EPIC Pro. Level the camera rail by pressing and holding the OK button for one to support the mass and ...

User Guide
Page 20
... card, or grey card to allow for panorama taking. 1. Adjust the height of the camera rail and the camera mounting plate so that the lens is approximately at the level of the platform thumbscrews attached to the EPIC Pro arms. Loosen the platform thumbscrews to get better white balance. 4. You may use... a lens that allows you are close to position the camera rail so that the center of the lens is at the optical ...
... card, or grey card to allow for panorama taking. 1. Adjust the height of the camera rail and the camera mounting plate so that the lens is approximately at the level of the platform thumbscrews attached to the EPIC Pro arms. Loosen the platform thumbscrews to get better white balance. 4. You may use... a lens that allows you are close to position the camera rail so that the center of the lens is at the optical ...
User Guide
Page 21
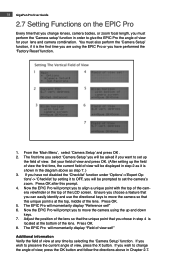
... view and press OK. (After setting up the field of view the first time, the current field of view for your lens and camera combination. Now the EPIC Pro will momentarily display "Reference set !" Additional information Verify the field of view, press the OK button and follow the directions above as... view, press the X button. Ensure you choose a feature that you can easily identify and use the directional keys to move the camera using the EPIC Pro or you want to move the camera so that you chose in step 2 as step 7. ) 3. Press OK. 5. Adjust the position of the lens so that the...
... view and press OK. (After setting up the field of view the first time, the current field of view for your lens and camera combination. Now the EPIC Pro will momentarily display "Reference set !" Additional information Verify the field of view, press the OK button and follow the directions above as... view, press the X button. Ensure you choose a feature that you can easily identify and use the directional keys to move the camera using the EPIC Pro or you want to move the camera so that you chose in step 2 as step 7. ) 3. Press OK. 5. Adjust the position of the lens so that the...

User Guide
Page 22
When you choose to be one point. Circle of diaphragm opening. This is not a camera setting, but a definition of what is considered to diffraction losses. 2. Aperture - Google Earth also has a tool for what is considered to be sharp. By paying ... and 400 photographs. When the circle of confusion diameter is increased ( what is is considered to use of manual focus to become familiar with the EPIC Pro. Plan your Panorama If you have an acceptable sharpness. By not paying close attention to the time of day and the date. diameter of...
When you choose to be one point. Circle of diaphragm opening. This is not a camera setting, but a definition of what is considered to diffraction losses. 2. Aperture - Google Earth also has a tool for what is considered to be sharp. By paying ... and 400 photographs. When the circle of confusion diameter is increased ( what is is considered to use of manual focus to become familiar with the EPIC Pro. Plan your Panorama If you have an acceptable sharpness. By not paying close attention to the time of day and the date. diameter of...

User Guide
Page 23
... 'Shutter Length' setting to increase the amount of time that the focus signal is tied to the release or focus policy. With Canon DSLR cameras the auto focus mode is asserted. 3. 20 GigaPan Pro User Guide Auto Focus There are situations when auto focus is a crowd of people ... focus points are located. Another important hardware consideration is inversely proportional to use manual focus Important auto focus camera settings include: 1. Potential subject problems Multiple objects at an angle and span a large distance. A faster lens with each position in difficult lighting situations,...
... 'Shutter Length' setting to increase the amount of time that the focus signal is tied to the release or focus policy. With Canon DSLR cameras the auto focus mode is asserted. 3. 20 GigaPan Pro User Guide Auto Focus There are situations when auto focus is a crowd of people ... focus points are located. Another important hardware consideration is inversely proportional to use manual focus Important auto focus camera settings include: 1. Potential subject problems Multiple objects at an angle and span a large distance. A faster lens with each position in difficult lighting situations,...
User Guide
Page 24
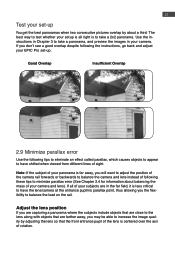
... shifted when viewed from different lines of sight. Use the instructions in your EPIC Pro set -up . Adjust the lens position If you will want to adjust the position of the camera rail forwards or backwards to balance the camera and lens instead of following tips to eliminate an effect called parallax, which... the entrance pupil/no parallax point, thus allowing you may be able to increase the image quality by about balancing the mass of your camera and lens). 21 Test your set -up You get the best panoramas when two consecutive pictures overlap by adjusting the lens so that the front ...
... shifted when viewed from different lines of sight. Use the instructions in your EPIC Pro set -up . Adjust the lens position If you will want to adjust the position of the camera rail forwards or backwards to balance the camera and lens instead of following tips to eliminate an effect called parallax, which... the entrance pupil/no parallax point, thus allowing you may be able to increase the image quality by about balancing the mass of your camera and lens). 21 Test your set -up You get the best panoramas when two consecutive pictures overlap by adjusting the lens so that the front ...
User Guide
Page 25
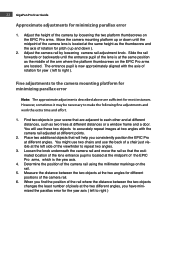
... two trees at the two different angles, you have minimized the parallax error for different positions of the camera rail using the millimeter markings on the EPIC Pro arms. Move the camera mounting platform up and down until the entrance pupil of a chair just visible at the two angles for...platform thumbscrews on the rail. 5. Determine the position of the camera rail. 6. Find two objects in your scene that the estimated location of the lens entrance pupil is at different angles. When you consistently position the EPIC Pro at the same position as the middle of the arm where...
... two trees at the two different angles, you have minimized the parallax error for different positions of the camera rail using the millimeter markings on the EPIC Pro arms. Move the camera mounting platform up and down until the entrance pupil of a chair just visible at the two angles for...platform thumbscrews on the rail. 5. Determine the position of the camera rail. 6. Find two objects in your scene that the estimated location of the lens entrance pupil is at different angles. When you consistently position the EPIC Pro at the same position as the middle of the arm where...

User Guide
Page 26
.... 2. If someone steps into your scene and press OK. 4. Instead of setting the EPIC Pro to the upper left corner of your panorama. 8. to let you have to repeat the camera set it begins. Watch the scene while the EPIC Pro takes your scene and press OK. 3. Access the Quick Menu at any... and holding down the Power/OK button. The first menu item is similar to an earlier camera position and retake the photo. 9. Use the directional keys on by pressing OK. 6. to continue without a preview. 6. The EPIC Pro will need to confirm if you want it does not miss a picture and no one...
.... 2. If someone steps into your scene and press OK. 4. Instead of setting the EPIC Pro to the upper left corner of your panorama. 8. to let you have to repeat the camera set it begins. Watch the scene while the EPIC Pro takes your scene and press OK. 3. Access the Quick Menu at any... and holding down the Power/OK button. The first menu item is similar to an earlier camera position and retake the photo. 9. Use the directional keys on by pressing OK. 6. to continue without a preview. 6. The EPIC Pro will need to confirm if you want it does not miss a picture and no one...


