
Instruction Manual
Page 3
... / Device Menu 44 Rearranging files [Replace 45 1 Inserting batteries 10 Formatting the recorder [Format 46 Charging by connecting to a computer via USB 12 5 Using the Recorder on Your PC 2 Turning on/off the power 13 HOLD 14 Operating environment 48 Connecting to your PC 50 3 Setting time and date [Time & Date] ....... 15 Disconnecting from your PC 51 Changing the time and date 16 [VOICE] mode and [MUSIC] mode Transfer the voice files to your PC 52 4 Using Windows Media Player 53 17 Notes on the folders 18 Window...
... / Device Menu 44 Rearranging files [Replace 45 1 Inserting batteries 10 Formatting the recorder [Format 46 Charging by connecting to a computer via USB 12 5 Using the Recorder on Your PC 2 Turning on/off the power 13 HOLD 14 Operating environment 48 Connecting to your PC 50 3 Setting time and date [Time & Date] ....... 15 Disconnecting from your PC 51 Changing the time and date 16 [VOICE] mode and [MUSIC] mode Transfer the voice files to your PC 52 4 Using Windows Media Player 53 17 Notes on the folders 18 Window...

Instruction Manual
Page 6
... read and save the data (☞ P. 64). s The playback speed can change the playback equalizer settings (☞ P. 36, P. 41). Getting Started Main features Main features s Dual function recorder as a Digital Voice Recorder and a Digital Music Player (☞ P.17). s The recorder stores highly 1 compressed WMA (Windows Media Audio) format voice messages in Variable Control Voice Actuator (VCVA) function (☞ P. 36, P. 39). s A Noise Cancel function (☞ P. 36, P. 40) and a Voice Filter function (☞ P. 36, P. 40) cut noise and enable clear audio playback...
... read and save the data (☞ P. 64). s The playback speed can change the playback equalizer settings (☞ P. 36, P. 41). Getting Started Main features Main features s Dual function recorder as a Digital Voice Recorder and a Digital Music Player (☞ P.17). s The recorder stores highly 1 compressed WMA (Windows Media Audio) format voice messages in Variable Control Voice Actuator (VCVA) function (☞ P. 36, P. 39). s A Noise Cancel function (☞ P. 36, P. 40) and a Voice Filter function (☞ P. 36, P. 40) cut noise and enable clear audio playback...
Instruction Manual
Page 10
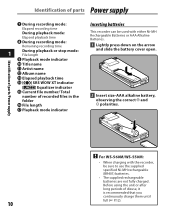
...long periods of parts Power supply 7 During recording mode: Elapsed recording time During playback mode: Elapsed playback time 8 During recording mode: Remaining recording time During playback or stop mode: 1 File length 9 Playback mode indicator 0 Title name ! Identification of recorded files in the folder ^ File length & Playback mode indicator Inserting batteries This recorder can be sure to use the supplied specified Ni-MH rechargeable (BR401) batteries. • The supplied rechargeable batteries are not fully charged. Artist name @ Album name # Elapsed playback time...
...long periods of parts Power supply 7 During recording mode: Elapsed recording time During playback mode: Elapsed playback time 8 During recording mode: Remaining recording time During playback or stop mode: 1 File length 9 Playback mode indicator 0 Title name ! Identification of recorded files in the folder ^ File length & Playback mode indicator Inserting batteries This recorder can be sure to use the supplied specified Ni-MH rechargeable (BR401) batteries. • The supplied rechargeable batteries are not fully charged. Artist name @ Album name # Elapsed playback time...
Instruction Manual
Page 11
...; This recorder cannot charge rechargeable batteries. and the batteries run out, you are not going to use may have to reset the time when you have loaded fresh batteries (☞ P.15). • Remove the batteries if you 1 see "Setting time and date [Time & Date]" (☞ P.15). In this recorder. • When changing batteries, AAA alkaline batteries or Olympus Ni-MH rechargeable batteries are too weak, [ ] and [Battery Low] appears on the display, replace the batteries as...
...; This recorder cannot charge rechargeable batteries. and the batteries run out, you are not going to use may have to reset the time when you have loaded fresh batteries (☞ P.15). • Remove the batteries if you 1 see "Setting time and date [Time & Date]" (☞ P.15). In this recorder. • When changing batteries, AAA alkaline batteries or Olympus Ni-MH rechargeable batteries are too weak, [ ] and [Battery Low] appears on the display, replace the batteries as...

Instruction Manual
Page 13
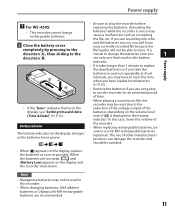
... Ni-MH rechargeable batteries are chemical products. The rechargeable batteries efficiency may not operate properly. • Use the supplied USB extension cable depending on /off the power When the recorder is displayed, it means that a battery that have not been used , turn the power off , existing data, mode settings, and clock settings will not be using time becomes notably short even after the batteries are fully charged, replace them regularly before...
... Ni-MH rechargeable batteries are chemical products. The rechargeable batteries efficiency may not operate properly. • Use the supplied USB extension cable depending on /off the power When the recorder is displayed, it means that a battery that have not been used , turn the power off , existing data, mode settings, and clock settings will not be using time becomes notably short even after the batteries are fully charged, replace them regularly before...

Instruction Manual
Page 27
... change folders: 1 Pressing the LIST button at the folder list display will be registered, even if the power is turned on, playback may be resumed from a PC, set the mode switch according to the folder type (☞ P.17). • When playing back files recorded on the display. When the resume function is activated the stopped location will select the folders for voice recordings and press the OK ` or 9 button. To playback a file recorded with other machines, you need to transfer (copy...
... change folders: 1 Pressing the LIST button at the folder list display will be registered, even if the power is turned on, playback may be resumed from a PC, set the mode switch according to the folder type (☞ P.17). • When playing back files recorded on the display. When the resume function is activated the stopped location will select the folders for voice recordings and press the OK ` or 9 button. To playback a file recorded with other machines, you need to transfer (copy...
Instruction Manual
Page 29
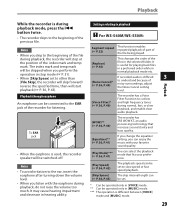
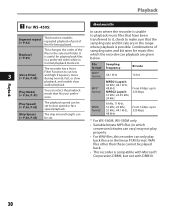
... operated only in [VOICE] mode. ** Can be switched-off. [Play Mode]*** (☞ P.36, P.41) You can enjoy the music with the earphone during normal, fast, or slow playback, and enable clear audio playback. Playback While the recorder is difficult 3 [Noise Cancel]* (☞ P.36, P.40) to understand because of noisy surroundings, adjust the Noise Cancel setting playback (☞ P. 36, P. 43). level. If you change the equalizer setting, you perform the operation in stop at This changes...
... operated only in [VOICE] mode. ** Can be switched-off. [Play Mode]*** (☞ P.36, P.41) You can enjoy the music with the earphone during normal, fast, or slow playback, and enable clear audio playback. Playback While the recorder is difficult 3 [Noise Cancel]* (☞ P.36, P.40) to understand because of noisy surroundings, adjust the Noise Cancel setting playback (☞ P. 36, P. 43). level. If you change the equalizer setting, you perform the operation in stop at This changes...
Instruction Manual
Page 30
... cut low 3 [Voice Filter] (☞ P.36, P.40) and high frequency tones during normal, fast, or slow playback, and enable clear audio playback. [Play Mode] (☞ P.36, P. 41) You can only play properly. • For WAV files, this recorder can select the playback mode that the sampling rate and bit rate are given below. It is possible. Playback 30 Playback " For WS-450S: Segment repeat (☞ P.32) This function enables repeated playback of part...
... cut low 3 [Voice Filter] (☞ P.36, P.40) and high frequency tones during normal, fast, or slow playback, and enable clear audio playback. [Play Mode] (☞ P.36, P. 41) You can only play properly. • For WAV files, this recorder can select the playback mode that the sampling rate and bit rate are given below. It is possible. Playback 30 Playback " For WS-450S: Segment repeat (☞ P.32) This function enables repeated playback of part...

Instruction Manual
Page 39
...recording. [LP]: Monaural long-term recording. • To record a meeting and lecture clearly, set other similar noises. [On]: Enables the Low Cut Filter function. [Off]: Disables this function. This function can be more clearly. Will resume recording in [Rec Mode]. • When the external monaural microphone is used while [Rec Mode] is not adjusted within 2 seconds, the display will activate recording. The recording indicator light glows when recording starts and flashes when recording pauses. 2 Press the 9 or 0 button adjust the start recording in Variable Control Voice...
...recording. [LP]: Monaural long-term recording. • To record a meeting and lecture clearly, set other similar noises. [On]: Enables the Low Cut Filter function. [Off]: Disables this function. This function can be more clearly. Will resume recording in [Rec Mode]. • When the external monaural microphone is used while [Rec Mode] is not adjusted within 2 seconds, the display will activate recording. The recording indicator light glows when recording starts and flashes when recording pauses. 2 Press the 9 or 0 button adjust the start recording in Variable Control Voice...
Instruction Manual
Page 43
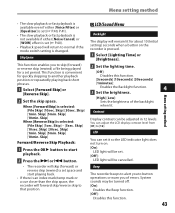
... You can adjust the LCD display contrast level from [01] to skip (forward) or reverse skip (rewind) a file being played for a set . [Off]: LED light will remain lit for about 10 (Initial setting) seconds when a button on the recorder is convenient for quickly skipping to normal if the mode switch setting is changed. Skip] [30sec. This function is pressed. 1 Select [Lighting Time] or [Brightness]. 2 Set the lighting time. [Off]: Disables...
... You can adjust the LCD display contrast level from [01] to skip (forward) or reverse skip (rewind) a file being played for a set . [Off]: LED light will remain lit for about 10 (Initial setting) seconds when a button on the recorder is convenient for quickly skipping to normal if the mode switch setting is changed. Skip] [30sec. This function is pressed. 1 Select [Lighting Time] or [Brightness]. 2 Set the lighting time. [Off]: Disables...
Instruction Manual
Page 44
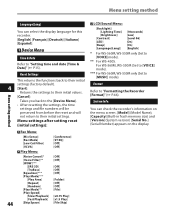
... [Off] [Play Mode]*** [Play Area] [Folder] [Repeat] [Off] [Random] [Off] [Play Mode]** [File] [Play Speed] [Slow Playback] [x0.75 Play] [Fast Playback] [x1.5 Play] 44 [Skip Space] [File Skip] . Menu setting method Menu setting method Language(Lang) You can check the recorder's information on the menu screen. [Model] (Model Name), [Capacity] (Built-in frash memory size) and [Version] (System version) [Serial No.] (Serial Number) appears on the display. Menu settings after setting reset (initial settings): , Rec Menu: [Mic Sense] [Rec Mode] [Low Cut Filter] [VCVA...
... [Off] [Play Mode]*** [Play Area] [Folder] [Repeat] [Off] [Random] [Off] [Play Mode]** [File] [Play Speed] [Slow Playback] [x0.75 Play] [Fast Playback] [x1.5 Play] 44 [Skip Space] [File Skip] . Menu setting method Menu setting method Language(Lang) You can check the recorder's information on the menu screen. [Model] (Model Name), [Capacity] (Built-in frash memory size) and [Version] (System version) [Serial No.] (Serial Number) appears on the display. Menu settings after setting reset (initial settings): , Rec Menu: [Mic Sense] [Rec Mode] [Low Cut Filter] [VCVA...
Instruction Manual
Page 46
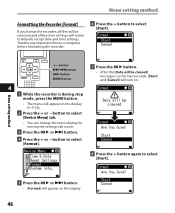
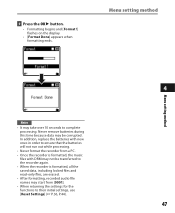
... [Start]. Menu setting method Formatting the Recorder [Format] If you format the recorder, all files will be removed and all function settings will return to select [Format]. 7 Press the OK ` button. • After the [Data will be cleared] message is on for two seconds, [Start] and [Cancel] will turn on the display. 46 Transfer any important files to a computer before formatting the recorder. 6 Press the + button to select [Start]. +− button 9 0 button OK ` button MENU button 4 1 While the recorder is during stop mode...
... [Start]. Menu setting method Formatting the Recorder [Format] If you format the recorder, all files will be removed and all function settings will return to select [Format]. 7 Press the OK ` button. • After the [Data will be cleared] message is on for two seconds, [Start] and [Cancel] will turn on the display. 46 Transfer any important files to a computer before formatting the recorder. 6 Press the + button to select [Start]. +− button 9 0 button OK ` button MENU button 4 1 While the recorder is during stop mode...
Instruction Manual
Page 47
... initial settings, use [Reset Settings] (☞ P.36, P.44). 47 Never remove batteries during this time because data may start from a PC. • Once the recorder is formatted, the music files with DRM may not be transferred to the recorder again. • When the recorder is formatted, all the saved data, including locked files and read-only files, are erased. • After formatting, recorded audio file names may be corrupted. In addition, replace the batteries with new ones...
... initial settings, use [Reset Settings] (☞ P.36, P.44). 47 Never remove batteries during this time because data may start from a PC. • Once the recorder is formatted, the music files with DRM may not be transferred to the recorder again. • When the recorder is formatted, all the saved data, including locked files and read-only files, are erased. • After formatting, recorded audio file names may be corrupted. In addition, replace the batteries with new ones...
Instruction Manual
Page 48
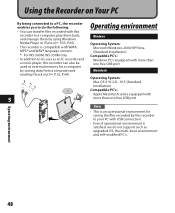
... PC's. Using the Recorder on Your PC Operating environment By being connected to a PC, the recorder enables you to do not support such as external memory for a computer Windows Operating System: Microsoft Windows 2000/XP/Vista (Standard Installation) Compatible PC's: Windows PC's equipped with more than one free USB port by this recorder can transfer files recorded with this recorder to a computer, play them back, and manage them by using Windows Media Player or iTunes...
... PC's. Using the Recorder on Your PC Operating environment By being connected to a PC, the recorder enables you to do not support such as external memory for a computer Windows Operating System: Microsoft Windows 2000/XP/Vista (Standard Installation) Compatible PC's: Windows PC's equipped with more than one free USB port by this recorder can transfer files recorded with this recorder to a computer, play them back, and manage them by using Windows Media Player or iTunes...

Instruction Manual
Page 49
... the files and music CDs downloaded from music distribution services. is removed before the drive is stopped, A WMA file may be changed or files may not be sure to a PC. 49 Initialization is different files with DRM purchased from online music from the folder names that are downloading a file from By the Copyright Act, any voice/music the recorder or uploading a file to a portable device the recorder. Copying the music 5 attached to copy or recorder. If the USB cable...
... the files and music CDs downloaded from music distribution services. is removed before the drive is stopped, A WMA file may be changed or files may not be sure to a PC. 49 Initialization is different files with DRM purchased from online music from the folder names that are downloading a file from By the Copyright Act, any voice/music the recorder or uploading a file to a portable device the recorder. Copying the music 5 attached to copy or recorder. If the USB cable...
Instruction Manual
Page 52
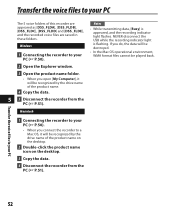
...; In the Mac OS operational environment, WMA format files cannot be played back. 2 Open the Explorer window. 3 Open the product name folder. • When you connect the recorder to your PC 52 Transfer the voice files to a Mac OS, it will be recognized by the drive name of this recorder are appeared as [DSS_FLDA], [DSS_FLDB], [DSS_FLDC], [DSS_FLDD] and [DSS_FLDE], and the recorded voice files are saved in these folders. If you do...
...; In the Mac OS operational environment, WMA format files cannot be played back. 2 Open the Explorer window. 3 Open the product name folder. • When you connect the recorder to your PC 52 Transfer the voice files to a Mac OS, it will be recognized by the drive name of this recorder are appeared as [DSS_FLDA], [DSS_FLDB], [DSS_FLDC], [DSS_FLDD] and [DSS_FLDE], and the recorded voice files are saved in these folders. If you do...

Instruction Manual
Page 62
... recorder to a PC, and start iTunes. 2 Select the play list to be transferred to the recorder, and put the check marks on the music files that you want to transfer. • The order of music pieces can be changed by Drag & Drop of the music file in the play list displayed. 5 3 Double-click the corresponding drive with the recorder, and open [Music] folder. • When you connect the recorder to a Mac...
... recorder to a PC, and start iTunes. 2 Select the play list to be transferred to the recorder, and put the check marks on the music files that you want to transfer. • The order of music pieces can be changed by Drag & Drop of the music file in the play list displayed. 5 3 Double-click the corresponding drive with the recorder, and open [Music] folder. • When you connect the recorder to a Mac...
Instruction Manual
Page 65
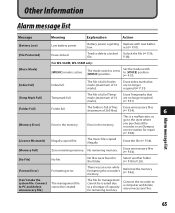
... [Memory Full] Zero remaining memory. There was an error while formatting the recorder's memory. Alarm message list 65 The mode switch is getting Replace with new batter- The music files copied illegally. Error in the folder. P.38). Set the mode switch to delete a locked Unlock the file (☞ P.36, file. The file for repair (☞ P.68). [Licence Mismatch] Illegally copied file. Select another folder (☞ P.18 to a computer and delete any unnecessary files. Reformat the memory (☞ P.46). [Can't make the system file. low. Erase...
... [Memory Full] Zero remaining memory. There was an error while formatting the recorder's memory. Alarm message list 65 The mode switch is getting Replace with new batter- The music files copied illegally. Error in the folder. P.38). Set the mode switch to delete a locked Unlock the file (☞ P.36, file. The file for repair (☞ P.68). [Licence Mismatch] Illegally copied file. Select another folder (☞ P.18 to a computer and delete any unnecessary files. Reformat the memory (☞ P.46). [Can't make the system file. low. Erase...

Instruction Manual
Page 66
Won't start The power is off . Unable to use the internal speaker. Unplug the earphones to record No playback tone 6 heard Low remaining memory. conference mode and try again (☞ P.23 or P.36, P.38). The connected external microphone is connected. Wrong folder. Move the recorder. 66 Troubleshooting Replace with new batteries (☞ P.10). The power is set to P.21). The maximum number of files has been reached. This could potentially be recorded by the...
Won't start The power is off . Unable to use the internal speaker. Unplug the earphones to record No playback tone 6 heard Low remaining memory. conference mode and try again (☞ P.23 or P.36, P.38). The connected external microphone is connected. Wrong folder. Move the recorder. 66 Troubleshooting Replace with new batteries (☞ P.10). The power is set to P.21). The maximum number of files has been reached. This could potentially be recorded by the...
Instruction Manual
Page 68
... plug adapters (PA331/PA231) which has stereo mini-plugs (ø3.5) with a tie-clip. 68 s Telephone pickup: TP7 Earphone type microphone can quick charge Olympus AA or AAA Ni- This charger can be clearly recorded. directional): ME15 Small concealing microphone with resistance at a distance while minimizing surrounding noise s Tie clip microphone (omni- s Connecting cord: KA333 Connecting cord which convert to record sound at both ends. s Technical Hotline Number in the U.S. Technical assistance and support...
... plug adapters (PA331/PA231) which has stereo mini-plugs (ø3.5) with a tie-clip. 68 s Telephone pickup: TP7 Earphone type microphone can quick charge Olympus AA or AAA Ni- This charger can be clearly recorded. directional): ME15 Small concealing microphone with resistance at a distance while minimizing surrounding noise s Tie clip microphone (omni- s Connecting cord: KA333 Connecting cord which convert to record sound at both ends. s Technical Hotline Number in the U.S. Technical assistance and support...


