Instruction Manual
Page 8
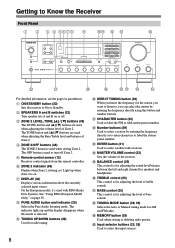
...Receiver Front Panel 1 2 3 4 5678 9 JK L M N V U T S RQ P O For detailed information, see the pages in parentheses. H PURE AUDIO button and indicator (25) Selects the Pure Audio listening mode. S MEMORY button (29) Used when storing or deleting radio presets. K CHARACTER button (32) Used to label the station preset number. N MASTER VOLUME control... (23) Sets the volume of Zone 2. R TUNING MODE button (28, 29) Selects the Auto or Manual tuning mode for speakers...
...Receiver Front Panel 1 2 3 4 5678 9 JK L M N V U T S RQ P O For detailed information, see the pages in parentheses. H PURE AUDIO button and indicator (25) Selects the Pure Audio listening mode. S MEMORY button (29) Used when storing or deleting radio presets. K CHARACTER button (32) Used to label the station preset number. N MASTER VOLUME control... (23) Sets the volume of Zone 2. R TUNING MODE button (28, 29) Selects the Auto or Manual tuning mode for speakers...
Instruction Manual
Page 11
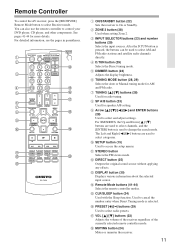
...29) Selects the Auto or Manual tuning mode for speaker A/B setting. Q VOL [ ]/[ ] buttons (23) Adjusts the volume of the receiver regardless of the currently selected remote controller mode. Used to select and adjust settings. For detailed information, see the pages in parentheses. 1 2 N 3 4 O ...J S K L T M A ON/STANDBY button (22) Sets the receiver to select Receiver mode. H SP A/B button (23) Used for AM and FM radio. B ZONE 2 button (38) Used when setting Zone 2. Remote Controller To control the AV receiver, press the [RECEIVER] Remote Mode button to On or Standby.
...29) Selects the Auto or Manual tuning mode for speaker A/B setting. Q VOL [ ]/[ ] buttons (23) Adjusts the volume of the receiver regardless of the currently selected remote controller mode. Used to select and adjust settings. For detailed information, see the pages in parentheses. 1 2 N 3 4 O ...J S K L T M A ON/STANDBY button (22) Sets the receiver to select Receiver mode. H SP A/B button (23) Used for AM and FM radio. B ZONE 2 button (38) Used when setting Zone 2. Remote Controller To control the AV receiver, press the [RECEIVER] Remote Mode button to On or Standby.
Instruction Manual
Page 15
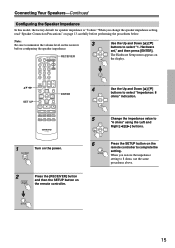
... [ENTER]. When you change the speaker impedance setting, read "Speaker Connection Precautions" on the remote controller. SET UP 4 ENTER 5 6 1 Turn on the power. 2 Press the [RECEIVER] button and then the SETUP button on page 13 carefully before configuring the speaker impedance.... impedance value to complete the setting. Press the SETUP button on the remote controller to "6 ohms" using the Left and Right [ ]/[ ] buttons. RECEIVER Use the Up and Down buttons to minimize the volume level on the display. When you restore the impedance setting to select "Impedance...
... [ENTER]. When you change the speaker impedance setting, read "Speaker Connection Precautions" on the remote controller. SET UP 4 ENTER 5 6 1 Turn on the power. 2 Press the [RECEIVER] button and then the SETUP button on page 13 carefully before configuring the speaker impedance.... impedance value to complete the setting. Press the SETUP button on the remote controller to "6 ohms" using the Left and Right [ ]/[ ] buttons. RECEIVER Use the Up and Down buttons to minimize the volume level on the display. When you restore the impedance setting to select "Impedance...
Instruction Manual
Page 22
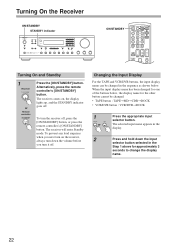
...up, and the STANDBY indicator goes off . Turning On the Receiver ON/STANDBY STANDBY indicator ON/STANDBY Turning On and Standby 1 Receiver or Remote controller Press the [ON/STANDBY] button. The receiver comes on the receiver, always turn down the input selector button selected in the sequence...selected input name appears in the display. 2 Press and hold down the volume before you turn the receiver off, press the [ON/STANDBY] button, or press the remote controller's [ON/STANDBY] button. To turn it off . The receiver will enter Standby mode. Alternatively, press the remote...
...up, and the STANDBY indicator goes off . Turning On the Receiver ON/STANDBY STANDBY indicator ON/STANDBY Turning On and Standby 1 Receiver or Remote controller Press the [ON/STANDBY] button. The receiver comes on the receiver, always turn down the input selector button selected in the sequence...selected input name appears in the display. 2 Press and hold down the volume before you turn the receiver off, press the [ON/STANDBY] button, or press the remote controller's [ON/STANDBY] button. To turn it off . The receiver will enter Standby mode. Alternatively, press the remote...

Instruction Manual
Page 23
Indicators Remote controller You can use the receiver's [MASTER VOLUME] control, or the remote controller's VOLUME [ ]/[ ] buttons. Enjoying Audio Sources Input selector buttons SPEAKERS A/B MASTER VOLUME INPUT SELECTOR SP A/B VOLUME / 1 Receiver Press the input selector button to select the component that you want to use. Note for North American model: When you connect a set of speakers ...
Indicators Remote controller You can use the receiver's [MASTER VOLUME] control, or the remote controller's VOLUME [ ]/[ ] buttons. Enjoying Audio Sources Input selector buttons SPEAKERS A/B MASTER VOLUME INPUT SELECTOR SP A/B VOLUME / 1 Receiver Press the input selector button to select the component that you want to use. Note for North American model: When you connect a set of speakers ...

Instruction Manual
Page 24
... time, press the [SLEEP] button. Note: The Mute function will be cancelled if the remote controller's VOLUME buttons are pressed or the receiver is muted. Notes: • Always turn off automatically after a specified period. 1 Remote controller Press the remote controller's [SLEEP] button repeatedly to select the required sleep time. To turn down the...
... time, press the [SLEEP] button. Note: The Mute function will be cancelled if the remote controller's VOLUME buttons are pressed or the receiver is muted. Notes: • Always turn off automatically after a specified period. 1 Remote controller Press the remote controller's [SLEEP] button repeatedly to select the required sleep time. To turn down the...
Instruction Manual
Page 25
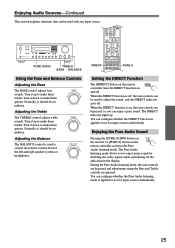
... bypassed, so you to make them louder. Normally, it should be used with any input source. Turn it up to control the relative volume level of the left and right speaker systems or headphones. When the DIRECT function is used to make them quieter. The Pure ...disabling the video signal output and turning off . Enjoying the Pure Audio Sound Pressing the [PURE AUDIO] button on the receiver or [PURE A] button on , the tone controls are ignored. Enjoying Audio Sources-Continued This section explains functions that can configure whether the DIRECT function is applied ...
... bypassed, so you to make them louder. Normally, it should be used with any input source. Turn it up to control the relative volume level of the left and right speaker systems or headphones. When the DIRECT function is used to make them quieter. The Pure ...disabling the video signal output and turning off . Enjoying the Pure Audio Sound Pressing the [PURE AUDIO] button on the receiver or [PURE A] button on , the tone controls are ignored. Enjoying Audio Sources-Continued This section explains functions that can configure whether the DIRECT function is applied ...

Instruction Manual
Page 26
Note: The volume, balance, mute and tone controls have the full consent of the copyright holder, copyright laws prohibit using your recordings for more information. 2 Use an input selector button to select the ...
Note: The volume, balance, mute and tone controls have the full consent of the copyright holder, copyright laws prohibit using your recordings for more information. 2 Use an input selector button to select the ...

Instruction Manual
Page 33
...the procedures below. For example: Remote ID setting procedure RECEIVER Use the Up and Down [ ]/[ ] buttons to complete the setting. 2 Press the [RECEIVER] REMOTE MODE button, followed by the SETUP button on the remote controller to select "1. The Hardware setup menu appears in ...the display. 33 The setup menu appears in the display. /// SET UP VOLUME ENTER 1 Turn on the power. 4 ...
...the procedures below. For example: Remote ID setting procedure RECEIVER Use the Up and Down [ ]/[ ] buttons to complete the setting. 2 Press the [RECEIVER] REMOTE MODE button, followed by the SETUP button on the remote controller to select "1. The Hardware setup menu appears in ...the display. 33 The setup menu appears in the display. /// SET UP VOLUME ENTER 1 Turn on the power. 4 ...

Instruction Manual
Page 34
... To use the Left [ ] button to control it 's noticeably quieter, use the same volume level as when the receiver was last turned off , select Last. Note: • The Power On Volume setting cannot be adjusted from 1, the default,...Volume setting. Changing the Remote Controller's ID 1 and While holding down the [RECEIVER] REMOTE MODE button, press and hold down the [SUBTITLE] button until the REMOTE MODE button lights up (about 3 seconds). (3 seconds) 2 Use the number buttons to set the level. Advanced Setup-Continued Advanced Setup Menu 1.Hardware set Remote ID When several Onkyo...
... To use the Left [ ] button to control it 's noticeably quieter, use the same volume level as when the receiver was last turned off , select Last. Note: • The Power On Volume setting cannot be adjusted from 1, the default,...Volume setting. Changing the Remote Controller's ID 1 and While holding down the [RECEIVER] REMOTE MODE button, press and hold down the [SUBTITLE] button until the REMOTE MODE button lights up (about 3 seconds). (3 seconds) 2 Use the number buttons to set the level. Advanced Setup-Continued Advanced Setup Menu 1.Hardware set Remote ID When several Onkyo...
Instruction Manual
Page 35
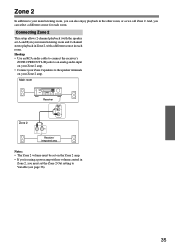
... main listening room and 2-channel stereo playback in Zone 2, with no volume control in Zone 2, you 're using a power amp with a different source in the other room, or as we call Zone 2. Main room Receiver Zone 2 IN R L Receiver/ integrated amp Notes: • The Zone 2 volume must set the Zone 2 Out setting to Variable (see page...
... main listening room and 2-channel stereo playback in Zone 2, with no volume control in Zone 2, you 're using a power amp with a different source in the other room, or as we call Zone 2. Main room Receiver Zone 2 IN R L Receiver/ integrated amp Notes: • The Zone 2 volume must set the Zone 2 Out setting to Variable (see page...
Instruction Manual
Page 36
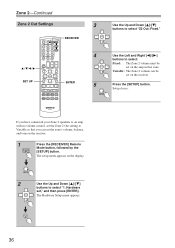
... and Down [ ]/[ ] buttons to select "1. Hardware set the zone's volume, balance, and tone on the receiver. 1 Press the [RECEIVER] Remote Mode button, followed by the [SETUP] button. Press the [SETUP] button. If you have connected your Zone 2 speakers to an amp with no volume control, set the Zone 2 Out setting to select: Fixed: The Zone...
... and Down [ ]/[ ] buttons to select "1. Hardware set the zone's volume, balance, and tone on the receiver. 1 Press the [RECEIVER] Remote Mode button, followed by the [SETUP] button. Press the [SETUP] button. If you have connected your Zone 2 speakers to an amp with no volume control, set the Zone 2 Out setting to select: Fixed: The Zone...

Instruction Manual
Page 37
... 2 To turn off , how to select an input source for Zone 2, and how to adjust the volume for Zone 2, press the [ZONE 2] button, followed by Zone 2. Controlling Zone 2 from the receiver ZONE 2 LEVEL/TONE Notes: • Only analog input sources are not output. If no sound is ...MUTING Alternatively, press the [ZONE 2] button followed by an input selector button within 8 seconds. Press the [ZONE 2] button, then point the remote controller at the receiver and press the [ON/STANDBY] button. Note: • You cannot select different AM or 2 FM radio stations for your main room and Zone...
... 2 To turn off , how to select an input source for Zone 2, and how to adjust the volume for Zone 2, press the [ZONE 2] button, followed by Zone 2. Controlling Zone 2 from the receiver ZONE 2 LEVEL/TONE Notes: • Only analog input sources are not output. If no sound is ...MUTING Alternatively, press the [ZONE 2] button followed by an input selector button within 8 seconds. Press the [ZONE 2] button, then point the remote controller at the receiver and press the [ON/STANDBY] button. Note: • You cannot select different AM or 2 FM radio stations for your main room and Zone...

Instruction Manual
Page 38
...Tone of Zone 2 1 On the receiver, press the [ZONE 2] button. 2 Press the receiver's [TONE] button repeatedly to select Balance. 3 Use the Up and Down [ ]/[ ] buttons to select Bass or Treble. Adjusting the Volume of Zone 2 1 On the remote controller, press the [ZONE 2] Remote ...Mode button, and then use the Up and Down [ ]/[ ] buttons. 2 Press the receiver's [TONE] button repeatedly to adjust the bass or treble. Use the...
...Tone of Zone 2 1 On the receiver, press the [ZONE 2] button. 2 Press the receiver's [TONE] button repeatedly to select Balance. 3 Use the Up and Down [ ]/[ ] buttons to select Bass or Treble. Adjusting the Volume of Zone 2 1 On the remote controller, press the [ZONE 2] Remote ...Mode button, and then use the Up and Down [ ]/[ ] buttons. 2 Press the receiver's [TONE] button repeatedly to adjust the bass or treble. Use the...

Instruction Manual
Page 40
...and audio formats (e.g., Dolby Digital or DTS). K VOL [ ]/[ ] button (23) Adjusts the volume of the AV receiver. P REPEAT button Used with the remote control code for controlling an Onkyo DVD player. F PLAY MODE button Selects play modes. I CLR button Cancels functions and clears entered numbers...and so on components with the random playback function. L MENU/MUTING button Displays a DVD's menu, or mutes or unmutes the receiver. Controlling Other Components Controlling a DVD Player, or DVD Recorder By pressing the Remote Mode button that has A, B, C, and D or colored buttons, ...
...and audio formats (e.g., Dolby Digital or DTS). K VOL [ ]/[ ] button (23) Adjusts the volume of the AV receiver. P REPEAT button Used with the remote control code for controlling an Onkyo DVD player. F PLAY MODE button Selects play modes. I CLR button Cancels functions and clears entered numbers...and so on components with the random playback function. L MENU/MUTING button Displays a DVD's menu, or mutes or unmutes the receiver. Controlling Other Components Controlling a DVD Player, or DVD Recorder By pressing the Remote Mode button that has A, B, C, and D or colored buttons, ...

Instruction Manual
Page 41
... play modes. button Selects discs on components with selectable play modes on a CD changer. I VOL [ ]/[ ] button (23) Adjusts the volume of the AV receiver. N REPEAT button Used with the remote control code for controlling an Onkyo CD player. The [CD] Remote Mode button is preprogrammed with the repeat playback function. F DISPLAY button Displays information about the...
... play modes. button Selects discs on components with selectable play modes on a CD changer. I VOL [ ]/[ ] button (23) Adjusts the volume of the AV receiver. N REPEAT button Used with the remote control code for controlling an Onkyo CD player. The [CD] Remote Mode button is preprogrammed with the repeat playback function. F DISPLAY button Displays information about the...

Instruction Manual
Page 42
... a Mode button when used with a DS-A2 RI Dock. I ALBUM +/- M Play [ ] button Starts playback. J VOL [ ]/[ ] button (23) Adjusts the volume of the AV receiver. If the component is already off, it will remain off . • Your iPod may not respond the first time you press this button... MENU/MUTING button* Displays a menu, or mutes or unmutes the AV receiver. This is because the remote controller transmits the On and Standby commands alternately, so if your iPod in which case you should press it will turn the Onkyo DS-A2 or DS- The [DOCK] Remote Mode button is already...
... a Mode button when used with a DS-A2 RI Dock. I ALBUM +/- M Play [ ] button Starts playback. J VOL [ ]/[ ] button (23) Adjusts the volume of the AV receiver. If the component is already off, it will remain off . • Your iPod may not respond the first time you press this button... MENU/MUTING button* Displays a menu, or mutes or unmutes the AV receiver. This is because the remote controller transmits the On and Standby commands alternately, so if your iPod in which case you should press it will turn the Onkyo DS-A2 or DS- The [DOCK] Remote Mode button is already...

Instruction Manual
Page 43
...VOL [ ]/[ ] button (23) Adjusts the volume of the current track. The Next [ ] button selects the next track. The Fast Forward [ ] button starts fast forward. F Play [ ] button Starts playback. E Muting button (24) Mutes or unmutes the AV receiver. Press it selects the beginning of the AV receiver. G Stop [ ] button Stops playback. During ... tapes. 4 5 6 2 7 3 8 * With some components, certain buttons may not work as expected, and some may not work at all. 43 Controlling a Cassette Recorder An Onkyo cassette recorder connected via controlled in Receiver mode.
...VOL [ ]/[ ] button (23) Adjusts the volume of the current track. The Next [ ] button selects the next track. The Fast Forward [ ] button starts fast forward. F Play [ ] button Starts playback. E Muting button (24) Mutes or unmutes the AV receiver. Press it selects the beginning of the AV receiver. G Stop [ ] button Stops playback. During ... tapes. 4 5 6 2 7 3 8 * With some components, certain buttons may not work as expected, and some may not work at all. 43 Controlling a Cassette Recorder An Onkyo cassette recorder connected via controlled in Receiver mode.

