
User Manual English
Page 2
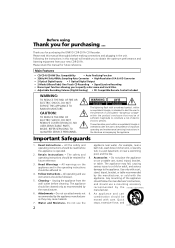
... constitute a risk of electric shock to persons. Quick 7. Main Features • CD/CD-R/CD-RW Disc Compatibility • Auto Finalizing Function • 32kHz/44.1kHz/48kHz Sampling-Rate Converter • High-Resolution D/A & A/D Converter • 2 Optical Digital Inputs • 1 Optical Digital Output • 2-Mode (Album/Fade) One-Touch CD Recording • Signal Synchro Recording • Name input function allowing you for purchasing the ONKYO CDR-201A CD Recorder. operating instructions should be as recommended by the manufacturer...
... constitute a risk of electric shock to persons. Quick 7. Main Features • CD/CD-R/CD-RW Disc Compatibility • Auto Finalizing Function • 32kHz/44.1kHz/48kHz Sampling-Rate Converter • High-Resolution D/A & A/D Converter • 2 Optical Digital Inputs • 1 Optical Digital Output • 2-Mode (Album/Fade) One-Touch CD Recording • Signal Synchro Recording • Name input function allowing you for purchasing the ONKYO CDR-201A CD Recorder. operating instructions should be as recommended by the manufacturer...

User Manual English
Page 3
..., try reversing the plug. When replacement parts are covered by the operating instructions as they may expose you are provided for service. 19. The appliance should be situated away from the appliance. 14. This plug will fit into the appliance through openings as an improper adjustment of any way, and F. Overloading - Never spill liquid of other controls may result in...
..., try reversing the plug. When replacement parts are covered by the operating instructions as they may expose you are provided for service. 19. The appliance should be situated away from the appliance. 14. This plug will fit into the appliance through openings as an improper adjustment of any way, and F. Overloading - Never spill liquid of other controls may result in...

User Manual English
Page 5
...not require memory preservation batteries. However, there is no guarantee that the ONKYO product described in this product is in a residential installation. On the average, memory contents are designed to Part 15 of this manual. However, this instruction manual is classified as ...uses and can be plugged-in in accordance with the corresponding technical standards such as a Laser Product by one or more of the Food and Drug Administration. If this product, please feel free to write to radio communications. A built-in a particular installation. The unit must maintain records...
...not require memory preservation batteries. However, there is no guarantee that the ONKYO product described in this product is in a residential installation. On the average, memory contents are designed to Part 15 of this manual. However, this instruction manual is classified as ...uses and can be plugged-in in accordance with the corresponding technical standards such as a Laser Product by one or more of the Food and Drug Administration. If this product, please feel free to write to radio communications. A built-in a particular installation. The unit must maintain records...
User Manual English
Page 6
... the wires in the mains lead of this Instruction Manual carefully. Should the fuse need to be connected to BS1362. IF THE FITTED MOULDED PLUG IS UNSUITABLE FOR THE SOCKET OUTLET IN YOUR HOME, THEN THE FUSE SHOULD BE REMOVED AND THE PLUG CUT OFF AND DISPOSED OF SAFELY. For British model Replacement and mounting of an AC plug on the power supply cord...
... the wires in the mains lead of this Instruction Manual carefully. Should the fuse need to be connected to BS1362. IF THE FITTED MOULDED PLUG IS UNSUITABLE FOR THE SOCKET OUTLET IN YOUR HOME, THEN THE FUSE SHOULD BE REMOVED AND THE PLUG CUT OFF AND DISPOSED OF SAFELY. For British model Replacement and mounting of an AC plug on the power supply cord...
User Manual English
Page 7
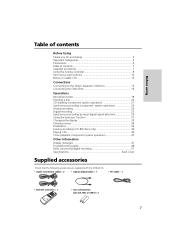
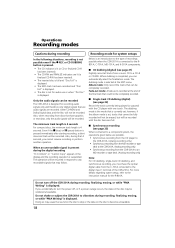
...by input digital signal detection 29 Using the level sync function 31 Changing the display 33 Entering names 34 Finalization 39 Erasing recordings (CD-RW discs only 40 Playing CDs 44 Timer playback (component system operation 47 Other Information Display messages 47 Troubleshooting guide 48 Rules concerning digital recording 51 Specifications Back cover Supplied accessories Check that the following accessories are supplied with the CDR-201A. • Audio connection cables × 2 • Optical digital cable × 1 • z cable × 1 • Remote controller ×...
...by input digital signal detection 29 Using the level sync function 31 Changing the display 33 Entering names 34 Finalization 39 Erasing recordings (CD-RW discs only 40 Playing CDs 44 Timer playback (component system operation 47 Other Information Display messages 47 Troubleshooting guide 48 Rules concerning digital recording 51 Specifications Back cover Supplied accessories Check that the following accessories are supplied with the CDR-201A. • Audio connection cables × 2 • Optical digital cable × 1 • z cable × 1 • Remote controller ×...

User Manual English
Page 11
... display A DISC/TRACK indicator B Display C MEMORY (programmed playback) indicator D RANDOM (random playback) indicator E REPEAT (repeat playback) indicator F Recording level display G LEVEL-SYNC indicator H FINALIZE indicator I CD/CD-R/CD-RW indicator J s (play /pause) button [26, 27, 44] Press to or later than the one currently playing. Rear panel 17 ANALOG INPUT (REC)/OUTPUT (PLAY) terminals [17] 18 z REMOTE CONTROL terminals [17] 19 DIGITAL OPTICAL INPUT 1/2 terminals [17] 20 DIGITAL OPTICAL OUTPUT terminal [17] 21 Power cord [17] 22 AC outlet [17] 11 Before using Part...
... display A DISC/TRACK indicator B Display C MEMORY (programmed playback) indicator D RANDOM (random playback) indicator E REPEAT (repeat playback) indicator F Recording level display G LEVEL-SYNC indicator H FINALIZE indicator I CD/CD-R/CD-RW indicator J s (play /pause) button [26, 27, 44] Press to or later than the one currently playing. Rear panel 17 ANALOG INPUT (REC)/OUTPUT (PLAY) terminals [17] 18 z REMOTE CONTROL terminals [17] 19 DIGITAL OPTICAL INPUT 1/2 terminals [17] 20 DIGITAL OPTICAL OUTPUT terminal [17] 21 Power cord [17] 22 AC outlet [17] 11 Before using Part...

User Manual English
Page 12
... remote controller 1 STANDBY/ON button [20] Press to switch the CDR-201A between the on state and the standby state. 2 RANDOM (random playback) button [45] Press to playback the tracks on the disc in random order. 3 MEMORY (programmed playback) button [46] Press to program the tracks to play in the recording standby state. 7 g (pause) button [44] Press during playback to the instruction manual with the R-801A. 12 For the part names and functions of a disc...
... remote controller 1 STANDBY/ON button [20] Press to switch the CDR-201A between the on state and the standby state. 2 RANDOM (random playback) button [45] Press to playback the tracks on the disc in random order. 3 MEMORY (programmed playback) button [46] Press to program the tracks to play in the recording standby state. 7 g (pause) button [44] Press during playback to the instruction manual with the R-801A. 12 For the part names and functions of a disc...

User Manual English
Page 14
... disc surface. Do not use the CDR-201A, then eject any disc inside of the discs. Also, never use or non-audio compact discs. This may not only cause improper operation of extremely low temperatures. I Handling discs Be careful not to 2 hours. If you will not use conventional record cleaners or antistatic agents. Doing so may cause highpitched noises or other connected components. When dirty, clean...
... disc surface. Do not use the CDR-201A, then eject any disc inside of the discs. Also, never use or non-audio compact discs. This may not only cause improper operation of extremely low temperatures. I Handling discs Be careful not to 2 hours. If you will not use conventional record cleaners or antistatic agents. Doing so may cause highpitched noises or other connected components. When dirty, clean...
User Manual English
Page 15
...; Direct change By pressing the play/pause button (n) on the CDR-201A, the input source at the tuner amplifier automatically switches to CDR. • Remote controller operation The remote controller supplied with it is automatically turned on the CDR-201A or starting a playback with the R-801A can start the recording by connecting instructions. FM Stereo/AM Tuner Amplifier (Not available in U.S.A. and Canada) • K-501A ....... Compact Disc(CD) Player (Not available in U.S.A. Also, when not using the CDR-201A, you to operate the...
...; Direct change By pressing the play/pause button (n) on the CDR-201A, the input source at the tuner amplifier automatically switches to CDR. • Remote controller operation The remote controller supplied with it is automatically turned on the CDR-201A or starting a playback with the R-801A can start the recording by connecting instructions. FM Stereo/AM Tuner Amplifier (Not available in U.S.A. and Canada) • K-501A ....... Compact Disc(CD) Player (Not available in U.S.A. Also, when not using the CDR-201A, you to operate the...

User Manual English
Page 16
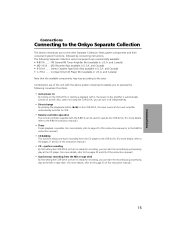
... INPUT 1 INPUT 2 OUTPUT OPTICAL DIGITAL ANALOG INPUT OUTPUT REMOTE CONTROL AC OUTLET AC 230-240V 50 Hz UNSWITCHED 100W MAX. To L channel of the CDR-201A (White) To R channel of the CDR-201A (Red) (White) To L channel of other component (Red) To R channel of 100 W or below Digital output LR Analog output LR Analog input z connector Amplifier 16 Digital output CD player, DAT deck, etc. Always complete all connections before inserting the power cord into the wall outlet. L R AUDIO CD RECORDER MODEL...
... INPUT 1 INPUT 2 OUTPUT OPTICAL DIGITAL ANALOG INPUT OUTPUT REMOTE CONTROL AC OUTLET AC 230-240V 50 Hz UNSWITCHED 100W MAX. To L channel of the CDR-201A (White) To R channel of the CDR-201A (Red) (White) To L channel of other component (Red) To R channel of 100 W or below Digital output LR Analog output LR Analog input z connector Amplifier 16 Digital output CD player, DAT deck, etc. Always complete all connections before inserting the power cord into the wall outlet. L R AUDIO CD RECORDER MODEL...

User Manual English
Page 17
...; Do not bundle the audio cables together with power cords or speaker cables. You must connect to the z connector of the CDR-201A. • The z connectors are only effective if they are used in total. 6 Connecting the power cord INPUT 1 INPUT 2 OUTPUT OPTICAL DIGITAL ANALOG INPUT OUTPUT REMOTE CONTROL AC OUTLET AC 230-240V 50 Hz UNSWITCHED 100W MAX. Notes: • The optical digital terminal is provided with an z connector. L R AUDIO CD RECORDER MODEL NO. Note: The shape...
...; Do not bundle the audio cables together with power cords or speaker cables. You must connect to the z connector of the CDR-201A. • The z connectors are only effective if they are used in total. 6 Connecting the power cord INPUT 1 INPUT 2 OUTPUT OPTICAL DIGITAL ANALOG INPUT OUTPUT REMOTE CONTROL AC OUTLET AC 230-240V 50 Hz UNSWITCHED 100W MAX. Notes: • The optical digital terminal is provided with an z connector. L R AUDIO CD RECORDER MODEL NO. Note: The shape...
User Manual English
Page 18
... connected to a component system, the operations given below are recorded. The dubbing mode is the mode that 4 seconds, you accidentally do turn off , or if a power outage occurs, the data on the disc may cause the sound on the disc to skip or the data on the disc to the type of the final track that can be recorded The CDR-201A is displayed. I Single-track CD dubbing (digital...
... connected to a component system, the operations given below are recorded. The dubbing mode is the mode that 4 seconds, you accidentally do turn off , or if a power outage occurs, the data on the disc may cause the sound on the disc to skip or the data on the disc to the type of the final track that can be recorded The CDR-201A is displayed. I Single-track CD dubbing (digital...
User Manual English
Page 19
... adjusted manually. The recording level can be adjusted manually. Press the o REC button to set track numbers manually . I When the level synch function is turned off The track numbers are gaps of the CDR-201A. I Analog recording (see page 34) You can be automatically assigned. Operations 19 I Entering a disc name (see page 26) This method records the signal at the optical digital inputs. For CD-Rs that do not include track number information, the track numbers will be played...
... adjusted manually. The recording level can be adjusted manually. Press the o REC button to set track numbers manually . I When the level synch function is turned off The track numbers are gaps of the CDR-201A. I Analog recording (see page 34) You can be automatically assigned. Operations 19 I Entering a disc name (see page 26) This method records the signal at the optical digital inputs. For CD-Rs that do not include track number information, the track numbers will be played...
User Manual English
Page 21
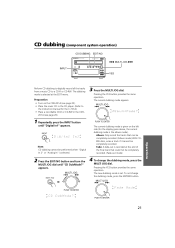
... the CD player. (Refer to a CD-R or CD-RW. To not change the dubbing mode, press the MULTI JOG dial. INPUT Note: CD dubbing cannot be completely recorded. CD dubbing (component system operation) INPUT CD DUBBING EDIT/NO AUDIO CD RECORDER INPUT STANDBY / ON STANDBY DISPLAY CD FINALIZE DUBBING REC EDIT / NO YES MULTI JOG PUSH TO ENTER CDR-201A q MULTI JOG w YES Operations Perform CD dubbing to digitally record all the tracks from a music CD to the instruction manual...
... the CD player. (Refer to a CD-R or CD-RW. To not change the dubbing mode, press the MULTI JOG dial. INPUT Note: CD dubbing cannot be completely recorded. CD dubbing (component system operation) INPUT CD DUBBING EDIT/NO AUDIO CD RECORDER INPUT STANDBY / ON STANDBY DISPLAY CD FINALIZE DUBBING REC EDIT / NO YES MULTI JOG PUSH TO ENTER CDR-201A q MULTI JOG w YES Operations Perform CD dubbing to digitally record all the tracks from a music CD to the instruction manual...

User Manual English
Page 26
... function turns on the CDR-201A (see page 20). • Place a recordable CD-R or CD-RW in the display followed by the time display (the recording standby state). To stop , if the recording standby 3 Press the o REC button (or the remote controller REC o button). Analog recording oREC AUDIO CD RECORDER INPUT STANDBY / ON STANDBY DISPLAY CD FINALIZE DUBBING REC EDIT / NO YES MULTI JOG PUSH TO ENTER CDR-201A n RC-448C STANDBY/ ON OPEN / CLOSE RANDOM MEMORY REPEAT...
... function turns on the CDR-201A (see page 20). • Place a recordable CD-R or CD-RW in the display followed by the time display (the recording standby state). To stop , if the recording standby 3 Press the o REC button (or the remote controller REC o button). Analog recording oREC AUDIO CD RECORDER INPUT STANDBY / ON STANDBY DISPLAY CD FINALIZE DUBBING REC EDIT / NO YES MULTI JOG PUSH TO ENTER CDR-201A n RC-448C STANDBY/ ON OPEN / CLOSE RANDOM MEMORY REPEAT...
User Manual English
Page 27
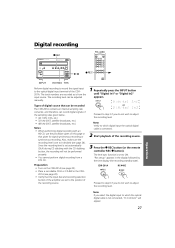
... 9 DISPLAY ENTER 10/0 oREC REC s INPUT EDIT/NO YES Perform digital recording to record the signal input to which digital input the optical digital cable is not connected, "D.In Unlock" will not be adjusted manually. The level sync function is set to ON. CDR-201A REC RC-448C REC Proceed to step 6 if you do not wish to which the optical digital cable is connected. 2 Start playback of the amplifier are recorded as is set...
... 9 DISPLAY ENTER 10/0 oREC REC s INPUT EDIT/NO YES Perform digital recording to record the signal input to which digital input the optical digital cable is not connected, "D.In Unlock" will not be adjusted manually. The level sync function is set to ON. CDR-201A REC RC-448C REC Proceed to step 6 if you do not wish to which the optical digital cable is connected. 2 Start playback of the amplifier are recorded as is set...

User Manual English
Page 45
... 9 DISPLAY ENTER 10/0 REPEAT REPEAT REC s RC-466S STANDBY/ ON CDR/PC TAPE ACOUSTIC PRESENCE INPUT SELECTOR CD/ DVD MD FM AM TAPE REW VOLUME UP MUTING TAPE FF DOWN SLEEP CLOCK TIMER ENTER MODE REPEAT TAPE CD/DVD CLEAR MD SCROLL CDR 1 2 3 4 5 6 7 8 9 10/0 --/--- With playback stopped, press the RANDOM button With the RC-466S remote controller, repeatedly press the MODE button to repeatedly playback the track currently being played. Repeat playback Press the REPEAT button as many times as desired Selecting "REPEAT" repeats all the tracks on the disc...
... 9 DISPLAY ENTER 10/0 REPEAT REPEAT REC s RC-466S STANDBY/ ON CDR/PC TAPE ACOUSTIC PRESENCE INPUT SELECTOR CD/ DVD MD FM AM TAPE REW VOLUME UP MUTING TAPE FF DOWN SLEEP CLOCK TIMER ENTER MODE REPEAT TAPE CD/DVD CLEAR MD SCROLL CDR 1 2 3 4 5 6 7 8 9 10/0 --/--- With playback stopped, press the RANDOM button With the RC-466S remote controller, repeatedly press the MODE button to repeatedly playback the track currently being played. Repeat playback Press the REPEAT button as many times as desired Selecting "REPEAT" repeats all the tracks on the disc...

User Manual English
Page 48
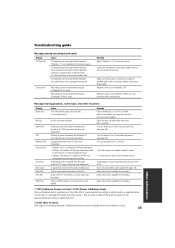
... an Onkyo Service Station. Messages during recording. Troubleshooting guide If the CDR-201A begins to operate improperly, use the troubleshooting guide below will appear in again. Display Disc Error Cause • Playback was likely stopped due to external noise or static electricity. Because the unit contains a microcomputer to provide advanced functions, it with one of recordings or 99 tracks have been recorded and no more recordings can be removed, disconnect the power cord and then...
... an Onkyo Service Station. Messages during recording. Troubleshooting guide If the CDR-201A begins to operate improperly, use the troubleshooting guide below will appear in again. Display Disc Error Cause • Playback was likely stopped due to external noise or static electricity. Because the unit contains a microcomputer to provide advanced functions, it with one of recordings or 99 tracks have been recorded and no more recordings can be removed, disconnect the power cord and then...
User Manual English
Page 49
...; Editing of a finalized CD-RW was attempted. Open the disc tray and make sure that cannot be performed because a finalized CD-RW is made for recording. *1 OPC (Optimum Power Control)/*3 PCA (Power Calibration Area) If an unfinalized disc is inserted into the CDR-201A, experimental recording is a CD-R or CD-RW with the DAO method (*2) using the remote controller. Insert a disc that is suitable for the z cable, audio connection cables, and optical digital cable. Entering name information...
...; Editing of a finalized CD-RW was attempted. Open the disc tray and make sure that cannot be performed because a finalized CD-RW is made for recording. *1 OPC (Optimum Power Control)/*3 PCA (Power Calibration Area) If an unfinalized disc is inserted into the CDR-201A, experimental recording is a CD-R or CD-RW with the DAO method (*2) using the remote controller. Insert a disc that is suitable for the z cable, audio connection cables, and optical digital cable. Entering name information...

User Manual English
Page 50
... properly connected. The remote controller is being used . Use an unfinalized disc. Use another disc. Replace all the remote controller batteries with the CDR-201A) Remedy Plug the power cord properly into a mains power supply. Use the remote controller within its operational range. The recording level adjustment is not properly set too low. There is played with new batteries (see pages 8, 9). The disc was not finalized after recording. (The CD-R indicator lights when the disc is an object between the CDR-201A and the remote controller obstructing...
... properly connected. The remote controller is being used . Use an unfinalized disc. Use another disc. Replace all the remote controller batteries with the CDR-201A) Remedy Plug the power cord properly into a mains power supply. Use the remote controller within its operational range. The recording level adjustment is not properly set too low. There is played with new batteries (see pages 8, 9). The disc was not finalized after recording. (The CD-R indicator lights when the disc is an object between the CDR-201A and the remote controller obstructing...

