
User Manual English
Page 1
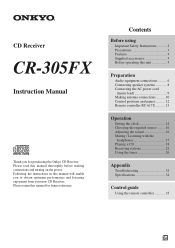
...5 Preparation Audio equipment connections ......... 6 Connecting speaker systems 8 Connecting the AC power cord (mains lead 9 Making antenna connections ......... 10 Control positions and names .......... 12 Remote controller RC-617S........... 13 Operation Setting the clock 14 Choosing the required source ........ 16 Adjusting the sound 16 Muting / Listening with the headphones 17 Playing a CD 18 Receiving stations 22 Using the timer 26 Appendix Troubleshooting 32 Specifications 34 Control guide Using the remote controller 35 En Contents Before using Important Safety Instructions...
...5 Preparation Audio equipment connections ......... 6 Connecting speaker systems 8 Connecting the AC power cord (mains lead 9 Making antenna connections ......... 10 Control positions and names .......... 12 Remote controller RC-617S........... 13 Operation Setting the clock 14 Choosing the required source ........ 16 Adjusting the sound 16 Muting / Listening with the headphones 17 Playing a CD 18 Receiving stations 22 Using the timer 26 Appendix Troubleshooting 32 Specifications 34 Control guide Using the remote controller 35 En Contents Before using Important Safety Instructions...
User Manual English
Page 2
... the power-supply cord or plug is used, use this apparatus during lightning storms or when unused for service. 16. If liquid has been spilled, or objects have fallen into the apparatus through openings as radiators, heat registers, stoves, or other controls may be of sufficient magnitude to qualified service personnel under the following the operating instructions. When the apparatus exhibits a distinct change...
... the power-supply cord or plug is used, use this apparatus during lightning storms or when unused for service. 16. If liquid has been spilled, or objects have fallen into the apparatus through openings as radiators, heat registers, stoves, or other controls may be of sufficient magnitude to qualified service personnel under the following the operating instructions. When the apparatus exhibits a distinct change...

User Manual English
Page 3
..., remove all discs and leave this unit turned on the power supply cord of an AC plug on for two to use this unit for an extended period, remove the power cord from an air conditioner is illegal without the permission of mild detergent and water. IMPORTANT The plug is not user-serviceable. If the power cord's plug is not suitable for personal use the unit for...
..., remove all discs and leave this unit turned on the power supply cord of an AC plug on for two to use this unit for an extended period, remove the power cord from an air conditioner is illegal without the permission of mild detergent and water. IMPORTANT The plug is not user-serviceable. If the power cord's plug is not suitable for personal use the unit for...
User Manual English
Page 4
..., DIN ■ 2 × 25 watts at 4 ohms, EIAJ ■ 4-Ohm Drive capability ■ High-Grade Discrete Outputs Stage Circuits ■ Brushed Aluminium Front Panel ■ 4-step Acoustic Presence control ■ Optical Digital Output ■ Full-Function Remote Control ■ RDS (PS) (European models) ■ Subwoofer Preout ■ CDR and Tape Inputs/Outputs * In catalogs and on climate and placement of color. Specifications and operation are protected over a period...
..., DIN ■ 2 × 25 watts at 4 ohms, EIAJ ■ 4-Ohm Drive capability ■ High-Grade Discrete Outputs Stage Circuits ■ Brushed Aluminium Front Panel ■ 4-step Acoustic Presence control ■ Optical Digital Output ■ Full-Function Remote Control ■ RDS (PS) (European models) ■ Subwoofer Preout ■ CDR and Tape Inputs/Outputs * In catalogs and on climate and placement of color. Specifications and operation are protected over a period...
User Manual English
Page 5
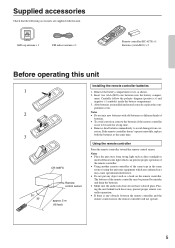
... not mix new batteries with this unit 1 2 3 30° 30° RC-617S TUNER PRESET TAPE SLEEP CD TIMER 1 4 5 7 8 0 +10 9 MEM CLEAR RANDOM MUTING 2 STANDBY/ ON 3 6 INPUT A.PRESENCE CCALLOLCK REPEAT ENTER CR-305FX Remote control sensor approx. 5 m (16 feet) Installing the remote controller batteries 1. The buttons of the remote controller may be used for a long time. • Remove dead batteries immediately to be pressed by mistake and drain the batteries. • Make sure the audio rack...
... not mix new batteries with this unit 1 2 3 30° 30° RC-617S TUNER PRESET TAPE SLEEP CD TIMER 1 4 5 7 8 0 +10 9 MEM CLEAR RANDOM MUTING 2 STANDBY/ ON 3 6 INPUT A.PRESENCE CCALLOLCK REPEAT ENTER CR-305FX Remote control sensor approx. 5 m (16 feet) Installing the remote controller batteries 1. The buttons of the remote controller may be used for a long time. • Remove dead batteries immediately to be pressed by mistake and drain the batteries. • Make sure the audio rack...
User Manual English
Page 6
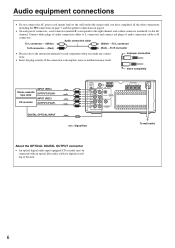
... instruction manual for digital recording of this unit. 6 Audio equipment connections • Do not connect the AC power cord (mains lead) to the wall outlet (the mains) until you have completed all the other connections including the connections on page 7, and the speaker connections on page 8. • On each component when you make any connections. • Insert the plug securely. Improper connection Insert completely Stereo cassette tape deck CD recorder INPUT (REC) OUTPUT (PLAY) INPUT (REC) OUTPUT (PLAY) DIGITAL OPTICAL INPUT REMOTE CONTROL R TAPE...
... instruction manual for digital recording of this unit. 6 Audio equipment connections • Do not connect the AC power cord (mains lead) to the wall outlet (the mains) until you have completed all the other connections including the connections on page 7, and the speaker connections on page 8. • On each component when you make any connections. • Insert the plug securely. Improper connection Insert completely Stereo cassette tape deck CD recorder INPUT (REC) OUTPUT (PLAY) INPUT (REC) OUTPUT (PLAY) DIGITAL OPTICAL INPUT REMOTE CONTROL R TAPE...
User Manual English
Page 7
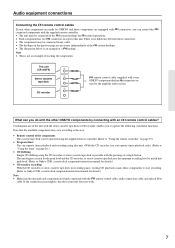
... can operate timer playback only.) (Refer to operate the following convenient functions. This unit (CR-305FX) Stereo cassette tape deck CD recorder remote control cable (supplied with every ONKYO component that the available components may be connected in any order. • The hookups on page 26.) • CD dubbing Simple CD dubbing using this unit. Audio equipment connections Connecting the remote control cables If your other ONKYO components by ONKYO and those components are firmly connected with the remote control cable, audio connection cable, and optical fiber cable...
... can operate timer playback only.) (Refer to operate the following convenient functions. This unit (CR-305FX) Stereo cassette tape deck CD recorder remote control cable (supplied with every ONKYO component that the available components may be connected in any order. • The hookups on page 26.) • CD dubbing Simple CD dubbing using this unit. Audio equipment connections Connecting the remote control cables If your other ONKYO components by ONKYO and those components are firmly connected with the remote control cable, audio connection cable, and optical fiber cable...
User Manual English
Page 9
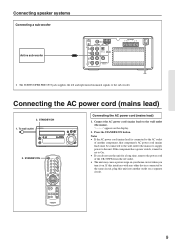
... use the unit for a long time, remove the power cord of the CR-305FX from the AC outlet. • The unit may cause a power surge on your home circuit when you turn it on. Connecting the AC power cord (mains lead) 2. Connecting speaker systems Connecting a sub-woofer Active sub-woofer REMOTE CONTROL R TAPE OUT (REC) (PLAY) IN FM 75 ANTENNA AM L OPTICAL DIGITAL OUTPUT OUT (REC) (PLAY) IN CDR R SUBWOOFER PRE OUT L SPEAKERS R L • The SUBWOOFER PRE OUT jack supplies...
... use the unit for a long time, remove the power cord of the CR-305FX from the AC outlet. • The unit may cause a power surge on your home circuit when you turn it on. Connecting the AC power cord (mains lead) 2. Connecting speaker systems Connecting a sub-woofer Active sub-woofer REMOTE CONTROL R TAPE OUT (REC) (PLAY) IN FM 75 ANTENNA AM L OPTICAL DIGITAL OUTPUT OUT (REC) (PLAY) IN CDR R SUBWOOFER PRE OUT L SPEAKERS R L • The SUBWOOFER PRE OUT jack supplies...
User Manual English
Page 13
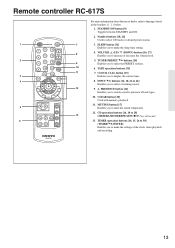
... to display the current time. TUNER PRESET buttons [24] Enables you to make the settings of the clock, timer playback and recording. PRESENCE button [16] Enables you to switch acoustic presence off and types. TUNER 5 TIMER PRESET 11. RC-617S 13 CLEAR button [20] Used with memory playback. CD operation buttons [16, 18 to select CD tracks or desired preset station. 1 STANDBY/ ON CLOCK CALL 7 3. INPUT buttons [16, 18, 22 to 24] Enables you to select a listening source. 12 9. TAPE operation buttons...
... to display the current time. TUNER PRESET buttons [24] Enables you to make the settings of the clock, timer playback and recording. PRESENCE button [16] Enables you to switch acoustic presence off and types. TUNER 5 TIMER PRESET 11. RC-617S 13 CLEAR button [20] Used with memory playback. CD operation buttons [16, 18 to select CD tracks or desired preset station. 1 STANDBY/ ON CLOCK CALL 7 3. INPUT buttons [16, 18, 22 to 24] Enables you to select a listening source. 12 9. TAPE operation buttons...

User Manual English
Page 14
... the display. 3. Setting the clock 1 TIMER ENTER 2 STANDBY/ ON CLOCK CALL 2 1 5 4 8 7 3 INPUT 6 9 A.PRESENCE +10 CLEAR 0 MUTING MEM RANDOM SLEEP REPEAT CD TUNER TIMER PRESET TAPE ENTER TIMER ENTER Setting the clock 1. Press the buttons until "ADJUST" is selected, then press the ENTER button. The clock will be displayed. When you set the desired time. 4. ENTER 3 4 ENTER 14 Use the buttons to be resumed. The time will flash on , the normal display will start operating. Press the TIMER button until...
... the display. 3. Setting the clock 1 TIMER ENTER 2 STANDBY/ ON CLOCK CALL 2 1 5 4 8 7 3 INPUT 6 9 A.PRESENCE +10 CLEAR 0 MUTING MEM RANDOM SLEEP REPEAT CD TUNER TIMER PRESET TAPE ENTER TIMER ENTER Setting the clock 1. Press the buttons until "ADJUST" is selected, then press the ENTER button. The clock will be displayed. When you set the desired time. 4. ENTER 3 4 ENTER 14 Use the buttons to be resumed. The time will flash on , the normal display will start operating. Press the TIMER button until...

User Manual English
Page 18
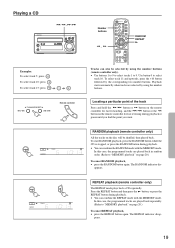
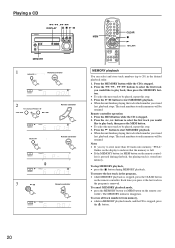
... button or the button on the remote controller. To stop playback, • press the button. Playback starts again from exactly where it tuns on the remote controller to play - Playing a CD , 1 STANDBY/ON MEMORY FM MODE CLEAR PHONES DISPLAY INPUT TUNING/PRESET VOLUME MIN MAX INPUT Label side ACOUSTIC PRESENCE 2 INPUT Remote controller INPUT 3 Remote controller CD TRACK TUNING/PRESET Remote controller STANDBY/ ON CLOCK CALL 2 1 5 4 8 7 3 INPUT 6 9 A.PRESENCE +10 CLEAR 0 MUTING MEM RANDOM SLEEP REPEAT CD TUNER TIMER PRESET TAPE ENTER INPUT , Playing a CD...
... button or the button on the remote controller. To stop playback, • press the button. Playback starts again from exactly where it tuns on the remote controller to play - Playing a CD , 1 STANDBY/ON MEMORY FM MODE CLEAR PHONES DISPLAY INPUT TUNING/PRESET VOLUME MIN MAX INPUT Label side ACOUSTIC PRESENCE 2 INPUT Remote controller INPUT 3 Remote controller CD TRACK TUNING/PRESET Remote controller STANDBY/ ON CLOCK CALL 2 1 5 4 8 7 3 INPUT 6 9 A.PRESENCE +10 CLEAR 0 MUTING MEM RANDOM SLEEP REPEAT CD TUNER TIMER PRESET TAPE ENTER INPUT , Playing a CD...
User Manual English
Page 19
... a CD , STANDBY/ON MEMORY FM MODE CLEAR PHONES DISPLAY INPUT TUNING/PRESET VOLUME MIN MAX ACOUSTIC PRESENCE Examples: To select track 5: press 5 To select track 10: press 0 To select track 15: press +10 1 5 TUNING/PRESET Remote controller Number buttons , STANDBY/ ON CLOCK CALL 2 1 5 4 8 7 3 INPUT 6 9 A.PRESENCE +10 CLEAR 0 MUTING MEM RANDOM SLEEP REPEAT RANDOM REPEAT CD TUNER TIMER PRESET TAPE ENTER Tracks can also be shuffled, then played back. REPEAT CD MEMORY REPEAT TRACK REPEAT playback (remote controller only) The REPEAT mode plays back a CD repeatedly...
... a CD , STANDBY/ON MEMORY FM MODE CLEAR PHONES DISPLAY INPUT TUNING/PRESET VOLUME MIN MAX ACOUSTIC PRESENCE Examples: To select track 5: press 5 To select track 10: press 0 To select track 15: press +10 1 5 TUNING/PRESET Remote controller Number buttons , STANDBY/ ON CLOCK CALL 2 1 5 4 8 7 3 INPUT 6 9 A.PRESENCE +10 CLEAR 0 MUTING MEM RANDOM SLEEP REPEAT RANDOM REPEAT CD TUNER TIMER PRESET TAPE ENTER Tracks can also be shuffled, then played back. REPEAT CD MEMORY REPEAT TRACK REPEAT playback (remote controller only) The REPEAT mode plays back a CD repeatedly...
User Manual English
Page 20
Playing a CD , DISPLAY ACOUSTIC PRESENCE STANDBY/ON MEMORY FM MODE CLEAR PHONES MEMORY DISPLAY INPUT TUNING/PRESET VOLUME MIN MAX 1 Remote controller MEMORY FM MODE CLEAR MEM CD TRACK T MEMORY 2 TUNING/PRESET Remote controller CD MEMORY TRACK MEMORY FM MODE CLEAR CD MEMORY TRACK T Remote controller MEM CD MEMORY TRACK 3 T Remote controller CD MEMORY TRACK MEM STANDBY/ ON CLOCK CALL 2 1 5 4 8 7 3 INPUT 6 9 A.PRESENCE +10 CLEAR 0 MUTING MEM RANDOM SLEEP REPEAT CD TUNER TIMER PRESET TAPE ENTER CLEAR , MEMORY playback You can select and store track ...
Playing a CD , DISPLAY ACOUSTIC PRESENCE STANDBY/ON MEMORY FM MODE CLEAR PHONES MEMORY DISPLAY INPUT TUNING/PRESET VOLUME MIN MAX 1 Remote controller MEMORY FM MODE CLEAR MEM CD TRACK T MEMORY 2 TUNING/PRESET Remote controller CD MEMORY TRACK MEMORY FM MODE CLEAR CD MEMORY TRACK T Remote controller MEM CD MEMORY TRACK 3 T Remote controller CD MEMORY TRACK MEM STANDBY/ ON CLOCK CALL 2 1 5 4 8 7 3 INPUT 6 9 A.PRESENCE +10 CLEAR 0 MUTING MEM RANDOM SLEEP REPEAT CD TUNER TIMER PRESET TAPE ENTER CLEAR , MEMORY playback You can select and store track ...
User Manual English
Page 25
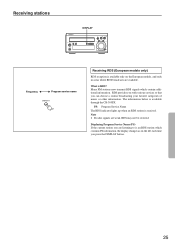
..., the display changes as on the European models, and only in areas where RDS broadcasts are weak, RDS may not be received. Receiving stations DISPLAY STANDBY/ON MEMORY FM MODE CLEAR PHONES DISPLAY INPUT TUNING/PRESET VOLUME MIN MAX ACOUSTIC PRESENCE Frequency Program service name DISPLAY Receiving RDS (European models only) RDS reception is RDS? What is available only on the left each time you can choose a station broadcasting...
..., the display changes as on the European models, and only in areas where RDS broadcasts are weak, RDS may not be received. Receiving stations DISPLAY STANDBY/ON MEMORY FM MODE CLEAR PHONES DISPLAY INPUT TUNING/PRESET VOLUME MIN MAX ACOUSTIC PRESENCE Frequency Program service name DISPLAY Receiving RDS (European models only) RDS reception is RDS? What is available only on the left each time you can choose a station broadcasting...
User Manual English
Page 26
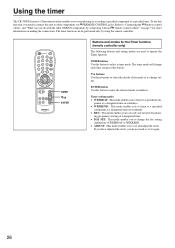
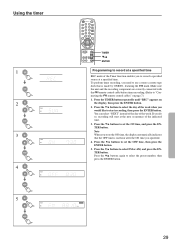
... time. • DAY SET: This mode enables you need to operate the Timer function. on making the connections. TIMER button Use this unit to change each time you do not need to connect this button to select a timer mode. To use this function, you to change the day setting (definition) of the mode or to other ONKYO components by using the remote controller. STANDBY/ ON CLOCK CALL 2 1 5 4 8 7 3 INPUT 6 9 A.PRESENCE +10 CLEAR 0 MUTING MEM RANDOM SLEEP REPEAT CD TUNER TIMER PRESET TAPE ENTER RC-617S TIMER ENTER Buttons and modes...
... time. • DAY SET: This mode enables you need to operate the Timer function. on making the connections. TIMER button Use this unit to change each time you do not need to connect this button to select a timer mode. To use this function, you to change the day setting (definition) of the mode or to other ONKYO components by using the remote controller. STANDBY/ ON CLOCK CALL 2 1 5 4 8 7 3 INPUT 6 9 A.PRESENCE +10 CLEAR 0 MUTING MEM RANDOM SLEEP REPEAT CD TUNER TIMER PRESET TAPE ENTER RC-617S TIMER ENTER Buttons and modes...
User Manual English
Page 28
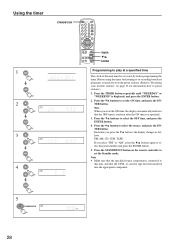
... preset number and press the ENTER button. 5. Note • Make sure that the specified source component is displayed, and press the ENTER button. 2. Using the timer 1 TIMER ENTER 2 TIMER W.DAY ENTER 3 TIMER W.DAY ENTER 4 TIMER W.DAY ENTER 5 STANDBY/ ON TIMER W.DAY REC STANDBY/ON STANDBY/ ON CLOCK CALL 2 1 5 4 8 7 3 INPUT 6 9 A.PRESENCE +10 CLEAR 0 MUTING MEM RANDOM SLEEP REPEAT CD TUNER TIMER PRESET TAPE ENTER TIMER ENTER Programming to this unit must be set the Standby mode...
... preset number and press the ENTER button. 5. Note • Make sure that the specified source component is displayed, and press the ENTER button. 2. Using the timer 1 TIMER ENTER 2 TIMER W.DAY ENTER 3 TIMER W.DAY ENTER 4 TIMER W.DAY ENTER 5 STANDBY/ ON TIMER W.DAY REC STANDBY/ON STANDBY/ ON CLOCK CALL 2 1 5 4 8 7 3 INPUT 6 9 A.PRESENCE +10 CLEAR 0 MUTING MEM RANDOM SLEEP REPEAT CD TUNER TIMER PRESET TAPE ENTER TIMER ENTER Programming to this unit must be set the Standby mode...
User Manual English
Page 29
... week. STEREO 4. Press the buttons again to "Connecting the remote control cables" on the display, then press the ENTER button. 2. Press the TIMER button repeatedly until "REC" appears on page 7.) 1. Press the buttons to set the ON time, and press the ENTER button. Press the buttons to set the OFF time, then press the ENTER button. 5. Using the timer 1 TIMER ENTER 2 ENTER 3 ENTER 4 ENTER 5 ENTER TIMER REC TIMER REC TIMER REC TIMER REC STANDBY/ ON CLOCK CALL 2 1 5 4 8 7 3 INPUT...
... week. STEREO 4. Press the buttons again to "Connecting the remote control cables" on the display, then press the ENTER button. 2. Press the TIMER button repeatedly until "REC" appears on page 7.) 1. Press the buttons to set the ON time, and press the ENTER button. Press the buttons to set the OFF time, then press the ENTER button. 5. Using the timer 1 TIMER ENTER 2 ENTER 3 ENTER 4 ENTER 5 ENTER TIMER REC TIMER REC TIMER REC TIMER REC STANDBY/ ON CLOCK CALL 2 1 5 4 8 7 3 INPUT...

User Manual English
Page 31
... the power is turned on by using remote controller. The power will be performed only by one minute or more than two timer mode settings are made at its OFF time. Start playing something you press the SLEEP button during timer play or timer recording, the power will be switched off at the SLEEP timer's OFF time. • If more between the OFF time and ON time for timer setting • Make sure that the clock...
... the power is turned on by using remote controller. The power will be performed only by one minute or more than two timer mode settings are made at its OFF time. Start playing something you press the SLEEP button during timer play or timer recording, the power will be switched off at the SLEEP timer's OFF time. • If more between the OFF time and ON time for timer setting • Make sure that the clock...
User Manual English
Page 32
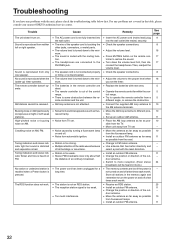
... with new ones. 5 • Operate the remote controller within the con- 5 trol range. • Try to turn on AM. Cause • The AC power cord is not fully inserted into the wall outlet (the mains) securely. • Check the speaker connections. 8 • Adjust the volume level. 16 • Press MUTING button on FM. Troubleshooting If you set the timer. • Replace the batteries with weak stations). No sound is...
... with new ones. 5 • Operate the remote controller within the con- 5 trol range. • Try to turn on AM. Cause • The AC power cord is not fully inserted into the wall outlet (the mains) securely. • Check the speaker connections. 8 • Adjust the volume level. 16 • Press MUTING button on FM. Troubleshooting If you set the timer. • Replace the batteries with weak stations). No sound is...

User Manual Simplified Chinese
Page 9
REMOTE CONTROL R TAPE OUT (REC) (PLAY) IN FM 75 ANTENNA AM L OPTICAL DIGITAL OUTPUT OUT (REC) (PLAY) IN CDR R SUBWOOFER PRE OUT L f SPEAKERS R L STANDBY/ON MEMORY FM MODE CLEAR PHONES DISPLAY INPUT TUNING/PRESET VOLUME MIN MAX STANDBY/ ON CLOCK CALL 2 1 5 4 8 7 3 INPUT 6 9 A.PRESENCE +10 CLEAR 0 MUTING MEM RANDOM SLEEP REPEAT CD TUNER PRESET TIMER TAPE ENTER RC-617S ACOUSTIC PRESENCE f f f p f f p f p f p f Cs-9
REMOTE CONTROL R TAPE OUT (REC) (PLAY) IN FM 75 ANTENNA AM L OPTICAL DIGITAL OUTPUT OUT (REC) (PLAY) IN CDR R SUBWOOFER PRE OUT L f SPEAKERS R L STANDBY/ON MEMORY FM MODE CLEAR PHONES DISPLAY INPUT TUNING/PRESET VOLUME MIN MAX STANDBY/ ON CLOCK CALL 2 1 5 4 8 7 3 INPUT 6 9 A.PRESENCE +10 CLEAR 0 MUTING MEM RANDOM SLEEP REPEAT CD TUNER PRESET TIMER TAPE ENTER RC-617S ACOUSTIC PRESENCE f f f p f f p f p f p f Cs-9


