
Owner Manual
Page 1
Follow these instructions to the radio 41 Using the timer 47 Using USB 51 Appendix 58 CD RECEIVER CR-N1 Instruction Manual Thank you for future reference. English Before using 2 Controls & connectors 12 Getting connected 18 Basic operation 30 Playing CDs 35 Listening to obtain optimum performance and maximum listening enjoyment from your new CR-N1. Please read this manual for purchasing the ONKYO CR-N1 CD Receiver. Please retain this manual thoroughly before making any connection or turning on the power.
Follow these instructions to the radio 41 Using the timer 47 Using USB 51 Appendix 58 CD RECEIVER CR-N1 Instruction Manual Thank you for future reference. English Before using 2 Controls & connectors 12 Getting connected 18 Basic operation 30 Playing CDs 35 Listening to obtain optimum performance and maximum listening enjoyment from your new CR-N1. Please read this manual for purchasing the ONKYO CR-N1 CD Receiver. Please retain this manual thoroughly before making any connection or turning on the power.
Owner Manual
Page 2
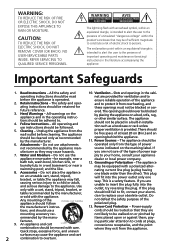
... be moved with a polarized alternating current line plug (a plug having one way. bath tub, wash bowl, kitchen sink, or 12. Use only with the appliance. If the plug should be free space of important operating and maintenance (servicing) instructions in installation such as they exit from overheating, and these openings must not be 6. Power-supply tions, and should use instructions should be placed in a built...
... be moved with a polarized alternating current line plug (a plug having one way. bath tub, wash bowl, kitchen sink, or 12. Use only with the appliance. If the plug should be free space of important operating and maintenance (servicing) instructions in installation such as they exit from overheating, and these openings must not be 6. Power-supply tions, and should use instructions should be placed in a built...
Owner Manual
Page 3
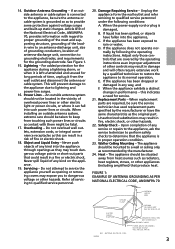
... been dropped or damaged in performance - Replacement Parts - The appliance should be situated away from the wall outlet and disconnect the antenna or cable system. Unplug the appliance form the wall outlet and refer servicing to service the appliance yourself as this indicates a need for the grounding electrode. When the power-supply cord or plug is left unattended and unused for...
... been dropped or damaged in performance - Replacement Parts - The appliance should be situated away from the wall outlet and disconnect the antenna or cable system. Unplug the appliance form the wall outlet and refer servicing to service the appliance yourself as this indicates a need for the grounding electrode. When the power-supply cord or plug is left unattended and unused for...
Owner Manual
Page 5
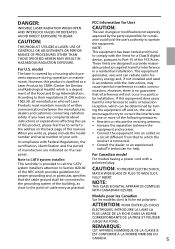
... about instructions or explanations affecting the use of this manual. DANGER: INVISIBLE LASER RADIATION WHEN OPEN AND INTERLOCK FAILED OR DEFEATED. If you write us, please include the model number and serial number of written communications between the equipment and receiver. • Connect the equipment into an outlet on a circuit different from that the cable ground shall be determined by turning the...
... about instructions or explanations affecting the use of this manual. DANGER: INVISIBLE LASER RADIATION WHEN OPEN AND INTERLOCK FAILED OR DEFEATED. If you write us, please include the model number and serial number of written communications between the equipment and receiver. • Connect the equipment into an outlet on a circuit different from that the cable ground shall be determined by turning the...
Owner Manual
Page 6
... it has been charged, the CR-N1 will be connected to the terminal which is coloured blue must have been plugged in in order to BS1362. For British model Replacement and mounting of 5 amperes and that the ONKYO product described in this instruction manual is classified as a "CLASS 1 LASER PRODUCT". GERMERING, GERMANY I. Should the fuse need to be performed only by...
... it has been charged, the CR-N1 will be connected to the terminal which is coloured blue must have been plugged in in order to BS1362. For British model Replacement and mounting of 5 amperes and that the ONKYO product described in this instruction manual is classified as a "CLASS 1 LASER PRODUCT". GERMERING, GERMANY I. Should the fuse need to be performed only by...
Owner Manual
Page 7
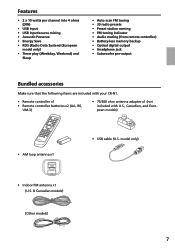
... model only) • Timer play (Weekday, Weekend) and Sleep • Auto scan FM tuning • 30 radio presets • Preset station naming • FM tuning indicator • Audio muting (from remote controller) • Battery-less memory backup • Optical digital output • Headphone jack • Subwoofer pre-output Bundled accessories Make sure that the following items are included with your CR-N1. • Remote controller x1 • Remote controller batteries x2 (AA, R6, UM-3) • 75/300 ohm antenna adapter...
... model only) • Timer play (Weekday, Weekend) and Sleep • Auto scan FM tuning • 30 radio presets • Preset station naming • FM tuning indicator • Audio muting (from remote controller) • Battery-less memory backup • Optical digital output • Headphone jack • Subwoofer pre-output Bundled accessories Make sure that the following items are included with your CR-N1. • Remote controller x1 • Remote controller batteries x2 (AA, R6, UM-3) • 75/300 ohm antenna adapter...
Owner Manual
Page 10
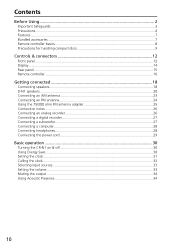
... handling compact discs 9 Controls & connectors 12 Front panel ...12 Display...14 Rear panel ...15 Remote controller ...16 Getting connected 18 Connecting speakers...18 D-N1 speakers ...20 Connecting an AM antenna 23 Connecting an FM antenna 24 Using the 75/300 ohm FM antenna adapter 25 Connection notes ...26 Connecting an analog recorder 26 Connecting a digital recorder 27 Connecting a subwoofer 27 Connecting a computer ...28 Connecting headphones 28 Connecting the power cord 29 Basic operation 30 Turning the CR-N1 on & off 30 Using Energy Save...30 Setting the clock ...31...
... handling compact discs 9 Controls & connectors 12 Front panel ...12 Display...14 Rear panel ...15 Remote controller ...16 Getting connected 18 Connecting speakers...18 D-N1 speakers ...20 Connecting an AM antenna 23 Connecting an FM antenna 24 Using the 75/300 ohm FM antenna adapter 25 Connection notes ...26 Connecting an analog recorder 26 Connecting a digital recorder 27 Connecting a subwoofer 27 Connecting a computer ...28 Connecting headphones 28 Connecting the power cord 29 Basic operation 30 Turning the CR-N1 on & off 30 Using Energy Save...30 Setting the clock ...31...
Owner Manual
Page 11
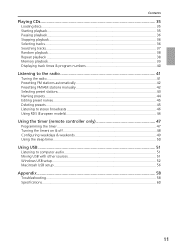
Contents Playing CDs 35 Loading discs...35 Starting playback...35 Pausing playback...36 Stopping playback...36 Selecting tracks ...36 Searching tracks ...37 Random playback...38 Repeat playback ...38 Memory playback...39 Displaying track times & program numbers 40 Listening to the radio 41 Tuning the radio...41 Presetting FM stations automatically 42 Presetting FM/AM stations manually 42 Selecting preset stations 43 Naming presets ...44 Editing preset names ...45 Deleting presets ...45 Listening to stereo broadcasts 46 Using RDS (European models 46 Using the timer (remote controller ...
Contents Playing CDs 35 Loading discs...35 Starting playback...35 Pausing playback...36 Stopping playback...36 Selecting tracks ...36 Searching tracks ...37 Random playback...38 Repeat playback ...38 Memory playback...39 Displaying track times & program numbers 40 Listening to the radio 41 Tuning the radio...41 Presetting FM stations automatically 42 Presetting FM/AM stations manually 42 Selecting preset stations 43 Naming presets ...44 Editing preset names ...45 Deleting presets ...45 Listening to stereo broadcasts 46 Using RDS (European models 46 Using the timer (remote controller ...
Owner Manual
Page 13
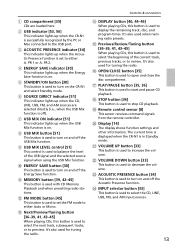
... tuning the radio. H USB MIX button [51] This button is used to the USB port. O Previous/Review/Tuning button [36-39, 41, 43-45] When playing CDs, this button is used to either Auto or Mono. R STOP button [36] This button is used to open and close the disc compartment. P OPEN/CLOSE button [35] This button is used to stop CD playback. The current time is displayed when the CR-N1 is off the USB Mix function. E STANDBY/ON button [30] This button is used to select the CD, LINE, USB...
... tuning the radio. H USB MIX button [51] This button is used to the USB port. O Previous/Review/Tuning button [36-39, 41, 43-45] When playing CDs, this button is used to either Auto or Mono. R STOP button [36] This button is used to open and close the disc compartment. P OPEN/CLOSE button [35] This button is used to stop CD playback. The current time is displayed when the CR-N1 is off the USB Mix function. E STANDBY/ON button [30] This button is used to select the CD, LINE, USB...
Owner Manual
Page 14
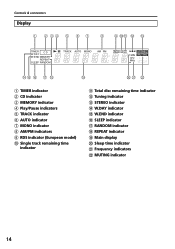
Controls & connectors Display A B CD E F G H I JK L M TIMER W.DAY CD W.END MEMORY REPEAT SLEEP RANDOM TRACK AUTO MONO AM PM RDS S T MIN kHz MHz STEREO MUTING S.BASS DIRECT NO P Q R S TU V A TIMER indicator B CD indicator C MEMORY indicator D Play/Pause indicators E TRACK indicator F AUTO indicator G MONO indicator H AM/PM indicators I RDS indicator (European model) J Single track remaining time indicator K Total disc remaining time indicator L Tuning indicator M STEREO indicator N W.DAY indicator O W.END indicator P SLEEP indicator Q RANDOM indicator R REPEAT indicator S Main...
Controls & connectors Display A B CD E F G H I JK L M TIMER W.DAY CD W.END MEMORY REPEAT SLEEP RANDOM TRACK AUTO MONO AM PM RDS S T MIN kHz MHz STEREO MUTING S.BASS DIRECT NO P Q R S TU V A TIMER indicator B CD indicator C MEMORY indicator D Play/Pause indicators E TRACK indicator F AUTO indicator G MONO indicator H AM/PM indicators I RDS indicator (European model) J Single track remaining time indicator K Total disc remaining time indicator L Tuning indicator M STEREO indicator N W.DAY indicator O W.END indicator P SLEEP indicator Q RANDOM indicator R REPEAT indicator S Main...
Owner Manual
Page 18
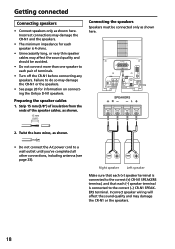
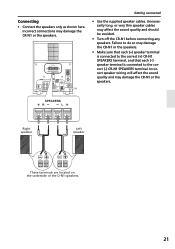
... (-) CR-N1 SPEAKERS terminal. Twist the bare wires, as shown. • Do not connect the AC power cord to a wall outlet until you've completed all other connections, including antenna (see page 23). -+ -+ Right speaker Left speaker Make sure that each (+) speaker terminal is connected to the correct (+) CR-N1 SPEAKERS terminal, and that each (-) speaker terminal is 4 ohms. • Unnecessarily long, or very thin speaker cables may affect the sound...
... (-) CR-N1 SPEAKERS terminal. Twist the bare wires, as shown. • Do not connect the AC power cord to a wall outlet until you've completed all other connections, including antenna (see page 23). -+ -+ Right speaker Left speaker Make sure that each (+) speaker terminal is connected to the correct (+) CR-N1 SPEAKERS terminal, and that each (-) speaker terminal is 4 ohms. • Unnecessarily long, or very thin speaker cables may affect the sound...
Owner Manual
Page 20
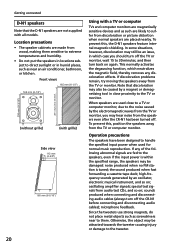
... of the following abnormal signals are used for normal music reproduction. the sound produced when fast forwarding a cassette tape deck; sounds produced when connecting and disconnecting audio cables (always turn off the TV or monitor, wait 15 to 30 minutes, and then turn off the CR-N1 before connecting and disconnecting audio cables); When speakers are fed to the speakers, even if the input power is within the specifi...
... of the following abnormal signals are used for normal music reproduction. the sound produced when fast forwarding a cassette tape deck; sounds produced when connecting and disconnecting audio cables (always turn off the TV or monitor, wait 15 to 30 minutes, and then turn off the CR-N1 before connecting and disconnecting audio cables); When speakers are fed to the speakers, even if the input power is within the specifi...
Owner Manual
Page 21
... CR-N1 or the speakers. Incorrect speaker wiring will affect the sound quality and may affect the sound quality and should be avoided. • Turn off the CR-N1 before connecting any speakers. Failure to the correct (-) CR-N1 SPEAKERS terminal. Getting connected • Use the supplied speaker cables. Connecting • Connect the speakers only as shown here. Incorrect connections may damage the CR-N1 or the speakers. • Make sure that each (+) speaker terminal is connected to the correct (+) CR-N1 SPEAKERS...
... CR-N1 or the speakers. Incorrect speaker wiring will affect the sound quality and may affect the sound quality and should be avoided. • Turn off the CR-N1 before connecting any speakers. Failure to the correct (-) CR-N1 SPEAKERS terminal. Getting connected • Use the supplied speaker cables. Connecting • Connect the speakers only as shown here. Incorrect connections may damage the CR-N1 or the speakers. • Make sure that each (+) speaker terminal is connected to the correct (+) CR-N1 SPEAKERS...
Owner Manual
Page 23
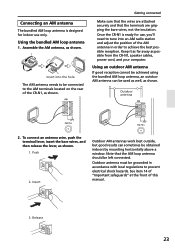
... reception. Insert into an AM radio station and adjust the position of the AM antenna in accordance with local regulations to the AM terminals located on the rear of this manual. 3. Release 23 Assemble the AM antenna, as possible from the CR-N1, speaker cables, power cord, and your computer. Once the CR-N1 is designed for use only. To connect an antenna wire, push the terminal lever, insert...
... reception. Insert into an AM radio station and adjust the position of the AM antenna in accordance with local regulations to the AM terminals located on the rear of this manual. 3. Release 23 Assemble the AM antenna, as possible from the CR-N1, speaker cables, power cord, and your computer. Once the CR-N1 is designed for use only. To connect an antenna wire, push the terminal lever, insert...
Owner Manual
Page 26
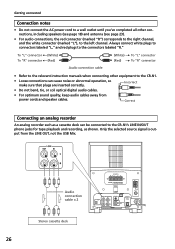
... AC power cord to a wall outlet until you've completed all other equipment to the CR-N1. • Loose connections can be connected to the CR-N1's LINE IN/OUT phono jacks for tape playback and recording, as shown. To "L" connector (White) To "R" connector (Red) Audio connection cable (White) (Red) To "L" connector To "R" connector • Refer to the relevant instruction manuals when connecting other connections, including speakers (see page 18) and antenna...
... AC power cord to a wall outlet until you've completed all other equipment to the CR-N1. • Loose connections can be connected to the CR-N1's LINE IN/OUT phono jacks for tape playback and recording, as shown. To "L" connector (White) To "R" connector (Red) Audio connection cable (White) (Red) To "L" connector To "R" connector • Refer to the relevant instruction manuals when connecting other connections, including speakers (see page 18) and antenna...
Owner Manual
Page 30
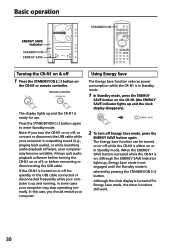
... the ENERGY SAVE button on or off frequently, or the USB cable connected or disconnected frequently while your computer is outputting sound (e.g., playing back audio), or while launching audio playback software, your computer is up and the clock display disappears). 2 To turn off , or connect or disconnect the USB cable while your computer may stop operating normally. Using Energy Save The Energy Save function reduces power consumption while the CR-N1 is in...
... the ENERGY SAVE button on or off frequently, or the USB cable connected or disconnected frequently while your computer is outputting sound (e.g., playing back audio), or while launching audio playback software, your computer is up and the clock display disappears). 2 To turn off , or connect or disconnect the USB cable while your computer may stop operating normally. Using Energy Save The Energy Save function reduces power consumption while the CR-N1 is in...

Owner Manual
Page 51
... outputting sound (e.g., playing back audio), or while launching audio playback software, your computer is up and the SOURCE DIRECT indicator goes out). The Volume, Muting, and Acoustic Presence functions can still hear computer system sounds while listening to your favorite CDs or radio stations. 1 Press the INPUT button on the CR-N1 repeatedly, or use the CD, LINE, FM, or AM INPUT SELECTOR buttons on or off , or before connecting or disconnecting the USB cable. Before connecting...
... outputting sound (e.g., playing back audio), or while launching audio playback software, your computer is up and the SOURCE DIRECT indicator goes out). The Volume, Muting, and Acoustic Presence functions can still hear computer system sounds while listening to your favorite CDs or radio stations. 1 Press the INPUT button on the CR-N1 repeatedly, or use the CD, LINE, FM, or AM INPUT SELECTOR buttons on or off , or before connecting or disconnecting the USB cable. Before connecting...
Owner Manual
Page 53
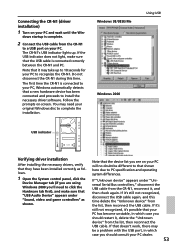
... USB cable. Note that "USB Audio Device" appears under "Universal Serial Bus controllers," disconnect the USB cable from the CR-N1 to a USB port on your PC will no doubt be a problem with the USB port, in which case you 'll need your PC to complete the installation. The CR-N1's USB indicator lights up to 10 seconds for your original Windows disc to recognize the CR-N1. If the USB indicator does not light, make...
... USB cable. Note that "USB Audio Device" appears under "Universal Serial Bus controllers," disconnect the USB cable from the CR-N1 to a USB port on your PC will no doubt be a problem with the USB port, in which case you 'll need your PC to complete the installation. The CR-N1's USB indicator lights up to 10 seconds for your original Windows disc to recognize the CR-N1. If the USB indicator does not light, make...
Owner Manual
Page 58
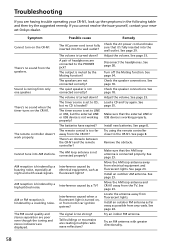
... though the tuning and stereo indicators are creating multiple radio wave reflections? The AC power cord is hindered by electrical equipment, such as possible from the speakers. The volume is not connected properly? The timer source is too far away from motor car ignition systems? The batteries have expired? The remote control is set to the CR-N1. The AM loop antenna is turned down ? Interference...
... though the tuning and stereo indicators are creating multiple radio wave reflections? The AC power cord is hindered by electrical equipment, such as possible from the speakers. The volume is not connected properly? The timer source is too far away from motor car ignition systems? The batteries have expired? The remote control is set to the CR-N1. The AM loop antenna is turned down ? Interference...
Owner Manual
Page 59
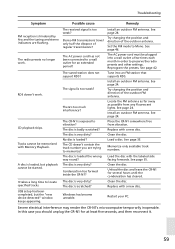
... direction of regular transmissions? Place the CR-N1 somewhere free from any fluorescent lights. Load the disc with a new disc. The radio presets no longer work . Tracks cannot be started. USB setup has been completed, but playback cannot be memorized with a new disc. The received signal is loaded? Condensation has formed inside the CR-N1? Windows has become unstable. The AC power cord must be plugged into an FM station that supports...
... direction of regular transmissions? Place the CR-N1 somewhere free from any fluorescent lights. Load the disc with a new disc. The radio presets no longer work . Tracks cannot be started. USB setup has been completed, but playback cannot be memorized with a new disc. The received signal is loaded? Condensation has formed inside the CR-N1? Windows has become unstable. The AC power cord must be plugged into an FM station that supports...

