
Owner Manual
Page 7
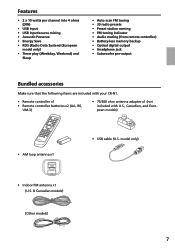
... • Optical digital output • Headphone jack • Subwoofer pre-output Bundled accessories Make sure that the following items are included with your CR-N1. • Remote controller x1 • Remote controller batteries x2 (AA, R6, UM-3) • 75/300 ohm antenna adapter x1 (not included with U.S., Canadian, and European models) • AM loop...
... • Optical digital output • Headphone jack • Subwoofer pre-output Bundled accessories Make sure that the following items are included with your CR-N1. • Remote controller x1 • Remote controller batteries x2 (AA, R6, UM-3) • 75/300 ohm antenna adapter x1 (not included with U.S., Canadian, and European models) • AM loop...

Owner Manual
Page 8
... the correct polarity (positive + and negative -). Using another remote controller of the same type in the same room, or using the CR-N1 near equipment that may affect remote controller performance. Always replace both batteries. Insert the batteries (AA...The remote controller will not work properly if there's an obstacle between it and the CR-N1's remote control sensor. 8 Remote controller basics Installing the batteries 1. Using the remote controller Remote control sensor 2. For reliable operation, point the remote controller toward the CR-N1's remote control...
... the correct polarity (positive + and negative -). Using another remote controller of the same type in the same room, or using the CR-N1 near equipment that may affect remote controller performance. Always replace both batteries. Insert the batteries (AA...The remote controller will not work properly if there's an obstacle between it and the CR-N1's remote control sensor. 8 Remote controller basics Installing the batteries 1. Using the remote controller Remote control sensor 2. For reliable operation, point the remote controller toward the CR-N1's remote control...
Owner Manual
Page 10
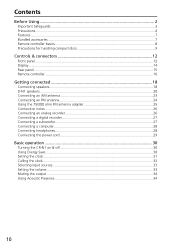
......8 Precautions for handling compact discs 9 Controls & connectors 12 Front panel ...12 Display...14 Rear panel ...15 Remote controller ...16 Getting connected 18 Connecting speakers...18 D-N1 speakers ...20 Connecting an AM antenna 23 Connecting an FM antenna 24 Using the 75/300 ohm FM antenna...digital recorder 27 Connecting a subwoofer 27 Connecting a computer ...28 Connecting headphones 28 Connecting the power cord 29 Basic operation 30 Turning the CR-N1 on & off 30 Using Energy Save...30 Setting the clock ...31 Calling the clock ...32 Selecting input sources ...33 Setting the ...
......8 Precautions for handling compact discs 9 Controls & connectors 12 Front panel ...12 Display...14 Rear panel ...15 Remote controller ...16 Getting connected 18 Connecting speakers...18 D-N1 speakers ...20 Connecting an AM antenna 23 Connecting an FM antenna 24 Using the 75/300 ohm FM antenna...digital recorder 27 Connecting a subwoofer 27 Connecting a computer ...28 Connecting headphones 28 Connecting the power cord 29 Basic operation 30 Turning the CR-N1 on & off 30 Using Energy Save...30 Setting the clock ...31 Calling the clock ...32 Selecting input sources ...33 Setting the ...
Owner Manual
Page 11
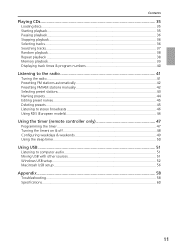
... stations 43 Naming presets ...44 Editing preset names ...45 Deleting presets ...45 Listening to stereo broadcasts 46 Using RDS (European models 46 Using the timer (remote controller only 47 Programming the timer ...47 Turning the timers on & off 48 Configuring weekdays & weekends 49 Using the sleep timer...50 Using USB ...51...
... stations 43 Naming presets ...44 Editing preset names ...45 Deleting presets ...45 Listening to stereo broadcasts 46 Using RDS (European models 46 Using the timer (remote controller only 47 Programming the timer ...47 Turning the timers on & off 48 Configuring weekdays & weekends 49 Using the sleep timer...50 Using USB ...51...
Owner Manual
Page 13
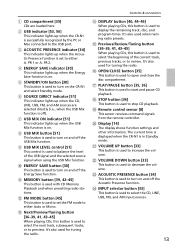
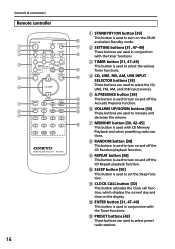
... the level of the current track, previous tracks, or to increase the volume. PR 1 or A. E STANDBY/ON button [30] This button is on the CR-N1 and select Standby mode. I USB MIX LEVEL control [51] This control is used to turn on . It's also used when naming radio presets. R STOP ...is used to select the CD, LINE, USB, FM, and AM input sources. 13 It's also used for tuning the radio. S Remote control sensor [8] This sensor receives command signals from the remote controller. PR 2. H USB MIX button [51] This button is on and off ). K MEMORY button [39, 42-45] This button...
... the level of the current track, previous tracks, or to increase the volume. PR 1 or A. E STANDBY/ON button [30] This button is on the CR-N1 and select Standby mode. I USB MIX LEVEL control [51] This control is used to turn on . It's also used when naming radio presets. R STOP ...is used to select the CD, LINE, USB, FM, and AM input sources. 13 It's also used for tuning the radio. S Remote control sensor [8] This sensor receives command signals from the remote controller. PR 2. H USB MIX button [51] This button is on and off ). K MEMORY button [39, 42-45] This button...
Owner Manual
Page 16
... Clock call func- J SLEEP button [50] This button is used to turn on the display. tion, which displays the current day and time on the CR-N1 and select Standby mode. S G MEMORY button [39, 42-45] This button is used with the timer functions C TIMER button [31, 47-49] This button... is used to turn on and off the CD Random playback function. Controls & connectors Remote controller A B C D E F G H I REPEAT button [38] This button is used in conjunction with CD Memory Playback and when presetting radio sta...
... Clock call func- J SLEEP button [50] This button is used to turn on the display. tion, which displays the current day and time on the CR-N1 and select Standby mode. S G MEMORY button [39, 42-45] This button is used with the timer functions C TIMER button [31, 47-49] This button... is used to turn on and off the CD Random playback function. Controls & connectors Remote controller A B C D E F G H I REPEAT button [38] This button is used in conjunction with CD Memory Playback and when presetting radio sta...
Owner Manual
Page 30
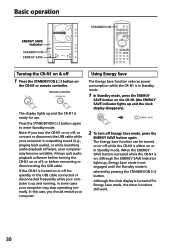
...indicator STANDBY/ON ENERGY SAVE STANDBY/ON Turning the CR-N1 on & off , or before turning the CR-N1 on or off 1 Press the STANDBY/ON ( ) button on the CR-N1 or remote controller. Note: If you should restart your computer is ready for use. Remote controller The display lights up and running, in ...Energy Save mode, the timer functions still work. 30 If the CR-N1 is turned on or off Energy Save mode, ...
...indicator STANDBY/ON ENERGY SAVE STANDBY/ON Turning the CR-N1 on & off , or before turning the CR-N1 on or off 1 Press the STANDBY/ON ( ) button on the CR-N1 or remote controller. Note: If you should restart your computer is ready for use. Remote controller The display lights up and running, in ...Energy Save mode, the timer functions still work. 30 If the CR-N1 is turned on or off Energy Save mode, ...

Owner Manual
Page 31
...1, 1, 10/0, 10/0, and then ENTER. Days are selected using the numeric keypad as follows: 1: SUN 2: MON 5: THU 6: FRI 3: TUE 7: SAT 4: WED 31 Remote controller The day of the week flashes on the display. 2 Use the SETTING ( / ) buttons, or the numeric keypad to select the day of the... (the clock is now set the clock while the CR-N1 is in Standby mode, the time is displayed. If you set .). TIMER Basic operation ENTER SETTING ( / ) Numeric keypad Setting the clock The remote controller is used to set it while the CR-N1 is on, the previously displayed information reappears.
...1, 1, 10/0, 10/0, and then ENTER. Days are selected using the numeric keypad as follows: 1: SUN 2: MON 5: THU 6: FRI 3: TUE 7: SAT 4: WED 31 Remote controller The day of the week flashes on the display. 2 Use the SETTING ( / ) buttons, or the numeric keypad to select the day of the... (the clock is now set the clock while the CR-N1 is in Standby mode, the time is displayed. If you set .). TIMER Basic operation ENTER SETTING ( / ) Numeric keypad Setting the clock The remote controller is used to set it while the CR-N1 is on, the previously displayed information reappears.
Owner Manual
Page 33
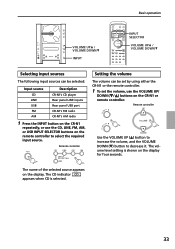
...inputs Rear panel USB port FM CR-N1's FM radio AM CR-N1's AM radio 1 Press the INPUT button on the CR-N1 repeatedly, or use the VOLUME UP/ DOWN ( / ) buttons on the display. The CD indicator CD appears when CD is shown on the display for four seconds. Remote controller Setting the volume The volume... can be set by using either the CR-N1 or the remote controller. 1 To set the volume, use the CD, LINE, FM, AM, or USB INPUT SELECTOR buttons...
...inputs Rear panel USB port FM CR-N1's FM radio AM CR-N1's AM radio 1 Press the INPUT button on the CR-N1 repeatedly, or use the VOLUME UP/ DOWN ( / ) buttons on the display. The CD indicator CD appears when CD is shown on the display for four seconds. Remote controller Setting the volume The volume... can be set by using either the CR-N1 or the remote controller. 1 To set the volume, use the CD, LINE, FM, AM, or USB INPUT SELECTOR buttons...

Owner Manual
Page 34
... Acoustic Presence function adds super-bass reality to music sources, increasing your listening pleasure. 1 Press the ACOUSTIC PRESENCE button on the CR-N1, or the A.PRESENCE button on the remote controller repeatedly to cycle through the Acoustic Presence settings. Alternatively, the output can be unmuted by using the Muting function. 1 Press... indicator A.PRESENCE ACOUSTIC PRESENCE MUTING Muting the output Sound output can be muted temporarily by pressing the VOLUME UP/DOWN ( / ) buttons on the CR-N1 or remote controller. Remote controller 2 To unmute the output, press the MUT-
... Acoustic Presence function adds super-bass reality to music sources, increasing your listening pleasure. 1 Press the ACOUSTIC PRESENCE button on the CR-N1, or the A.PRESENCE button on the remote controller repeatedly to cycle through the Acoustic Presence settings. Alternatively, the output can be unmuted by using the Muting function. 1 Press... indicator A.PRESENCE ACOUSTIC PRESENCE MUTING Muting the output Sound output can be muted temporarily by pressing the VOLUME UP/DOWN ( / ) buttons on the CR-N1 or remote controller. Remote controller 2 To unmute the output, press the MUT-
Owner Manual
Page 35
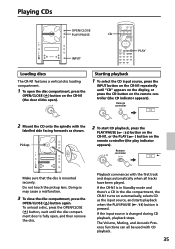
... on automatically, selects CD as shown. Pickup 2 To start CD playback, press the PLAY/PAUSE ( ) button on the CR-N1, or the PLAY ( ) button on the remote controller (the CD indicator appears). Doing so may cause a malfunction. 3 To close the disc compartment, press the OPEN/CLOSE ( ) button again...OPEN/CLOSE PLAY/PAUSE CD INPUT PLAY Loading discs The CR-N1 features a vertical disc loading compartment. 1 To open the disc compartment, press the OPEN/CLOSE ( ) button on the CR-N1 (the door slides open , and then remove the disc. Remote controller CD 2 Mount the CD onto the spindle with...
... on automatically, selects CD as shown. Pickup 2 To start CD playback, press the PLAY/PAUSE ( ) button on the CR-N1, or the PLAY ( ) button on the remote controller (the CD indicator appears). Doing so may cause a malfunction. 3 To close the disc compartment, press the OPEN/CLOSE ( ) button again...OPEN/CLOSE PLAY/PAUSE CD INPUT PLAY Loading discs The CR-N1 features a vertical disc loading compartment. 1 To open the disc compartment, press the OPEN/CLOSE ( ) button on the CR-N1 (the door slides open , and then remove the disc. Remote controller CD 2 Mount the CD onto the spindle with...
Owner Manual
Page 36
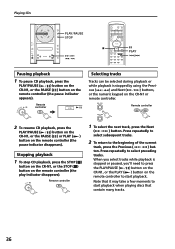
... few moments to select preceding tracks. ton. When you 'll need to press the PLAY/PAUSE ( ) button on the CR-N1, or the PLAY ( ) button on the remote controller to the beginning of the current track, press the Previous ( ) but- Stopping playback 1 To stop CD playback, ...Pausing playback 1 To pause CD playback, press the PLAY/PAUSE ( ) button on the CR-N1, or the PAUSE ( ) button on the CR-N1 or remote controller. Press repeatedly to start playback. Remote controller CD Selecting tracks Tracks can be selected during playback or while playback is stopped or paused...
... few moments to select preceding tracks. ton. When you 'll need to press the PLAY/PAUSE ( ) button on the CR-N1, or the PLAY ( ) button on the remote controller to the beginning of the current track, press the Previous ( ) but- Stopping playback 1 To stop CD playback, ...Pausing playback 1 To pause CD playback, press the PLAY/PAUSE ( ) button on the CR-N1, or the PAUSE ( ) button on the CR-N1 or remote controller. Press repeatedly to start playback. Remote controller CD Selecting tracks Tracks can be selected during playback or while playback is stopped or paused...

Owner Manual
Page 38
... Random Playback. 38 Repeat playback CD playback normally stops once the last track has been played. See "Memory playback" on the remote controller (the RANDOM indicator appears and playback starts after a few seconds). With Repeat Playback, the CD is selected. Repeat playback ...order. 1 To start Random Playback, press the RANDOM button on page 39 for more information. Random playback can play memorized tracks repeatedly. Remote controller CD REPEAT 2 Start CD playback as normal. 3 To cancel Repeat Playback, press the REPEAT button again (the REPEAT indicator disappears)....
... Random Playback. 38 Repeat playback CD playback normally stops once the last track has been played. See "Memory playback" on the remote controller (the RANDOM indicator appears and playback starts after a few seconds). With Repeat Playback, the CD is selected. Repeat playback ...order. 1 To start Random Playback, press the RANDOM button on page 39 for more information. Random playback can play memorized tracks repeatedly. Remote controller CD REPEAT 2 Start CD playback as normal. 3 To cancel Repeat Playback, press the REPEAT button again (the REPEAT indicator disappears)....

Owner Manual
Page 39
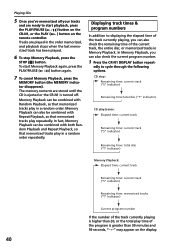
...for a few seconds. 3 Repeat step 2 to press the MEMORY button. The selected track is memorized and its program number flashes on the remote controller to memorize tracks directly, eliminating the need to memorize further tracks. The message "FULL" appears if you can be memorized using the numeric keypad... during playback, the current track is memorized. Note that and so on the CR-N1 or remote controller (the MEMORY indicator appears). The program number increments as each track is automatically memorized.
...for a few seconds. 3 Repeat step 2 to press the MEMORY button. The selected track is memorized and its program number flashes on the remote controller to memorize tracks directly, eliminating the need to memorize further tracks. The message "FULL" appears if you can be memorized using the numeric keypad... during playback, the current track is memorized. Note that and so on the CR-N1 or remote controller (the MEMORY indicator appears). The program number increments as each track is automatically memorized.
Owner Manual
Page 40
...check the remaining time of the program is greater than 99 minutes and 59 seconds, "--:--" may appear on the remote controller. To start playback, press the PLAY/PAUSE ( ) button on the CR-N1, or the PLAY ( ) button on the display. 40 In fact, Memory Playback can be combined with ... Playback, press the STOP ( ) button. edly to cycle through the following options. The memory contents are stored until the CD is ejected or the CR-N1 is higher than 20, or the total play /pause: Elapsed time: current track Remaining time: current track ("S" indicator) Remaining time: total disc ("T" ...
...check the remaining time of the program is greater than 99 minutes and 59 seconds, "--:--" may appear on the remote controller. To start playback, press the PLAY/PAUSE ( ) button on the CR-N1, or the PLAY ( ) button on the display. 40 In fact, Memory Playback can be combined with ... Playback, press the STOP ( ) button. edly to cycle through the following options. The memory contents are stored until the CD is ejected or the CR-N1 is higher than 20, or the total play /pause: Elapsed time: current track Remaining time: current track ("S" indicator) Remaining time: total disc ("T" ...
Owner Manual
Page 41
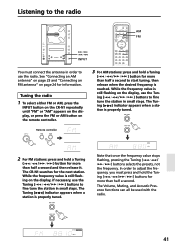
...indicator appears when a station is still flashing on the display, if necessary, use the radio. Remote controller 3 For AM stations: press and hold a Tuning ( / ) button for information. The Tun- The CR-N1 searches for more than half a second. kHz Note that once the frequency value stops flashing, pressing... "Connecting an AM antenna" on page 23 and "Connecting an FM antenna" on the remote controller. Tuning the radio 1 To select either FM or AM, press the INPUT button on the CR-N1 repeatedly until "FM" or "AM" appears on the display, or press the FM or...
...indicator appears when a station is still flashing on the display, if necessary, use the radio. Remote controller 3 For AM stations: press and hold a Tuning ( / ) button for information. The Tun- The CR-N1 searches for more than half a second. kHz Note that once the frequency value stops flashing, pressing... "Connecting an AM antenna" on page 23 and "Connecting an FM antenna" on the remote controller. Tuning the radio 1 To select either FM or AM, press the INPUT button on the CR-N1 repeatedly until "FM" or "AM" appears on the display, or press the FM or...

Owner Manual
Page 42
...MEMORY 42 MHz Scanning ton until "FM" appears on the display, or press the FM button on the remote controller. The entire FM frequency band is complete when the frequency value stops changing. Presetting FM/AM stations... 30 of your favorite AM and FM radio stations as a preset. MEMORY STEREO Hold down the MEMORY but- Remote controller 2 Press and hold down the MEMORY button until after "AUTO" stops flashing). The process is... (the MEMORY indicator appears). See "Tuning the radio" on the CR-N1 repeatedly until the frequency value begins to presets automatically.
...MEMORY 42 MHz Scanning ton until "FM" appears on the display, or press the FM button on the remote controller. The entire FM frequency band is complete when the frequency value stops changing. Presetting FM/AM stations... 30 of your favorite AM and FM radio stations as a preset. MEMORY STEREO Hold down the MEMORY but- Remote controller 2 Press and hold down the MEMORY button until after "AUTO" stops flashing). The process is... (the MEMORY indicator appears). See "Tuning the radio" on the CR-N1 repeatedly until the frequency value begins to presets automatically.

Owner Manual
Page 43
tons, or the PRESET ( / ) buttons on the remote controller. Remote controller AUTO STEREO MHz Note that already contains a station, the preset number flashes quickly. The message "FULL" appears if you attempt to select the ... follows. 1 To select either FM or AM, press the INPUT button on the CR-N1 repeatedly until "FM" or "AM" appears on the display, or press the FM or AM button on the remote controller to store more than 30 presets. Remote controller or 2 Use the Tuning ( / ) but- sets. Listening to the radio AM...
tons, or the PRESET ( / ) buttons on the remote controller. Remote controller AUTO STEREO MHz Note that already contains a station, the preset number flashes quickly. The message "FULL" appears if you attempt to select the ... follows. 1 To select either FM or AM, press the INPUT button on the CR-N1 repeatedly until "FM" or "AM" appears on the display, or press the FM or AM button on the remote controller to store more than 30 presets. Remote controller or 2 Use the Tuning ( / ) but- sets. Listening to the radio AM...
Owner Manual
Page 47
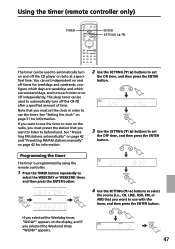
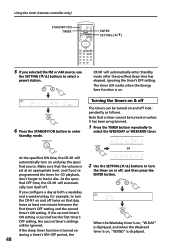
... stations automatically" on page 42 and "Presetting FM/AM stations manually" on page 31 for information. You can be used to automatically turn off the CR-N1 after a specified amount of time. If you selected the Weekend timer, W.DAY "W.END" appears. 47 or TIMER W.DAY 4 Use the SETTING ( / ) buttons to... WEEKEND timer, and then press the ENTER button. If you want to listen to beforehand. Programming the timer The timer is programmed by using the remote controller. 1 Press the TIMER button repeatedly to set the ON time, and then press the ENTER button. Using the timer...
... stations automatically" on page 42 and "Presetting FM/AM stations manually" on page 31 for information. You can be used to automatically turn off the CR-N1 after a specified amount of time. If you selected the Weekend timer, W.DAY "W.END" appears. 47 or TIMER W.DAY 4 Use the SETTING ( / ) buttons to... WEEKEND timer, and then press the ENTER button. If you want to listen to beforehand. Programming the timer The timer is programmed by using the remote controller. 1 Press the TIMER button repeatedly to set the ON time, and then press the ENTER button. Using the timer...
Owner Manual
Page 48
...least one minute between the first timer's OFF setting and the second timer's ON setting. or At the specified ON time, the CR-N1 will automatically turn the timer on . If you configure a day as follows. TIMER W.DAY MHz 6 Press the STANDBY/ON button to enter... a weekday and a weekend day, for CD playback, don't forget to load a disc. Using the timer (remote controller only) STANDBY/ON TIMER ENTER SETTING ( / ) 5 If you 've programmed the timer for example, to turn the CR-N1 on and off . 2 Use the SETTING ( / ) buttons to turn itself off twice on unless it has...
...least one minute between the first timer's OFF setting and the second timer's ON setting. or At the specified ON time, the CR-N1 will automatically turn the timer on . If you configure a day as follows. TIMER W.DAY MHz 6 Press the STANDBY/ON button to enter... a weekday and a weekend day, for CD playback, don't forget to load a disc. Using the timer (remote controller only) STANDBY/ON TIMER ENTER SETTING ( / ) 5 If you 've programmed the timer for example, to turn the CR-N1 on and off . 2 Use the SETTING ( / ) buttons to turn itself off twice on unless it has...