
Owner Manual
Page 1
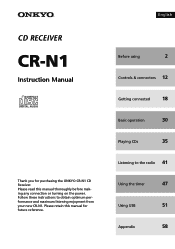
Please retain this manual thoroughly before making any connection or turning on the power. English Before using 2 Controls & connectors 12 Getting connected 18 Basic operation 30 Playing CDs 35 Listening to obtain optimum performance and maximum listening enjoyment from your new CR-N1. Follow these instructions to the radio 41 Using the timer 47 Using USB 51 Appendix 58 Please read this manual for purchasing the ONKYO CR-N1 CD Receiver. CD RECEIVER CR-N1 Instruction Manual Thank you for future reference.
Please retain this manual thoroughly before making any connection or turning on the power. English Before using 2 Controls & connectors 12 Getting connected 18 Basic operation 30 Playing CDs 35 Listening to obtain optimum performance and maximum listening enjoyment from your new CR-N1. Follow these instructions to the radio 41 Using the timer 47 Using USB 51 Appendix 58 Please read this manual for purchasing the ONKYO CR-N1 CD Receiver. CD RECEIVER CR-N1 Instruction Manual Thank you for future reference.
Owner Manual
Page 5
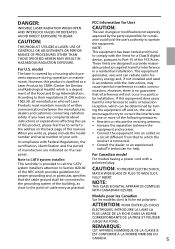
... ÉLECTRIQUES, INTRODUIRE LA LAME LA PLUS LARGE DE LA FICHE DANS LA BORNE CORRESPONDANTE DE LA PRISE ET POUSSER JUSQU'AU FOND. If this manual. In compliance with a polarized plug: CAUTION: TO PREVENT ELECTRIC SHOCK, MATCH WIDE BLADE OF PLUG TO WIDE SLOT, FULLY INSERT. CAUTION: THIS PRODUCT UTILIZES A LASER...
... ÉLECTRIQUES, INTRODUIRE LA LAME LA PLUS LARGE DE LA FICHE DANS LA BORNE CORRESPONDANTE DE LA PRISE ET POUSSER JUSQU'AU FOND. If this manual. In compliance with a polarized plug: CAUTION: TO PREVENT ELECTRIC SHOCK, MATCH WIDE BLADE OF PLUG TO WIDE SLOT, FULLY INSERT. CAUTION: THIS PRODUCT UTILIZES A LASER...
Owner Manual
Page 6
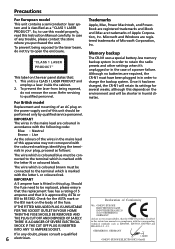
... coloured red. If in order to open the enclosure. Declaration of Conformity We, ONKYO EUROPE ELECTRONICS GmbH INDUSTRIESTRASSE 20 82110 GERMERING, GERMANY declare in own responsibility, that the ONKYO product described in your plug, proceed as follows: The wire which is marked with...identifying the terminals in this Instruction Manual carefully. GERMERING, GERMANY I. Precautions For European model This unit contains a semiconductor laser system and is classified as EN60065, EN55013, EN55020 and EN61000-3-2, -3-3. In case of the fuse. The CR-N1 uses a special battery-less memory...
... coloured red. If in order to open the enclosure. Declaration of Conformity We, ONKYO EUROPE ELECTRONICS GmbH INDUSTRIESTRASSE 20 82110 GERMERING, GERMANY declare in own responsibility, that the ONKYO product described in your plug, proceed as follows: The wire which is marked with...identifying the terminals in this Instruction Manual carefully. GERMERING, GERMANY I. Precautions For European model This unit contains a semiconductor laser system and is classified as EN60065, EN55013, EN55020 and EN61000-3-2, -3-3. In case of the fuse. The CR-N1 uses a special battery-less memory...
Owner Manual
Page 11
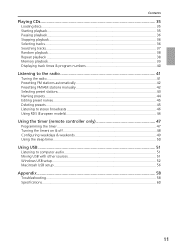
......39 Displaying track times & program numbers 40 Listening to the radio 41 Tuning the radio...41 Presetting FM stations automatically 42 Presetting FM/AM stations manually 42 Selecting preset stations 43 Naming presets ...44 Editing preset names ...45 Deleting presets ...45 Listening to stereo broadcasts 46 Using RDS (European models 46...
......39 Displaying track times & program numbers 40 Listening to the radio 41 Tuning the radio...41 Presetting FM stations automatically 42 Presetting FM/AM stations manually 42 Selecting preset stations 43 Naming presets ...44 Editing preset names ...45 Deleting presets ...45 Listening to stereo broadcasts 46 Using RDS (European models 46...
Owner Manual
Page 23
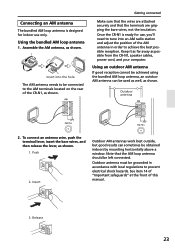
...radio station and adjust the position of the AM antenna in accordance with local regulations to the AM terminals located on the rear of this manual. 3. Getting connected Make sure that the wires are gripping the bare wires, not the insulation. To connect an antenna wire, push the...work best outside, but good results can be obtained indoors by mounting horizontally above a window. Outdoor antenna must be left connected. Once the CR-N1 is designed for use only. Assemble the AM antenna, as shown. Note that the terminals are attached securely and that the AM loop antenna...
...radio station and adjust the position of the AM antenna in accordance with local regulations to the AM terminals located on the rear of this manual. 3. Getting connected Make sure that the wires are gripping the bare wires, not the insulation. To connect an antenna wire, push the...work best outside, but good results can be obtained indoors by mounting horizontally above a window. Outdoor antenna must be left connected. Once the CR-N1 is designed for use only. Assemble the AM antenna, as shown. Note that the terminals are attached securely and that the AM loop antenna...

Owner Manual
Page 24
...into an FM radio station and adjust the position of the FM antenna in order to fix the antenna into the FM terminal, as this manual. Using a TV antenna It's best not to prevent electrical shock hazards. U.S. Use thumbtacks (drawing pins) or something similar to achieve the best ...possible reception. 2. Outdoor FM antennas work best outside, but good results can be used instead, as shown. Other models Once the CR-N1 is designed for indoor use only. Using the bundled FM antenna 1. Outdoor antenna should be grounded in an attic or loft. Outdoor antenna ...
...into an FM radio station and adjust the position of the FM antenna in order to fix the antenna into the FM terminal, as this manual. Using a TV antenna It's best not to prevent electrical shock hazards. U.S. Use thumbtacks (drawing pins) or something similar to achieve the best ...possible reception. 2. Outdoor FM antennas work best outside, but good results can be used instead, as shown. Other models Once the CR-N1 is designed for indoor use only. Using the bundled FM antenna 1. Outdoor antenna should be grounded in an attic or loft. Outdoor antenna ...
Owner Manual
Page 26
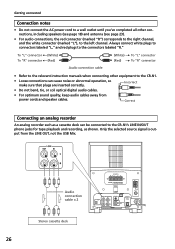
... not connect the AC power cord to a wall outlet until you've completed all other equipment to the CR-N1. • Loose connections can be connected to the CR-N1's LINE IN/OUT phono jacks for tape playback and recording, as a cassette deck can cause noise or ... connector (White) To "R" connector (Red) Audio connection cable (White) (Red) To "L" connector To "R" connector • Refer to the relevant instruction manuals when connecting other connections, including speakers (see page 18) and antenna (see page 23). • For audio connections, the red connector (marked "R") corresponds...
... not connect the AC power cord to a wall outlet until you've completed all other equipment to the CR-N1. • Loose connections can be connected to the CR-N1's LINE IN/OUT phono jacks for tape playback and recording, as a cassette deck can cause noise or ... connector (White) To "R" connector (Red) Audio connection cable (White) (Red) To "L" connector To "R" connector • Refer to the relevant instruction manuals when connecting other connections, including speakers (see page 18) and antenna (see page 23). • For audio connections, the red connector (marked "R") corresponds...

Owner Manual
Page 42
...2 Press the MEMORY button (the MEMORY indicator appears and "- -" flashes). Note that you must hold down the MEMORY but- Presetting FM/AM stations manually You can store up to 30 stations are assigned to change (the MEMORY indicator appears). Note that you want to store as presets. 1 Tune into... the station that previously stored presets will be overwritten by this function. 1 Select FM by pressing the INPUT button on the CR-N1 repeatedly until "FM" appears on the display, or press the FM button on page 41 for all receivable FM stations and assigns them to presets...
...2 Press the MEMORY button (the MEMORY indicator appears and "- -" flashes). Note that you must hold down the MEMORY but- Presetting FM/AM stations manually You can store up to 30 stations are assigned to change (the MEMORY indicator appears). Note that you want to store as presets. 1 Tune into... the station that previously stored presets will be overwritten by this function. 1 Select FM by pressing the INPUT button on the CR-N1 repeatedly until "FM" appears on the display, or press the FM button on page 41 for all receivable FM stations and assigns them to presets...
Owner Manual
Page 47
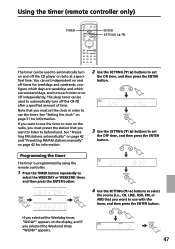
... TIMER button repeatedly to use with the timer, and then press the ENTER button. The sleep timer can be used to automatically turn off the CR-N1 after a specified amount of time. If you want to use the timer to turn on the radio, you must set the OFF time..., and then press the ENTER button. See "Presetting FM stations automatically" on page 42 and "Presetting FM/AM stations manually" on page 42 for information. 2 Use the SETTING ( / ) buttons to set independent on and off times for information. If you selected the Weekday timer, "W.DAY...
... TIMER button repeatedly to use with the timer, and then press the ENTER button. The sleep timer can be used to automatically turn off the CR-N1 after a specified amount of time. If you want to use the timer to turn on the radio, you must set the OFF time..., and then press the ENTER button. See "Presetting FM stations automatically" on page 42 and "Presetting FM/AM stations manually" on page 42 for information. 2 Use the SETTING ( / ) buttons to set independent on and off times for information. If you selected the Weekday timer, "W.DAY...

Owner Manual
Page 52
... goes out and the SOURCE DIRECT indicator lights up). Checking your PC's USB ports Before connecting the CR-N1, it 's recommended that support high-speed transmission. Using USB 4 To turn down the CR-N1 volume beforehand. The USB Mix can be connected or disconnected even while your PC is on your PC... "View devices by type" button. 3 Click the plus box next to correct this, see several USB devices listed, as shown here. See your computer manual or consult your dealer to that the USB device is output from the LINE OUT. Under "Universal Serial Bus controllers," you see on . A letter X,...
... goes out and the SOURCE DIRECT indicator lights up). Checking your PC's USB ports Before connecting the CR-N1, it 's recommended that support high-speed transmission. Using USB 4 To turn down the CR-N1 volume beforehand. The USB Mix can be connected or disconnected even while your PC is on your PC... "View devices by type" button. 3 Click the plus box next to correct this, see several USB devices listed, as shown here. See your computer manual or consult your dealer to that the USB device is output from the LINE OUT. Under "Universal Serial Bus controllers," you see on . A letter X,...

Owner Manual
Page 56
...and screen shots are provided where differences exist between the CR-N1 and Macintosh. Connecting the CR-N1 1 Turn on a third-party PCI interface card)....down the CR-N1 volume beforehand. USB indicator 56 The CR-N1's USB indicator lights up. Using USB Macintosh USB setup The CR-N1 USB interface ...disconnected even while your Macintosh is recognized After connecting the CR-N1, you should verify that it 's recommended that shown here...by your Macintosh. 1 Choose Apple System Profiler from the CR-N1 to ensure that "Burr-Brown Japan PCM2702" is connected correctly between operating...
...and screen shots are provided where differences exist between the CR-N1 and Macintosh. Connecting the CR-N1 1 Turn on a third-party PCI interface card)....down the CR-N1 volume beforehand. USB indicator 56 The CR-N1's USB indicator lights up. Using USB Macintosh USB setup The CR-N1 USB interface ...disconnected even while your Macintosh is recognized After connecting the CR-N1, you should verify that it 's recommended that shown here...by your Macintosh. 1 Choose Apple System Profiler from the CR-N1 to ensure that "Burr-Brown Japan PCM2702" is connected correctly between operating...