
User Manual English
Page 2
... rear edge of time. 14. Clean only with the manufacturer's instructions. 8. Install in accordance with dry cloth. 7. A grounding type plug has two blades and a third grounding prong. Protect the power cord from the apparatus. 11. Damage Requiring Service Unplug the apparatus from tip-over. If the apparatus does not operate normally by the manufacturer. 12. Batteries Always consider the environmental...
... rear edge of time. 14. Clean only with the manufacturer's instructions. 8. Install in accordance with dry cloth. 7. A grounding type plug has two blades and a third grounding prong. Protect the power cord from the apparatus. 11. Damage Requiring Service Unplug the apparatus from tip-over. If the apparatus does not operate normally by the manufacturer. 12. Batteries Always consider the environmental...
User Manual English
Page 3
... discs and certain parts inside the unit is in a humid place. • Do not use only, recording copyrighted material is hitting the unit. - Make sure that the ONKYO product described in this instruction manual is not userserviceable. Installing this Unit • Install this unit in a well-ventilated location. • Ensure that the voltage in an audio rack. Never put the unit on , or cold air from the AC power...
... discs and certain parts inside the unit is in a humid place. • Do not use only, recording copyrighted material is hitting the unit. - Make sure that the ONKYO product described in this instruction manual is not userserviceable. Installing this Unit • Install this unit in a well-ventilated location. • Ensure that the voltage in an audio rack. Never put the unit on , or cold air from the AC power...
User Manual English
Page 7
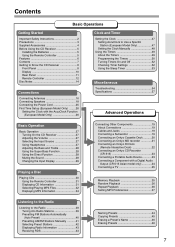
... 4 Before Using the CD Receiver 5 Installing the Batteries 5 Using the Remote Controller 5 Features 6 Contents 7 Getting to Know the CD Receiver 8 Front Panel 8 Display 10 Rear Panel 11 Remote Controller 12 Disc Notes 14 Connections Connecting Antennas 16 Connecting Speakers 18 Connecting the Power Cord 25 First Time Setup (European Model Only) ........ 26 Setting the Clock with the AccuClock Function (European Model Only 26 Clock and Timer Setting the Clock 47 Setting AccuClock to Use a Specific Station (European Model Only 47 Setting the Clock Manually 48 Using the Timers...
... 4 Before Using the CD Receiver 5 Installing the Batteries 5 Using the Remote Controller 5 Features 6 Contents 7 Getting to Know the CD Receiver 8 Front Panel 8 Display 10 Rear Panel 11 Remote Controller 12 Disc Notes 14 Connections Connecting Antennas 16 Connecting Speakers 18 Connecting the Power Cord 25 First Time Setup (European Model Only) ........ 26 Setting the Clock with the AccuClock Function (European Model Only 26 Clock and Timer Setting the Clock 47 Setting AccuClock to Use a Specific Station (European Model Only 47 Setting the Clock Manually 48 Using the Timers...
User Manual English
Page 9
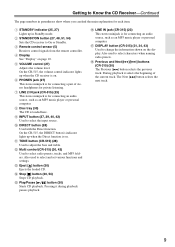
... audio source, such as an MP3 music player or personal computer. F PHONES jack (27) This stereo minijack is for each item. G LINE 2 IN jack (CR-515) (23) This stereo minijack is for connecting a pair of the current track. During playback it during playback pauses playback. E VOLUME control (27) Adjusts the volume level. Also used to select and set various functions and settings. Getting to adjust the bass and treble. A STANDBY indicator (25, 27) Lights up when the Direct function is on . D Display...
... audio source, such as an MP3 music player or personal computer. F PHONES jack (27) This stereo minijack is for each item. G LINE 2 IN jack (CR-515) (23) This stereo minijack is for connecting a pair of the current track. During playback it during playback pauses playback. E VOLUME control (27) Adjusts the volume level. Also used to select and set various functions and settings. Getting to adjust the bass and treble. A STANDBY indicator (25, 27) Lights up when the Direct function is on . D Display...
User Manual English
Page 10
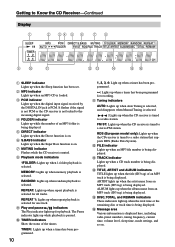
... A SLEEP indicator Lights up when the Direct function is selected for one track. Getting to a radio station. E DIRECT indicator Lights up when the Sleep function has been set. REPEAT: Lights up when repeat playback is paused. REPEAT 1: Lights up when repeat playback is on. The Pause indicator lights up when an MP3 file number is displayed here, including radio preset numbers, tuning frequency, current time, volume level, sleep time, mode settings, and so on . L FILE indicator Lights up while playback is selected...
... A SLEEP indicator Lights up when the Direct function is selected for one track. Getting to a radio station. E DIRECT indicator Lights up when the Sleep function has been set. REPEAT: Lights up when repeat playback is paused. REPEAT 1: Lights up when repeat playback is on. The Pause indicator lights up when an MP3 file number is displayed here, including radio preset numbers, tuning frequency, current time, volume level, sleep time, mode settings, and so on . L FILE indicator Lights up while playback is selected...
User Manual English
Page 11
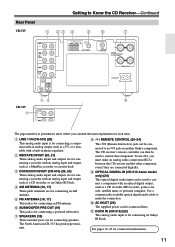
... Onkyo RI Dock. H REMOTE CONTROL (20-24) This (Remote Interactive) jack can be used to control that component. I OPTICAL DIGITAL IN (CR-515 Asian model only) (24) This optical digital audio input can be used to connect a component with an optical digital output, such as a TV, or a turntable with an analog output, such as a CD recorder, MD recorder, games console, satellite tuner, or personal computer. K DOCK IN (CR-315) (22) This analog audio input is for connecting a recorder...
... Onkyo RI Dock. H REMOTE CONTROL (20-24) This (Remote Interactive) jack can be used to control that component. I OPTICAL DIGITAL IN (CR-515 Asian model only) (24) This optical digital audio input can be used to connect a component with an optical digital output, such as a TV, or a turntable with an analog output, such as a CD recorder, MD recorder, games console, satellite tuner, or personal computer. K DOCK IN (CR-315) (22) This analog audio input is for connecting a recorder...
User Manual English
Page 13
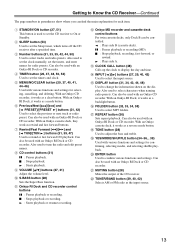
..., which turns off the CD receiver after a specified time. With an Onkyo RI Dock, it works as a mode button. I VOLUME [ / ] buttons (27, 31) Adjust the volume level. N INPUT [ ]/[ ] buttons (27, 29, 40, 42) Used to confirm various functions and settings. T ENTER button Used to select the input source. Can also be used with an Onkyo RI Dock or CD recorder. Also used to tune the radio and edit preset names. M CLOCK CALL button (48...
..., which turns off the CD receiver after a specified time. With an Onkyo RI Dock, it works as a mode button. I VOLUME [ / ] buttons (27, 31) Adjust the volume level. N INPUT [ ]/[ ] buttons (27, 29, 40, 42) Used to confirm various functions and settings. T ENTER button Used to select the input source. Can also be used with an Onkyo RI Dock or CD recorder. Also used to tune the radio and edit preset names. M CLOCK CALL button (48...
User Manual English
Page 16
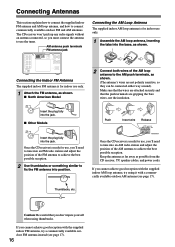
... possible from the CD receiver, TV, speaker cables, and power cords. If you 'll need to tune into the jack. The CD receiver won't pick up any radio signals without an antenna connected, so you must connect the antenna to use , you cannot achieve good reception with the supplied indoor AM loop antenna, try using thumbtacks. Insert the plug fully into the jack. ■ Other Models Push Insert wire Release...
... possible from the CD receiver, TV, speaker cables, and power cords. If you 'll need to tune into the jack. The CD receiver won't pick up any radio signals without an antenna connected, so you must connect the antenna to use , you cannot achieve good reception with the supplied indoor AM loop antenna, try using thumbtacks. Insert the plug fully into the jack. ■ Other Models Push Insert wire Release...
User Manual English
Page 19
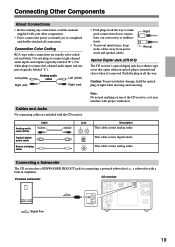
... on top of the CD receiver, as it 's removed. Analog audio cable (RCA) Optical digital audio cable Stereo miniplug cable Cable Jack R L Description This cable carries analog audio. This cable carries analog audio. Use white plugs to make good connections (loose connections can cause noise or malfunctions). • To prevent interference, keep audio cables away from power cords and speaker cables. Connection Color Coding RCA-type audio connections are included with a built-in all connections. Push the plug in amplifier...
... on top of the CD receiver, as it 's removed. Analog audio cable (RCA) Optical digital audio cable Stereo miniplug cable Cable Jack R L Description This cable carries analog audio. This cable carries analog audio. Use white plugs to make good connections (loose connections can cause noise or malfunctions). • To prevent interference, keep audio cables away from power cords and speaker cables. Connection Color Coding RCA-type audio connections are included with a built-in all connections. Push the plug in amplifier...
User Manual English
Page 23
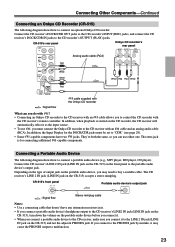
... have two jacks. CR-515's rear panel LINE 1 IN OUT MD/ TAPE IN Red Analog audio cable (RCA) Onkyo CD recorder's rear panel INPUT OUTPUT (REC) (PLAY) L REMOTE CONTROL R OUT DOCK/ CDR IN R White White L Red White Red Red White : Signal flow cable supplied with the Onkyo CD recorder What can use , you to control the CD recorder with an cable and an analog audio cable (RCA). In addition, the Input Display for connecting additional -capable...
... have two jacks. CR-515's rear panel LINE 1 IN OUT MD/ TAPE IN Red Analog audio cable (RCA) Onkyo CD recorder's rear panel INPUT OUTPUT (REC) (PLAY) L REMOTE CONTROL R OUT DOCK/ CDR IN R White White L Red White Red Red White : Signal flow cable supplied with the Onkyo CD recorder What can use , you to control the CD recorder with an cable and an analog audio cable (RCA). In addition, the Input Display for connecting additional -capable...
User Manual English
Page 26
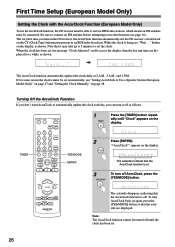
... connect an FM antenna before attempting to use the AccuClock function, the CD receiver must be able to receive RDS radio stations, which means an FM antenna must be turned off until "Clock" appears on the display. While the clock is being set, "Wait ..." flashes on page 48. TIMER 26 2 YES/MODE ENTER 3 Press [ENTER]. The asterisks disappear, indicating that the AccuClock function is off. First Time Setup...
... connect an FM antenna before attempting to use the AccuClock function, the CD receiver must be able to receive RDS radio stations, which means an FM antenna must be turned off until "Clock" appears on the display. While the clock is being set, "Wait ..." flashes on page 48. TIMER 26 2 YES/MODE ENTER 3 Press [ENTER]. The asterisks disappear, indicating that the AccuClock function is off. First Time Setup...
User Manual English
Page 27
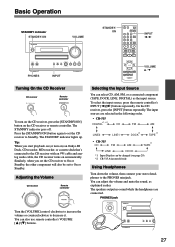
... the CD receiver, press the [INPUT] button repeatedly. PHONES jack Turn the [VOLUME] control clockwise to increase the volume or counterclockwise to the PHONES minijack. Basic Operation STANDBY indicator STANDBY/ON VOLUME STANDBY/ ON INPUT / PHONES INPUT VOLUME / Turning On the CD Receiver CD receiver Remote controller To turn on) an Onkyo RI Dock, CD recorder, MD recorder, or cassette deck that's connected to Standby. The speakers output no sound while the headphones are selected in the following order. • CR-515 DIGITAL*1, *2 CD FM...
... the CD receiver, press the [INPUT] button repeatedly. PHONES jack Turn the [VOLUME] control clockwise to increase the volume or counterclockwise to the PHONES minijack. Basic Operation STANDBY indicator STANDBY/ON VOLUME STANDBY/ ON INPUT / PHONES INPUT VOLUME / Turning On the CD Receiver CD receiver Remote controller To turn on) an Onkyo RI Dock, CD recorder, MD recorder, or cassette deck that's connected to Standby. The speakers output no sound while the headphones are selected in the following order. • CR-515 DIGITAL*1, *2 CD FM...
User Manual English
Page 28
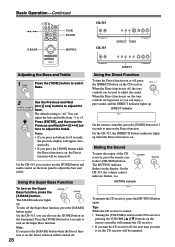
... buttons for 8 seconds, the previous display will be turned off , press the [DIRECT] button on or off . DIRECT indicator On the remote controller, press the [TONE] button for 3 seconds to +3. On the CR-515, the [DIRECT] button's indicator lights up when the Direct function is on, the Direct function will appear auto- Using the Super Bass Function To turn on the Super Bass function, press the [S.BASS] button. You can enjoy a pure sound, and the DIRECT indicator lights up . Basic Operation...
... buttons for 8 seconds, the previous display will be turned off , press the [DIRECT] button on or off . DIRECT indicator On the remote controller, press the [TONE] button for 3 seconds to +3. On the CR-515, the [DIRECT] button's indicator lights up when the Direct function is on, the Direct function will appear auto- Using the Super Bass Function To turn on the Super Bass function, press the [S.BASS] button. You can enjoy a pure sound, and the DIRECT indicator lights up . Basic Operation...
User Manual English
Page 31
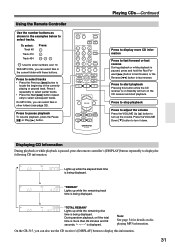
Using the Remote Controller Use the number buttons as shown in other folders (see page 32). Press it down. Displaying CD Information During playback or while playback is paused, press the remote controller's [DISPLAY] button repeatedly to pause playback To resume playback, press the Pause [ ] or Play [ ] button. "TOTAL REMAIN" Lights up while the elapsed track time is being displayed. Note: See page 34 for details on the CD receiver and start playback Pressing this information...
Using the Remote Controller Use the number buttons as shown in other folders (see page 32). Press it down. Displaying CD Information During playback or while playback is paused, press the remote controller's [DISPLAY] button repeatedly to pause playback To resume playback, press the Pause [ ] or Play [ ] button. "TOTAL REMAIN" Lights up while the elapsed track time is being displayed. Note: See page 34 for details on the CD receiver and start playback Pressing this information...
User Manual English
Page 45
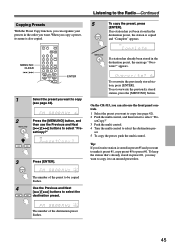
... the multi control, and then turn it to an unused preset first. To not overwrite the previously stored station, press the [MENU/NO] button. Tip: If you favorite station is copied and "Complete" appears. On the CR-515, you can organize your presets in the destination preset, the message "Overwrite?" set. 5 To copy the preset, push the multi control. appears. Copying Presets With the Preset Copy function, you can also use the...
... the multi control, and then turn it to an unused preset first. To not overwrite the previously stored station, press the [MENU/NO] button. Tip: If you favorite station is copied and "Complete" appears. On the CR-515, you can organize your presets in the destination preset, the message "Overwrite?" set. 5 To copy the preset, push the multi control. appears. Copying Presets With the Preset Copy function, you can also use the...
User Manual English
Page 47
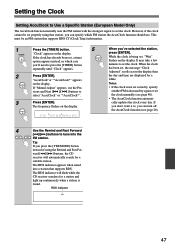
... or set , the message "Clock Adjusted" scrolls across the display, then 2 Press [ENTER]. cally updates the clock every day. RDS indicator 47 Notes: If "Manual Adjust" appears, use . has been set select "AccuClock" or "*AccuClock*". the clock manually (see page 26). 4 Use the Rewind and Fast Forward [ ]/[ ] buttons to tune into a station that supports RDS CT (Clock Time) information. 1 Press the [TIMER] button. The frequency flashes on the display. When the clock repeatedly until "Clock...
... or set , the message "Clock Adjusted" scrolls across the display, then 2 Press [ENTER]. cally updates the clock every day. RDS indicator 47 Notes: If "Manual Adjust" appears, use . has been set select "AccuClock" or "*AccuClock*". the clock manually (see page 26). 4 Use the Rewind and Fast Forward [ ]/[ ] buttons to tune into a station that supports RDS CT (Clock Time) information. 1 Press the [TIMER] button. The frequency flashes on the display. When the clock repeatedly until "Clock...
User Manual English
Page 49
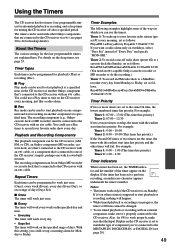
... IN, or DIGITAL IN (see page 29). 49 Using the Timers The CD receiver has five timers: four programmable timers for automated playback or recording, and a sleep timer for playback (Play) or recording (Rec). ■ Play Play mode can be used to start playback at a specified time. Timer Types Each timer can be an Onkyo MD recorder or cassette deck that are connected to the CD receiver via (see...
... IN, or DIGITAL IN (see page 29). 49 Using the Timers The CD receiver has five timers: four programmable timers for automated playback or recording, and a sleep timer for playback (Play) or recording (Rec). ■ Play Play mode can be used to start playback at a specified time. Timer Types Each timer can be an Onkyo MD recorder or cassette deck that are connected to the CD receiver via (see...
User Manual English
Page 54
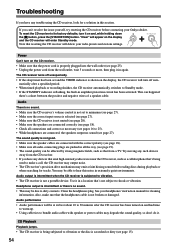
... display, the CD receiver will delete your radio presets and custom settings. Also, make a call, the CD receiver may output noise. • The CD receiver's precision drive mechanism may be at its factory defaults, turn off auto- Headphone output is intermittent or there's no sound. • Make sure the CD receiver's volume control is not set and the TIMER indicator is not broken or damaged. CD Playback Playback jumps. • The CD receiver is being used...
... display, the CD receiver will delete your radio presets and custom settings. Also, make a call, the CD receiver may output noise. • The CD receiver's precision drive mechanism may be at its factory defaults, turn off auto- Headphone output is intermittent or there's no sound. • Make sure the CD receiver's volume control is not set and the TIMER indicator is not broken or damaged. CD Playback Playback jumps. • The CD receiver is being used...
User Manual English
Page 55
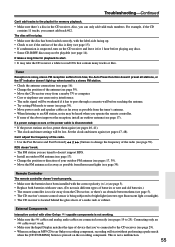
Tuner Reception is noisy, stereo FM reception suffers from hiss, the Auto Preset function doesn't preset all stations, or the ST indicator doesn't light up . • Check to see if the surface of the disc is dirty (see page 15). • If condensation is suspected, turn on the recording component. Remote Controller The remote controller doesn't work properly. • Make sure the batteries have been installed with the correct polarity (+/-) (see...
Tuner Reception is noisy, stereo FM reception suffers from hiss, the Auto Preset function doesn't preset all stations, or the ST indicator doesn't light up . • Check to see if the surface of the disc is dirty (see page 15). • If condensation is suspected, turn on the recording component. Remote Controller The remote controller doesn't work properly. • Make sure the batteries have been installed with the correct polarity (+/-) (see...
User Manual English
Page 56
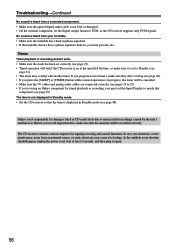
... unsuccessful recordings caused by the unit's malfunction. Timers Timer playback or recording doesn't work. • Make sure the clock has been set correctly (see page 29). Before you must set to 25). • If you're using an Onkyo component for signal processing and control functions. Troubleshooting-Continued No sound is heard from a connected component. • Make sure the optical digital audio cable is on at least 5 seconds, and then plug it...
... unsuccessful recordings caused by the unit's malfunction. Timers Timer playback or recording doesn't work. • Make sure the clock has been set correctly (see page 29). Before you must set to 25). • If you're using an Onkyo component for signal processing and control functions. Troubleshooting-Continued No sound is heard from a connected component. • Make sure the optical digital audio cable is on at least 5 seconds, and then plug it...