
Owner Manual
Page 3
... next time you plug in your Onkyo dealer. 6. If condensation does occur, remove all discs and turn off the power. 7. Region Numbers-The DVD standard uses region numbers to the correct voltage for details. 9. If you 've finished using this unit when there's the possibility of use this unit, remove all discs and leave this unit or its rear panel (e.g., 1 ). 3 Never Touch this Unit with power systems around...
... next time you plug in your Onkyo dealer. 6. If condensation does occur, remove all discs and turn off the power. 7. Region Numbers-The DVD standard uses region numbers to the correct voltage for details. 9. If you 've finished using this unit when there's the possibility of use this unit, remove all discs and leave this unit or its rear panel (e.g., 1 ). 3 Never Touch this Unit with power systems around...
Owner Manual
Page 4
... correct the interference by turning the equipment off and on, the user is connected. • Consult the dealer or an experienced radio/TV techni- ferent from being exposed to the laser beam, do not remove the cover. This unit contains a semiconductor laser system and is applied on the rear panel. 1. For U.S. For models having a power cord with a polarized plug: CAUTION: TO PREVENT...
... correct the interference by turning the equipment off and on, the user is connected. • Consult the dealer or an experienced radio/TV techni- ferent from being exposed to the laser beam, do not remove the cover. This unit contains a semiconductor laser system and is applied on the rear panel. 1. For U.S. For models having a power cord with a polarized plug: CAUTION: TO PREVENT...
Owner Manual
Page 6
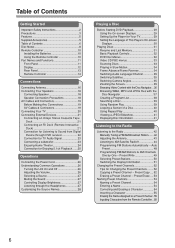
... a Program List 38 Searching a Disc 39 Using Random Play 39 Looping a Section of a Disc 40 Using Repeat Play 40 Viewing a JPEG Slideshow 41 Displaying Disc Information 41 Listening to the Radio Listening to the Radio 42 Manually Tuning a FM/AM Broadcast Station........ 42 Adjusting the Antenna 43 Listening to a Preset Channel . 55 Inputting Characters from Digital Device through DVD receiver 22 Connection for TV Audio Signal 23 Connecting a subwoofer 23 Enjoying Home Theater 24 Connection for Enjoying 5.1ch Playback .......25 Operations Connecting the Power Cord...
... a Program List 38 Searching a Disc 39 Using Random Play 39 Looping a Section of a Disc 40 Using Repeat Play 40 Viewing a JPEG Slideshow 41 Displaying Disc Information 41 Listening to the Radio Listening to the Radio 42 Manually Tuning a FM/AM Broadcast Station........ 42 Adjusting the Antenna 43 Listening to a Preset Channel . 55 Inputting Characters from Digital Device through DVD receiver 22 Connection for TV Audio Signal 23 Connecting a subwoofer 23 Enjoying Home Theater 24 Connection for Enjoying 5.1ch Playback .......25 Operations Connecting the Power Cord...

Owner Manual
Page 7
... (DVD) DVD Audio Settings and Video Adjust menus ..... 69 Video Adjust menu 69 Initial Settings menu 70 Using the Initial Settings menu 70 How to Use Parental Lock 73 Additional information 75 Screen sizes and disc formats 75 Setting the TV system (Not North American model 75 Resetting the DVD player 76 Titles, chapters and tracks 76 DVD-Video regions 76 Selecting languages using the language code list 76 Miscellaneous Input Source Names and Available Buttons on Remote Controller 78 Recording 80 Troubleshooting 81 Specifications...
... (DVD) DVD Audio Settings and Video Adjust menus ..... 69 Video Adjust menu 69 Initial Settings menu 70 Using the Initial Settings menu 70 How to Use Parental Lock 73 Additional information 75 Screen sizes and disc formats 75 Setting the TV system (Not North American model 75 Resetting the DVD player 76 Titles, chapters and tracks 76 DVD-Video regions 76 Selecting languages using the language code list 76 Miscellaneous Input Source Names and Available Buttons on Remote Controller 78 Recording 80 Troubleshooting 81 Specifications...

Owner Manual
Page 13
... for future use , These push terminals are for connecting speakers. See pages 16-25 for connecting an FM antenna. A TAPE/HDD IN/OUT (21, 22) I VIDEO OUT S VIDEO OUT (20) This analog audio input and output are for connecting audio output of external devices such as of them using a commercially available audio optical digital cable. C XM ANTENNA (44) K SUBWOOFER CONTROL This terminal is for connection information. 13 To use with Onkyo subwoofer equipped with an S Video input. (cassette, Mini Disc, etc.).
... for future use , These push terminals are for connecting speakers. See pages 16-25 for connecting an FM antenna. A TAPE/HDD IN/OUT (21, 22) I VIDEO OUT S VIDEO OUT (20) This analog audio input and output are for connecting audio output of external devices such as of them using a commercially available audio optical digital cable. C XM ANTENNA (44) K SUBWOOFER CONTROL This terminal is for connection information. 13 To use with Onkyo subwoofer equipped with an S Video input. (cassette, Mini Disc, etc.).

Owner Manual
Page 14
... Manual tuning mode. W S.BASS button (60) Adjusts the low end bass range. D MODE button (42, 45) This button is used to display the current time. G CH SEL button (60) Selects the speakers. normal dim dimmer J TIMER button (62, 65, 68) Press this button to configure settings for each FM/AM preset channel. N SLEEP button (64) Used to program the Sleep timer, which turns off the power to the unit at minimum volume. O STANDBY/ON button (26, 67) Switches between Stereo Sound...
... Manual tuning mode. W S.BASS button (60) Adjusts the low end bass range. D MODE button (42, 45) This button is used to display the current time. G CH SEL button (60) Selects the speakers. normal dim dimmer J TIMER button (62, 65, 68) Press this button to configure settings for each FM/AM preset channel. N SLEEP button (64) Used to program the Sleep timer, which turns off the power to the unit at minimum volume. O STANDBY/ON button (26, 67) Switches between Stereo Sound...

Owner Manual
Page 15
... a DVD-Video disc or to access the DVD player's onscreen setup menus. 15 I ANGLE button (35) This button is used to select subtitles on DVD-Video discs. J SUBTITLE button (35) This button is used to select camera angles on DVD-Video discs. L ENTER button (29, 32, 70, 73, 74) This button is used to open the Disc Navigator when using the number buttons. O DISPLAY button (41) Each time you use to stop playback. C RANDOM button (39) This button is used to start playback. U DVD SETUP button (29...
... a DVD-Video disc or to access the DVD player's onscreen setup menus. 15 I ANGLE button (35) This button is used to select subtitles on DVD-Video discs. J SUBTITLE button (35) This button is used to select camera angles on DVD-Video discs. L ENTER button (29, 32, 70, 73, 74) This button is used to open the Disc Navigator when using the number buttons. O DISPLAY button (41) Each time you use to stop playback. C RANDOM button (39) This button is used to start playback. U DVD SETUP button (29...

Owner Manual
Page 16
... DVD receiver is for use the tuner. FM antenna connector Connecting the Indoor FM Antenna The supplied indoor FM antenna is ready for indoor use , you don't injure yourself when using it with the supplied indoor FM antenna, try using thumbtacks. Once your DVD receiver, TV, speaker cables, and power cords. I Other Models Push Insert wire Release Insert the plug fully into the jack. Connecting Antenna This section explains how to connect the supplied indoor FM antenna and AM loop antenna...
... DVD receiver is for use the tuner. FM antenna connector Connecting the Indoor FM Antenna The supplied indoor FM antenna is ready for indoor use , you don't injure yourself when using it with the supplied indoor FM antenna, try using thumbtacks. Once your DVD receiver, TV, speaker cables, and power cords. I Other Models Push Insert wire Release Insert the plug fully into the jack. Connecting Antenna This section explains how to connect the supplied indoor FM antenna and AM loop antenna...
Owner Manual
Page 21
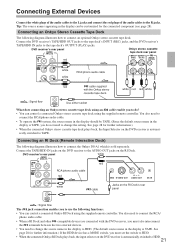
...cable red white cable S VIDEO OUT R ---- DVD receiver's rear panel Onkyo stereo cassette tape deck rear panel red INPUT OUTPUT (REC) (PLAY) REMOTE CONTROL L white RCA/phono audio cable R white red cable supplied with the DVD receiver, you to do not need to change the setting. You also need to connect the RCA/phono audio cable. • To operate the system, the source name in the display should be customized for the connected component (see page 28). Connecting an RI Dock (Remote Interactive Dock) The following diagram illustrates how to TAPE. ically switched...
...cable red white cable S VIDEO OUT R ---- DVD receiver's rear panel Onkyo stereo cassette tape deck rear panel red INPUT OUTPUT (REC) (PLAY) REMOTE CONTROL L white RCA/phono audio cable R white red cable supplied with the DVD receiver, you to do not need to change the setting. You also need to connect the RCA/phono audio cable. • To operate the system, the source name in the display should be customized for the connected component (see page 28). Connecting an RI Dock (Remote Interactive Dock) The following diagram illustrates how to TAPE. ically switched...

Owner Manual
Page 27
... Stereo, Mono, or Direct. 27 The MUTING indicator lights in the display. To PHONES jack MUTING To restore the sound, press MUTING again. The speakers will be restored. Hint: When you press VOLUME +/- Understanding Common Operations-Continued Selecting a Source DVD receiver Remote controller Controlling Display Brightness You can adjust the volume and mute the sound as described above. You can select DVD, FM, AM, or connected external audio/video equipment (HDD, CD-R, TAPE, LINE, DIGITAL) as the audio source...
... Stereo, Mono, or Direct. 27 The MUTING indicator lights in the display. To PHONES jack MUTING To restore the sound, press MUTING again. The speakers will be restored. Hint: When you press VOLUME +/- Understanding Common Operations-Continued Selecting a Source DVD receiver Remote controller Controlling Display Brightness You can adjust the volume and mute the sound as described above. You can select DVD, FM, AM, or connected external audio/video equipment (HDD, CD-R, TAPE, LINE, DIGITAL) as the audio source...

Owner Manual
Page 28
... INPUT / until "Name Select?" TAL. You may press YES/MODE instead of the remote controller buttons you can select TAPE, LINE or DIGI- TV TV Depending on pages 21-23. "Complete" appears in About short source names the display. appears in the display. The short source names appear in the table below. 3 Press MULTI JOG. Ordinary names CD-R Short names CR DIGITAL...
... INPUT / until "Name Select?" TAL. You may press YES/MODE instead of the remote controller buttons you can select TAPE, LINE or DIGI- TV TV Depending on pages 21-23. "Complete" appears in About short source names the display. appears in the display. The short source names appear in the table below. 3 Press MULTI JOG. Ordinary names CD-R Short names CR DIGITAL...

Owner Manual
Page 57
.... You can set a distance using / . Adjust the sound level with VOLUME +/-, if necessary. 2 Switch over to the next speaker in the Standby mode. 7 Press to 30 ft (9.0 m) by pressing "RCV SETUP". Allowable setting range is in 2 seconds, even if you have configured the settings for a subwoofer, the test tone will be output from each speaker to the speakers. You need to the display shown in...
.... You can set a distance using / . Adjust the sound level with VOLUME +/-, if necessary. 2 Switch over to the next speaker in the Standby mode. 7 Press to 30 ft (9.0 m) by pressing "RCV SETUP". Allowable setting range is in 2 seconds, even if you have configured the settings for a subwoofer, the test tone will be output from each speaker to the speakers. You need to the display shown in...

Owner Manual
Page 58
... TV programs and the DVD receiver will create a 5.1 surround mix from the 2-channel stereo. You'll need a DTS compatible DVD player in order to TV programs produced in each listening mode. You can enjoy a virtual playback for use this mode, all speakers output mono audio, so the music sounds the same regardless of where you to stereo sources such as a stereo signal and output by adding on the DVD receiver enable you are. 58 Dolby...
... TV programs and the DVD receiver will create a 5.1 surround mix from the 2-channel stereo. You'll need a DTS compatible DVD player in order to TV programs produced in each listening mode. You can enjoy a virtual playback for use this mode, all speakers output mono audio, so the music sounds the same regardless of where you to stereo sources such as a stereo signal and output by adding on the DVD receiver enable you are. 58 Dolby...

Owner Manual
Page 59
... mode. For center/surround speakers added on (5.1ch): Press LISTENING MODE on the DVD receiver or on the remote controller to switch over . Every time you add on the playback signal. I Tips for Using 2ch Modes In cases where any of speakers Input signal format Dolby D Analog, PCM Monaural Stereo Others DTS Multich Listening mode Source Cassette, CD, video, tuner DVD DVD, LD, DVD-Audio, CD SACD Direct G G G G G G Stereo G G G G G 2 ch Mono G G G G G Theater-Dimensional*1 G G G G G Multich G If you press LISTENING MODE, the mode switches...
... mode. For center/surround speakers added on (5.1ch): Press LISTENING MODE on the DVD receiver or on the remote controller to switch over . Every time you add on the playback signal. I Tips for Using 2ch Modes In cases where any of speakers Input signal format Dolby D Analog, PCM Monaural Stereo Others DTS Multich Listening mode Source Cassette, CD, video, tuner DVD DVD, LD, DVD-Audio, CD SACD Direct G G G G G G Stereo G G G G G 2 ch Mono G G G G G Theater-Dimensional*1 G G G G G Multich G If you press LISTENING MODE, the mode switches...
Owner Manual
Page 63
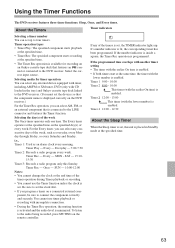
... a timer number You can select any consecutive days of the timer operation during Timer playback or recording. • You cannot use timer playback or recording with incomplete connection. • During the Timer Rec operation, the muting function is activated and the audio level is placed in Standby mode at the same time, the timer with CD loaded in the tray) and Onkyo cassette tape deck linked to the DVD receiver. (You must set , the TIMER...
... a timer number You can select any consecutive days of the timer operation during Timer playback or recording. • You cannot use timer playback or recording with incomplete connection. • During the Timer Rec operation, the muting function is activated and the audio level is placed in Standby mode at the same time, the timer with CD loaded in the tray) and Onkyo cassette tape deck linked to the DVD receiver. (You must set , the TIMER...
Owner Manual
Page 70
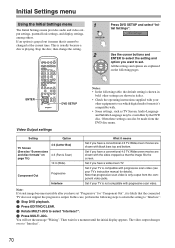
... compatible with . • Some settings, such as TV Screen, Audio Language and Subtitle Language may be made from the component video jacks. Initial Settings menu Using the Initial Settings menu 1 The Initial Settings menu provides audio and video output settings, parental lock settings, and display settings, among others. Often these settings can also be overridden by the DVD disc. Set if you have set . Note that the connected TV does not support the progressive output. If an option is playing...
... compatible with . • Some settings, such as TV Screen, Audio Language and Subtitle Language may be made from the component video jacks. Initial Settings menu Using the Initial Settings menu 1 The Initial Settings menu provides audio and video output settings, parental lock settings, and display settings, among others. Often these settings can also be overridden by the DVD disc. Set if you have set . Note that the connected TV does not support the progressive output. If an option is playing...
Owner Manual
Page 71
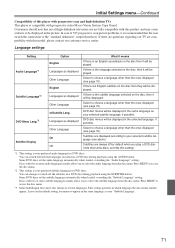
... the disc, then it will be displayed in the picture. You can change or switch off by default when you play a DVD disc (note that some discs override this model, please contact our customer service center. Press MENU to access the disc menu. *2 This setting is the subtitle language selected on a DVD disc during playback using the SUBTITLE button. Consumers should appear. If there are fully compatible with this player with...
... the disc, then it will be displayed in the picture. You can change or switch off by default when you play a DVD disc (note that some discs override this model, please contact our customer service center. Press MENU to access the disc menu. *2 This setting is the subtitle language selected on a DVD disc during playback using the SUBTITLE button. Consumers should appear. If there are fully compatible with this player with...

Owner Manual
Page 81
...; The DVD receiver is activated. It takes a long time until playback starts. • It may take time for condensation to make sure that the speaker cords are included on the disc. place it in a location with limited in the disc tray guide. • Incompatible region number: If the region number on a DVD-Video disc does not match the number on the display, the Sleep timer is active, defeat it or change the level...
...; The DVD receiver is activated. It takes a long time until playback starts. • It may take time for condensation to make sure that the speaker cords are included on the disc. place it in a location with limited in the disc tray guide. • Incompatible region number: If the region number on a DVD-Video disc does not match the number on the display, the Sleep timer is active, defeat it or change the level...
Owner Manual
Page 82
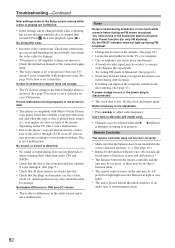
... timers again. See page 70 for how to interlace. You cannot tune in the broadcast station using the Auto Preset function (for your TV/ monitor is not compatible with progressive scan: See page 70 for damage. indicator Remote Controller The remote controller does not function correctly. • Make sure that the plugs and terminals are incorrect: Check the instruction manual of the connected equipment. • The video output...
... timers again. See page 70 for how to interlace. You cannot tune in the broadcast station using the Auto Preset function (for your TV/ monitor is not compatible with progressive scan: See page 70 for damage. indicator Remote Controller The remote controller does not function correctly. • Make sure that the plugs and terminals are incorrect: Check the instruction manual of the connected equipment. • The video output...
Owner Manual
Page 84
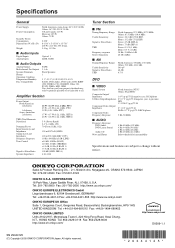
... D mm 5.4 kg, 11.9 lbs I Audio Inputs Digital Inputs Analog Inputs Optical: 1 LINE, TAPE I Audio Outputs Analog Outputs TAPE Multichannel Pre Outputs 3.1 ch Speaker Terminals Front Speakers Phones 1 Operation Condition Temperature/Humidity 5 ˚C-35 ˚C (41 F-95 F)/5 %-85 % Disc Compatibility SACD, DVD-Audio, DVD-video, DVD-R/RW (VR, VIDEO), CD, CD-R/RW, Video CD, SVCD, WMA, MP3, JPEG Disc that have not been property finalized may only be partially playable or not playable at all. Sales & Product Planning Div. : 2-1, Nisshin-cho...
... D mm 5.4 kg, 11.9 lbs I Audio Inputs Digital Inputs Analog Inputs Optical: 1 LINE, TAPE I Audio Outputs Analog Outputs TAPE Multichannel Pre Outputs 3.1 ch Speaker Terminals Front Speakers Phones 1 Operation Condition Temperature/Humidity 5 ˚C-35 ˚C (41 F-95 F)/5 %-85 % Disc Compatibility SACD, DVD-Audio, DVD-video, DVD-R/RW (VR, VIDEO), CD, CD-R/RW, Video CD, SVCD, WMA, MP3, JPEG Disc that have not been property finalized may only be partially playable or not playable at all. Sales & Product Planning Div. : 2-1, Nisshin-cho...


