
Owner Manual
Page 5
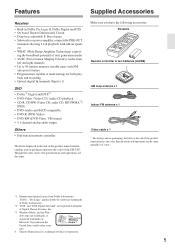
...the DR-UN7. Specifications and operations are the same regardless of Onkyo Corporation. 5 Theater-Dimensional is a trademark of color. *1. Bass feature &#... Dimensional Circuit • Deep bass adjustable S. Make sure you have the following accessories: RC-640S Remote controller & two batteries (AA/R6) AM loop antenna x 1 Indoor FM antenna x 1 Video...Laboratories. *2. "DTS" and "DTS Digital Surround" are trademarks, or registered trademarks of Digital Theater Systems, Inc. *3. Features Supplied Accessories Receiver • Built-in the United States and/or other ...
...the DR-UN7. Specifications and operations are the same regardless of Onkyo Corporation. 5 Theater-Dimensional is a trademark of color. *1. Bass feature &#... Dimensional Circuit • Deep bass adjustable S. Make sure you have the following accessories: RC-640S Remote controller & two batteries (AA/R6) AM loop antenna x 1 Indoor FM antenna x 1 Video...Laboratories. *2. "DTS" and "DTS Digital Surround" are trademarks, or registered trademarks of Digital Theater Systems, Inc. *3. Features Supplied Accessories Receiver • Built-in the United States and/or other ...
Owner Manual
Page 6
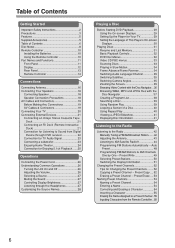
... Connectors 19 Before Making Any Connections 19 AV Cables & Connectors 19 Connecting Your TV 20 Connecting External Devices 21 Connecting an Onkyo Stereo Cassette Tape Deck 21 Connecting an RI Dock (Remote Interactive Dock 21 Connection for Changing the Preset Channels ........ 52 Copying a Preset Channel - Table of Contents Getting Started Important Safety...
... Connectors 19 Before Making Any Connections 19 AV Cables & Connectors 19 Connecting Your TV 20 Connecting External Devices 21 Connecting an Onkyo Stereo Cassette Tape Deck 21 Connecting an RI Dock (Remote Interactive Dock 21 Connection for Changing the Preset Channels ........ 52 Copying a Preset Channel - Table of Contents Getting Started Important Safety...

Owner Manual
Page 7
...58 Selecting Listening Mode 59 Listening Mode and Audio Adjust Adjusting Sound 60 Adjusting Individual Speaker Levels 60 Emphasizing the Low End Using the Remote Controller 60 Using the Late Night Function (Dolby Digital only 60 Audio Adjust Function 61 Setting Clock and Timer Setting the Clock 62 ... Using the Initial Settings menu 70 How to Use Parental Lock 73 Additional information 75 Screen sizes and disc formats 75 Setting the TV system (Not North American model 75 Resetting the DVD player 76 Titles, chapters and tracks 76 DVD-Video regions 76 Selecting languages using the...
...58 Selecting Listening Mode 59 Listening Mode and Audio Adjust Adjusting Sound 60 Adjusting Individual Speaker Levels 60 Emphasizing the Low End Using the Remote Controller 60 Using the Late Night Function (Dolby Digital only 60 Audio Adjust Function 61 Setting Clock and Timer Setting the Clock 62 ... Using the Initial Settings menu 70 How to Use Parental Lock 73 Additional information 75 Screen sizes and disc formats 75 Setting the TV system (Not North American model 75 Resetting the DVD player 76 Titles, chapters and tracks 76 DVD-Video regions 76 Selecting languages using the...

Owner Manual
Page 10
... work if there's an obstacle between it shut. Keep this in a rack behind colored glass doors. Notes: • If the remote controller doesn't work reliably, try replacing the batteries. • Don't mix new and old batteries or different types of the same type...this in accordance with the polarity diagram inside the battery compartment. DVD receiver 3 Put the cover onto the remote controller and slide it and the DVD receiver's remote control sensor. 10 Remote Controller Installing the Batteries 1 To open the battery compartment, press the small hollow and slide off the cover...
... work if there's an obstacle between it shut. Keep this in a rack behind colored glass doors. Notes: • If the remote controller doesn't work reliably, try replacing the batteries. • Don't mix new and old batteries or different types of the same type...this in accordance with the polarity diagram inside the battery compartment. DVD receiver 3 Put the cover onto the remote controller and slide it and the DVD receiver's remote control sensor. 10 Remote Controller Installing the Batteries 1 To open the battery compartment, press the small hollow and slide off the cover...

Owner Manual
Page 11
... select a programmed station, play- H LISTENING MODE button (59) Use this button during playback, the unit enters Pause mode. A Remote control sensor (10) L TIMER button (62, 64, 65, 68) Receives signals from the remote controller. It also assists you input characters. also move the cursor when you to select the listening modes. N YES...
... select a programmed station, play- H LISTENING MODE button (59) Use this button during playback, the unit enters Pause mode. A Remote control sensor (10) L TIMER button (62, 64, 65, 68) Receives signals from the remote controller. It also assists you input characters. also move the cursor when you to select the listening modes. N YES...

Owner Manual
Page 13
...ing a recorder with an analog audio input and output jector with a composite video input. L REMOTE CONTROL (21, 22) This (Remote Interactive) jack can be used to an component video input on another Onkyo AV component. D FM ANTENNA (16, 17) This jack is for connecting an FM antenna. ...To use with Onkyo subwoofer equipped with a built-in parentheses show where you must make an ...
...ing a recorder with an analog audio input and output jector with a composite video input. L REMOTE CONTROL (21, 22) This (Remote Interactive) jack can be used to an component video input on another Onkyo AV component. D FM ANTENNA (16, 17) This jack is for connecting an FM antenna. ...To use with Onkyo subwoofer equipped with a built-in parentheses show where you must make an ...

Owner Manual
Page 14
.... Z RETURN button (45, 56, 57) This button is used to return to control the amplifier and the tuner. Part Names and Functions-Continued Remote Controller This section describes the role of the individual buttons you can find the main explanation for playback at a specified time. M A N O 2 3 4 P Q R 5 S 6 7 8 T 9 U J V K W L X Y Z The...
.... Z RETURN button (45, 56, 57) This button is used to return to control the amplifier and the tuner. Part Names and Functions-Continued Remote Controller This section describes the role of the individual buttons you can find the main explanation for playback at a specified time. M A N O 2 3 4 P Q R 5 S 6 7 8 T 9 U J V K W L X Y Z The...

Owner Manual
Page 15
... items on a DVD-Video disc. Q Stop button (32) This button is used to display the menu on the display changes. Part Names and Functions-Continued Remote Controller This section describes the role of the individual buttons you use to control DVD and CD. 1 2 O 3 P 4 5 Q 6 R 7 S 8 9 J K T L M U N The page numbers in parentheses show where you...
... items on a DVD-Video disc. Q Stop button (32) This button is used to display the menu on the display changes. Part Names and Functions-Continued Remote Controller This section describes the role of the individual buttons you use to control DVD and CD. 1 2 O 3 P 4 5 Q 6 R 7 S 8 9 J K T L M U N The page numbers in parentheses show where you...
Owner Manual
Page 21
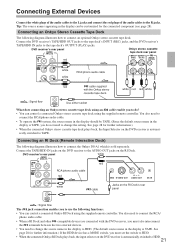
...rear panel Onkyo stereo cassette tape deck rear panel red INPUT OUTPUT (REC) (PLAY) REMOTE CONTROL L white RCA/phono audio cable R white red cable supplied with the DVD receiver, you to do not need to connect the RCA/phono audio cable. • To operate the system, the ... is automat- ically switched to the tape deck's OUTPUT (PLAY) jacks. Connecting an Onkyo Stereo Cassette Tape Deck The following functions: • You can control a connected Onkyo RI Dock using the supplied remote controller. Connect the DVD receiver's TAPE/HDD OUT jacks to the tape deck's INPUT...
...rear panel Onkyo stereo cassette tape deck rear panel red INPUT OUTPUT (REC) (PLAY) REMOTE CONTROL L white RCA/phono audio cable R white red cable supplied with the DVD receiver, you to do not need to connect the RCA/phono audio cable. • To operate the system, the ... is automat- ically switched to the tape deck's OUTPUT (PLAY) jacks. Connecting an Onkyo Stereo Cassette Tape Deck The following functions: • You can control a connected Onkyo RI Dock using the supplied remote controller. Connect the DVD receiver's TAPE/HDD OUT jacks to the tape deck's INPUT...

Owner Manual
Page 22
... "Customizing the Source Names" on page 28.) • You can control a part of the DVD receiver's operations by using the supplied remote controller of the DVD receiver. • If you have connected an optical audio digital cable and an audio pin code, you playback your ... device through DVD receiver Connect the DVD receiver's DIGITAL IN terminal with a digital audio output terminal on any Onkyo audio processor by using the accompanying remote controller of the Onkyo audio processor. (Standby/On, Input switch over, Volume control, Muting, Tuner control and Sound quality adjustment.) ...
... "Customizing the Source Names" on page 28.) • You can control a part of the DVD receiver's operations by using the supplied remote controller of the DVD receiver. • If you have connected an optical audio digital cable and an audio pin code, you playback your ... device through DVD receiver Connect the DVD receiver's DIGITAL IN terminal with a digital audio output terminal on any Onkyo audio processor by using the accompanying remote controller of the Onkyo audio processor. (Standby/On, Input switch over, Volume control, Muting, Tuner control and Sound quality adjustment.) ...

Owner Manual
Page 26
.... Also, if you press the same button again, the unit will turn off (standby). Adjusting the Volume DVD receiver Remote controller Turn VOLUME clockwise to increase the volume or counterclockwise to such a device is automatically turned on or off and enter Standby mode. Turning the ... Off Press STANDBY/ON on the unit or on the DVD receiver. The STANDBY indicator lights up. If you turn on the power to) an Onkyo RI Dock, CD recorder or cassette tape deck that is connected to the DVD receiver via an cable and RCA/phono audio cables, the power...
.... Also, if you press the same button again, the unit will turn off (standby). Adjusting the Volume DVD receiver Remote controller Turn VOLUME clockwise to increase the volume or counterclockwise to such a device is automatically turned on or off and enter Standby mode. Turning the ... Off Press STANDBY/ON on the unit or on the DVD receiver. The STANDBY indicator lights up. If you turn on the power to) an Onkyo RI Dock, CD recorder or cassette tape deck that is connected to the DVD receiver via an cable and RCA/phono audio cables, the power...

Owner Manual
Page 27
... Brightness You can adjust the volume and mute the sound as the audio source. Hint: When you turn the unit off and then on the remote controller. You can select DVD, FM, AM, or connected external audio/video equipment (HDD, CD-R, TAPE, LINE, DIGITAL) as described above....Listening through the Headphones Decrease the volume, then connect the stereo headphones mini plug to Stereo, Mono, or Direct. 27 Press DIMMER on the remote controller Every time you press VOLUME +/- Tip: During muting: • If you press the button, the display brightness will reproduce no sound while...
... Brightness You can adjust the volume and mute the sound as the audio source. Hint: When you turn the unit off and then on the remote controller. You can select DVD, FM, AM, or connected external audio/video equipment (HDD, CD-R, TAPE, LINE, DIGITAL) as described above....Listening through the Headphones Decrease the volume, then connect the stereo headphones mini plug to Stereo, Mono, or Direct. 27 Press DIMMER on the remote controller Every time you press VOLUME +/- Tip: During muting: • If you press the button, the display brightness will reproduce no sound while...

Owner Manual
Page 28
You may press YES/MODE instead of the remote controller buttons you can use after you connected per the instructions on pages 21-23. Check the short names in the display. Display 1 2 3-5 5 *1 Select this ... and 79 offer a list of MULTI JOG to get the same result. 2 Press EDIT/NO/CLEAR repeatedly until the source whose name you connected an Onkyo USB component that appears in the display to suit any component you have changed the source TAPE HDD CD-R names. *1 PC LINE TV GAME DIGITAL...
You may press YES/MODE instead of the remote controller buttons you can use after you connected per the instructions on pages 21-23. Check the short names in the display. Display 1 2 3-5 5 *1 Select this ... and 79 offer a list of MULTI JOG to get the same result. 2 Press EDIT/NO/CLEAR repeatedly until the source whose name you connected an Onkyo USB component that appears in the display to suit any component you have changed the source TAPE HDD CD-R names. *1 PC LINE TV GAME DIGITAL...

Owner Manual
Page 29
..., then press ENTER. Select "TV Screen" from 4:3 (Letter Box) to 4:3 (Pan & Scan) if you prefer. Selects the highlighted menu item (both ENTER buttons on the remote 3 work in this player makes extensive use the cursor buttons to change the setting from the "Video Output" settings. Press DVD SETUP to the main...
..., then press ENTER. Select "TV Screen" from 4:3 (Letter Box) to 4:3 (Pan & Scan) if you prefer. Selects the highlighted menu item (both ENTER buttons on the remote 3 work in this player makes extensive use the cursor buttons to change the setting from the "Video Output" settings. Press DVD SETUP to the main...
Owner Manual
Page 31
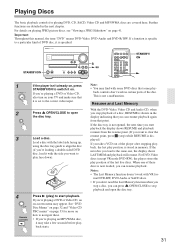
... memory. This is shown in the display indicating that you can resume playback again from the resume point. (If you want to play face down). 4 Remote controller Press (play position is the same one of the last five discs. If the next disc you 're playing a DVD or Video CD...
... memory. This is shown in the display indicating that you can resume playback again from the resume point. (If you want to play face down). 4 Remote controller Press (play position is the same one of the last five discs. If the next disc you 're playing a DVD or Video CD...

Owner Manual
Page 32
...Highlights a numbered menu option (some discs only). Playing Discs-Continued / / Basic Playback Controls The table below shows the basic controls on the remote for details. Stops playback. Skips to the start fast reverse scanning. Press ENTER to select. • If the disc is stopped, playback ... when you want to the start playback; RETURN Returns to resume normal playback. See the disc packaging for playing discs. Button (remote only) What it does Starts playback. ENTER Selects the current menu option. others only appear when you can select what you start...
...Highlights a numbered menu option (some discs only). Playing Discs-Continued / / Basic Playback Controls The table below shows the basic controls on the remote for details. Stops playback. Skips to the start fast reverse scanning. Press ENTER to select. • If the disc is stopped, playback ... when you want to the start playback; RETURN Returns to resume normal playback. See the disc packaging for playing discs. Button (remote only) What it does Starts playback. ENTER Selects the current menu option. others only appear when you can select what you start...

Owner Manual
Page 33
...CD playing in some of some functions (random or repeat, for playback while the DVD receiver is one ). Press ENTER only) to enter a numbered - (remote menu option. Scanning Discs You can fast-scan discs forward or backward at the end or beginning of the disc. Displays the previous menu page... Some Video CD have menus from which you can choose what you want to watch. These are not available during PBC playback. Button DVD receiver remote What it does - This is one ). If you want to use them, start the disc playing using a number button to select a track. •...
...CD playing in some of some functions (random or repeat, for playback while the DVD receiver is one ). Press ENTER only) to enter a numbered - (remote menu option. Scanning Discs You can fast-scan discs forward or backward at the end or beginning of the disc. Displays the previous menu page... Some Video CD have menus from which you can choose what you want to watch. These are not available during PBC playback. Button DVD receiver remote What it does - This is one ). If you want to use them, start the disc playing using a number button to select a track. •...
Owner Manual
Page 38
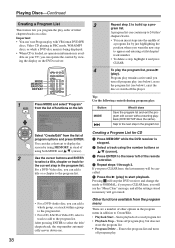
... play , but does not erase the program list • Program Delete - MODE MEMORY RANDOM REPEAT 1 Press MODE and select "Program" from the list of the remote controller. 4 Repeat steps 1 through 3. After pressing ENTER to select the title/ chapter/track, the step number automatically moves down one. 38 3 Repeat step 2 to start...
... play , but does not erase the program list • Program Delete - MODE MEMORY RANDOM REPEAT 1 Press MODE and select "Program" from the list of the remote controller. 4 Repeat steps 1 through 3. After pressing ENTER to select the title/ chapter/track, the step number automatically moves down one. 38 3 Repeat step 2 to start...

Owner Manual
Page 39
... loaded, select any available Random mode by pressing RANDOM, and then set the random play . 1 Press MODE and select "Random" from the list of the remote controller. Searching a Disc You can search DVD-Video discs by title or chapter number, or by track number or time. SACDs by track number, CDs...
... loaded, select any available Random mode by pressing RANDOM, and then set the random play . 1 Press MODE and select "Random" from the list of the remote controller. Searching a Disc You can search DVD-Video discs by title or chapter number, or by track number or time. SACDs by track number, CDs...

Owner Manual
Page 41
...; Discs can be displayed onscreen while a disc is playing, the information appears at the top and bottom of the screen). Displays the next picture. DISPLAY 1 Remote controller To show/switch/hide the information displayed, press DISPLAY repeatedly. • When a disc is playing. Displaying Disc Information Various track, chapter and title information...
...; Discs can be displayed onscreen while a disc is playing, the information appears at the top and bottom of the screen). Displays the next picture. DISPLAY 1 Remote controller To show/switch/hide the information displayed, press DISPLAY repeatedly. • When a disc is playing. Displaying Disc Information Various track, chapter and title information...
