Instruction Manual
Page 5
...Controlling Your iPod 85 Controlling Other Components 87 Preprogrammed Remote Control Codes 87 Looking up for Remote Control Code 87 Entering Remote Control Codes 88 Remote Control Codes for Integra/Onkyo Components Connected via V ......... 88 Resetting Remote Mode Buttons 89 Resetting the Remote Controller 89 Controlling Other Components 89 Learning Commands 91 Using Normal Macros 92 Others Troubleshooting 93 Specifications 98 About HDMI 100 Using an RIHD-compatible TV, Player, or Recorder ... 101 Video Resolution Chart 103 To reset the AV receiver to its factory defaults, turn...
...Controlling Your iPod 85 Controlling Other Components 87 Preprogrammed Remote Control Codes 87 Looking up for Remote Control Code 87 Entering Remote Control Codes 88 Remote Control Codes for Integra/Onkyo Components Connected via V ......... 88 Resetting Remote Mode Buttons 89 Resetting the Remote Controller 89 Controlling Other Components 89 Learning Commands 91 Using Normal Macros 92 Others Troubleshooting 93 Specifications 98 About HDMI 100 Using an RIHD-compatible TV, Player, or Recorder ... 101 Video Resolution Chart 103 To reset the AV receiver to its factory defaults, turn...
Instruction Manual
Page 6
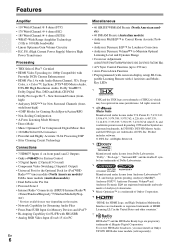
... license under license from Dolby Laboratories. and worldwide patents issued & pending. All Rights Reserved. *3 • 7 HDMI*6 Inputs (1 on front panel) and 2 Outputs • Onkyo Q for System Control • 5 Digital Inputs (2 Optical/3 Coaxial) • Component Video Switching (3 Inputs/1 Output) • Universal Port for the Optional Dock for iPod*9/HD Radio™*7 tuner module (North American models)/ DAB+ tuner module (Australian models) • Dual Subwoofer Pre Out • Powered Zone 2 • Internet Radio* Connectivity (SIRIUS Internet Radio*8/ vTuner/Pandora/Rhapsody...
... license under license from Dolby Laboratories. and worldwide patents issued & pending. All Rights Reserved. *3 • 7 HDMI*6 Inputs (1 on front panel) and 2 Outputs • Onkyo Q for System Control • 5 Digital Inputs (2 Optical/3 Coaxial) • Component Video Switching (3 Inputs/1 Output) • Universal Port for the Optional Dock for iPod*9/HD Radio™*7 tuner module (North American models)/ DAB+ tuner module (Australian models) • Dual Subwoofer Pre Out • Powered Zone 2 • Internet Radio* Connectivity (SIRIUS Internet Radio*8/ vTuner/Pandora/Rhapsody...
Instruction Manual
Page 17
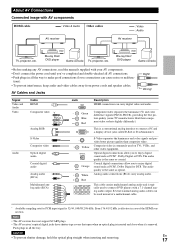
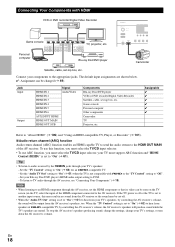
... shutter damage, hold the optical plug straight when inserting and removing. Wrong! tions). • To prevent interference, keep audio and video cables away from power cords and speaker cables. Blu-ray Disc/ DVD player Game console • Before making any AV connections, read the manuals supplied with AV components HDMI cable : Video & Audio Other cables AV receiver : Video : Audio AV receiver TV, projector, etc. The audio quality is effective in all the way to connect DVD players with a 7.1-channel analog audio output.
... shutter damage, hold the optical plug straight when inserting and removing. Wrong! tions). • To prevent interference, keep audio and video cables away from power cords and speaker cables. Blu-ray Disc/ DVD player Game console • Before making any AV connections, read the manuals supplied with AV components HDMI cable : Video & Audio Other cables AV receiver : Video : Audio AV receiver TV, projector, etc. The audio quality is effective in all the way to connect DVD players with a 7.1-channel analog audio output.
Instruction Manual
Page 18
...'s settings, or turn down the AV receiver's volume. To stop the AV receiver's speakers producing sound, change the settings, change your TV's speakers, by controlling the AV receiver's volume, the AV receiver's speakers will be cut off or the TV is set to the appropriate jacks. Personal computer Blu-ray Disc/DVD player Camcorder Satellite, cable, set -top box, etc. En 18 Jack Input Output HDMI IN 1 HDMI IN 2 HDMI IN 3 HDMI IN 4 HDMI IN 5 HDMI IN 6 AUX INPUT HDMI HDMI OUT MAIN HDMI OUT SUB Signal Audio/Video Components Blu-ray Disc/DVD player...
...'s settings, or turn down the AV receiver's volume. To stop the AV receiver's speakers producing sound, change the settings, change your TV's speakers, by controlling the AV receiver's volume, the AV receiver's speakers will be cut off or the TV is set to the appropriate jacks. Personal computer Blu-ray Disc/DVD player Camcorder Satellite, cable, set -top box, etc. En 18 Jack Input Output HDMI IN 1 HDMI IN 2 HDMI IN 3 HDMI IN 4 HDMI IN 5 HDMI IN 6 AUX INPUT HDMI HDMI OUT MAIN HDMI OUT SUB Signal Audio/Video Components Blu-ray Disc/DVD player...
Instruction Manual
Page 20
... receiver will automatically turn on and select that component as well, use $ and %.) ■ How to record the video With the connections described above, you 'll need a commercially available MC head amp or MC transformer to connect to PHONO IN. Connecting Integra/Onkyo V Components Step 1: Make sure that component as the input source. ■ Remote Control You can enjoy Dolby Digital and DTS. (To record or listen in Zone 2 as the input source. ■ Direct Change...
... receiver will automatically turn on and select that component as well, use $ and %.) ■ How to record the video With the connections described above, you 'll need a commercially available MC head amp or MC transformer to connect to PHONO IN. Connecting Integra/Onkyo V Components Step 1: Make sure that component as the input source. ■ Remote Control You can enjoy Dolby Digital and DTS. (To record or listen in Zone 2 as the input source. ■ Direct Change...
Instruction Manual
Page 22
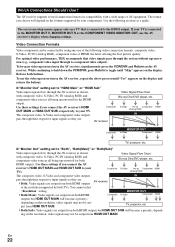
... (e.g., component video input through the AV receiver as a guide. En 22 The on-screen setup menus appear only on the display and release the buttons. ■ "Monitor Out" setting set to "Both", "Both(Main)" or "Both(Sub)" Video input signals flow through to your components. The format you choose will become a priority; HDMI outputs. TV, projector, etc Both(Sub): Video signals are output from both HDMI outputs AV receiver at the resolution supported by -pass video upconversion...
... (e.g., component video input through the AV receiver as a guide. En 22 The on-screen setup menus appear only on the display and release the buttons. ■ "Monitor Out" setting set to "Both", "Both(Main)" or "Both(Sub)" Video input signals flow through to your components. The format you choose will become a priority; HDMI outputs. TV, projector, etc Both(Sub): Video signals are output from both HDMI outputs AV receiver at the resolution supported by -pass video upconversion...
Instruction Manual
Page 25
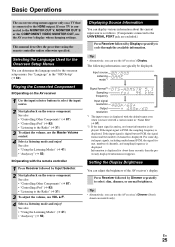
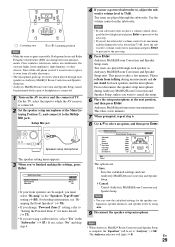
... input source. 2 Start playback on the source component. See also: • "Using the Listening Modes" (➔ 41) • "Audyssey" (➔ 55) ■ Operating with the default name even when you can use the Master Volume control. 4 Select a listening mode and enjoy! If the input signal is PCM, the sampling frequency is displayed. For some digital input signals, including multichannel PCM, the signal format, number of channels is connected to the Radio" (➔ 31) 3 To adjust the volume, use the AV receiver's display when changing settings...
... input source. 2 Start playback on the source component. See also: • "Using the Listening Modes" (➔ 41) • "Audyssey" (➔ 55) ■ Operating with the default name even when you can use the Master Volume control. 4 Select a listening mode and enjoy! If the input signal is PCM, the sampling frequency is displayed. For some digital input signals, including multichannel PCM, the signal format, number of channels is connected to the Radio" (➔ 31) 3 To adjust the volume, use the AV receiver's display when changing settings...
Instruction Manual
Page 26
... indicator lights on the display for this setting cannot be selected. Note that if you 'll shorten the sleep time by R/X to the selected listening mode. BD/DVD Audio Bass Video Treble 0dB Info Subwoofer Level Input Center Level Listening Mode Dynamic EQ Dynamic Volume 2 Use R/X/F/S to 10 minutes in the following categories: "MOVIE/ TV", "MUSIC", "GAME" and "THX". Muting the AV Receiver You can temporarily mute the output of the following settings: "Bass", "Treble", "Subwoofer Level", "Center Level", "Dynamic...
... indicator lights on the display for this setting cannot be selected. Note that if you 'll shorten the sleep time by R/X to the selected listening mode. BD/DVD Audio Bass Video Treble 0dB Info Subwoofer Level Input Center Level Listening Mode Dynamic EQ Dynamic Volume 2 Use R/X/F/S to 10 minutes in the following categories: "MOVIE/ TV", "MUSIC", "GAME" and "THX". Muting the AV Receiver You can temporarily mute the output of the following settings: "Bass", "Treble", "Subwoofer Level", "Center Level", "Dynamic...
Instruction Manual
Page 27
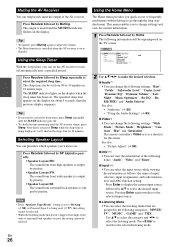
... lights. (The Powered Zone 2 speakers are described below. Once the AV receiver has entered the normal macro mode, all channels shown here output the sound. *4 When you have entered a custom name in the Easy macro mode, you connect a pair of Activities will be displayed. Repeat this case, pressing All Off will set to the AV receiver is turned on . 2. The Onkyo DVD player connected to Stereo, unless it via the Home menu...
... lights. (The Powered Zone 2 speakers are described below. Once the AV receiver has entered the normal macro mode, all channels shown here output the sound. *4 When you have entered a custom name in the Easy macro mode, you connect a pair of Activities will be displayed. Repeat this case, pressing All Off will set to the AV receiver is turned on . 2. The Onkyo DVD player connected to Stereo, unless it via the Home menu...
Instruction Manual
Page 29
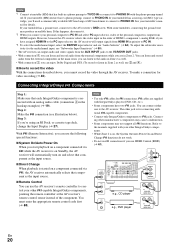
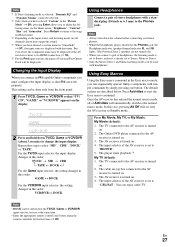
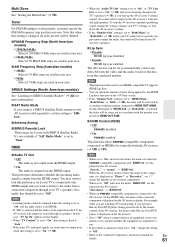
... Audyssey MultEQ Room Correction and Speaker Setup, unless you change "Powered Zone 2" setting, refer to "Setting the Powered Zone 2" for the speaker configuration, speaker distances, and speaker levels by using a subwoofer(s), select "Yes" in the "Speakers Type(Front)" setting (➔ 50). Audyssey MultEQ Room Correction and Speaker Setup starts. Review Speaker Configuration - - Close windows, televisions, radios, air conditioners, fluorescent lights, home appliances, light dimmers, or other devices. Test tones are played through each speaker as possible. This process takes...
... Audyssey MultEQ Room Correction and Speaker Setup, unless you change "Powered Zone 2" setting, refer to "Setting the Powered Zone 2" for the speaker configuration, speaker distances, and speaker levels by using a subwoofer(s), select "Yes" in the "Speakers Type(Front)" setting (➔ 50). Audyssey MultEQ Room Correction and Speaker Setup starts. Review Speaker Configuration - - Close windows, televisions, radios, air conditioners, fluorescent lights, home appliances, light dimmers, or other devices. Test tones are played through each speaker as possible. This process takes...
Instruction Manual
Page 47
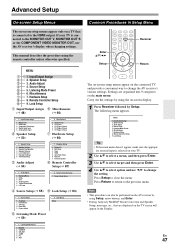
... VIDEO MONITOR OUT, use F/S to the HDMI output. Audio Adjust E 4. HDMI 5. Multiplex/Mono 2. Lock Setup Setup 5. Press Setup to the previous menu. Digital Audio Input 5. Volume Setup 2. THX Audio Setup D Audio Adjust (➔ 54) 7. Network 7. Listening Mode Preset 6. Press Return to return to close the menu. If your TV. 2 Use R/X to select a menu, and then press Enter. 3 Use R/X to select target and then press Enter. 4 Use R/X to select option and use the AV receiver's display when changing settings. Component Video Input 4. Remote ID 2. Firmware Update...
... VIDEO MONITOR OUT, use F/S to the HDMI output. Audio Adjust E 4. HDMI 5. Multiplex/Mono 2. Lock Setup Setup 5. Press Setup to the previous menu. Digital Audio Input 5. Volume Setup 2. THX Audio Setup D Audio Adjust (➔ 54) 7. Network 7. Listening Mode Preset 6. Press Return to return to close the menu. If your TV. 2 Use R/X to select a menu, and then press Enter. 3 Use R/X to select target and then press Enter. 4 Use R/X to select option and use the AV receiver's display when changing settings. Component Video Input 4. Remote ID 2. Firmware Update...
Instruction Manual
Page 50
... you connect a component (such as a priority in this if you can check the settings made by Audyssey MultEQ® Room Correction and Speaker Setup function (➔ 28). For hookup information, see "Bi-amping the Front Speakers" (➔ 15). Analog Audio Input Some DVD players output the LFE channel from a digital input (optical and coaxial) is set automatically by Audyssey MultEQ Room Correction and Speaker Setup function, or set to "Bi-Amp" (➔ 77). ■ Powered Zone 2 See "Setting the Powered Zone 2" (➔...
... you connect a component (such as a priority in this if you can check the settings made by Audyssey MultEQ® Room Correction and Speaker Setup function (➔ 28). For hookup information, see "Bi-amping the Front Speakers" (➔ 15). Analog Audio Input Some DVD players output the LFE channel from a digital input (optical and coaxial) is set automatically by Audyssey MultEQ Room Correction and Speaker Setup function, or set to "Bi-Amp" (➔ 77). ■ Powered Zone 2 See "Setting the Powered Zone 2" (➔...
Instruction Manual
Page 61
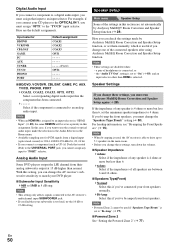
... Radio Mode If you operate a Blu-ray Disc/DVD player (being applied by the HDMI Lip Sync function on the display. • When "TV Control" is set to "Auto". • With some TVs and input signals, no sound through your area. Multi Zone See "Setting the Multi Zone" (➔ 78). Tuner For FM/AM tuning to work properly, you want to turn down the AV receiver's volume. • If the "Monitor Out" setting is unnatural when set to "On", change your...
... Radio Mode If you operate a Blu-ray Disc/DVD player (being applied by the HDMI Lip Sync function on the display. • When "TV Control" is set to "Auto". • With some TVs and input signals, no sound through your area. Multi Zone See "Setting the Multi Zone" (➔ 78). Tuner For FM/AM tuning to work properly, you want to turn down the AV receiver's volume. • If the "Monitor Out" setting is unnatural when set to "On", change your...
Instruction Manual
Page 62
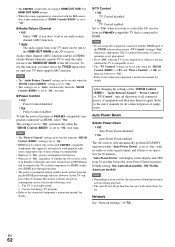
... the display and OSD from your TV tuner can be sent to the HDMI OUT MAIN of the AV receiver. Note • Do not assign the component connected with the HDMI input to the TV/CD selector when you must support ARC function. After changing the settings of equipment. Refer to all connected pieces of the "HDMI Control (RIHD)", "Audio Return Channel", "Power Control", or "TV Control", turn off the power to the user's manuals...
... the display and OSD from your TV tuner can be sent to the HDMI OUT MAIN of the AV receiver. Note • Do not assign the component connected with the HDMI input to the TV/CD selector when you must support ARC function. After changing the settings of equipment. Refer to all connected pieces of the "HDMI Control (RIHD)", "Audio Return Channel", "Power Control", or "TV Control", turn off the power to the user's manuals...
Instruction Manual
Page 63
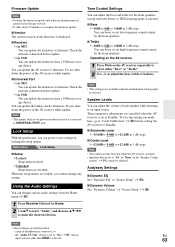
... input selector other than HDMI is selected. 63 Note • You cannot use R/X/F/S to make the desired selection. the "Audio TV Out" setting is set to Standby. Do not shutdown the power of "Source Setup" (➔ 56). You can update the firmware via NET: You can boost or cut low-frequency sounds output by Home. 2 UseR/X to select "Audio", and then use this preference, you can protect your settings by the front speakers. Operating on the AV receiver...
... input selector other than HDMI is selected. 63 Note • You cannot use R/X/F/S to make the desired selection. the "Audio TV Out" setting is set to Standby. Do not shutdown the power of "Source Setup" (➔ 56). You can update the firmware via NET: You can boost or cut low-frequency sounds output by Home. 2 UseR/X to select "Audio", and then use this preference, you can protect your settings by the front speakers. Operating on the AV receiver...

Instruction Manual
Page 64
...; The Music Optimizer function only works with PCM digital audio input signals with the following listening modes: THX Cinema, THX Surround EX, and THX Select2 Cinema. Note • Settings for home theater viewing. ■ Re-EQ Off: Re-EQ Function off . On: Re-EQ (THX) Function on. If both coaxial and HDMI inputs have been assigned, coaxial input is too harsh, making it with music files that use "lossy" compression, such as an input source...
...; The Music Optimizer function only works with PCM digital audio input signals with the following listening modes: THX Cinema, THX Surround EX, and THX Select2 Cinema. Note • Settings for home theater viewing. ■ Re-EQ Off: Re-EQ Function off . On: Re-EQ (THX) Function on. If both coaxial and HDMI inputs have been assigned, coaxial input is too harsh, making it with music files that use "lossy" compression, such as an input source...
Instruction Manual
Page 84
... panel. • While your iPod is not displayed on your TV. Auto Power On If you to another input source, the AV receiver will automatically select your iPod as the input source. Using the Onkyo Dock Dock is on Standby, the AV receiver will automatically turn on the Onkyo Dock components, see the instruction manual of the Onkyo Dock. You can use this function. • You cannot use the AV receiver's remote controller to control basic iPod functions (➔ 85). ■ Operating...
... panel. • While your iPod is not displayed on your TV. Auto Power On If you to another input source, the AV receiver will automatically select your iPod as the input source. Using the Onkyo Dock Dock is on Standby, the AV receiver will automatically turn on the Onkyo Dock components, see the instruction manual of the Onkyo Dock. You can use this function. • You cannot use the AV receiver's remote controller to control basic iPod functions (➔ 85). ■ Operating...
Instruction Manual
Page 94
... speaker has 28, 52 been adjusted to "Left / Right". Mono listening mode is selected, - front wide and surround back speakers with a mono source, such as required (The volume cannot be reduced. Try selecting another listening mode. In the Mono listening mode, only the front speakers 54 output sound if the "Output Speaker" setting is set to a digital input on your player for about three seconds, and then resume playback. When playing DTS program material, using...
... speaker has 28, 52 been adjusted to "Left / Right". Mono listening mode is selected, - front wide and surround back speakers with a mono source, such as required (The volume cannot be reduced. Try selecting another listening mode. In the Mono listening mode, only the front speakers 54 output sound if the "Output Speaker" setting is set to a digital input on your player for about three seconds, and then resume playback. When playing DTS program material, using...
Instruction Manual
Page 100
... receiver uses HDCP (High-bandwidth Digital Content Protection)*2, so only HDCP-compatible components can carry control signals, digital video, and up to -DVI adapter cable. (This may be restricted by Intel for digital video signals. In addition, video signals from a component connected via HDMI must also support HDMI output of digital audio (2-channel PCM, multichannel digital audio, and multichannel PCM). If the picture is based on the following: Audio Return Channel, 3D, x.v.Color, Deep Color, Lip Sync, DTS-HD Master Audio, DTS-HD High Resolution Audio, Dolby...
... receiver uses HDCP (High-bandwidth Digital Content Protection)*2, so only HDCP-compatible components can carry control signals, digital video, and up to -DVI adapter cable. (This may be restricted by Intel for digital video signals. In addition, video signals from a component connected via HDMI must also support HDMI output of digital audio (2-channel PCM, multichannel digital audio, and multichannel PCM). If the picture is based on the following: Audio Return Channel, 3D, x.v.Color, Deep Color, Lip Sync, DTS-HD Master Audio, DTS-HD High Resolution Audio, Dolby...
Instruction Manual
Page 102
... power cable is not necessary. Select "Use the speakers connected from the AV receiver" from the menu screen of the TV, and confirm that the power of the connected components is output from the speakers connected to an Q compatible TV or player/recorder, it is disconnected from the TV speakers. Note • Perform the above operations when you adjust the volume or switch the input on the power of the Blu-ray Disc/DVD player/recorder. 4. Connect...
... power cable is not necessary. Select "Use the speakers connected from the AV receiver" from the menu screen of the TV, and confirm that the power of the connected components is output from the speakers connected to an Q compatible TV or player/recorder, it is disconnected from the TV speakers. Note • Perform the above operations when you adjust the volume or switch the input on the power of the Blu-ray Disc/DVD player/recorder. 4. Connect...

