Owner Manual
Page 5
...DV-CP704 22 First Time Setup 22 Basic Playback 23 Loading & Removing Discs 23 Loading Discs During Playback 24 Selecting Discs 24 Starting, Pausing & Stopping Playback ......25 Navigating Disc Menus 26 Using the Disc Navigation Window............27 Selecting Titles, Chapters & Tracks by Number 28 Locating ...Random Playback 35 Memory Playback 36 Selecting Camera Angles 37 Selecting Languages & Audio Formats...... 38 Selecting Subtitles 38 Setting the HDMI 39 Using Last Memory 40 Zooming 41 Displaying Information 41 Configuring the DV-CP704 42 Using the Onscreen Setup Menus 43 ...
...DV-CP704 22 First Time Setup 22 Basic Playback 23 Loading & Removing Discs 23 Loading Discs During Playback 24 Selecting Discs 24 Starting, Pausing & Stopping Playback ......25 Navigating Disc Menus 26 Using the Disc Navigation Window............27 Selecting Titles, Chapters & Tracks by Number 28 Locating ...Random Playback 35 Memory Playback 36 Selecting Camera Angles 37 Selecting Languages & Audio Formats...... 38 Selecting Subtitles 38 Setting the HDMI 39 Using Last Memory 40 Zooming 41 Displaying Information 41 Configuring the DV-CP704 42 Using the Onscreen Setup Menus 43 ...
Owner Manual
Page 6
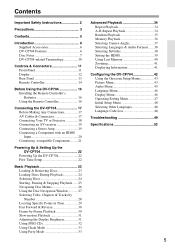
.... "Dolby" and the double-D symbol are registered trademarks of DTS, Inc. *3. HDMI, the HDMI logo and High-Definition Multimedia Interface are trademarks of Onkyo Corporation. *5. "DTS" and "DTS Digital Out" are trademarks or registered trademarks of... the product name indicates the color. Windows Media, and the Win- Coaxial digital cable (1.0 m) In catalogs and on a DVD-Video disc, even if that disc...
.... "Dolby" and the double-D symbol are registered trademarks of DTS, Inc. *3. HDMI, the HDMI logo and High-Definition Multimedia Interface are trademarks of Onkyo Corporation. *5. "DTS" and "DTS Digital Out" are trademarks or registered trademarks of... the product name indicates the color. Windows Media, and the Win- Coaxial digital cable (1.0 m) In catalogs and on a DVD-Video disc, even if that disc...
Owner Manual
Page 10
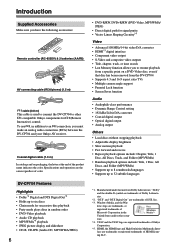
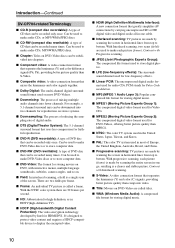
... fewer channels. It's designed to protect video content and requires a HDCP-compatible device to display the encrypted video. ■ HDMI (High Definition Multimedia Interface): A new connection format that greatly simplifies AV connections by carrying uncompressed SD or... Linear PCM: The uncompressed digital audio format used for storing digital music. 10 Introduction-Continued DV-CP704-related Terminology ■ CD-R (compact disc recordable): A type of CD that can be subdivided into chapters. ■ Component video: A video connection format that separates the luminance (Y)...
... fewer channels. It's designed to protect video content and requires a HDCP-compatible device to display the encrypted video. ■ HDMI (High Definition Multimedia Interface): A new connection format that greatly simplifies AV connections by carrying uncompressed SD or... Linear PCM: The uncompressed digital audio format used for storing digital music. 10 Introduction-Continued DV-CP704-related Terminology ■ CD-R (compact disc recordable): A type of CD that can be subdivided into chapters. ■ Component video: A video connection format that separates the luminance (Y)...
Owner Manual
Page 13
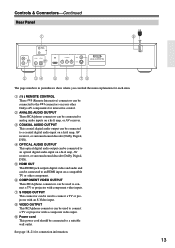
...A REMOTE CONTROL These (Remote Interactive) connectors can be used to con- I Power cord This power cord should be connected to an HDMI input on a hi-fi amp, AV receiver, or surround sound decoder (Dolby Digital, DTS). See page 18-21 for interactive control.... nect a TV or projector with an S-Video input. E HDMI OUT This HDMI jack outputs digital video and audio and can be connected to a coaxial digital audio input on a compatible TV or other Onkyo AV components for connection information. 13 Controls & Connectors-Continued Rear Panel ...
...A REMOTE CONTROL These (Remote Interactive) connectors can be used to con- I Power cord This power cord should be connected to an HDMI input on a hi-fi amp, AV receiver, or surround sound decoder (Dolby Digital, DTS). See page 18-21 for interactive control.... nect a TV or projector with an S-Video input. E HDMI OUT This HDMI jack outputs digital video and audio and can be connected to a coaxial digital audio input on a compatible TV or other Onkyo AV components for connection information. 13 Controls & Connectors-Continued Rear Panel ...
Owner Manual
Page 15
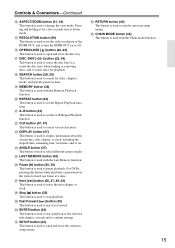
.... W DISPLAY button (41) This button is used to start playback of the HDMI OUT, and to open and close the disc tray. c Fast Forward [ ] button (30) This button is used to display information about the current disc, title, chapter, or track, including the elapsed time, remaining time, total time...paused moves the video forward one frame at a time. For DVDs, pressing this button while playback is used to select the disc bays (i.e., rotate the disc tray) when loading or removing discs, and to change the view mode. a Next [ ] button (25, 27, 29, 32) This button is used with...
.... W DISPLAY button (41) This button is used to start playback of the HDMI OUT, and to open and close the disc tray. c Fast Forward [ ] button (30) This button is used to display information about the current disc, title, chapter, or track, including the elapsed time, remaining time, total time...paused moves the video forward one frame at a time. For DVDs, pressing this button while playback is used to select the disc bays (i.e., rotate the disc tray) when loading or removing discs, and to change the view mode. a Next [ ] button (25, 27, 29, 32) This button is used with...
Owner Manual
Page 17
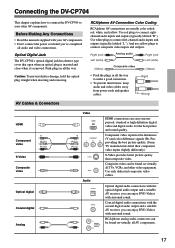
... Use only dedicated composite video cables. Push plugs in all the way. Use white plugs to connect left-channel audio inputs and outputs (typically labeled "L"). HDMI Component video S-Video Composite video Y PB /CB PR / CR Optical digital Coaxial digital Analog Video Y PB / CB PR / CR Audio... HDMI connections can be found on virtually all TVs, VCRs, and other AV components. Optical digital audio connections with the optical digital audio output and a ...
... Use only dedicated composite video cables. Push plugs in all the way. Use white plugs to connect left-channel audio inputs and outputs (typically labeled "L"). HDMI Component video S-Video Composite video Y PB /CB PR / CR Optical digital Coaxial digital Analog Video Y PB / CB PR / CR Audio... HDMI connections can be found on virtually all TVs, VCRs, and other AV components. Optical digital audio connections with the optical digital audio output and a ...

Owner Manual
Page 18
...(red) (white) (yellow) Component video cable S-Video cable AV RCA/phono cable (supplied) (red) (white) Only one connection required! This player is compatible with your TV. • If you use the supplied composite video cable to connect the DV-CP704's VIDEO OUTPUT to the component video... in picture distortion, because of the copy protection system used on DVD-Video discs. • When you connect a TV that does not support progressive scanning to the component video output, change the HDMI Output Setting to Off (see page 19). Connecting the DV-CP704-Continued Connecting...
...(red) (white) (yellow) Component video cable S-Video cable AV RCA/phono cable (supplied) (red) (white) Only one connection required! This player is compatible with your TV. • If you use the supplied composite video cable to connect the DV-CP704's VIDEO OUTPUT to the component video... in picture distortion, because of the copy protection system used on DVD-Video discs. • When you connect a TV that does not support progressive scanning to the component video output, change the HDMI Output Setting to Off (see page 19). Connecting the DV-CP704-Continued Connecting...
Owner Manual
Page 19
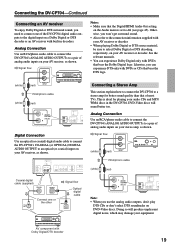
...decoders. DVD-Video discs will produce unpleasant digital noise, which may damage your AV receiver, as shown. Doing so will sound better too. This is set to an optical (or coaxial) input on your stereo amp, as shown. Notes: • Make sure that the Digital/HDMI Audio Out setting ... enjoy Dolby Digital or DTS surround sound, you use the analog audio outputs, don't play DTS CDs or don't select DTS soundtracks on DVD-Video discs. Signal flow L (white) (red) R ANALOG INPUT RCA/phono cable (white) (red) Coaxial digital cable (supplied) COAXIAL OPTICAL Connect one or the other...
...decoders. DVD-Video discs will produce unpleasant digital noise, which may damage your AV receiver, as shown. Doing so will sound better too. This is set to an optical (or coaxial) input on your stereo amp, as shown. Notes: • Make sure that the Digital/HDMI Audio Out setting ... enjoy Dolby Digital or DTS surround sound, you use the analog audio outputs, don't play DTS CDs or don't select DTS soundtracks on DVD-Video discs. Signal flow L (white) (red) R ANALOG INPUT RCA/phono cable (white) (red) Coaxial digital cable (supplied) COAXIAL OPTICAL Connect one or the other...
Owner Manual
Page 20
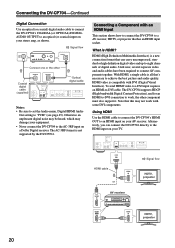
...work , the other COAXIAL OPTICAL Coaxial digital cable (supplied) Optical digital cable Notes: • Be sure to set the Audio menu, Digital/HDMI Audio Out setting to an optical (or coaxial) input on a Dolby Digital receiver. Alternatively, you can carry uncompressed, standard or high de... and audio cables have been required to -DVI cable. Note that 's necessary to the HDMI input on your TV. 20 HDMI cable HDMI IN or AV receiver HDMI IN Signal flow HDTV, projector HDMI HDMI IN HDTV, projector The DV-CP704 supports HDCP (High-bandwidth Digital Content Protection), and for...
...work , the other COAXIAL OPTICAL Coaxial digital cable (supplied) Optical digital cable Notes: • Be sure to set the Audio menu, Digital/HDMI Audio Out setting to an optical (or coaxial) input on a Dolby Digital receiver. Alternatively, you can carry uncompressed, standard or high de... and audio cables have been required to -DVI cable. Note that 's necessary to the HDMI input on your TV. 20 HDMI cable HDMI IN or AV receiver HDMI IN Signal flow HDTV, projector HDMI HDMI IN HDTV, projector The DV-CP704 supports HDCP (High-bandwidth Digital Content Protection), and for...
Owner Manual
Page 21
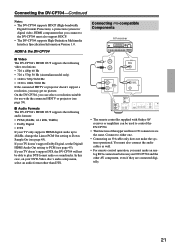
...• Connecting an cable only does not make an analog RCA connection between your DVD-Video disc's audio setup menu, select an audio format other AV component, even if they are the same. HDMI components that you must also support HDCP. • The DV-CP704 supports High-Defi...DV-CP704 supports HDCP (High-bandwidth Digital Content Protection), a protection system for use with Onkyo AV receiver or amplifiers can be able to PCM (see page 45). HDMI & the DV-CP704 ■ Video The DV-CP704's HDMI OUT supports the following audio formats: • PCM (48 kHz, 44.1 kHz, ...
...• Connecting an cable only does not make an analog RCA connection between your DVD-Video disc's audio setup menu, select an audio format other AV component, even if they are the same. HDMI components that you must also support HDCP. • The DV-CP704 supports High-Defi...DV-CP704 supports HDCP (High-bandwidth Digital Content Protection), a protection system for use with Onkyo AV receiver or amplifiers can be able to PCM (see page 45). HDMI & the DV-CP704 ■ Video The DV-CP704's HDMI OUT supports the following audio formats: • PCM (48 kHz, 44.1 kHz, ...
Owner Manual
Page 22
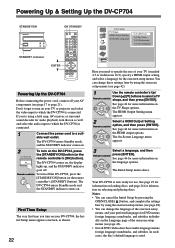
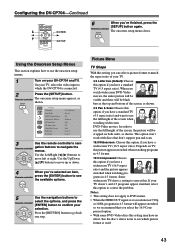
...menu appears. 2 Select a HDMI Output Setting option, and then press [ENTER]. Don't forget to turn on . You can change these settings later by using a hi-fi amp, AV receiver, or surround sound decoder for more information on selecting and playing discs. Notes: • You can... Pan Scan 16:9 Widescreen 16:9 Compressed STANDBY indicator ENTER Powering Up the DV-CP704 Before connecting the power cord, connect all DVD-Video discs have multi-language menus, foreign language soundtracks, and subtitles. If you're using the onscreen setup menus (see page 48). • ...
...menu appears. 2 Select a HDMI Output Setting option, and then press [ENTER]. Don't forget to turn on . You can change these settings later by using a hi-fi amp, AV receiver, or surround sound decoder for more information on selecting and playing discs. Notes: • You can... Pan Scan 16:9 Widescreen 16:9 Compressed STANDBY indicator ENTER Powering Up the DV-CP704 Before connecting the power cord, connect all DVD-Video discs have multi-language menus, foreign language soundtracks, and subtitles. If you're using the onscreen setup menus (see page 48). • ...

Owner Manual
Page 39
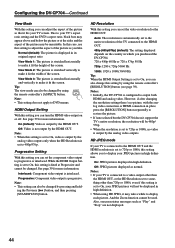
... outputs. 1080i: 1920 × 1080i 50/60Hz Not output by using the onscreen setup menus (see page 44). In this case, you turn on HDMI. olutions: Auto: The resolution is displayed to change the setting. Tip: These settings can also be changed by the DV-CP704's analog video outputs.... the component video output is on the remote controller repeat- To turn off . tion. If there is no picture when you need to change the HDMI resolu- ting on the TV, the DV-CP704 may find that there's no picture, press the [RESOLUTION] button repeatedly until the picture reappears...
... outputs. 1080i: 1920 × 1080i 50/60Hz Not output by using the onscreen setup menus (see page 44). In this case, you turn on HDMI. olutions: Auto: The resolution is displayed to change the setting. Tip: These settings can also be changed by the DV-CP704's analog video outputs.... the component video output is on the remote controller repeat- To turn off . tion. If there is no picture when you need to change the HDMI resolu- ting on the TV, the DV-CP704 may find that there's no picture, press the [RESOLUTION] button repeatedly until the picture reappears...
Owner Manual
Page 42
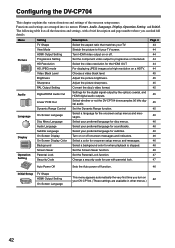
...Setting Progressive Setting HD Resolution HD JPEG mode Video Black Level Brightness Sharpness PAL Output Setting Digital/HDMI Audio Out Linear PCM Out Dynamic Range Control On-Screen Language Disc Menu Language Audio Language Subtitle Language On-Screen Display On-Screen Display Color Background Screen Saver Parental...46 46 46 47 47 Auto Power Off Sets the Auto power off . Turn HDMI video output on your preferred language for onscreen setup menus and messages. Adjust the picture sharpness. Convert the disc's video format. Set the Dynamic Range function. Select your DV-CP704. (These ...
...Setting Progressive Setting HD Resolution HD JPEG mode Video Black Level Brightness Sharpness PAL Output Setting Digital/HDMI Audio Out Linear PCM Out Dynamic Range Control On-Screen Language Disc Menu Language Audio Language Subtitle Language On-Screen Display On-Screen Display Color Background Screen Saver Parental...46 46 46 47 47 Auto Power Off Sets the Auto power off . Turn HDMI video output on your preferred language for onscreen setup menus and messages. Adjust the picture sharpness. Convert the disc's video format. Set the Dynamic Range function. Select your DV-CP704. (These ...
Owner Manual
Page 43
...The onscreen setup menu appears, as shown. 4:3 Pan & Scan: Choose this option if you have a standard TV (4:3 aspect ratio). Picture TV Shape View Mode HDMI Output Setting Progressive Setting HD Resolution HD Jpeg mode Video Black Level Brightness Sharpness : 4:3 Letter box : Normal : Off : Interlace : Auto : Off : Light...Choose this option if you select the 16:9 Compressed option. • With some DVD-Video discs this setting you can select a picture format to DVD menus. • When the HDMI OUT signal is used. 43 Picture Menu TV Shape With this setting may have a setting to...
...The onscreen setup menu appears, as shown. 4:3 Pan & Scan: Choose this option if you have a standard TV (4:3 aspect ratio). Picture TV Shape View Mode HDMI Output Setting Progressive Setting HD Resolution HD Jpeg mode Video Black Level Brightness Sharpness : 4:3 Letter box : Normal : Off : Interlace : Auto : Off : Light...Choose this option if you select the 16:9 Compressed option. • With some DVD-Video discs this setting you can select a picture format to DVD menus. • When the HDMI OUT signal is used. 43 Picture Menu TV Shape With this setting may have a setting to...
Owner Manual
Page 44
... be unsuitable. View Mode 1: The picture is output by the analog video outputs. Note: • This setting does not apply to output both HDMI and analog video. Off: JPEG pictures displayed as "Play" and "Stop" are not displayed. 44 Configuring the DV-CP704-Continued View... to progressive or interlaced. Note: • When this setting is set to 720p or 1080i, no picture, with the analog video connection or HDMI connection in its original aspect ratio. Note: • This setting can also change this setting is set to On, your TV screen. Interlaced:...
... be unsuitable. View Mode 1: The picture is output by the analog video outputs. Note: • This setting does not apply to output both HDMI and analog video. Off: JPEG pictures displayed as "Play" and "Stop" are not displayed. 44 Configuring the DV-CP704-Continued View... to progressive or interlaced. Note: • When this setting is set to 720p or 1080i, no picture, with the analog video connection or HDMI connection in its original aspect ratio. Note: • This setting can also change this setting is set to On, your TV screen. Interlaced:...
Owner Manual
Page 45
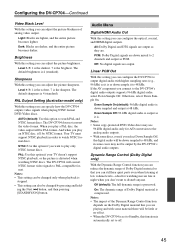
..., this function is down sampled to 48 kHz, and in order to play an NTSC disc, it'll be changed only when playback is stopped. • This setting can configure the optical, coaxial, and HDMI digital outputs. Off: No digital signals are darker, and the entire picture becomes darker. ...PAL format. Dark: Blacks are output. Your TV must support NTSC playback in some discs, even if you connect to off. 45 NTSC: Use this option if you can also be NTSC format. Audio Menu Digital/HDMI Audio Out With this option to 48 kHz. Light: Blacks are playing and with higher...
..., this function is down sampled to 48 kHz, and in order to play an NTSC disc, it'll be changed only when playback is stopped. • This setting can configure the optical, coaxial, and HDMI digital outputs. Off: No digital signals are darker, and the entire picture becomes darker. ...PAL format. Dark: Blacks are output. Your TV must support NTSC playback in some discs, even if you connect to off. 45 NTSC: Use this option if you can also be NTSC format. Audio Menu Digital/HDMI Audio Out With this option to 48 kHz. Light: Blacks are playing and with higher...
Owner Manual
Page 48
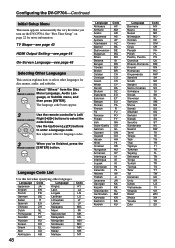
... buttons to enter a language code. See adjacent table for language codes. 3 When you turn on page 22 for disc menus, audio, and subtitles. 1 Select "Others" from the Disc Remote controller Menu Language, Audio Lan- Language Code Language Japanese JA Kirghiz English EN Latin French FR Lingala German DE ... Language Code List Use this list when specifying other languages for more information. TV Shape-see page 43 HDMI Output Setting-see page 44 On-Screen Language-see page 46 Selecting Other Languages This section explains how to select other languages.
... buttons to enter a language code. See adjacent table for language codes. 3 When you turn on page 22 for disc menus, audio, and subtitles. 1 Select "Others" from the Disc Remote controller Menu Language, Audio Lan- Language Code Language Japanese JA Kirghiz English EN Latin French FR Lingala German DE ... Language Code List Use this list when specifying other languages for more information. TV Shape-see page 43 HDMI Output Setting-see page 44 On-Screen Language-see page 46 Selecting Other Languages This section explains how to select other languages.
Owner Manual
Page 49
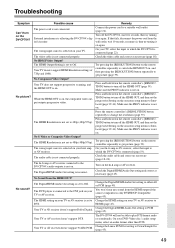
... Out setting to play DTS format audio or soundtracks. Possible cause The power cord is not connected properly. The DVD player is not on the remote controller repeatedly to HDMI (page 45). Your TV or AV receiver doesn't support Dolby Digital. Make sure the PRGV indicator is not set... [RESOLUTION] button to 480p (480p/576p). The wrong input source is not on your DVD-Video disc's audio setup menu, select an audio format other than DTS. Your TV doesn't support HDMI Resolution settings of 720p and 1080i. Change the Linear PCM Out setting to a suitable wall outlet (page...
... Out setting to play DTS format audio or soundtracks. Possible cause The power cord is not connected properly. The DVD player is not on the remote controller repeatedly to HDMI (page 45). Your TV or AV receiver doesn't support Dolby Digital. Make sure the PRGV indicator is not set... [RESOLUTION] button to 480p (480p/576p). The wrong input source is not on your DVD-Video disc's audio setup menu, select an audio format other than DTS. Your TV doesn't support HDMI Resolution settings of 720p and 1080i. Change the Linear PCM Out setting to a suitable wall outlet (page...
Owner Manual
Page 50
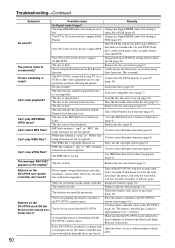
...8). Point the remote controller at the DV-CP704's remote sensor. Can't play MP3/WMA/ JPEG discs? Can't view JPEG files? The Digital/HDMI Audio Out setting is dirty. The selected disc cannot be able to your TV via a VCR or other than 5 megabytes (page 8). On your...Relocate if necessary. Can't start playback? The message "BAD DISC" appears on . You're using these functions. Change the Digital/HDMI Audio Out setting to Down Sample On (page 45). Load some discs (page 23). Finalize the disc (page 8). Make sure that doesn't resolve the issue, disconnect...
...8). Point the remote controller at the DV-CP704's remote sensor. Can't play MP3/WMA/ JPEG discs? Can't view JPEG files? The Digital/HDMI Audio Out setting is dirty. The selected disc cannot be able to your TV via a VCR or other than 5 megabytes (page 8). On your...Relocate if necessary. Can't start playback? The message "BAD DISC" appears on . You're using these functions. Change the Digital/HDMI Audio Out setting to Down Sample On (page 45). Load some discs (page 23). Finalize the disc (page 8). Make sure that doesn't resolve the issue, disconnect...
Owner Manual
Page 51
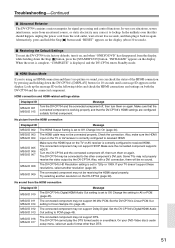
... Setting is displayed, and the DV-CP704 enters Standby mode. ■ HDMI Status Mode If you can check the status of the HDMI connection by the DV-CP704. If your DVD-Video disc's audio setup menu, select an audio format other component's DVI jack. MSG ID 011 The connected component may not support... and settings on the TV or AV receiver is correctly configured to its factory defaults, turn it on, and when "ONKYO DVD" has disappeared from the display, while holding down the Stop [ ] button, press the [STANDBY/ON] button. In the unlikely even that component. Try selecting ...
... Setting is displayed, and the DV-CP704 enters Standby mode. ■ HDMI Status Mode If you can check the status of the HDMI connection by the DV-CP704. If your DVD-Video disc's audio setup menu, select an audio format other component's DVI jack. MSG ID 011 The connected component may not support... and settings on the TV or AV receiver is correctly configured to its factory defaults, turn it on, and when "ONKYO DVD" has disappeared from the display, while holding down the Stop [ ] button, press the [STANDBY/ON] button. In the unlikely even that component. Try selecting ...