Owner Manual
Page 5
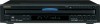
...HDMI Input 20 Connecting -compatible Components .........21 Powering Up & Setting Up the DV-CP704 22 Powering Up the DV-CP704 22 First Time Setup 22 Basic Playback 23 Loading & Removing Discs 23 Loading Discs During Playback 24 Selecting Discs 24 Starting, Pausing & Stopping Playback ......25 Navigating Disc Menus 26 Using the Disc...35 Memory Playback 36 Selecting Camera Angles 37 Selecting Languages & Audio Formats...... 38 Selecting Subtitles 38 Setting the HDMI 39 Using Last Memory 40 Zooming 41 Displaying Information 41 Configuring the DV-CP704 42 Using the Onscreen Setup ...
...HDMI Input 20 Connecting -compatible Components .........21 Powering Up & Setting Up the DV-CP704 22 Powering Up the DV-CP704 22 First Time Setup 22 Basic Playback 23 Loading & Removing Discs 23 Loading Discs During Playback 24 Selecting Discs 24 Starting, Pausing & Stopping Playback ......25 Navigating Disc Menus 26 Using the Disc...35 Memory Playback 36 Selecting Camera Angles 37 Selecting Languages & Audio Formats...... 38 Selecting Subtitles 38 Setting the HDMI 39 Using Last Memory 40 Zooming 41 Displaying Information 41 Configuring the DV-CP704 42 Using the Onscreen Setup ...
Owner Manual
Page 6
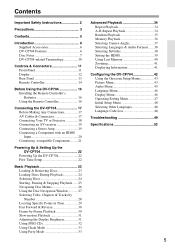
... 192 kHz/24-bit D/A converter • Coaxial digital output • Optical digital output • Analog output Others • Load discs without stopping playback • Adjustable display brightness • Slow motion playback • Fast forward and reverse • Repeat playback options include: Chapter... HDMI logo and High-Definition Multimedia Interface are trademarks, or registered trademarks of Microsoft Corporation in addition to an connection, you must make an analog audio connection (RCA) between the DV-CP704 and your Onkyo AV receiver. Introduction Supplied Accessories ...
... 192 kHz/24-bit D/A converter • Coaxial digital output • Optical digital output • Analog output Others • Load discs without stopping playback • Adjustable display brightness • Slow motion playback • Fast forward and reverse • Repeat playback options include: Chapter... HDMI logo and High-Definition Multimedia Interface are trademarks, or registered trademarks of Microsoft Corporation in addition to an connection, you must make an analog audio connection (RCA) between the DV-CP704 and your Onkyo AV receiver. Introduction Supplied Accessories ...
Owner Manual
Page 11
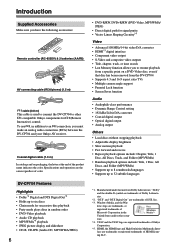
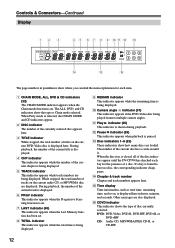
... used with the Party mode function. H RANDOM button (35) This button is used to select discs for more information. J DISPLAY button (41) This button is used to select the disc bays (i.e., rotate the disc tray) when loading or removing discs, and to pause playback. Q PAUSE [ ] button (25) This button is turned on or off. B STANDBY...
... used with the Party mode function. H RANDOM button (35) This button is used to select discs for more information. J DISPLAY button (41) This button is used to select the disc bays (i.e., rotate the disc tray) when loading or removing discs, and to pause playback. Q PAUSE [ ] button (25) This button is turned on or off. B STANDBY...
Owner Manual
Page 12
...CD indicators show where you can find the main explanation for the presence of a disc. B Pause indicator (25) This indicator appears when playback is shown during playback. Other messages are loaded. During playback, the number of the current title is displayed. 4 CHP indicator This ...while track numbers are displayed. When Party mode is being displayed. 0 Camera angle indicator (37) This indicator appears if the DVD-Video disc being displayed. F CDVD indicator This indicator shows the type of titles on , is displayed here. E Time display Time information, such as...
...CD indicators show where you can find the main explanation for the presence of a disc. B Pause indicator (25) This indicator appears when playback is shown during playback. Other messages are loaded. During playback, the number of the current title is displayed. 4 CHP indicator This ...while track numbers are displayed. When Party mode is being displayed. 0 Camera angle indicator (37) This indicator appears if the DVD-Video disc being displayed. F CDVD indicator This indicator shows the type of titles on , is displayed here. E Time display Time information, such as...
Owner Manual
Page 15
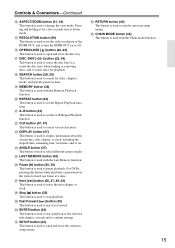
...the selected title chapter, or track and to change the view mode. X ANGLE button (37) This button is used to start playback of the HDMI OUT, and to select the next chapter or track. c Fast Forward [ ] button (30) This button is used to select different camera angles...This button is used to stop playback. For DVDs, pressing this button while playback is used to select the disc bays (i.e., rotate the disc tray) when loading or removing discs, and to open and close the disc tray. P OPEN/CLOSE [ ] button (23, 24) This button is paused moves the video forward one...
...the selected title chapter, or track and to change the view mode. X ANGLE button (37) This button is used to start playback of the HDMI OUT, and to select the next chapter or track. c Fast Forward [ ] button (30) This button is used to select different camera angles...This button is used to stop playback. For DVDs, pressing this button while playback is used to select the disc bays (i.e., rotate the disc tray) when loading or removing discs, and to open and close the disc tray. P OPEN/CLOSE [ ] button (23, 24) This button is paused moves the video forward one...
Owner Manual
Page 22
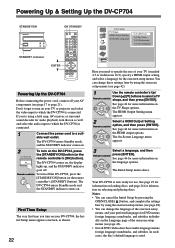
...DV-CP704 enters Standby mode and the STANDBY indicator comes on selecting and playing discs. The HDMI Output Setting menu appears. 2 Select a HDMI Output Setting option, and then press [ENTER]. In such cases, the disc's default language is connected. First Time Setup The very first time you...64257; amp, AV receiver, or surround sound decoder for audio playback, turn on your TV (standard 4:3 or widescreen 16:9), specify a HDMI output setting, and select a language for the onscreen setup menus. See page 23 for information on loading discs, and page 24 for information on .
...DV-CP704 enters Standby mode and the STANDBY indicator comes on selecting and playing discs. The HDMI Output Setting menu appears. 2 Select a HDMI Output Setting option, and then press [ENTER]. In such cases, the disc's default language is connected. First Time Setup The very first time you...64257; amp, AV receiver, or surround sound decoder for audio playback, turn on your TV (standard 4:3 or widescreen 16:9), specify a HDMI output setting, and select a language for the onscreen setup menus. See page 23 for information on loading discs, and page 24 for information on .
Owner Manual
Page 23
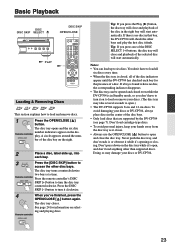
...the DV-CP704 (see page 7). Never push the disc tray, and don't touch it, or obstruct it while it closes. • Always use the OPEN/CLOSE [ ] button to turn the disc tray counterclockwise. ber of the disc bays. • Only load discs that bay, the DV-CP704 will close and ...playback of the disc in the center of the disc bay on the right. 2 Place a disc, label side up to access the other disc bays. The disc tray turns counterclockwise two bays...
...the DV-CP704 (see page 7). Never push the disc tray, and don't touch it, or obstruct it while it closes. • Always use the OPEN/CLOSE [ ] button to turn the disc tray counterclockwise. ber of the disc bays. • Only load discs that bay, the DV-CP704 will close and ...playback of the disc in the center of the disc bay on the right. 2 Place a disc, label side up to access the other disc bays. The disc tray turns counterclockwise two bays...
Owner Manual
Page 24
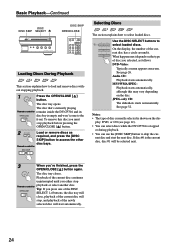
... playback or select another disc. rent disc and start automatically. 24 Playback of the current disc has a circle around it. JPEG-only CD: The slideshow starts automatically. Basic Playback-Continued DISC DISC SKIP SELECT DISC SKIP OPEN/CLOSE Loading Discs During Playback DVD CD MP3 WMA JPEG This section explains how to select loaded discs. The disc tray opens. To remove...
... playback or select another disc. rent disc and start automatically. 24 Playback of the current disc has a circle around it. JPEG-only CD: The slideshow starts automatically. Basic Playback-Continued DISC DISC SKIP SELECT DISC SKIP OPEN/CLOSE Loading Discs During Playback DVD CD MP3 WMA JPEG This section explains how to select loaded discs. The disc tray opens. To remove...
Owner Manual
Page 26
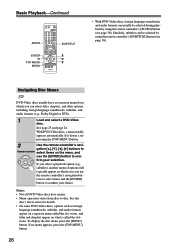
... to select items and the [ENTER] button to con- firm your choice. See page 23 and page 24. Navigating Disc Menus DVD DVD-Video discs usually have menus. • Menu operation varies from which case you can select titles, chapters, and other options, including foreign ...soundtracks, subtitles, and audio formats (e.g., Dolby Digital or DTS). 1 Load and select a DVD-Video disc. Notes: • Not all DVD-Video discs have an onscreen menu from disc-to Remote controller select items on what's called the disc menu, and titles and chapters appear on the menu, and use ...
... to select items and the [ENTER] button to con- firm your choice. See page 23 and page 24. Navigating Disc Menus DVD DVD-Video discs usually have menus. • Menu operation varies from which case you can select titles, chapters, and other options, including foreign ...soundtracks, subtitles, and audio formats (e.g., Dolby Digital or DTS). 1 Load and select a DVD-Video disc. Notes: • Not all DVD-Video discs have an onscreen menu from disc-to Remote controller select items on what's called the disc menu, and titles and chapters appear on the menu, and use ...
Owner Manual
Page 27
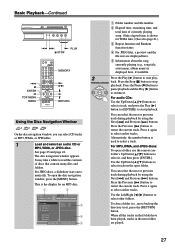
... Play [ ] button to select earlier tracks. You can select CD tracks or MP3, WMA, or JPEG files. 1 Load and select an audio CD or MP3, WMA, or JPEG disc. Press it again to resume it , and then press [ENTER]. To close a folder (i.e., move back up the directory tree),...the Up/Down [ ]/[ ] buttons to select a track, and press the Play [ ] button (or [ENTER]) to start playback. Press it again to select it . Onkyo 1 004. Track01 MP3 002. When all the tracks in the next folder are displayed here. E Information about the song currently playing (e.g., song title, artist name...
... Play [ ] button to select earlier tracks. You can select CD tracks or MP3, WMA, or JPEG files. 1 Load and select an audio CD or MP3, WMA, or JPEG disc. Press it again to resume it , and then press [ENTER]. To close a folder (i.e., move back up the directory tree),...the Up/Down [ ]/[ ] buttons to select a track, and press the Play [ ] button (or [ENTER]) to start playback. Press it again to select it . Onkyo 1 004. Track01 MP3 002. When all the tracks in the next folder are displayed here. E Information about the song currently playing (e.g., song title, artist name...
Owner Manual
Page 28
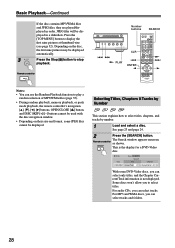
... buttons SEARCH CLR PLAY ENTER Notes: • You can select tracks. The Search window appears onscreen, Remote controller as shown. Depending on the disc, the first nine pictures may be displayed automatically. 3 Press the Stop [ ] button to play a random selection of MP3/WMA fi.... Basic Playback-Continued If the disc contains MP3/WMA files and JPEG files, they are played/displayed in a slideshow. Selecting Titles, Chapters & Tracks by Number DVD CD MP3 WMA This section explains how to select titles, chapters, and tracks by number. 1 Load and select...
... buttons SEARCH CLR PLAY ENTER Notes: • You can select tracks. The Search window appears onscreen, Remote controller as shown. Depending on the disc, the first nine pictures may be displayed automatically. 3 Press the Stop [ ] button to play a random selection of MP3/WMA fi.... Basic Playback-Continued If the disc contains MP3/WMA files and JPEG files, they are played/displayed in a slideshow. Selecting Titles, Chapters & Tracks by Number DVD CD MP3 WMA This section explains how to select titles, chapters, and tracks by number. 1 Load and select...
Owner Manual
Page 32
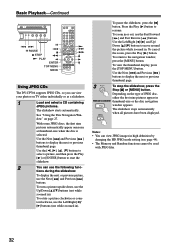
... Reverse [ ] buttons. Depending on the type of JPEG disc, either individually or as a slideshow. 1 Load and select a CD containing JPEG pictures. With some JPEG discs, the first nine pictures automatically appear onscreen at thumbnail-size when the disc is selected. To view the thumbnail display, press the [...photos on page 27. Notes: • You can view JPEG images in Remote controller thumbnail-size or the disc navigation window appears. See "Using the Disc Navigation Window" on TV either the first nine pictures appear in high definition by changing ...
... Reverse [ ] buttons. Depending on the type of JPEG disc, either individually or as a slideshow. 1 Load and select a CD containing JPEG pictures. With some JPEG discs, the first nine pictures automatically appear onscreen at thumbnail-size when the disc is selected. To view the thumbnail display, press the [...photos on page 27. Notes: • You can view JPEG images in Remote controller thumbnail-size or the disc navigation window appears. See "Using the Disc Navigation Window" on TV either the first nine pictures appear in high definition by changing ...

Owner Manual
Page 33
...- Using Party Mode CD MP3 WMA With the Party mode function, you can play all audio CDs and MP3/WMA discs consecutively as if they were one big disc. 1 Press the [CHAIN MODE] button repeatedly to select CD, DVD, or Remote controller ALL. The CHAIN MODE ... functions with Chain mode. • You can - ALL: All discs are played consecu- CD: All audio CDs, including MP3 and WMA discs, are played consecutively. Press the [PARTY MODE] button. All loaded audio discs, including MP3 and WMA discs, are played automatically. tively. The CHAIN MODE and CD indicators appear...
...- Using Party Mode CD MP3 WMA With the Party mode function, you can play all audio CDs and MP3/WMA discs consecutively as if they were one big disc. 1 Press the [CHAIN MODE] button repeatedly to select CD, DVD, or Remote controller ALL. The CHAIN MODE ... functions with Chain mode. • You can - ALL: All discs are played consecu- CD: All audio CDs, including MP3 and WMA discs, are played consecutively. Press the [PARTY MODE] button. All loaded audio discs, including MP3 and WMA discs, are played automatically. tively. The CHAIN MODE and CD indicators appear...
Owner Manual
Page 50
... clean it 's incompatible. Connect the DV-CP704 directly to direct sunshine or inverter-type fluorescent lights. Load some discs (page 23). Load the disc the correct way up (page 23). Use the correct filename extension (page 8). If that doesn't resolve the issue,...le is normal. Install new batteries (page 16). No discs loaded. Power supply voltage fluctuations and other video equipment and its copy protection system is installed in the center of approximately 16 ft. (5 meters). Change the Digital/HDMI Audio Out setting to Down Sample On (page 45)....
... clean it 's incompatible. Connect the DV-CP704 directly to direct sunshine or inverter-type fluorescent lights. Load some discs (page 23). Load the disc the correct way up (page 23). Use the correct filename extension (page 8). If that doesn't resolve the issue,...le is normal. Install new batteries (page 16). No discs loaded. Power supply voltage fluctuations and other video equipment and its copy protection system is installed in the center of approximately 16 ft. (5 meters). Change the Digital/HDMI Audio Out setting to Down Sample On (page 45)....


