
Owner Manual
Page 2
... outlet and refer servicing to qualified service personnel. Servicing is used, use attachments/accessories specified by the manufacturer, or sold with the manufacturer's instructions. 8. When the power-supply cord or plug is damaged, liquid has been spilled or objects have fallen into your safety. When the apparatus exhibits a distinct change in accordance with the apparatus. Batteries Always consider...
... outlet and refer servicing to qualified service personnel. Servicing is used, use attachments/accessories specified by the manufacturer, or sold with the manufacturer's instructions. 8. When the power-supply cord or plug is damaged, liquid has been spilled or objects have fallen into your safety. When the apparatus exhibits a distinct change in accordance with the apparatus. Batteries Always consider...
Owner Manual
Page 3
... unit or its side or on the optical pickup, or the disc drive mechanism becomes dirty or worn, the picture quality may be sure to a hot and humid place. - Power WARNING BEFORE PLUGGING IN THE UNIT FOR THE FIRST TIME, READ THE FOLLOWING SECTION CAREFULLY. Precautions 1. Recording Copyright-Unless it's for personal use it occasionally. • When you originally...
... unit or its side or on the optical pickup, or the disc drive mechanism becomes dirty or worn, the picture quality may be sure to a hot and humid place. - Power WARNING BEFORE PLUGGING IN THE UNIT FOR THE FIRST TIME, READ THE FOLLOWING SECTION CAREFULLY. Precautions 1. Recording Copyright-Unless it's for personal use it occasionally. • When you originally...
Owner Manual
Page 4
... a particular installation. nician for your plug, proceed as a "CLASS 1 LASER PRODUCT". If the fuse needs to the terminal which the receiver is coloured blue must be connected to the terminal which can radiate radio frequency energy and, if not installed and used in accordance with the letter N or coloured black. If the power cord's plug is no guarantee that indicated on the rear panel...
... a particular installation. nician for your plug, proceed as a "CLASS 1 LASER PRODUCT". If the fuse needs to the terminal which the receiver is coloured blue must be connected to the terminal which can radiate radio frequency energy and, if not installed and used in accordance with the letter N or coloured black. If the power cord's plug is no guarantee that indicated on the rear panel...

Owner Manual
Page 5
... Instructions 2 Precautions 3 Features 5 Supplied Accessories 5 Table of Contents 5 Front & Rear Panels 6 Front Panel & Display 6 Rear Panel 7 Remote Controller 8 RC-625C Remote Controller 8 Before Using the DX-7555 9 Installing the Remote Controller's Batteries 9 Using the Remote Controller 9 Connections Connecting the DX-7555 10 Audio Connections 10 Connections 11 Operation Turning On the DX-7555 12 Turning On the DX-7555 12 Playing CDs 12 Playing CDs 12 Selecting MP3 Folders & Tracks by Number 15 Displaying Information 16 Memory Playback 17 Random Playback 18 Repeat...
... Instructions 2 Precautions 3 Features 5 Supplied Accessories 5 Table of Contents 5 Front & Rear Panels 6 Front Panel & Display 6 Rear Panel 7 Remote Controller 8 RC-625C Remote Controller 8 Before Using the DX-7555 9 Installing the Remote Controller's Batteries 9 Using the Remote Controller 9 Connections Connecting the DX-7555 10 Audio Connections 10 Connections 11 Operation Turning On the DX-7555 12 Turning On the DX-7555 12 Playing CDs 12 Playing CDs 12 Selecting MP3 Folders & Tracks by Number 15 Displaying Information 16 Memory Playback 17 Random Playback 18 Repeat...
Owner Manual
Page 6
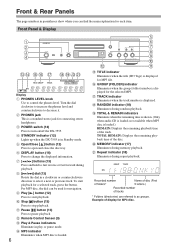
... remaining time is shown. (Only when audio CD is in Standby mode. T MEMORY indicator (17) Illuminates during playback. Front Panel & Display 1 2 3 4 CD EF G HIJK Display A PHONES LEVEL knob Use to decrease it. Turn the dial clockwise to increase the phones level and counterclockwise to control the phones level. B PHONES jack This is a standard stereo jack for a selected track, press the button. D STANDBY indicator (12) Lights up when the DX-7555 is loaded; J Stop [ ] button...
... remaining time is shown. (Only when audio CD is in Standby mode. T MEMORY indicator (17) Illuminates during playback. Front Panel & Display 1 2 3 4 CD EF G HIJK Display A PHONES LEVEL knob Use to decrease it. Turn the dial clockwise to increase the phones level and counterclockwise to control the phones level. B PHONES jack This is a standard stereo jack for a selected track, press the button. D STANDBY indicator (12) Lights up when the DX-7555 is loaded; J Stop [ ] button...
Owner Manual
Page 7
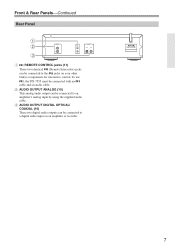
B AUDIO OUTPUT ANALOG (10) This analog audio output can be connected with an cable and an audio cable. To use , the DX-7555 must be connected to an amplifier's analog input by using the supplied audio cable. C AUDIO OUTPUT DIGITAL OPTICAL/ COAXIAL (10) These two digital audio outputs can be connected to the jacks on an amplifier or recorder. 7 Front & Rear Panels-Continued Rear Panel 1 2 3 A REMOTE CONTROL jacks (11) These two identical (Remote Interactive) jacks can be connected to a digital audio input on your other Onkyo components for interactive control.
B AUDIO OUTPUT ANALOG (10) This analog audio output can be connected with an cable and an audio cable. To use , the DX-7555 must be connected to an amplifier's analog input by using the supplied audio cable. C AUDIO OUTPUT DIGITAL OPTICAL/ COAXIAL (10) These two digital audio outputs can be connected to the jacks on an amplifier or recorder. 7 Front & Rear Panels-Continued Rear Panel 1 2 3 A REMOTE CONTROL jacks (11) These two identical (Remote Interactive) jacks can be connected to a digital audio input on your other Onkyo components for interactive control.

Owner Manual
Page 8
...; No Display* * When the display is set to set memory program. L ENTER button 5 Press to turn off again. 8 N DISPLAY button (16) 8 Press to adjust the display brightness. R Play [ ] button (12) Press to enter track numbers. C Number buttons (13, 15) Use these buttons to start playback. tings, and then press the ENTER or Arrow buttons to put the DX-7555 on status. S [ / ] buttons (13) Press to open and close the disc tray. B I registering memory. Press to pause playback. P Pause [ ] button...
...; No Display* * When the display is set to set memory program. L ENTER button 5 Press to turn off again. 8 N DISPLAY button (16) 8 Press to adjust the display brightness. R Play [ ] button (12) Press to enter track numbers. C Number buttons (13, 15) Use these buttons to start playback. tings, and then press the ENTER or Arrow buttons to put the DX-7555 on status. S [ / ] buttons (13) Press to open and close the disc tray. B I registering memory. Press to pause playback. P Pause [ ] button...
Owner Manual
Page 9
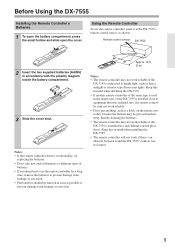
... it at the DX-7555's remote control sensor, as possible to equipment that uses infrared rays, the remote controller may not work reliably if the DX-7555 is installed in accordance with the polarity diagram inside the battery compartment. 3 Slide the cover shut. Keep this in mind when installing the DX-7555. • The remote controller will not work reliably, try replacing the batteries. • Don't mix new and old batteries or different...
... it at the DX-7555's remote control sensor, as possible to equipment that uses infrared rays, the remote controller may not work reliably if the DX-7555 is installed in accordance with the polarity diagram inside the battery compartment. 3 Slide the cover shut. Keep this in mind when installing the DX-7555. • The remote controller will not work reliably, try replacing the batteries. • Don't mix new and old batteries or different...
Owner Manual
Page 10
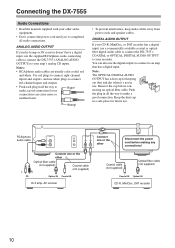
... or optical fiber digital audio cable to connect the DX-7555's COAXIAL or OPTICAL DIGITAL AUDIO OUTPUT to your amp's analog CD inputs. Notes: • RCA/phono audio cables are usually color coded: red and white. Use red plugs to connect right-channel inputs and outputs, and use the digital outputs to connect to make a good connection (loose connections can also use white plugs to connect left-channel inputs and outputs. • Push each plug in all audio connections. Wrong! • To prevent interference, keep audio cables away from power cords and speaker cables...
... or optical fiber digital audio cable to connect the DX-7555's COAXIAL or OPTICAL DIGITAL AUDIO OUTPUT to your amp's analog CD inputs. Notes: • RCA/phono audio cables are usually color coded: red and white. Use red plugs to connect right-channel inputs and outputs, and use the digital outputs to connect to make a good connection (loose connections can also use white plugs to connect left-channel inputs and outputs. • Push each plug in all audio connections. Wrong! • To prevent interference, keep audio cables away from power cords and speaker cables...

Owner Manual
Page 11
.../phono audio cable Disconnect the power cord before making any connections! See the manuals supplied with your other -compatible Onkyo AV components. I Dimmer When you dim the display brightness on an -compatible Onkyo AV component, the displays on all your Onkyo components and use the following special functions: I Direct Change If your DX-7555 is connected to control all other AV components connected via are dimmed as the input source. Coaxial cable (not supplied) cable L R CD Coaxial...
.../phono audio cable Disconnect the power cord before making any connections! See the manuals supplied with your other -compatible Onkyo AV components. I Dimmer When you dim the display brightness on an -compatible Onkyo AV component, the displays on all your Onkyo components and use the following special functions: I Direct Change If your DX-7555 is connected to control all other AV components connected via are dimmed as the input source. Coaxial cable (not supplied) cable L R CD Coaxial...
Owner Manual
Page 12
... but- Put the CD on the remote controller. 4 Press again the switch to start . Press the Play [ ] button to turn on the display. Note: With CDs that contain many tracks, playback may take a while to put on standby next time you turn off the DX-7555. Turning On the DX-7555 Turning On the DX-7555 POWER STANDBY indicator Playing CDs ON STANDBY To wall outlet Playing CDs 1 To open the disc tray, press the Open/Close [ ] button. 2 1 Plug the power cord into a suit...
... but- Put the CD on the remote controller. 4 Press again the switch to start . Press the Play [ ] button to turn on the display. Note: With CDs that contain many tracks, playback may take a while to put on standby next time you turn off the DX-7555. Turning On the DX-7555 Turning On the DX-7555 POWER STANDBY indicator Playing CDs ON STANDBY To wall outlet Playing CDs 1 To open the disc tray, press the Open/Close [ ] button. 2 1 Plug the power cord into a suit...
Owner Manual
Page 13
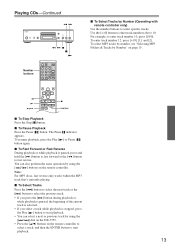
... track by Number" on the remote controller to select a track, and then the ENTER button to start playback. 13 Use the [>10] button to enter track number 10, press [10/0]. To resume playback, press the Play [ ] or Pause [ ] button again. Note: For MP3 discs, fast reverse only works within the MP3 track that's currently playing. To enter track number 12, press [>10], [1], and [2]. I To Select Tracks by using the [ / ] dial on the DX-7555...
... track by Number" on the remote controller to select a track, and then the ENTER button to start playback. 13 Use the [>10] button to enter track number 10, press [10/0]. To resume playback, press the Play [ ] or Pause [ ] button again. Note: For MP3 discs, fast reverse only works within the MP3 track that's currently playing. To enter track number 12, press [>10], [1], and [2]. I To Select Tracks by using the [ / ] dial on the DX-7555...

Owner Manual
Page 14
... same operation by using the Play [ ] button. 14 get track is set to play. And if you press the [ / ] dial, or the ENTER button on the remote controller, the tracks contained in the folder will be displayed in sequential order. This mode can also have to navigate the folder hierarchy to the previous hierarchy, press the Stop [ ] button on the DX-7555, or the [ ] button on the remote controller, playback will...
... same operation by using the Play [ ] button. 14 get track is set to play. And if you press the [ / ] dial, or the ENTER button on the remote controller, the tracks contained in the folder will be displayed in sequential order. This mode can also have to navigate the folder hierarchy to the previous hierarchy, press the Stop [ ] button on the DX-7555, or the [ ] button on the remote controller, playback will...
Owner Manual
Page 15
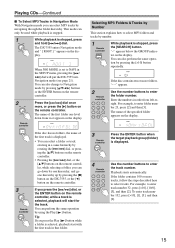
... number. 1 Remote controller While playback is set to select tracks. The DX-7555 enters Navigation mode and " [ ROOT ] " appears on the display. 3 Remote controller Press the ENTER button when the target playback group (folder) is stopped, press and hold [ / ] dial. If the disc has no folders, the name of the specified folder appears on the display. 2 Remote controller 3 Remote controller When JOG MODE is stopped, press the [SEARCH] button. For example, to enter track number...
... number. 1 Remote controller While playback is set to select tracks. The DX-7555 enters Navigation mode and " [ ROOT ] " appears on the display. 3 Remote controller Press the ENTER button when the target playback group (folder) is stopped, press and hold [ / ] dial. If the disc has no folders, the name of the specified folder appears on the display. 2 Remote controller 3 Remote controller When JOG MODE is stopped, press the [SEARCH] button. For example, to enter track number...
Owner Manual
Page 17
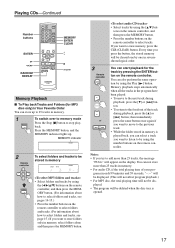
.... 1 To switch over to memory mode Press the Stop [ ] button to 25 tracks in reverse chronological order. Notes: • If you press the button, the stored memory will be cleared one by using the Play [ ] button. Memory playback stops automatically when all the tracks in the program have been played. • To move to erase memory, press the CLR (CLEAR) button. Playing CDs-Continued Number buttons ENTER / RANDOM REPEAT MEMORY...
.... 1 To switch over to memory mode Press the Stop [ ] button to 25 tracks in reverse chronological order. Notes: • If you press the button, the stored memory will be cleared one by using the Play [ ] button. Memory playback stops automatically when all the tracks in the program have been played. • To move to erase memory, press the CLR (CLEAR) button. Playing CDs-Continued Number buttons ENTER / RANDOM REPEAT MEMORY...
Owner Manual
Page 20
... produces no distinctive effect, use the DX-7555 with the factory default setting (SHARP). 20 When using the remote controller, press the [ / ] buttons and then ENTER button. 4 Remote controller Rotate the [ / ] dial in a direction of clockwise or counterclockwise to display a title you are recommended to switch the characteristics of the digital filter for better sound quality. When using the remote controller, press the ENTER or SETUP button. terclockwise to reproduce agogics...
... produces no distinctive effect, use the DX-7555 with the factory default setting (SHARP). 20 When using the remote controller, press the [ / ] buttons and then ENTER button. 4 Remote controller Rotate the [ / ] dial in a direction of clockwise or counterclockwise to display a title you are recommended to switch the characteristics of the digital filter for better sound quality. When using the remote controller, press the ENTER or SETUP button. terclockwise to reproduce agogics...

Owner Manual
Page 21
... are played. JOLIET (USE SVD/ISO9660) This preference applies to NOT READ, version 2.3/2.4 ID3 tags will not be displayed. Depending on which the audio processing is read. SVD (Supplementary Volume Descriptor) supports long file and folder names and characters other word a sound image may hear slurred or unclear sound, in CD disc will be output with the factory default setting (NORMAL). The operation...
... are played. JOLIET (USE SVD/ISO9660) This preference applies to NOT READ, version 2.3/2.4 ID3 tags will not be displayed. Depending on which the audio processing is read. SVD (Supplementary Volume Descriptor) supports long file and folder names and characters other word a sound image may hear slurred or unclear sound, in CD disc will be output with the factory default setting (NORMAL). The operation...

Owner Manual
Page 22
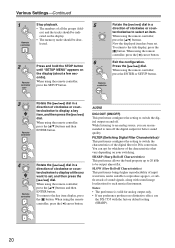
... to display [INITIAL- When using the remote controller, press the ENTER button. terclockwise to display [EXECUTE]. Various Settings-Continued To Return Each Setting to the Factory Default 1 Remote controller Stop playback. • The numbers of all the groups (folders) and the tracks should be indicated on the display (about a few seconds). If a disc is loaded, the DX-7555 will start reading the disc from scratch. 2 Remote controller Press and hold the STOP button until "SETUP MENU...
... to display [INITIAL- When using the remote controller, press the ENTER button. terclockwise to display [EXECUTE]. Various Settings-Continued To Return Each Setting to the Factory Default 1 Remote controller Stop playback. • The numbers of all the groups (folders) and the tracks should be indicated on the display (about a few seconds). If a disc is loaded, the DX-7555 will start reading the disc from scratch. 2 Remote controller Press and hold the STOP button until "SETUP MENU...
Owner Manual
Page 23
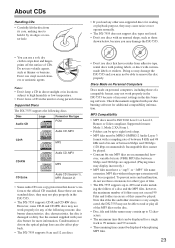
... any of time. About CDs Handling CDs • Carefully lift the disc from adhesive tape, rental discs with peeling labels, or discs with custommade labels or stickers. Condensation or dirt on personal computers, including those shown below, because you may damage the DX-7555. • You can also affect playback. • The DX-7555 supports 8 cm and 12 cm discs. • Don't use vinyl record cleaners or...
... any of time. About CDs Handling CDs • Carefully lift the disc from adhesive tape, rental discs with peeling labels, or discs with custommade labels or stickers. Condensation or dirt on personal computers, including those shown below, because you may damage the DX-7555. • You can also affect playback. • The DX-7555 supports 8 cm and 12 cm discs. • Don't use vinyl record cleaners or...
Owner Manual
Page 25
.... Power Can't turn the power on by pressing the [ ] button before you have any trouble using the DX-7555, look for a solution here. See "Supported Discs" on for memory playback. • No such track on page 23. • The CD-R/RW disc is properly plugged into the full stop state by pressing the ON button on the DX-7555. • Make sure that the DX-7555 is dirty. Remove the disc and clean it...
.... Power Can't turn the power on by pressing the [ ] button before you have any trouble using the DX-7555, look for a solution here. See "Supported Discs" on for memory playback. • No such track on page 23. • The CD-R/RW disc is properly plugged into the full stop state by pressing the ON button on the DX-7555. • Make sure that the DX-7555 is dirty. Remove the disc and clean it...


