
Owner Manual
Page 2
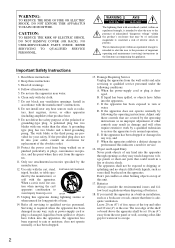
...where they may be exposed to escape. 2 A polarized plug has two blades with arrowhead symbol, within an equilateral triangle, is used, use attachments/accessories specified by following conditions: A. The rear edge of uninsulated "dangerous voltage" within an equilateral triangle is ... wall, creating a flue-like gap for service. 16. PORTABLE CART WARNING S3125A 13. Important Safety Instructions 1. Only use caution when moving the cart/ apparatus combination to qualified service personnel. The apparatus shall not be of sufficient magnitude to...
...where they may be exposed to escape. 2 A polarized plug has two blades with arrowhead symbol, within an equilateral triangle, is used, use attachments/accessories specified by following conditions: A. The rear edge of uninsulated "dangerous voltage" within an equilateral triangle is ... wall, creating a flue-like gap for service. 16. PORTABLE CART WARNING S3125A 13. Important Safety Instructions 1. Only use caution when moving the cart/ apparatus combination to qualified service personnel. The apparatus shall not be of sufficient magnitude to...
Owner Manual
Page 3
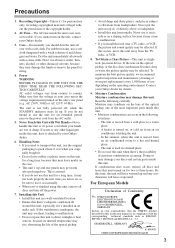
... normal. • If you originally bought it on its power cord while your Onkyo dealer. 6. Dry the unit immediately afterwards with a soft cloth. Doing so may damage your Onkyo dealer for a long time, it on the operating environment. Don't use abrasive cloths, thinners, alcohol, or other liquid gets inside this unit or its...
... normal. • If you originally bought it on its power cord while your Onkyo dealer. 6. Dry the unit immediately afterwards with a soft cloth. Doing so may damage your Onkyo dealer for a long time, it on the operating environment. Don't use abrasive cloths, thinners, alcohol, or other liquid gets inside this unit or its...
Owner Manual
Page 4
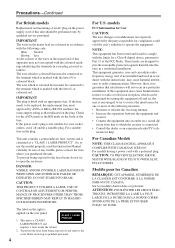
...the terminals in your socket outlets, cut if off and on, the user is encouraged to try to open the enclosure. Refer servicing to use this model properly, read this Instruction Manual carefully. This unit is connected. • Consult the dealer or an experienced radio/TV tech- ...If this equipment does cause harmful interference to radio or television reception, which can radiate radio frequency energy and, if not installed and used in the plug. Precautions-Continued For British models Replacement and mounting of an AC plug on the power supply cord of this unit should...
...the terminals in your socket outlets, cut if off and on, the user is encouraged to try to open the enclosure. Refer servicing to use this model properly, read this Instruction Manual carefully. This unit is connected. • Consult the dealer or an experienced radio/TV tech- ...If this equipment does cause harmful interference to radio or television reception, which can radiate radio frequency energy and, if not installed and used in the plug. Precautions-Continued For British models Replacement and mounting of an AC plug on the power supply cord of this unit should...

Owner Manual
Page 5
... Remote Control Supplied Accessories Make sure you have the following accessories: Audio cable (1 m) cable (80 cm) • To use , the DX-7555 must be connected with an cable and an audio cable. Remote controller RC-625C & two batteries (AA/R6) Table of ... Remote Controller 8 RC-625C Remote Controller 8 Before Using the DX-7555 9 Installing the Remote Controller's Batteries 9 Using the Remote Controller 9 Connections Connecting the DX-7555 10 Audio Connections 10 Connections 11 Operation Turning On the DX-7555 12 Turning On the DX-7555 12 Playing CDs 12 Playing CDs 12 Selecting MP3...
... Remote Control Supplied Accessories Make sure you have the following accessories: Audio cable (1 m) cable (80 cm) • To use , the DX-7555 must be connected with an cable and an audio cable. Remote controller RC-625C & two batteries (AA/R6) Table of ... Remote Controller 8 RC-625C Remote Controller 8 Before Using the DX-7555 9 Installing the Remote Controller's Batteries 9 Using the Remote Controller 9 Connections Connecting the DX-7555 10 Audio Connections 10 Connections 11 Operation Turning On the DX-7555 12 Turning On the DX-7555 12 Playing CDs 12 Playing CDs 12 Selecting MP3...
Owner Manual
Page 6
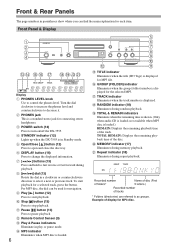
...is in Standby mode. U Repeat indicator (18) Illuminates during random playback. Front Panel & Display 1 2 3 4 CD EF G HIJK Display A PHONES LEVEL knob Use to decrease it. E Open/Close [ ] button (12) Press to pause playback L Remote Control Senser (9) M Play & Pause indicators Illuminate in play or pause ...of display for MP3 disc. H [ / ] dial (13) Rotate the dial in a clockwise or counterclockwise direction to turn on/off the DX-7555. R RANDOM indicator (18) Illuminates during repeat playback. Example of the disc. B PHONES jack This is displayed for MP3 file. N...
...is in Standby mode. U Repeat indicator (18) Illuminates during random playback. Front Panel & Display 1 2 3 4 CD EF G HIJK Display A PHONES LEVEL knob Use to decrease it. E Open/Close [ ] button (12) Press to pause playback L Remote Control Senser (9) M Play & Pause indicators Illuminate in play or pause ...of display for MP3 disc. H [ / ] dial (13) Rotate the dial in a clockwise or counterclockwise direction to turn on/off the DX-7555. R RANDOM indicator (18) Illuminates during repeat playback. Example of the disc. B PHONES jack This is displayed for MP3 file. N...
Owner Manual
Page 7
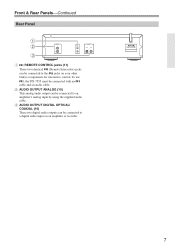
To use , the DX-7555 must be connected to an amplifier's analog input by using the supplied audio cable. B AUDIO OUTPUT ANALOG (10) This analog audio output can be connected with an cable and an audio cable. C AUDIO OUTPUT DIGITAL OPTICAL/ COAXIAL (10) These two digital audio outputs can be connected to a digital audio input on your other Onkyo components for interactive control. Front & Rear Panels-Continued Rear Panel 1 2 3 A REMOTE CONTROL jacks (11) These two identical (Remote Interactive) jacks can be connected to the jacks on an amplifier or recorder. 7
To use , the DX-7555 must be connected to an amplifier's analog input by using the supplied audio cable. B AUDIO OUTPUT ANALOG (10) This analog audio output can be connected with an cable and an audio cable. C AUDIO OUTPUT DIGITAL OPTICAL/ COAXIAL (10) These two digital audio outputs can be connected to a digital audio input on your other Onkyo components for interactive control. Front & Rear Panels-Continued Rear Panel 1 2 3 A REMOTE CONTROL jacks (11) These two identical (Remote Interactive) jacks can be connected to the jacks on an amplifier or recorder. 7

Owner Manual
Page 8
...Press to search and select a track number. E SETUP button (20) Press to display the screen for several seconds, then turn on the DX-7555 from its standby mode. A H REPEAT button (18) Press to set memory program. Press to remove the last track in parentheses show where...standby from its pow- P Pause [ ] button (13) Press to enter track numbers. C Number buttons (13, 15) Use these buttons to pause playback. B STANDBY button (12) Press to put the DX-7555 on status. R Play [ ] button (12) Press to start playback. E K MEMORY button (17) Press to set ...
...Press to search and select a track number. E SETUP button (20) Press to display the screen for several seconds, then turn on the DX-7555 from its standby mode. A H REPEAT button (18) Press to set memory program. Press to remove the last track in parentheses show where...standby from its pow- P Pause [ ] button (13) Press to enter track numbers. C Number buttons (13, 15) Use these buttons to pause playback. B STANDBY button (12) Press to put the DX-7555 on status. R Play [ ] button (12) Press to start playback. E K MEMORY button (17) Press to set ...
Owner Manual
Page 9
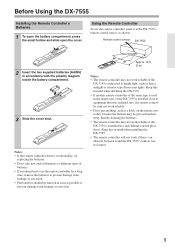
... of the same type is used in mind when installing the DX-7555. • If another remote controller of batteries. • If you intend not to use the remote controller, point it and the DX-7555's remote control sensor. 9 Using the Remote Controller To use the remote controller for a long... 3 Slide the cover shut. Remote control sensor DX-7555 2 Insert the two supplied batteries (AA/R6) in mind when installing the DX-7555. • The remote controller will not work reliably if the DX-7555 is installed close to equipment that uses infrared rays, the remote controller may not work ...
... of the same type is used in mind when installing the DX-7555. • If another remote controller of batteries. • If you intend not to use the remote controller, point it and the DX-7555's remote control sensor. 9 Using the Remote Controller To use the remote controller for a long... 3 Slide the cover shut. Remote control sensor DX-7555 2 Insert the two supplied batteries (AA/R6) in mind when installing the DX-7555. • The remote controller will not work reliably if the DX-7555 is installed close to equipment that uses infrared rays, the remote controller may not work ...
Owner Manual
Page 10
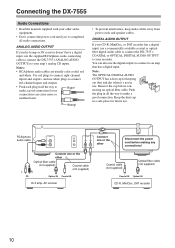
...in all the way to your hi-fi amp or AV receiver doesn't have a digital input, use a commercially available coaxial or optical fiber digital audio cable to connect the DX-7555's COAXIAL or OPTICAL DIGITAL AUDIO OUTPUT to an amp that has a digital input. RCA/phono audio ...all the way to make a good connection (loose connections can also use the digital outputs to connect to your CD-R, MiniDisc, or DAT recorder has a digital input, use the supplied RCA/phono audio connecting cable to connect the DX-7555's ANALOG AUDIO OUTPUTs to make a good connection. Wrong! •...
...in all the way to your hi-fi amp or AV receiver doesn't have a digital input, use a commercially available coaxial or optical fiber digital audio cable to connect the DX-7555's COAXIAL or OPTICAL DIGITAL AUDIO OUTPUT to an amp that has a digital input. RCA/phono audio ...all the way to make a good connection (loose connections can also use the digital outputs to connect to your CD-R, MiniDisc, or DAT recorder has a digital input, use the supplied RCA/phono audio connecting cable to connect the DX-7555's ANALOG AUDIO OUTPUTs to make a good connection. Wrong! •...

Owner Manual
Page 11
... them to control all other -compatible AV components for connecting additional -compatible components. • Connect the DX-7555's connector to your Onkyo components and use the functions, you need to connect one remote controller to malfunction. • Some Onkyo -compatible AV components may not support the special functions described here. RCA/phono audio cable Disconnect...
... them to control all other -compatible AV components for connecting additional -compatible components. • Connect the DX-7555's connector to your Onkyo components and use the functions, you need to connect one remote controller to malfunction. • Some Onkyo -compatible AV components may not support the special functions described here. RCA/phono audio cable Disconnect...
Owner Manual
Page 13
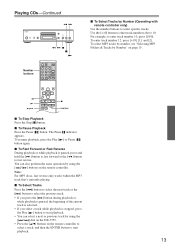
... ] button to fast forward or the [ ] button to fast reverse. The Pause indicator appears. You can also perform the same operation by using the [ / ] dial on the DX-7555. • Press the [ / ] buttons on the remote controller to select a track, and then the ENTER button to start playback. •...; You can select a next or previous track by using the [ ]/[ ] buttons on page 15. / / I To Fast Forward or Fast Reverse During playback ...
... ] button to fast forward or the [ ] button to fast reverse. The Pause indicator appears. You can also perform the same operation by using the [ / ] dial on the DX-7555. • Press the [ / ] buttons on the remote controller to select a track, and then the ENTER button to start playback. •...; You can select a next or previous track by using the [ ]/[ ] buttons on page 15. / / I To Fast Forward or Fast Reverse During playback ...

Owner Manual
Page 14
... To select a track for the track. I Selecting MP3 Tracks You don't have control by using the Play [ ] button. To go back to NAVI in the SETUP menu, keeping the [ / ] dial pressed will put the DX-7555 into Group mode (see page 21). 2 Select a folder in sequential order. Remote controller 3...folder will start for playback You can be displayed. This mode can select a track by using the Play [ ] button. 14 get track is set to the previous hierarchy, press the Stop [ ] button on the DX-7555, or the [ ] button on the remote controller, playback will be displayed. You ...
... To select a track for the track. I Selecting MP3 Tracks You don't have control by using the Play [ ] button. To go back to NAVI in the SETUP menu, keeping the [ / ] dial pressed will put the DX-7555 into Group mode (see page 21). 2 Select a folder in sequential order. Remote controller 3...folder will start for playback You can be displayed. This mode can select a track by using the Play [ ] button. 14 get track is set to the previous hierarchy, press the Stop [ ] button on the DX-7555, or the [ ] button on the remote controller, playback will be displayed. You ...
Owner Manual
Page 15
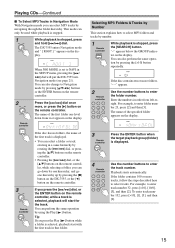
...how to select MP3 folders and tracks by number. 1 Remote controller While playback is displayed. 4 Remote controller Use the number buttons to Navigation mode by pressing the [ ] button on the DX-7555, or the [ ] button on the remote controller. For example, to enter the folder number. Enter ... on the remote controller, while a track is stopped, press and hold [ / ] dial. If you can only be used while playback is stopped. 1 While playback is selected, playback will put the DX-7555 into Navigation mode (see page 21). The name of the first folder one hierarchy...
...how to select MP3 folders and tracks by number. 1 Remote controller While playback is displayed. 4 Remote controller Use the number buttons to Navigation mode by pressing the [ ] button on the DX-7555, or the [ ] button on the remote controller. For example, to enter the folder number. Enter ... on the remote controller, while a track is stopped, press and hold [ / ] dial. If you can only be used while playback is stopped. 1 While playback is selected, playback will put the DX-7555 into Navigation mode (see page 21). The name of the first folder one hierarchy...
Owner Manual
Page 17
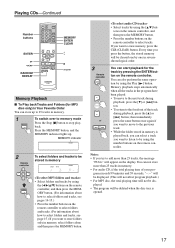
... playback for MP3 disc only) in Your Favorite Order You can not store more than 25 tracks in memory • Select folders and tracks by using the [ / / / ] buttons on the remote controller, and then press the MEMORY button. (For information about how to select folders and tracks... to be cleared one by one in memory, select folders alone and then press the MEMORY button. 3 Remote controller or • Select tracks by using the [ / ] but- MEMORY indicator 2 Remote controller To select folders and tracks to store folders only in reverse chronological order. You can store ...
... playback for MP3 disc only) in Your Favorite Order You can not store more than 25 tracks in memory • Select folders and tracks by using the [ / / / ] buttons on the remote controller, and then press the MEMORY button. (For information about how to select folders and tracks... to be cleared one by one in memory, select folders alone and then press the MEMORY button. 3 Remote controller or • Select tracks by using the [ / ] but- MEMORY indicator 2 Remote controller To select folders and tracks to store folders only in reverse chronological order. You can store ...
Owner Manual
Page 18
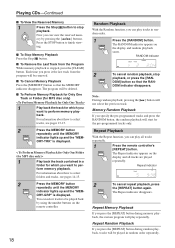
... remote controller. 18 Random Playback With the Random function, you press it the last track from the Program While memory playback is displayed. ory by using the number buttons on the display and random playback starts. I To Perform Memory Playback for Only One Track or Folder (for MP3 disc only) 1 Play...
... remote controller. 18 Random Playback With the Random function, you press it the last track from the Program While memory playback is displayed. ory by using the number buttons on the display and random playback starts. I To Perform Memory Playback for Only One Track or Folder (for MP3 disc only) 1 Play...
Owner Manual
Page 19
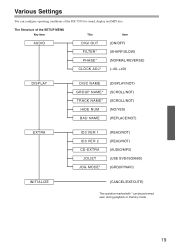
... ID3 VER 1 ID3 VER 2 CD-EXTRA JOLIET JOG MODE* (READ/NOT) (READ/NOT) (AUDIO/MP3) (USE SVD/ISO9660) (GROUP/NAVI) INITIALIZE (CANCEL/EXECUTE) The operation marked with * can configure operating conditions of the DX-7555 for sound, display and MP3 disc. Various Settings You can be performed even during playback or...
... ID3 VER 1 ID3 VER 2 CD-EXTRA JOLIET JOG MODE* (READ/NOT) (READ/NOT) (AUDIO/MP3) (USE SVD/ISO9660) (GROUP/NAVI) INITIALIZE (CANCEL/EXECUTE) The operation marked with * can configure operating conditions of the DX-7555 for sound, display and MP3 disc. Various Settings You can be performed even during playback or...
Owner Manual
Page 20
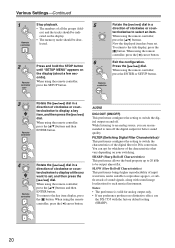
... Characteristics) This preference brings higher reproducibility of input waveform, and is valid for analog output only. • If any preference produces no distinctive effect, use the DX-7555 with sound image localization for each musical instrument. SLOW (Slow Roll-off Characteristics) This preference allows the band property up to 20 kHz to turn...
... Characteristics) This preference brings higher reproducibility of input waveform, and is valid for analog output only. • If any preference produces no distinctive effect, use the DX-7555 with sound image localization for each musical instrument. SLOW (Slow Roll-off Characteristics) This preference allows the band property up to 20 kHz to turn...

Owner Manual
Page 21
...(Reversed Phase) The waveform recorded in an approximate range between +40 and -40. • If any adjustment produces no distinctive effect, use the DX-7555 with the factory default setting (NORMAL). Notes: • You can be output with * can adjust in CD disc will be performed even... with the factory default setting (0). JOG MODE (GROUP/NAVI)* This preference configures the setting to switch the search method you may use the DX-7555 with a value of the track name and the group (folder) name. CLOCK ADJ (Clock Adjustment)* This preference configures the setting...
...(Reversed Phase) The waveform recorded in an approximate range between +40 and -40. • If any adjustment produces no distinctive effect, use the DX-7555 with the factory default setting (NORMAL). Notes: • You can be output with * can adjust in CD disc will be performed even... with the factory default setting (0). JOG MODE (GROUP/NAVI)* This preference configures the setting to switch the search method you may use the DX-7555 with a value of the track name and the group (folder) name. CLOCK ADJ (Clock Adjustment)* This preference configures the setting...

Owner Manual
Page 22
...disc is loaded, the DX-7555 will start reading the disc from scratch. 2 Remote controller Press and hold the STOP button until "SETUP MENU" appears on the display. • The memory mode should be deselected. 5 Remote controller Press the [ / ] dial. When using the remote controller, press... the [ / ] buttons and then the ENTER button. When using the remote controller, press the SETUP button. 3 Rotate the [ / ] dial in a direction of clockwise...
...disc is loaded, the DX-7555 will start reading the disc from scratch. 2 Remote controller Press and hold the STOP button until "SETUP MENU" appears on the display. • The memory mode should be deselected. 5 Remote controller Press the [ / ] dial. When using the remote controller, press... the [ / ] buttons and then the ENTER button. When using the remote controller, press the SETUP button. 3 Rotate the [ / ] dial in a direction of clockwise...
Owner Manual
Page 23
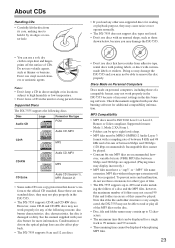
...the MP3 files on personal computers, including those shown below, because you may damage the DX-7555. • You can also affect playback. • The DX-7555 supports 8 cm and 12 cm discs. • Don't use discs with your disc burner for a long period of time. Incompatible files cannot be ...including the folders of a disc and the MP3 files, however, the maximum number of folders may not work properly in the DX-7555 because of CDs. Don't use these are supported. (Playing times may not be able to 32 characters. • The maximum time that can be up to ...
...the MP3 files on personal computers, including those shown below, because you may damage the DX-7555. • You can also affect playback. • The DX-7555 supports 8 cm and 12 cm discs. • Don't use discs with your disc burner for a long period of time. Incompatible files cannot be ...including the folders of a disc and the MP3 files, however, the maximum number of folders may not work properly in the DX-7555 because of CDs. Don't use these are supported. (Playing times may not be able to 32 characters. • The maximum time that can be up to ...