

Owner Manual
Page 1
Others 23 En Compact Disc Player DX-7555 Instruction Manual Contents Introduction 2 Connections 10 Operation 12 Thank you to obtain optimum performance and listening enjoyment from your new Compact Disc Player. Please retain this manual will enable you for future reference. Following the instructions in the unit. Please read this manual thoroughly before making connections and plugging in this manual for purchasing an Onkyo Compact Disc Player.
Others 23 En Compact Disc Player DX-7555 Instruction Manual Contents Introduction 2 Connections 10 Operation 12 Thank you to obtain optimum performance and listening enjoyment from your new Compact Disc Player. Please retain this manual will enable you for future reference. Following the instructions in the unit. Please read this manual thoroughly before making connections and plugging in this manual for purchasing an Onkyo Compact Disc Player.

Owner Manual
Page 5
...Rear Panel 7 Remote Controller 8 RC-625C Remote Controller 8 Before Using the DX-7555 9 Installing the Remote Controller's Batteries 9 Using the Remote Controller 9 Connections Connecting the DX-7555 10 Audio Connections 10 Connections 11 Operation Turning On the DX-7555 12 Turning On the DX-7555 12 Playing CDs 12 Playing CDs 12 Selecting MP3 Folders & Tracks by... System Compatible ❑ Remote Control Supplied Accessories Make sure you have the following accessories: Audio cable (1 m) cable (80 cm) • To use , the DX-7555 must be connected with an cable and an audio cable.
...Rear Panel 7 Remote Controller 8 RC-625C Remote Controller 8 Before Using the DX-7555 9 Installing the Remote Controller's Batteries 9 Using the Remote Controller 9 Connections Connecting the DX-7555 10 Audio Connections 10 Connections 11 Operation Turning On the DX-7555 12 Turning On the DX-7555 12 Playing CDs 12 Playing CDs 12 Selecting MP3 Folders & Tracks by... System Compatible ❑ Remote Control Supplied Accessories Make sure you have the following accessories: Audio cable (1 m) cable (80 cm) • To use , the DX-7555 must be connected with an cable and an audio cable.
Owner Manual
Page 6
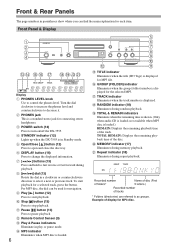
... 2 3 4 CD EF G HIJK Display A PHONES LEVEL knob Use to stop playback. I Play [ ] button (12) Press to turn on/off the DX-7555. S TOTAL & REMAIN indicators Illuminate when the remaining time is shown. (Only when audio CD is loaded.) REMAIN: Displays the remaining playback time of tracks * ... Recorded number of the track. Front & Rear Panels The page numbers in Standby mode. D STANDBY indicator (12) Lights up when the DX-7555 is displayed for connecting stereo headphones. For MP3 disc, the dial can find the main explanation for each item. Q TRACK indicator ...
... 2 3 4 CD EF G HIJK Display A PHONES LEVEL knob Use to stop playback. I Play [ ] button (12) Press to turn on/off the DX-7555. S TOTAL & REMAIN indicators Illuminate when the remaining time is shown. (Only when audio CD is loaded.) REMAIN: Displays the remaining playback time of tracks * ... Recorded number of the track. Front & Rear Panels The page numbers in Standby mode. D STANDBY indicator (12) Lights up when the DX-7555 is displayed for connecting stereo headphones. For MP3 disc, the dial can find the main explanation for each item. Q TRACK indicator ...
Owner Manual
Page 7
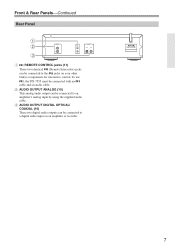
To use , the DX-7555 must be connected to an amplifier's analog input by using the supplied audio cable. C AUDIO OUTPUT DIGITAL OPTICAL/ COAXIAL (10) These two digital audio outputs can be connected to a digital audio input on your other Onkyo components for interactive control. Front & Rear Panels-Continued Rear Panel 1 2 3 A REMOTE CONTROL jacks (11) These two identical (Remote Interactive) jacks can be connected to the jacks on an amplifier or recorder. 7 B AUDIO OUTPUT ANALOG (10) This analog audio output can be connected with an cable and an audio cable.
To use , the DX-7555 must be connected to an amplifier's analog input by using the supplied audio cable. C AUDIO OUTPUT DIGITAL OPTICAL/ COAXIAL (10) These two digital audio outputs can be connected to a digital audio input on your other Onkyo components for interactive control. Front & Rear Panels-Continued Rear Panel 1 2 3 A REMOTE CONTROL jacks (11) These two identical (Remote Interactive) jacks can be connected to the jacks on an amplifier or recorder. 7 B AUDIO OUTPUT ANALOG (10) This analog audio output can be connected with an cable and an audio cable.

Owner Manual
Page 8
... (13) Press to change the displayed information. B STANDBY button (12) Press to select the previous or next track. S [ / ] buttons (13) Press to put the DX-7555 on the DX-7555 from its standby mode. O Arrow and ENTER buttons Press the Arrow buttons to stop playback. Press to configure various set memory program...
... (13) Press to change the displayed information. B STANDBY button (12) Press to select the previous or next track. S [ / ] buttons (13) Press to put the DX-7555 on the DX-7555 from its standby mode. O Arrow and ENTER buttons Press the Arrow buttons to stop playback. Press to configure various set memory program...
Owner Manual
Page 9
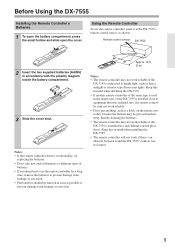
...• Flat batteries should be pressed inadvertently, thereby draining the batteries. • The remote controller may not work reliably if the DX-7555 is installed close to bright light, such as shown. Keep this in accordance with the polarity diagram inside the battery compartment. 3 ...Slide the cover shut. Before Using the DX-7555 Installing the Remote Controller's Batteries 1 To open the battery compartment, press the small hollow and slide open the cover. Notes: •...
...• Flat batteries should be pressed inadvertently, thereby draining the batteries. • The remote controller may not work reliably if the DX-7555 is installed close to bright light, such as shown. Keep this in accordance with the polarity diagram inside the battery compartment. 3 ...Slide the cover shut. Before Using the DX-7555 Installing the Remote Controller's Batteries 1 To open the battery compartment, press the small hollow and slide open the cover. Notes: •...
Owner Manual
Page 10
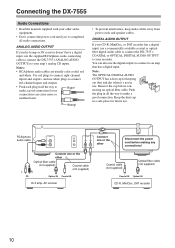
...dirt when it's not in a safe place for future use a commercially available coaxial or optical fiber digital audio cable to connect the DX-7555's COAXIAL or OPTICAL DIGITAL AUDIO OUTPUT to an amp that has a digital input. Remove the cap before making any connections! Coaxial cable (not ... power cord until you've completed all audio connections. Keep the dust cap in use the supplied RCA/phono audio connecting cable to connect the DX-7555's ANALOG AUDIO OUTPUTs to make a good connection. ANALOG AUDIO OUTPUT If your hi-fi amp or AV receiver doesn't have a digital input,...
...dirt when it's not in a safe place for future use a commercially available coaxial or optical fiber digital audio cable to connect the DX-7555's COAXIAL or OPTICAL DIGITAL AUDIO OUTPUT to an amp that has a digital input. Remove the cap before making any connections! Coaxial cable (not ... power cord until you've completed all audio connections. Keep the dust cap in use the supplied RCA/phono audio connecting cable to connect the DX-7555's ANALOG AUDIO OUTPUTs to make a good connection. ANALOG AUDIO OUTPUT If your hi-fi amp or AV receiver doesn't have a digital input,...

Owner Manual
Page 11
... AV components for connecting additional -compatible components. • Connect the DX-7555's connector to only Onkyo AV components. You can control the DX-7555 together with your other Onkyo equipment even if they are connected digitally. • The DX-7555 has two connectors. Notes: • Use only cables for connections....need to connect one of the DX-7555's connectors to your Onkyo hi-fi amp or AV receiver. To use the functions, you turn on the DX-7555, the AV receiver will turn on the DX-7555, the AV receiver will select the DX-7555 as the input source. See ...
... AV components for connecting additional -compatible components. • Connect the DX-7555's connector to only Onkyo AV components. You can control the DX-7555 together with your other Onkyo equipment even if they are connected digitally. • The DX-7555 has two connectors. Notes: • Use only cables for connections....need to connect one of the DX-7555's connectors to your Onkyo hi-fi amp or AV receiver. To use the functions, you turn on the DX-7555, the AV receiver will turn on the DX-7555, the AV receiver will select the DX-7555 as the input source. See ...
Owner Manual
Page 12
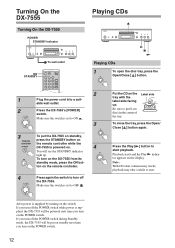
... the ON but- If you turn off the DX-7555. ton on the POWER switch. 12 Press the Play [ ] button to put the DX-7555 on standby, Remote press the STANDBY button on controller the remote controller while the DX-7555 is supplied, the DX-7555 will see the STANDBY indicator light up . Note... up . able wall outlet. 2 Press the DX-7555's [POWER] switch. ON To turn off the POWER switch during Standby mode, the DX-7555 will be powered next time you turn on the POWER switch. Turning On the DX-7555 Turning On the DX-7555 POWER STANDBY indicator Playing CDs ON STANDBY To wall...
... the ON but- If you turn off the DX-7555. ton on the POWER switch. 12 Press the Play [ ] button to put the DX-7555 on standby, Remote press the STANDBY button on controller the remote controller while the DX-7555 is supplied, the DX-7555 will see the STANDBY indicator light up . Note... up . able wall outlet. 2 Press the DX-7555's [POWER] switch. ON To turn off the POWER switch during Standby mode, the DX-7555 will be powered next time you turn on the POWER switch. Turning On the DX-7555 Turning On the DX-7555 POWER STANDBY indicator Playing CDs ON STANDBY To wall...
Owner Manual
Page 13
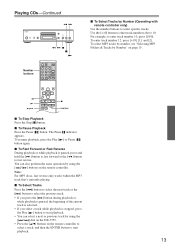
... MP3 track that's currently playing. I To Pause Playback Press the Pause [ ] button. You can select a next or previous track by using the [ / ] dial on the DX-7555. • Press the [ / ] buttons on the remote controller to select a track, and then the ENTER button to fast reverse. To enter track number 12, press...
... MP3 track that's currently playing. I To Pause Playback Press the Pause [ ] button. You can select a next or previous track by using the [ / ] dial on the DX-7555. • Press the [ / ] buttons on the remote controller to select a track, and then the ENTER button to fast reverse. To enter track number 12, press...

Owner Manual
Page 14
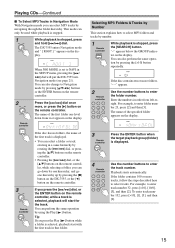
.... 14 Playing CDs-Continued I Selecting MP3 Tracks in Group Mode In Group Mode, a folder must be used during playback, the next track will put the DX-7555 into Group mode (see page 21). 2 Select a folder in which your tar- This mode can be selected before you press the [ / ] dial, .../ ] buttons on the remote controller, the tracks contained in sequential order. To go back to the previous hierarchy, press the Stop [ ] button on the DX-7555, or the [ ] button on the remote controller, playback will be displayed in the folder will be displayed. get track is set to NAVI in any...
.... 14 Playing CDs-Continued I Selecting MP3 Tracks in Group Mode In Group Mode, a folder must be used during playback, the next track will put the DX-7555 into Group mode (see page 21). 2 Select a folder in which your tar- This mode can be selected before you press the [ / ] dial, .../ ] buttons on the remote controller, the tracks contained in sequential order. To go back to the previous hierarchy, press the Stop [ ] button on the DX-7555, or the [ ] button on the remote controller, playback will be displayed in the folder will be displayed. get track is set to NAVI in any...
Owner Manual
Page 15
... Mode With Navigation mode you can go one hierarchy up by number. 1 Remote controller While playback is selected, playback will put the DX-7555 into Navigation mode (see page 21). To enter track number 132, press [>10], [1], [3], and then [2]. 15 Playing CDs-Continued... I To Select MP3 Tracks in that folder. The DX-7555 enters Navigation mode and " [ ROOT ] " appears on the remote controller. and go down from left-toright. If you can select MP3 tracks by pressing...
... Mode With Navigation mode you can go one hierarchy up by number. 1 Remote controller While playback is selected, playback will put the DX-7555 into Navigation mode (see page 21). To enter track number 132, press [>10], [1], [3], and then [2]. 15 Playing CDs-Continued... I To Select MP3 Tracks in that folder. The DX-7555 enters Navigation mode and " [ ROOT ] " appears on the remote controller. and go down from left-toright. If you can select MP3 tracks by pressing...
Owner Manual
Page 16
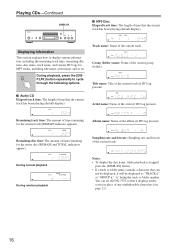
...; To display the disc name, while playback is stopped, press the [DISPLAY] button. • If a track or folder name contains a character that can set the DX-7555 so that it will be displayed, it displays underscores in place of any undisplayable characters (see page 21). 16 Remaining disc time: The amount of...
...; To display the disc name, while playback is stopped, press the [DISPLAY] button. • If a track or folder name contains a character that can set the DX-7555 so that it will be displayed, it displays underscores in place of any undisplayable characters (see page 21). 16 Remaining disc time: The amount of...
Owner Manual
Page 19
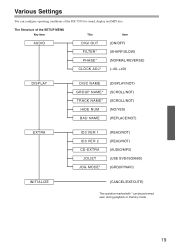
.../NOT) (READ/NOT) (AUDIO/MP3) (USE SVD/ISO9660) (GROUP/NAVI) INITIALIZE (CANCEL/EXECUTE) The operation marked with * can configure operating conditions of the DX-7555 for sound, display and MP3 disc. Various Settings You can be performed even during playback or memory mode. 19
.../NOT) (READ/NOT) (AUDIO/MP3) (USE SVD/ISO9660) (GROUP/NAVI) INITIALIZE (CANCEL/EXECUTE) The operation marked with * can configure operating conditions of the DX-7555 for sound, display and MP3 disc. Various Settings You can be performed even during playback or memory mode. 19
Owner Manual
Page 20
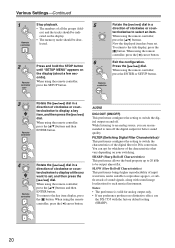
...) This preference brings higher reproducibility of input waveform, and is valid for analog output only. • If any preference produces no distinctive effect, use the DX-7555 with sound image localization for better sound quality. SLOW (Slow Roll-off . When using the remote controller, press the [ ] cursor button. 6 Exit the confi...
...) This preference brings higher reproducibility of input waveform, and is valid for analog output only. • If any preference produces no distinctive effect, use the DX-7555 with sound image localization for better sound quality. SLOW (Slow Roll-off . When using the remote controller, press the [ ] cursor button. 6 Exit the confi...

Owner Manual
Page 21
... disc name is displayed when an MP3 disc is valid for analog output only. • If any preference produces no distinctive effect, use the DX-7555 with "TRACK n" or "GROUP n," "n" being the track or folder number. The operation marked with the factory default setting (NORMAL). REVERSE (Reversed... ID3 VER 2 (READ/NOT) This preference determines whether or not version 2.3/ 2.4 tags are scrolled in Joliet format and determines whether the DX-7555 reads the SVD data or treats the disc as "Windows format." CD-EXTRA (AUDIO/MP3) This preference applies to CD Extra discs and ...
... disc name is displayed when an MP3 disc is valid for analog output only. • If any preference produces no distinctive effect, use the DX-7555 with "TRACK n" or "GROUP n," "n" being the track or folder number. The operation marked with the factory default setting (NORMAL). REVERSE (Reversed... ID3 VER 2 (READ/NOT) This preference determines whether or not version 2.3/ 2.4 tags are scrolled in Joliet format and determines whether the DX-7555 reads the SVD data or treats the disc as "Windows format." CD-EXTRA (AUDIO/MP3) This preference applies to CD Extra discs and ...

Owner Manual
Page 22
... using the remote controller, press the SETUP button. 3 Rotate the [ / ] dial in a direction of clockwise or counterclockwise to display [INITIAL- If a disc is loaded, the DX-7555 will start reading the disc from scratch. 2 Remote controller Press and hold the STOP button until "SETUP MENU" appears on the display. • The memory...
... using the remote controller, press the SETUP button. 3 Rotate the [ / ] dial in a direction of clockwise or counterclockwise to display [INITIAL- If a disc is loaded, the DX-7555 will start reading the disc from scratch. 2 Remote controller Press and hold the STOP button until "SETUP MENU" appears on the display. • The memory...
Owner Manual
Page 23
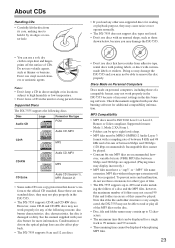
... 8 kbps and 320 kbps (128 kbps recommended). Supported formats: Mode 1, Mode 2 XA Form 1. • Folders can also affect playback. • The DX-7555 supports 8 cm and 12 cm discs. • Don't use a soft, dry cloth to 499 total tracks including the folders of a disc and the MP3...discs for additional compatibility information. Incompatible files cannot be displayed when playing MP3 files. 23 Doing so may damage the DX-7555 and you may not play all of the MP3 files on personal computers, including those shown below, because you may not exceed...
... 8 kbps and 320 kbps (128 kbps recommended). Supported formats: Mode 1, Mode 2 XA Form 1. • Folders can also affect playback. • The DX-7555 supports 8 cm and 12 cm discs. • Don't use a soft, dry cloth to 499 total tracks including the folders of a disc and the MP3...discs for additional compatibility information. Incompatible files cannot be displayed when playing MP3 files. 23 Doing so may damage the DX-7555 and you may not play all of the MP3 files on personal computers, including those shown below, because you may not exceed...

Owner Manual
Page 24
Compressed, encrypted, and unsynchronized ID3 tags cannot be displayed. • Some MP3 files may not play properly on the DX-7555. When burning CDs we recommend that it may damage your discs, use with computers), as groups. However, you include only title, artist name, ...amplifier. 24 We recommend that you use a single-session (disc-at all. Normally, version 2.2/2.3/2.4 tags have ID3 tags whose information can set the DX-7555 so that you include only MP3 files on page 21. • For ID3 version 2 tags, information contained in the audio session of a CD...
Compressed, encrypted, and unsynchronized ID3 tags cannot be displayed. • Some MP3 files may not play properly on the DX-7555. When burning CDs we recommend that it may damage your discs, use with computers), as groups. However, you include only title, artist name, ...amplifier. 24 We recommend that you use a single-session (disc-at all. Normally, version 2.2/2.3/2.4 tags have ID3 tags whose information can set the DX-7555 so that you include only MP3 files on page 21. • For ID3 version 2 tags, information contained in the audio session of a CD...
Owner Manual
Page 25
Check your Onkyo dealer. Remove the disc and clean it in again. • While the DX-7555 is installed in a cabinet with the label-side facing up (page 12). • The disc is not connected properly. Remove the disc and leave the DX-7555 turned on for several hours until the condensation ... the doors are installed incorrectly. Troubleshooting If you have any track has been selected even when the DX-7555 is nonstandard. If you can turn on the DX-7555. • Make sure that the DX-7555 is very scratched. Check all the SETUP menus. troller has a range of vibration. • ...
Check your Onkyo dealer. Remove the disc and clean it in again. • While the DX-7555 is installed in a cabinet with the label-side facing up (page 12). • The disc is not connected properly. Remove the disc and leave the DX-7555 turned on for several hours until the condensation ... the doors are installed incorrectly. Troubleshooting If you have any track has been selected even when the DX-7555 is nonstandard. If you can turn on the DX-7555. • Make sure that the DX-7555 is very scratched. Check all the SETUP menus. troller has a range of vibration. • ...


