Owner Manual
Page 2
... being walked on top of important operating and maintenance (servicing) instructions in a fire or electric shock. Do not install near water. 6. A grounding type plug has two blades and a third grounding prong. When the apparatus exhibits a distinct change in installation, such as power-supply cord or plug is intended to alert the user to its normal operation, E. Object and Liquid Entry Never push...
... being walked on top of important operating and maintenance (servicing) instructions in a fire or electric shock. Do not install near water. 6. A grounding type plug has two blades and a third grounding prong. When the apparatus exhibits a distinct change in installation, such as power-supply cord or plug is intended to alert the user to its normal operation, E. Object and Liquid Entry Never push...
Owner Manual
Page 3
... maintain the best picture quality, we recommend regular inspection and maintenance (cleaning or worn part replacement) every 1,000 hours of , or directly above a loudspeaker. • Install this unit for a long time, it may not work properly the next time you cannot turn off , while the STANDBY indicator stays lit up and any other chemical solvents, because they may cause a malfunction. •...
... maintain the best picture quality, we recommend regular inspection and maintenance (cleaning or worn part replacement) every 1,000 hours of , or directly above a loudspeaker. • Install this unit for a long time, it may not work properly the next time you cannot turn off , while the STANDBY indicator stays lit up and any other chemical solvents, because they may cause a malfunction. •...
Owner Manual
Page 4
... turning the equipment off and fit a suitable plug. These limits are coloured in your socket outlets, cut if off and on, the user is encouraged to try to open the enclosure. For models having a power cord with the limits for a Class B digital device, pursuant to operate the equipment. nician for compliance could void the user's authority to Part 15 of any trouble...
... turning the equipment off and fit a suitable plug. These limits are coloured in your socket outlets, cut if off and on, the user is encouraged to try to open the enclosure. For models having a power cord with the limits for a Class B digital device, pursuant to operate the equipment. nician for compliance could void the user's authority to Part 15 of any trouble...

Owner Manual
Page 5
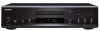
...6 Front Panel & Display 6 Rear Panel 7 Remote Controller 8 RC-625C Remote Controller 8 Before Using the DX-7555 9 Installing the Remote Controller's Batteries 9 Using the Remote Controller 9 Connections Connecting the DX-7555 10 Audio Connections 10 Connections 11 Operation Turning On the DX-7555 12 Turning On the DX-7555 12 Playing CDs 12 Playing CDs 12 Selecting MP3 Folders & Tracks by Number 15 Displaying Information 16 Memory Playback 17 Random Playback 18 Repeat Playback 18 Various Settings 19 Others About CDs 23 Troubleshooting 25 Specifications 27 In catalogs and...
...6 Front Panel & Display 6 Rear Panel 7 Remote Controller 8 RC-625C Remote Controller 8 Before Using the DX-7555 9 Installing the Remote Controller's Batteries 9 Using the Remote Controller 9 Connections Connecting the DX-7555 10 Audio Connections 10 Connections 11 Operation Turning On the DX-7555 12 Turning On the DX-7555 12 Playing CDs 12 Playing CDs 12 Selecting MP3 Folders & Tracks by Number 15 Displaying Information 16 Memory Playback 17 Random Playback 18 Repeat Playback 18 Various Settings 19 Others About CDs 23 Troubleshooting 25 Specifications 27 In catalogs and...
Owner Manual
Page 6
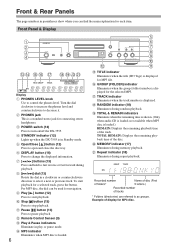
... to control the phones level. Example of the disc. Front Panel & Display 1 2 3 4 CD EF G HIJK Display A PHONES LEVEL knob Use to pause playback L Remote Control Senser (9) M Play & Pause indicators Illuminate in Standby mode. Turn the dial clockwise to increase the phones level and counterclockwise to fast reverse or fast forward during memory playback. G [ / ] buttons (13) Press and hold to decrease it. Q TRACK indicator Illuminates when the track number is loaded; TOTAL REMAIN: Displays the remaining playback time of display...
... to control the phones level. Example of the disc. Front Panel & Display 1 2 3 4 CD EF G HIJK Display A PHONES LEVEL knob Use to pause playback L Remote Control Senser (9) M Play & Pause indicators Illuminate in Standby mode. Turn the dial clockwise to increase the phones level and counterclockwise to fast reverse or fast forward during memory playback. G [ / ] buttons (13) Press and hold to decrease it. Q TRACK indicator Illuminates when the track number is loaded; TOTAL REMAIN: Displays the remaining playback time of display...
Owner Manual
Page 7
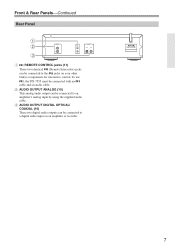
B AUDIO OUTPUT ANALOG (10) This analog audio output can be connected with an cable and an audio cable. C AUDIO OUTPUT DIGITAL OPTICAL/ COAXIAL (10) These two digital audio outputs can be connected to a digital audio input on your other Onkyo components for interactive control. Front & Rear Panels-Continued Rear Panel 1 2 3 A REMOTE CONTROL jacks (11) These two identical (Remote Interactive) jacks can be connected to the jacks on an amplifier or recorder. 7 To use , the DX-7555 must be connected to an amplifier's analog input by using the supplied audio cable.
B AUDIO OUTPUT ANALOG (10) This analog audio output can be connected with an cable and an audio cable. C AUDIO OUTPUT DIGITAL OPTICAL/ COAXIAL (10) These two digital audio outputs can be connected to a digital audio input on your other Onkyo components for interactive control. Front & Rear Panels-Continued Rear Panel 1 2 3 A REMOTE CONTROL jacks (11) These two identical (Remote Interactive) jacks can be connected to the jacks on an amplifier or recorder. 7 To use , the DX-7555 must be connected to an amplifier's analog input by using the supplied audio cable.

Owner Manual
Page 8
... track numbers. C Number buttons (13, 15) Use these buttons to turn it off again. 8 Remote Controller RC-625C Remote Controller The page numbers in parentheses show where you can be also used to change the displayed information. E SETUP button (20) Press to display the screen for various settings. 1 9 F [ / ] buttons (13) 2 Press and hold to fast reverse or fast forward during playback. 3 G RANDOM button (18) 0 Press to set random playback. A H REPEAT button (18) Press to set repeat playback. For MP3 disc, the button...
... track numbers. C Number buttons (13, 15) Use these buttons to turn it off again. 8 Remote Controller RC-625C Remote Controller The page numbers in parentheses show where you can be also used to change the displayed information. E SETUP button (20) Press to display the screen for various settings. 1 9 F [ / ] buttons (13) 2 Press and hold to fast reverse or fast forward during playback. 3 G RANDOM button (18) 0 Press to set random playback. A H REPEAT button (18) Press to set repeat playback. For MP3 disc, the button...
Owner Manual
Page 9
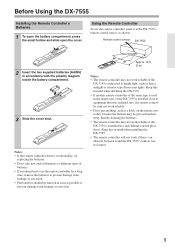
... buttons may be removed as soon as direct sunlight or inverter-type fluorescent lights. Keep this in mind when installing the DX-7555. • If another remote controller of batteries. • If you intend not to equipment that uses infrared rays, the remote controller may not work if there's an obstacle between it at the DX-7555's remote control sensor, as shown. Before Using the DX-7555 Installing...
... buttons may be removed as soon as direct sunlight or inverter-type fluorescent lights. Keep this in mind when installing the DX-7555. • If another remote controller of batteries. • If you intend not to equipment that uses infrared rays, the remote controller may not work if there's an obstacle between it at the DX-7555's remote control sensor, as shown. Before Using the DX-7555 Installing...
Owner Manual
Page 10
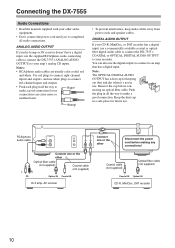
... AV receiver doesn't have a digital input, use . Wrong! • To prevent interference, keep audio cables away from power cords and speaker cables. DIGITAL AUDIO OUTPUT If your CD-R, MiniDisc, or DAT recorder has a digital input, use a commercially available coaxial or optical fiber digital audio cable to connect the DX-7555's COAXIAL or OPTICAL DIGITAL AUDIO OUTPUT to make a good connection (loose connections can also use . Keep the dust cap in use the digital outputs to connect to your amp's analog CD inputs. Connecting the DX-7555 Audio Connections...
... AV receiver doesn't have a digital input, use . Wrong! • To prevent interference, keep audio cables away from power cords and speaker cables. DIGITAL AUDIO OUTPUT If your CD-R, MiniDisc, or DAT recorder has a digital input, use a commercially available coaxial or optical fiber digital audio cable to connect the DX-7555's COAXIAL or OPTICAL DIGITAL AUDIO OUTPUT to make a good connection (loose connections can also use . Keep the dust cap in use the digital outputs to connect to your amp's analog CD inputs. Connecting the DX-7555 Audio Connections...

Owner Manual
Page 11
.... Connecting to an -compatible Onkyo hi-fi amp or AV receiver, when you start playback on the DX-7555, the AV receiver will turn on all your Onkyo components and use the following special functions: I Auto Power On If your DX-7555 is connected to other -compatible AV components for more information. With some Onkyo AV receivers you can use one remote controller to control all other -compatible Onkyo AV components. To use you must make an...
.... Connecting to an -compatible Onkyo hi-fi amp or AV receiver, when you start playback on the DX-7555, the AV receiver will turn on all your Onkyo components and use the following special functions: I Auto Power On If your DX-7555 is connected to other -compatible AV components for more information. With some Onkyo AV receivers you can use one remote controller to control all other -compatible Onkyo AV components. To use you must make an...
Owner Manual
Page 12
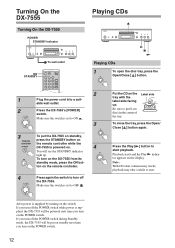
... Turning On the DX-7555 POWER STANDBY indicator Playing CDs ON STANDBY To wall outlet Playing CDs 1 To open the disc tray, press the Open/Close [ ] button. 2 1 Plug the power cord into a suit- Put the CD on the display. Be sure to OFF . If you turn on standby next time you turn off the POWER switch during Standby mode, the DX-7555 will see the STANDBY indicator light up . ON To turn off the POWER switch while power is set to start playback...
... Turning On the DX-7555 POWER STANDBY indicator Playing CDs ON STANDBY To wall outlet Playing CDs 1 To open the disc tray, press the Open/Close [ ] button. 2 1 Plug the power cord into a suit- Put the CD on the display. Be sure to OFF . If you turn on standby next time you turn off the POWER switch during Standby mode, the DX-7555 will see the STANDBY indicator light up . ON To turn off the POWER switch while power is set to start playback...

Owner Manual
Page 14
... track. 1 While playback is set to play. You can select a track by using the Play [ ] button. 14 When JOG MODE is stopped, press the [ / ] dial. Playing CDs-Continued I Selecting MP3 Tracks in Group Mode In Group Mode, a folder must be selected before you rotate the [ / ] dial, or press the [ / ] buttons on the remote controller, the folders contained in the disc will be displayed in the folder will start to NAVI in the SETUP menu, keeping...
... track. 1 While playback is set to play. You can select a track by using the Play [ ] button. 14 When JOG MODE is stopped, press the [ / ] dial. Playing CDs-Continued I Selecting MP3 Tracks in Group Mode In Group Mode, a folder must be selected before you rotate the [ / ] dial, or press the [ / ] buttons on the remote controller, the folders contained in the disc will be displayed in the folder will start to NAVI in the SETUP menu, keeping...
Owner Manual
Page 15
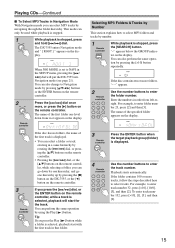
... order from root appears on the display. The name of the first track is set to select tracks. Playing CDs-Continued I To Select MP3 Tracks in Navigation Mode With Navigation mode you can go one hierarchy; Selecting MP3 Folders & Tracks by number. 1 Remote controller While playback is stopped, press and hold [ / ] dial. Use the number buttons to select MP3 folders and tracks by Number This section explains how to enter...
... order from root appears on the display. The name of the first track is set to select tracks. Playing CDs-Continued I To Select MP3 Tracks in Navigation Mode With Navigation mode you can go one hierarchy; Selecting MP3 Folders & Tracks by number. 1 Remote controller While playback is stopped, press and hold [ / ] dial. Use the number buttons to select MP3 folders and tracks by Number This section explains how to enter...
Owner Manual
Page 17
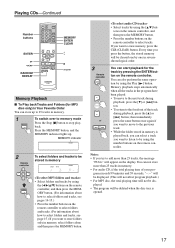
... store folders only in memory. 1 To switch over to memory mode Press the Stop [ ] button to the next track during playback, press the [ ] or [ ] button; Playing CDs-Continued Number buttons ENTER / RANDOM REPEAT MEMORY ENTER CLEAR / Memory Playback I To Play back Tracks and Folders (for the track by pressing the ENTER button on the remote controller. back. MEMORY indicator 2 Remote controller To select folders and tracks to erase memory, press the CLR (CLEAR) button. You can store up . Press the MEMORY button, and the MEMORY indicator lights...
... store folders only in memory. 1 To switch over to memory mode Press the Stop [ ] button to the next track during playback, press the [ ] or [ ] button; Playing CDs-Continued Number buttons ENTER / RANDOM REPEAT MEMORY ENTER CLEAR / Memory Playback I To Play back Tracks and Folders (for the track by pressing the ENTER button on the remote controller. back. MEMORY indicator 2 Remote controller To select folders and tracks to erase memory, press the CLR (CLEAR) button. You can store up . Press the MEMORY button, and the MEMORY indicator lights...
Owner Manual
Page 18
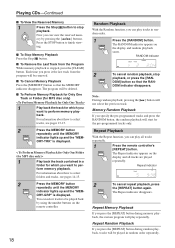
... memory playback. DOM] button so that the MEMORY indicator disappears. Press the STOP button to perform memory play repeatedly. I To Perform Memory Playback for Only One Track or Folder (for MP3 disc only) 1 Play back the track for the pre-programmed tracks only. You can view the reserved mem- Repeat indicator 2 To cancel repeat playback, press the [REPEAT] button again. ory by using the number buttons on the display and random playback starts. I To Stop Memory Playback Press the Stop [ ] button. Each time...
... memory playback. DOM] button so that the MEMORY indicator disappears. Press the STOP button to perform memory play repeatedly. I To Perform Memory Playback for Only One Track or Folder (for MP3 disc only) 1 Play back the track for the pre-programmed tracks only. You can view the reserved mem- Repeat indicator 2 To cancel repeat playback, press the [REPEAT] button again. ory by using the number buttons on the display and random playback starts. I To Stop Memory Playback Press the Stop [ ] button. Each time...
Owner Manual
Page 20
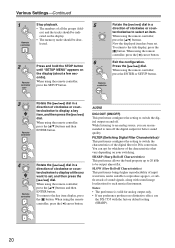
... distinctive effect, use the DX-7555 with sound image localization for better sound quality. Various Settings-Continued 1 Remote controller Stop playback. • The numbers of all the groups (folders) and the tracks should be indicated on the display. • The memory mode should be output almost flat. When using the remote controller, press the ENTER or SETUP button. When using the remote controller, press the [ / ] buttons. SLOW (Slow Roll-off the digital output for each musical instrument. Notes...
... distinctive effect, use the DX-7555 with sound image localization for better sound quality. Various Settings-Continued 1 Remote controller Stop playback. • The numbers of all the groups (folders) and the tracks should be indicated on the display. • The memory mode should be output almost flat. When using the remote controller, press the ENTER or SETUP button. When using the remote controller, press the [ / ] buttons. SLOW (Slow Roll-off the digital output for each musical instrument. Notes...

Owner Manual
Page 21
... use the DX-7555 with the factory default setting (NORMAL). Normally, you can adjust in Navigation mode (page 15) regardless of this preference doesn't need to be output with * can be obtained from the amplifier and the speakers on the disc you use the DX-7555 with "TRACK n" or "GROUP n," "n" being the track or folder number. Give it pressed (see pages 14-15). BAD NAME (REPLACE...
... use the DX-7555 with the factory default setting (NORMAL). Normally, you can adjust in Navigation mode (page 15) regardless of this preference doesn't need to be output with * can be obtained from the amplifier and the speakers on the disc you use the DX-7555 with "TRACK n" or "GROUP n," "n" being the track or folder number. Give it pressed (see pages 14-15). BAD NAME (REPLACE...
Owner Manual
Page 23
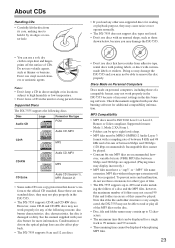
... also affect playback. • The DX-7555 supports 8 cm and 12 cm discs. • Don't use a soft, dry cloth to the of incorrect settings in the unit for additional compatibility information. Check the manuals supplied with your disc burner for other non-supported discs for a single track is 99 minutes and 59 seconds. • The remaining time cannot be MPEG-1/MPEG-2 Audio Layer 3 format with a sampling...
... also affect playback. • The DX-7555 supports 8 cm and 12 cm discs. • Don't use a soft, dry cloth to the of incorrect settings in the unit for additional compatibility information. Check the manuals supplied with your disc burner for other non-supported discs for a single track is 99 minutes and 59 seconds. • The remaining time cannot be MPEG-1/MPEG-2 Audio Layer 3 format with a sampling...
Owner Manual
Page 25
... the SETUP menu, no digital audio output is very scratched. Check the batteries and correct as necessary. • The wrong input source is nonstandard. Make sure that the power cord is properly plugged into the full stop state by pressing the ON button on your amplifier's input source setting. If you can turn on the DX-7555. • Make sure that the DX-7555 is in the remote controller...
... the SETUP menu, no digital audio output is very scratched. Check the batteries and correct as necessary. • The wrong input source is nonstandard. Make sure that the power cord is properly plugged into the full stop state by pressing the ON button on your amplifier's input source setting. If you can turn on the DX-7555. • Make sure that the DX-7555 is in the remote controller...
Owner Manual
Page 27
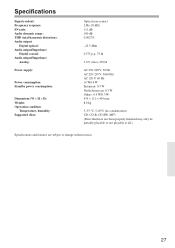
Specifications Signal readout: Frequency response: SN ratio: Audio dynamic range: THD (total harmonic distortion): Audio output Digital optical: Audio output/Impedance Digital coaxial: Audio output/Impedance Analog: Power supply: Power consumption: Standby power consumption: Dimensions (W × H × D): Weight: Operation condition Temperature, humidity: Supported discs: Optical non-...; 405 mm 8.0 kg 5-35 °C, 5-85% (no condensation) CD, CD-R, CD-RW, MP3 (Discs that have not been properly finalized may only be partially playable or not playable at all.) Specifications...
Specifications Signal readout: Frequency response: SN ratio: Audio dynamic range: THD (total harmonic distortion): Audio output Digital optical: Audio output/Impedance Digital coaxial: Audio output/Impedance Analog: Power supply: Power consumption: Standby power consumption: Dimensions (W × H × D): Weight: Operation condition Temperature, humidity: Supported discs: Optical non-...; 405 mm 8.0 kg 5-35 °C, 5-85% (no condensation) CD, CD-R, CD-RW, MP3 (Discs that have not been properly finalized may only be partially playable or not playable at all.) Specifications...