Owner Manual
Page 1
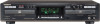
...reference. OISTKYO, Audio CD Recorder DX-RD511 Instruction Manual ry DIGITAL AUDIO DIGITAL AUDIO Recordable r y rAET U DIGITAL AUDIO (ReWritable Thank you to the serial copy management system 10 Fast recording 11 Normal recording 12 Synchro recording from an external source 13 Manual recording from an external ... 24 Erasing the memory contents 25 Auto track numbering 26 Adjusting recording balance 26 Appendix I Display messages 27 Troubleshooting Guide 29 Name of each part 30 Specifications 32 Please read this manual for purchasing the Onkyo Audio CD Recorder.
...reference. OISTKYO, Audio CD Recorder DX-RD511 Instruction Manual ry DIGITAL AUDIO DIGITAL AUDIO Recordable r y rAET U DIGITAL AUDIO (ReWritable Thank you to the serial copy management system 10 Fast recording 11 Normal recording 12 Synchro recording from an external source 13 Manual recording from an external ... 24 Erasing the memory contents 25 Auto track numbering 26 Adjusting recording balance 26 Appendix I Display messages 27 Troubleshooting Guide 29 Name of each part 30 Specifications 32 Please read this manual for purchasing the Onkyo Audio CD Recorder.
Owner Manual
Page 3
... cord of this unit should be connected to their regulations 21 CFR section 1002.30, all manufactures who sell Laser Products must maintain records of written communications between the equipment and receiver. • Connect the equipment into an outlet on , the user is encouraged to ...the coloured markings identifying the terminals in any complaints about instructions or explanations affecting the use of the wires in the OFF position, the CD recorder is coloured brown must be replaced, please ensure that the replacement fuse has a rating of 5 amps and that interference will not occur...
... cord of this unit should be connected to their regulations 21 CFR section 1002.30, all manufactures who sell Laser Products must maintain records of written communications between the equipment and receiver. • Connect the equipment into an outlet on , the user is encouraged to ...the coloured markings identifying the terminals in any complaints about instructions or explanations affecting the use of the wires in the OFF position, the CD recorder is coloured brown must be replaced, please ensure that the replacement fuse has a rating of 5 amps and that interference will not occur...
Owner Manual
Page 5
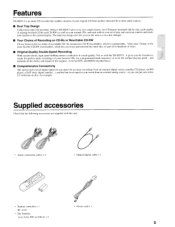
... a reduction in the central display. Not so with the DX-RD511. and HDCD-encoded discs. ■ Comprehensive Connectivity The optical and coaxial digital inputs let you make bit-accurate recordings from an external digital source (another CD player, an MD player, a DAT deck, digital satellite......), and the line-level input let you record from another musical CD or other audio sources. ■ Dual Tray Design Unlike most other CD recorders, Onkyo's DX-RD51 1 gives ...
... a reduction in the central display. Not so with the DX-RD511. and HDCD-encoded discs. ■ Comprehensive Connectivity The optical and coaxial digital inputs let you make bit-accurate recordings from an external digital source (another CD player, an MD player, a DAT deck, digital satellite......), and the line-level input let you record from another musical CD or other audio sources. ■ Dual Tray Design Unlike most other CD recorders, Onkyo's DX-RD51 1 gives ...

Owner Manual
Page 6
... Do not use volatile agents on discs, such as shown below. Discs for recording purposes: • CD-Audio Recordable (CD-R) discs nrmo DIGITAL AUDIO Recordable • CD-Audio ReWritable (CD-RW) discs r _r piortaahr DIGITAL AUDIO ReWritable CD-Rs allow you may not he able to wipe dust and fingerprints off the ...these could damage the speakers and amplifier. Avoid using heart-shaped or octagonal discs. Notes on CD-Rs cannot be erased, however. Your recorder uses two types of the unit. CD-ROMs for music only). Do not use discs that have residue from the disc case, ...
... Do not use volatile agents on discs, such as shown below. Discs for recording purposes: • CD-Audio Recordable (CD-R) discs nrmo DIGITAL AUDIO Recordable • CD-Audio ReWritable (CD-RW) discs r _r piortaahr DIGITAL AUDIO ReWritable CD-Rs allow you may not he able to wipe dust and fingerprints off the ...these could damage the speakers and amplifier. Avoid using heart-shaped or octagonal discs. Notes on CD-Rs cannot be erased, however. Your recorder uses two types of the unit. CD-ROMs for music only). Do not use discs that have residue from the disc case, ...
Owner Manual
Page 8
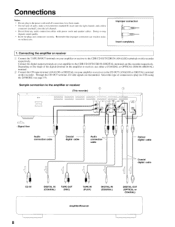
...IH UT ANALOG - O - Improper connection Inser completely. 1. Connect the digital output terminals on your amplifier to the CD OUT (ANALOG or DIGITAL) terminal on this recorder. Depending on the shape of the digital terminal on the amplifier or receiver, use either a COAXIAL or OPTICAL CDR ...• Do not plug in noise, or malfunctions. Through the CD OUT terminal, CD-side signals are transmitted. Sample connection to play two CDs using the DJ MODE (see page 19). Select this recorder respectively. DIGITAL CDR `DIGITAL Signal flow Audio connection cable Coaxial digital ...
...IH UT ANALOG - O - Improper connection Inser completely. 1. Connect the digital output terminals on your amplifier to the CD OUT (ANALOG or DIGITAL) terminal on this recorder. Depending on the shape of the digital terminal on the amplifier or receiver, use either a COAXIAL or OPTICAL CDR ...• Do not plug in noise, or malfunctions. Through the CD OUT terminal, CD-side signals are transmitted. Sample connection to play two CDs using the DJ MODE (see page 19). Select this recorder respectively. DIGITAL CDR `DIGITAL Signal flow Audio connection cable Coaxial digital ...
Owner Manual
Page 9
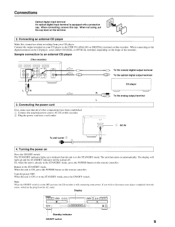
...mull I O- (D) AL CON - When the unit is still consuming some power. Note: When the ON/OFF switch is in the OFF position, the CD recorder is ON or in the STANDBY mode, press the ON/OFF switch. Connections Optical digital input terminal An optical digital input terminal is already in .... Turning the power on automatically. The unit then turns on Press the ON/OFF switch. If you wish to an external CD player (This recorder) ° CO I - - Standby indicator ON/OFF switch 9 Return to indicate that all of the terminal. CoT DP- Connecting the power cord First, make ...
...mull I O- (D) AL CON - When the unit is still consuming some power. Note: When the ON/OFF switch is in the OFF position, the CD recorder is ON or in the STANDBY mode, press the ON/OFF switch. Connections Optical digital input terminal An optical digital input terminal is already in .... Turning the power on automatically. The unit then turns on Press the ON/OFF switch. If you wish to an external CD player (This recorder) ° CO I - - Standby indicator ON/OFF switch 9 Return to indicate that all of the terminal. CoT DP- Connecting the power cord First, make ...
Owner Manual
Page 10
... (PMA) of a copy created through digital recording, with a CD-R or CD-RW. Until finalization, recording can be continued onto remaining tracks. • Normal recording ("REC LISTEN" See page 12) Recording is made onto the following five recording modes. Rule 3 With a DAT deck or a CD recorder that supports the sampling frequencies of a CD-R or CD-RW that has been created through digital...
... (PMA) of a copy created through digital recording, with a CD-R or CD-RW. Until finalization, recording can be continued onto remaining tracks. • Normal recording ("REC LISTEN" See page 12) Recording is made onto the following five recording modes. Rule 3 With a DAT deck or a CD recorder that supports the sampling frequencies of a CD-R or CD-RW that has been created through digital...
Owner Manual
Page 11
I I ANALOG CD-RW indicator CD indicator T0TAsl 11!!! iif I I I I I I I I I I I I I I Recording 3, 4 5 r. 000 0 0 6 DISPLAY 1, 2 0 0 5 REC TYPE RECORD 6 REC TYPE RECORD it• 1 1=11_.I I.
I I ANALOG CD-RW indicator CD indicator T0TAsl 11!!! iif I I I I I I I I I I I I I I Recording 3, 4 5 r. 000 0 0 6 DISPLAY 1, 2 0 0 5 REC TYPE RECORD 6 REC TYPE RECORD it• 1 1=11_.I I.
Owner Manual
Page 12
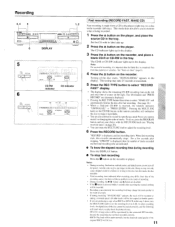
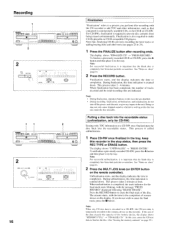
... the step 5 above, turn off the power, rock the unit, or give any impact to the unit. Recording 3, 4 5 6 1, 2 1 an O DISPLAY 5 REC TYPE RECORD 6 HEC TYPE RECORD 1, 1=1.I• CD CD-RW indicator CD indicator 701,1 !If I 1.1 •I•1, 1 I I J i l l I I I I I I .< REC0RD.< cD co ANALOG 12 Normal recording (REC LISTEN) Recording is made normally, but also make it is important that of the...
... the step 5 above, turn off the power, rock the unit, or give any impact to the unit. Recording 3, 4 5 6 1, 2 1 an O DISPLAY 5 REC TYPE RECORD 6 HEC TYPE RECORD 1, 1=1.I• CD CD-RW indicator CD indicator 701,1 !If I 1.1 •I•1, 1 I I J i l l I I I I I I .< REC0RD.< cD co ANALOG 12 Normal recording (REC LISTEN) Recording is made normally, but also make it is important that of the...
Owner Manual
Page 13
...the function is triggered by detecting the beginning of the external input signal. Recording is completely free from an external source (REC EXT DISC) Only pressing the PLAY button on the recorder, and place a blank CD-R or CD-RW in the external player to select "REC EXT DISC" display. &#...8226; You can set the recording level for "ANALOG," "DIGITAL 1," and "OPTICAL" input sources independently 6 After "START...
...the function is triggered by detecting the beginning of the external input signal. Recording is completely free from an external source (REC EXT DISC) Only pressing the PLAY button on the recorder, and place a blank CD-R or CD-RW in the external player to select "REC EXT DISC" display. &#...8226; You can set the recording level for "ANALOG," "DIGITAL 1," and "OPTICAL" input sources independently 6 After "START...
Owner Manual
Page 14
... select a source track(s). Note: For successful recording, it is important that of recording. • During recording, the button is disabled. • The recording level set here is retained and used whenever manual recording from an external CD player is completely free from dust particles or scratches... To stop after 20 seconds silence. Testing of silence in analog recordings. • To interrupt recording Press the button on the recorder. Each time you start the source in the midst of a track CD-SYNC recording starts at the beginning of the next track or after 2.7 seconds...
... select a source track(s). Note: For successful recording, it is important that of recording. • During recording, the button is disabled. • The recording level set here is retained and used whenever manual recording from an external CD player is completely free from dust particles or scratches... To stop after 20 seconds silence. Testing of silence in analog recordings. • To interrupt recording Press the button on the recorder. Each time you start the source in the midst of a track CD-SYNC recording starts at the beginning of the next track or after 2.7 seconds...
Owner Manual
Page 15
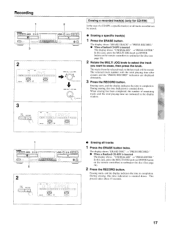
...•VII button again to adjust the recording level. Pressing the MULTI JOG knob (or the ENTER button on this recorder. E 5 REC - YPE RECORD Mt• TOTAL 11• 1 , 1z13141b1 1 1 1 1 1 1 1 1 I I I 11 DIGITAL I 0 I GHANG, O I , •I1VV. 8 (CD recorder control buttons) p-ii • 5 Press..." display. 6 Rotate the MULTI JOG knob to create a 3-second soundless interval. This is changed, the CD recorder will unfinalize the disc to resume recording from an external digital source... and initialization, do not turn ON the auto track numbering (see page 26...
...•VII button again to adjust the recording level. Pressing the MULTI JOG knob (or the ENTER button on this recorder. E 5 REC - YPE RECORD Mt• TOTAL 11• 1 , 1z13141b1 1 1 1 1 1 1 1 1 I I I 11 DIGITAL I 0 I GHANG, O I , •I1VV. 8 (CD recorder control buttons) p-ii • 5 Press..." display. 6 Rotate the MULTI JOG knob to create a 3-second soundless interval. This is changed, the CD recorder will unfinalize the disc to resume recording from an external digital source... and initialization, do not turn ON the auto track numbering (see page 26...
Owner Manual
Page 16
..., keep this time indication is completely frcc from dust particles or scratches. When unfinalization is temporarily recorded in the tray. Note that, finalizing CD-Rs prevents recording the later tracks or adding/erasing titles and other information, such as that the blank disc is...The erasure starts, with the CD recorder to add TOC and other texts (see pages 23 to 24). 1 Press the FINALIZE button after recording with the time to the completion of tracks recorded and the total recording time are disabled. • During recording, finalization, unfinalization, and initialization...
..., keep this time indication is completely frcc from dust particles or scratches. When unfinalization is temporarily recorded in the tray. Note that, finalizing CD-Rs prevents recording the later tracks or adding/erasing titles and other information, such as that the blank disc is...The erasure starts, with the CD recorder to add TOC and other texts (see pages 23 to 24). 1 Press the FINALIZE button after recording with the time to the completion of tracks recorded and the total recording time are disabled. • During recording, finalization, unfinalization, and initialization...
Owner Manual
Page 17
...will be erased. • Erasing a specific track(s) 1 Press the ERASE button. The display shows "ERASE DISC" "PRESS RECORD." • When a finalized CD-RW is inserted The display shows "UNFINALIZE" ->"PRESS ENTER." Erasing starts, and the display indicates the time to completion. ...to unfinalize the disc (See page 16). 2 Press the RECORD button. MULTI JOG Ow.] _,PUSH TOENTER I II N. Recording ~-.• ~ . l • 3 2 s_ ANALOG IC)] 3 2 o o 0 Mi l I -.. MULTI JOG VD ENTER Erasing a recorded track(s) (only for CD-RW) In the case of remaining tracks and the total...
...will be erased. • Erasing a specific track(s) 1 Press the ERASE button. The display shows "ERASE DISC" "PRESS RECORD." • When a finalized CD-RW is inserted The display shows "UNFINALIZE" ->"PRESS ENTER." Erasing starts, and the display indicates the time to completion. ...to unfinalize the disc (See page 16). 2 Press the RECORD button. MULTI JOG Ow.] _,PUSH TOENTER I II N. Recording ~-.• ~ . l • 3 2 s_ ANALOG IC)] 3 2 o o 0 Mi l I -.. MULTI JOG VD ENTER Erasing a recorded track(s) (only for CD-RW) In the case of remaining tracks and the total...
Owner Manual
Page 19
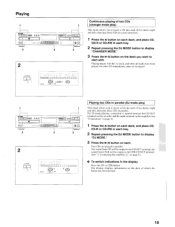
... deck, and place CD, CD-R or CD-RW in each tray. 2 Repeat pressing the DJ MODE button to the CD OUT terminal; Li= O L O L-1 11 1 1,-,L -0 O O 2 2 DJ MODE I IIRIRicOLIR: I . For DJ mode playing, connection is needed between the CD OUT terminal on this recorder and the input terminal... on the amplifier (see "Connections" in page 8). 1 Press the button on each of which the button has been pressed. 19 Playing begins with . the sound from CD will be played. 000 r -A H O ...
... deck, and place CD, CD-R or CD-RW in each tray. 2 Repeat pressing the DJ MODE button to the CD OUT terminal; Li= O L O L-1 11 1 1,-,L -0 O O 2 2 DJ MODE I IIRIRicOLIR: I . For DJ mode playing, connection is needed between the CD OUT terminal on this recorder and the input terminal... on the amplifier (see "Connections" in page 8). 1 Press the button on each of which the button has been pressed. 19 Playing begins with . the sound from CD will be played. 000 r -A H O ...
Owner Manual
Page 20
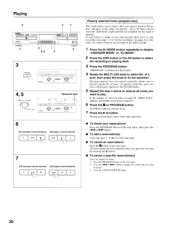
... I I, I I I I I I I I PUSH TO ENTER ANALOG CHAVGFA I % NAY., i CD ANALOG 4, 5 H.. Pressing numeric keys on the playing-side deck prior to fast recording (see page 11) or normal recording (see page 12), only tunes you want to play ) This mode allows you to select tunes you...reservations are also cancelled when you specify. Press the PROGRAM button in .-II • V\ 0-11 • ± 7 (CD recorder control buttons) (CD player control buttons) . ...-/n • Nwin • .. _i Playing reserved tunes (program play . Playing 6 4 J 0 2 1 6 3, 6 3 PROGRAM :...
... I I, I I I I I I I I PUSH TO ENTER ANALOG CHAVGFA I % NAY., i CD ANALOG 4, 5 H.. Pressing numeric keys on the playing-side deck prior to fast recording (see page 11) or normal recording (see page 12), only tunes you want to play ) This mode allows you to select tunes you...reservations are also cancelled when you specify. Press the PROGRAM button in .-II • V\ 0-11 • ± 7 (CD recorder control buttons) (CD player control buttons) . ...-/n • Nwin • .. _i Playing reserved tunes (program play . Playing 6 4 J 0 2 1 6 3, 6 3 PROGRAM :...
Owner Manual
Page 22
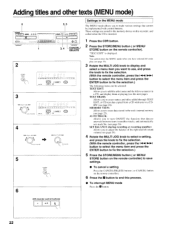
... following items can be implemented with control buttons. TEXT ERASE: Allows you to add the artist name and the title to end this recorder, and called when the CD is displayed. Note: You cannot enter the MENU mode when you have selected Di mode play (see page 19). 3 Rotate the MULTI..., press the kill-ol/10-10-I 10)% M Oill' PUSH TO ENTER TO ENT ER 5 STORE/ MENU 6 Settings in a CD, and display them at playing (see page 25). SET BALANCE (during recording or recording standby): Allows you to a CDRW (see page 26). 4 Rotate the MULTI JOG knob to select a setting, and press the...
... following items can be implemented with control buttons. TEXT ERASE: Allows you to add the artist name and the title to end this recorder, and called when the CD is displayed. Note: You cannot enter the MENU mode when you have selected Di mode play (see page 19). 3 Rotate the MULTI..., press the kill-ol/10-10-I 10)% M Oill' PUSH TO ENTER TO ENT ER 5 STORE/ MENU 6 Settings in a CD, and display them at playing (see page 25). SET BALANCE (during recording or recording standby): Allows you to a CDRW (see page 26). 4 Rotate the MULTI JOG knob to select a setting, and press the...
Owner Manual
Page 23
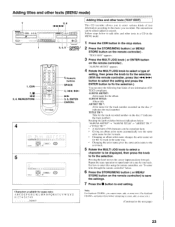
...track. • Changing an album artist name changes the artist name set for name entry ABCDEFGHIJKLMNOPQRSTUVWXY7 0 1 23456789 , _(space) Note: For finalized CD-RWs, you recorded. Repeat the same operation to input letters on the remote controller) to save the settings. 7 Press the • button to end setting. ... 2 Press the STORE/MENU button ( or MENU/ STORE button on the remote controller) . Adding titles and other texts (TEXT EDIT) This CD recorder allows you to enter various kinds of text information according to the music you cannot enter, add, or erase text. (For finalized...
...track. • Changing an album artist name changes the artist name set for name entry ABCDEFGHIJKLMNOPQRSTUVWXY7 0 1 23456789 , _(space) Note: For finalized CD-RWs, you recorded. Repeat the same operation to input letters on the remote controller) to save the settings. 7 Press the • button to end setting. ... 2 Press the STORE/MENU button ( or MENU/ STORE button on the remote controller) . Adding titles and other texts (TEXT EDIT) This CD recorder allows you to enter various kinds of text information according to the music you cannot enter, add, or erase text. (For finalized...
Owner Manual
Page 26
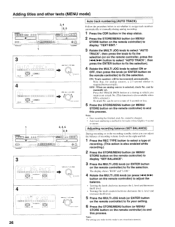
... recording has finished, track No. Adding titles and other texts (MENU mode) I I• 3, 4 2, 5 0 coo • I • 6 o 0 • 1 3 I I= Ol'I I I I I I I I I I 1 1 i I 1 I I I ANALOG 1-4-4 MULTI JOG NI TO ENTER 4 I I I I I I I H 1.4.4 MULTI JOG NH PUSH TO ENTER ©OO' O 3, 4, 5 2, 6 Q UOO I-i • i • I O 3 I 11 EC< RUPP CD ... MENU/ STORE button on the remote controller) to fix the selection. Adjusting recording balance (SET BALANCE) During recording or in the recording standby status you can be incremented automatically. ON: Track numbers will be set...
... recording has finished, track No. Adding titles and other texts (MENU mode) I I• 3, 4 2, 5 0 coo • I • 6 o 0 • 1 3 I I= Ol'I I I I I I I I I I 1 1 i I 1 I I I ANALOG 1-4-4 MULTI JOG NI TO ENTER 4 I I I I I I I H 1.4.4 MULTI JOG NH PUSH TO ENTER ©OO' O 3, 4, 5 2, 6 Q UOO I-i • i • I O 3 I 11 EC< RUPP CD ... MENU/ STORE button on the remote controller) to fix the selection. Adjusting recording balance (SET BALANCE) During recording or in the recording standby status you can be incremented automatically. ON: Track numbers will be set...
Owner Manual
Page 27
...The unit is unplayable. No disc is loaded or the loaded disc is closing the disc tray. This also appears during recording. The recording stops immediately. The disc will be a CD-ROM for use . An attempt was made to a disc failure such as for the next operation, such as a scratch... erasing. External analog input (CDR ANALOG IN) is placed in the open disc tray has not yet been finalized (CD recorder). NOT FINALIZED W SCANNING A CD-RW that the disc is not for your guidance. DISPLAY messages Messages, as the time display appears. The disc becomes playable ...
...The unit is unplayable. No disc is loaded or the loaded disc is closing the disc tray. This also appears during recording. The recording stops immediately. The disc will be a CD-ROM for use . An attempt was made to a disc failure such as for the next operation, such as a scratch... erasing. External analog input (CDR ANALOG IN) is placed in the open disc tray has not yet been finalized (CD recorder). NOT FINALIZED W SCANNING A CD-RW that the disc is not for your guidance. DISPLAY messages Messages, as the time display appears. The disc becomes playable ...


