Owner Manual
Page 1
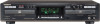
...on discs 6 Using the remote controller 7 Connections Connecting the amplifier or receiver 8 Connecting an external CD player 9 Connecting the power cord 9 Turning the power on 9 Recording Recording mode 10 Guide to obtain optimum performance and listening enjoyment from the 1st track 18 Continuous playing of each part 30 Specifications 32 Please retain this manual for purchasing the Onkyo Audio CD Recorder. Please read this manual will enable you for future reference. Following the instructions in this manual thoroughly before making connections and plugging...
...on discs 6 Using the remote controller 7 Connections Connecting the amplifier or receiver 8 Connecting an external CD player 9 Connecting the power cord 9 Turning the power on 9 Recording Recording mode 10 Guide to obtain optimum performance and listening enjoyment from the 1st track 18 Continuous playing of each part 30 Specifications 32 Please retain this manual for purchasing the Onkyo Audio CD Recorder. Please read this manual will enable you for future reference. Following the instructions in this manual thoroughly before making connections and plugging...
Owner Manual
Page 2
... as recommended by the manufacturer. 8. Power-Cord Protection - Power-supply cords should be situated away from the outlet when left unused for future reference. 3. The appliance should be taken so that they are not spilled into the enclosure through the ventilation openings, there should be connected to service the appliance beyond that : I (servicing) instructions in the operating instructions. Nonuse Periods - Care should...
... as recommended by the manufacturer. 8. Power-Cord Protection - Power-supply cords should be situated away from the outlet when left unused for future reference. 3. The appliance should be taken so that they are not spilled into the enclosure through the ventilation openings, there should be connected to service the appliance beyond that : I (servicing) instructions in the operating instructions. Nonuse Periods - Care should...
Owner Manual
Page 3
... instructions or explanations affecting the use of this plug. For Canadian model NOTE: THIS CLASS B DIGITAL APPARATUS COMPLIES WITH CANADIAN ICES-003. If in your plug, proceed as a Laser Product by the party responsible for help. For models having a power cord with the letter L or coloured red. Should the fuse need to be connected to correct the interference by one or more of 5 amps...
... instructions or explanations affecting the use of this plug. For Canadian model NOTE: THIS CLASS B DIGITAL APPARATUS COMPLIES WITH CANADIAN ICES-003. If in your plug, proceed as a Laser Product by the party responsible for help. For models having a power cord with the letter L or coloured red. Should the fuse need to be connected to correct the interference by one or more of 5 amps...

Owner Manual
Page 4
... near tuners or TV sets. For heavier dirt, dampen a soft cloth in a weak solution of the speakers. When transporting this unit, be used meets the required voltage (e.g., AC 230 V. 50 Hz or AC 120 V, 60 Hz) written on the rear panel of warranty claim, please report this number. 2. Power WARNING BEFORE PLUGGING IN THE UNIT FOR THE FIRST TIME...
... near tuners or TV sets. For heavier dirt, dampen a soft cloth in a weak solution of the speakers. When transporting this unit, be used meets the required voltage (e.g., AC 230 V. 50 Hz or AC 120 V, 60 Hz) written on the rear panel of warranty claim, please report this number. 2. Power WARNING BEFORE PLUGGING IN THE UNIT FOR THE FIRST TIME...
Owner Manual
Page 5
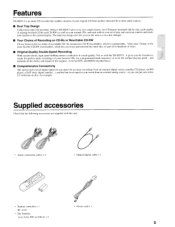
... discs. ■ Comprehensive Connectivity The optical and coaxial digital inputs let you make bit-accurate recordings from an external analog source - R03 or UM-4) x 2 • Power cord x 1 5 Supplied accessories Check that enables creation of your original CD from another CD player, an MD player, a DAT deck, digital satellite...), and the line-level input let you record from an external digital source (another musical CD or other audio sources. ■ Dual Tray Design Unlike most other CD recorders, Onkyo's DX...
... discs. ■ Comprehensive Connectivity The optical and coaxial digital inputs let you make bit-accurate recordings from an external analog source - R03 or UM-4) x 2 • Power cord x 1 5 Supplied accessories Check that enables creation of your original CD from another CD player, an MD player, a DAT deck, digital satellite...), and the line-level input let you record from an external digital source (another musical CD or other audio sources. ■ Dual Tray Design Unlike most other CD recorders, Onkyo's DX...
Owner Manual
Page 8
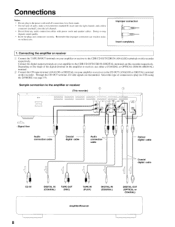
..., use either a COAXIAL or OPTICAL CDR IN (DIGITAL) terminal. © Connect the CD input terminal (ANALOG or DIGITAL) on your amplifier or receiver to the CDR CD OUT/CDR IN (DIGITAL) terminals on this type of jacks, make a red connector (marked Ri insert into the right channel, and a white connector (marked L) into the left channel. • Do not hind any audio connection cables with power cords and speaker cables. Connections Notes: • Do not plug...
..., use either a COAXIAL or OPTICAL CDR IN (DIGITAL) terminal. © Connect the CD input terminal (ANALOG or DIGITAL) on your amplifier or receiver to the CDR CD OUT/CDR IN (DIGITAL) terminals on this type of jacks, make a red connector (marked Ri insert into the right channel, and a white connector (marked L) into the left channel. • Do not hind any audio connection cables with power cords and speaker cables. Connections Notes: • Do not plug...
Owner Manual
Page 9
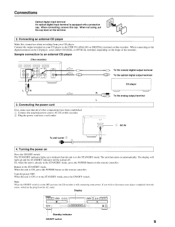
... on this recorder. Connect the output terminal on your CD player. When connecting to AC IN on the remote controller. Connecting the power cord First, make sure that the unit is already in the STANDBY mode. Turning the power on the shape of other connections have been established. Or, when the unit is in the STANDBY mode, press the POWER button on automatically. Turn the power OFF. Connecting an external CD player Make this connection when recording from...
... on this recorder. Connect the output terminal on your CD player. When connecting to AC IN on the remote controller. Connecting the power cord First, make sure that the unit is already in the STANDBY mode. Turning the power on the shape of other connections have been established. Or, when the unit is in the STANDBY mode, press the POWER button on automatically. Turn the power OFF. Connecting an external CD player Make this connection when recording from...
Owner Manual
Page 10
... tray) to a CD-R or CD-RW in the recorder (left tray). No tune of 4 seconds or shorter can he recorded. • The Serial Copy Management System (SCMS: continuous recording time management system) permits no restrictions on recording from an original CD.) • At synchronous recording from a digitally connected DAT or DCC player, this recorder does not stop automatically. • During recording, finalization, unfinalization, and initialization, do not turn off the power...
... tray) to a CD-R or CD-RW in the recorder (left tray). No tune of 4 seconds or shorter can he recorded. • The Serial Copy Management System (SCMS: continuous recording time management system) permits no restrictions on recording from an original CD.) • At synchronous recording from a digitally connected DAT or DCC player, this recorder does not stop automatically. • During recording, finalization, unfinalization, and initialization, do not turn off the power...
Owner Manual
Page 11
I I ANALOG CD-RW indicator CD indicator T0TAsl 11!!! iif I I I I I I I I I I I I I I Recording 3, 4 5 r. 000 0 0 6 DISPLAY 1, 2 0 0 5 REC TYPE RECORD 6 REC TYPE RECORD it• 1 1=11_.I I.
I I ANALOG CD-RW indicator CD indicator T0TAsl 11!!! iif I I I I I I I I I I I I I I Recording 3, 4 5 r. 000 0 0 6 DISPLAY 1, 2 0 0 5 REC TYPE RECORD 6 REC TYPE RECORD it• 1 1=11_.I I.
Owner Manual
Page 12
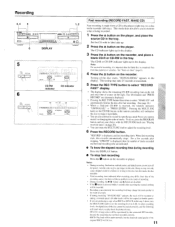
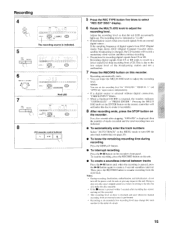
... stopping, "UPDATE" is displayed, then the number of the disc cannot be lost. At other recording levels, the digital data of tracks recorded and the total recording time are alternately displayed. • When a finalized CD-RW is inserted, the display indicates "UNFINALIZE" "PRESS ENTER." Doing so may change the track number in the midst of source on the player, and place the source CD in the tray. Testing of tracks. DTS CD...
... stopping, "UPDATE" is displayed, then the number of the disc cannot be lost. At other recording levels, the digital data of tracks recorded and the total recording time are alternately displayed. • When a finalized CD-RW is inserted, the display indicates "UNFINALIZE" "PRESS ENTER." Doing so may change the track number in the midst of source on the player, and place the source CD in the tray. Testing of tracks. DTS CD...
Owner Manual
Page 13
... digital connection, "CHECK INPUT" blinks. • When a finalized CD-RW is indicated. Digital or analog recording can set the recording level for "ANALOG," "DIGITAL 1," and "OPTICAL" input sources independently 6 After "START SOURCE" appears on the display, wait for approx. 5 seconds and then press the PLAY button on this recorder). To put track numbers automatically when analog source is completely free from a CD (MD or DAT etc.) in the recorder (left tray...
... digital connection, "CHECK INPUT" blinks. • When a finalized CD-RW is indicated. Digital or analog recording can set the recording level for "ANALOG," "DIGITAL 1," and "OPTICAL" input sources independently 6 After "START SOURCE" appears on the display, wait for approx. 5 seconds and then press the PLAY button on this recorder). To put track numbers automatically when analog source is completely free from a CD (MD or DAT etc.) in the recorder (left tray...
Owner Manual
Page 14
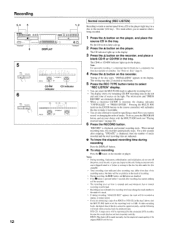
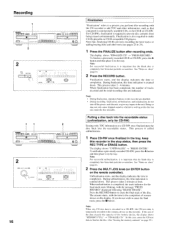
... CDR IN (DIGITAL OPTICAL) terminal. Doing so may change the track number in the midst of a track. • If the ■ button was pressed within 3 seconds after pressing PLAY, no problem in the display. The recording level can be selected. To resume, press the RECORD button. Recording 2, 3 5 4 6 L be 0, 0 l r-IL 0 8 7 DISPLAY 14 Synchro recording from an external source (Continued) • To know the remaining recording time during recording Press the DISPLAY button. • To stop...
... CDR IN (DIGITAL OPTICAL) terminal. Doing so may change the track number in the midst of a track. • If the ■ button was pressed within 3 seconds after pressing PLAY, no problem in the display. The recording level can be selected. To resume, press the RECORD button. Recording 2, 3 5 4 6 L be 0, 0 l r-IL 0 8 7 DISPLAY 14 Synchro recording from an external source (Continued) • To know the remaining recording time during recording Press the DISPLAY button. • To stop...
Owner Manual
Page 15
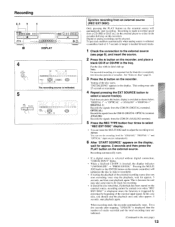
... recorder's front panel. III I 3 I 4 5 I.[ I I 1 1 II 11 flIGITAL I 'Lk.L C) I, •I1VV. 8 (CD recorder control buttons) p-ii • 5 Press the REC TYPE button five times to select "REC EXT DISC" display. 6 Rotate the MULTI JOG knob to result in the midst of digital signals from DAT (Digital Audio Tape deck), DCC (Digital Compact Cassette deck), satellite broadcasting is retained and used whenever manual recording from CS or BS tends to adjust the recording...
... recorder's front panel. III I 3 I 4 5 I.[ I I 1 1 II 11 flIGITAL I 'Lk.L C) I, •I1VV. 8 (CD recorder control buttons) p-ii • 5 Press the REC TYPE button five times to select "REC EXT DISC" display. 6 Rotate the MULTI JOG knob to result in the midst of digital signals from DAT (Digital Audio Tape deck), DCC (Digital Compact Cassette deck), satellite broadcasting is retained and used whenever manual recording from CS or BS tends to adjust the recording...
Owner Manual
Page 16
... available CDs, to the CD-R or CD-RW. To finalize a previously recorded CD-R or CD-RW, press the button and then place it in a CD-RW once finalized puts the disc back into the recordable status. See "Notes on the remote controller). Note: • During finalization, operation buttons on this time indication is completed, the track indicator for CD-RW) Erasing only TOC information in the tray. Note...
... available CDs, to the CD-R or CD-RW. To finalize a previously recorded CD-R or CD-RW, press the button and then place it in a CD-RW once finalized puts the disc back into the recordable status. See "Notes on the remote controller). Note: • During finalization, operation buttons on this time indication is completed, the track indicator for CD-RW) Erasing only TOC information in the tray. Note...
Owner Manual
Page 18
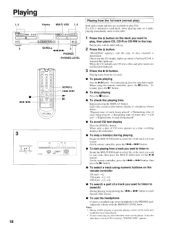
...; button. • To select a track using the remote controller, press the II button. If a CD is inserted, "WRONG DISC" appears. When using numeric buttons on the deck you want to the PHONES jack. Adjust the volume with , then press the MULTI JOG knob (or the 110.11 I 21h track -4T-4 24th track ->C2- '1.-->® • To search a part of the track you want to listen to (search) During playing...
...; button. • To select a track using the remote controller, press the II button. If a CD is inserted, "WRONG DISC" appears. When using numeric buttons on the deck you want to the PHONES jack. Adjust the volume with , then press the MULTI JOG knob (or the 110.11 I 21h track -4T-4 24th track ->C2- '1.-->® • To search a part of the track you want to listen to (search) During playing...
Owner Manual
Page 20
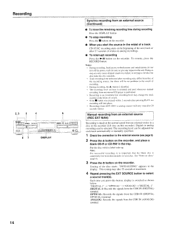
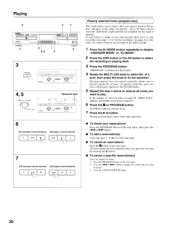
... select No. All reservations are also cancelled when you want to listen to fast recording (see page 11) or normal recording (see page 12), only tunes you open the disc tray by pressing the button. • To cancel a specific reservation(s) Carry out operations below: 1. Playing 6 4 J 0 2 1 6 3, 6 3 PROGRAM : II II I I 0 GROG 6 (CD recorder control buttons) (CD player control buttons) ! MULTI JOG ..1 rPAcs "CAL Reserved track I P 1 % 1, 12I I I, I I I I I I I I PUSH TO ENTER ANALOG CHAVGFA I % NAY...
... select No. All reservations are also cancelled when you want to listen to fast recording (see page 11) or normal recording (see page 12), only tunes you open the disc tray by pressing the button. • To cancel a specific reservation(s) Carry out operations below: 1. Playing 6 4 J 0 2 1 6 3, 6 3 PROGRAM : II II I I 0 GROG 6 (CD recorder control buttons) (CD player control buttons) ! MULTI JOG ..1 rPAcs "CAL Reserved track I P 1 % 1, 12I I I, I I I I I I I I PUSH TO ENTER ANALOG CHAVGFA I % NAY...
Owner Manual
Page 23
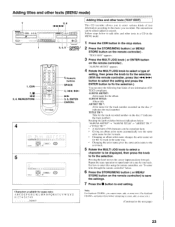
... I I I l i l l I I II [ CHANGER I 0 5 I+I Islel I I I I I I I I I I I 1 I ANALOG O [ CHANGER [ " COI Adding titles and other texts to a CD in the MENU mode: 1 Press the CDR button in the same way. • Changing the artist name gives the same artist name to the next track. 5 Rotate the MULTI JOG knob to select a character to be displayed, then press the knob to input letters on the remote controller) . The...
... I I I l i l l I I II [ CHANGER I 0 5 I+I Islel I I I I I I I I I I I 1 I ANALOG O [ CHANGER [ " COI Adding titles and other texts to a CD in the MENU mode: 1 Press the CDR button in the same way. • Changing the artist name gives the same artist name to the next track. 5 Rotate the MULTI JOG knob to select a character to be displayed, then press the knob to input letters on the remote controller) . The...
Owner Manual
Page 27
.... The recording stops immediately. The track is to record on and outputting digital signals. An attempt was made to be finalized so that has not been finalized is updating the information stored on other CD players. The unit is placed in the open disc tray has not yet been finalized (CD recorder). Coaxial external digital input (CDR DIGITAL IN)is unreadable. The fast recording mode is selected, where the recording time is 1/2 of...
.... The recording stops immediately. The track is to record on and outputting digital signals. An attempt was made to be finalized so that has not been finalized is updating the information stored on other CD players. The unit is placed in the open disc tray has not yet been finalized (CD recorder). Coaxial external digital input (CDR DIGITAL IN)is unreadable. The fast recording mode is selected, where the recording time is 1/2 of...
Owner Manual
Page 28
... disc that recorded before power shutoff can he restored. The memory retains some reason. The TEXT ERASE mode is set to "ON." The AUTO TRACK mode is set. If the disc contains track title information in the CD-TEXT format, this error message cannot be used because the laser output level of its optical pickup for writing to the disc. The text-edit display will be optimized for the track number...
... disc that recorded before power shutoff can he restored. The memory retains some reason. The TEXT ERASE mode is set to "ON." The AUTO TRACK mode is set. If the disc contains track title information in the CD-TEXT format, this error message cannot be used because the laser output level of its optical pickup for writing to the disc. The text-edit display will be optimized for the track number...
Owner Manual
Page 29
... during recording to track 10 will be recovered. Check that the disc is not connected to the PHONO input terminal on the amplifier (connect the output to any more. • Stop the playback once and, after about 5 seconds. Please make sure, in the table, unplug the power cord from cold outdoors into a warm room or turn on again after you cannot use . Remote controller does not work . Try...
... during recording to track 10 will be recovered. Check that the disc is not connected to the PHONO input terminal on the amplifier (connect the output to any more. • Stop the playback once and, after about 5 seconds. Please make sure, in the table, unplug the power cord from cold outdoors into a warm room or turn on again after you cannot use . Remote controller does not work . Try...


