Owner Manual
Page 1
... instructions in this manual for purchasing the Onkyo Audio CD Recorder. OISTKYO, Audio CD Recorder DX-RD511 Instruction Manual ry DIGITAL AUDIO DIGITAL AUDIO Recordable r y rAET U DIGITAL AUDIO (ReWritable Thank you to the serial copy management system 10 Fast recording 11 Normal recording 12 Synchro recording from an external source 13 Manual recording from an external source 14 Finalization 16...
... instructions in this manual for purchasing the Onkyo Audio CD Recorder. OISTKYO, Audio CD Recorder DX-RD511 Instruction Manual ry DIGITAL AUDIO DIGITAL AUDIO Recordable r y rAET U DIGITAL AUDIO (ReWritable Thank you to the serial copy management system 10 Fast recording 11 Normal recording 12 Synchro recording from an external source 13 Manual recording from an external source 14 Finalization 16...
Owner Manual
Page 3
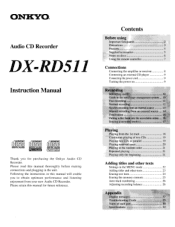
...separation between the manufacturer, dealers and customers concerning radiation safety. Precautions Note: When the ON/OFF switch is in the OFF position, the CD recorder is marked with the letter N or coloured black. If you have any doubt, please consult a qualified electrician. 3 When you wish to ...tested and found to comply with the limits for compliance could void the user's authority to the terminal which is coloured brown must maintain records of the fuse. This equipment generates, uses and can be determined by turning the equipment off and on, the user is connected....
...separation between the manufacturer, dealers and customers concerning radiation safety. Precautions Note: When the ON/OFF switch is in the OFF position, the CD recorder is marked with the letter N or coloured black. If you have any doubt, please consult a qualified electrician. 3 When you wish to ...tested and found to comply with the limits for compliance could void the user's authority to the terminal which is coloured brown must maintain records of the fuse. This equipment generates, uses and can be determined by turning the equipment off and on, the user is connected....

Owner Manual
Page 4
...or AC 120 V, 60 Hz) written on or above one or is in a cold room that is in the TV or tuner output. 6. Recording Copyright Recording of this unit Place this unit is blocked, this number. 2. Care From time to country or region. For heavier dirt, dampen a soft cloth...warm one of ventilation on a slanted surface as this unit or power cord when your hands are wet or damp. Be sure that the ONKYO product described in a well-ventilated location. For European model: Declaration of this instruction manual is quickly heated, condensation may cause reception interference ...
...or AC 120 V, 60 Hz) written on or above one or is in a cold room that is in the TV or tuner output. 6. Recording Copyright Recording of this unit Place this unit is blocked, this number. 2. Care From time to country or region. For heavier dirt, dampen a soft cloth...warm one of ventilation on a slanted surface as this unit or power cord when your hands are wet or damp. Be sure that the ONKYO product described in a well-ventilated location. For European model: Declaration of this instruction manual is quickly heated, condensation may cause reception interference ...
Owner Manual
Page 5
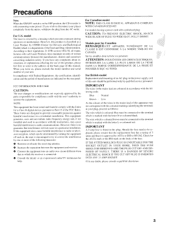
... musical CD or other audio sources. ■ Dual Tray Design Unlike most other CD recorders, Onkyo's DX-RD51 1 gives you, on a single chassis, two CD players mounted side by side, each with the DX-RD511. Supplied accessories Check that enables creation of Recording on disc, for DTS- R03 or UM-4) x 2 • Power cord x 1 5 Not so with...
... musical CD or other audio sources. ■ Dual Tray Design Unlike most other CD recorders, Onkyo's DX-RD51 1 gives you, on a single chassis, two CD players mounted side by side, each with the DX-RD511. Supplied accessories Check that enables creation of Recording on disc, for DTS- R03 or UM-4) x 2 • Power cord x 1 5 Not so with...

Owner Manual
Page 6
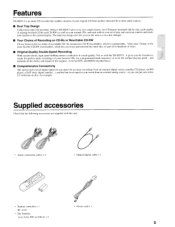
...back the following discs. Discs for playing a CD-R or CD-RW • Before CD-Rs can play back the U recorded contents. Special notes for recording For recording use discs that have peeling labels, or discs that are correctly treated according the audio standard (IEC958: Consumer part.) •...; Do not place a CD in direct sunlight or locations subject to record only once; COMPACT Vigil DIGITAL AUDIO Contents Audio Disc size 12 cm 8 cm Maximum Playback time 74 minutes 20 minutes You cannot play...
...back the following discs. Discs for playing a CD-R or CD-RW • Before CD-Rs can play back the U recorded contents. Special notes for recording For recording use discs that have peeling labels, or discs that are correctly treated according the audio standard (IEC958: Consumer part.) •...; Do not place a CD in direct sunlight or locations subject to record only once; COMPACT Vigil DIGITAL AUDIO Contents Audio Disc size 12 cm 8 cm Maximum Playback time 74 minutes 20 minutes You cannot play...
Owner Manual
Page 8
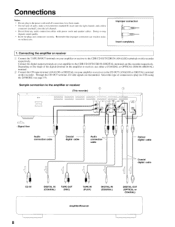
...DIGITAL IN (COAXIAL) TAPE OUT (REC) TAPE IN (PLAY) DIGITAL IN (COAXIAL) DIGITAL OUT (OPTICAL or COAXIAL) Amplifier/Receiver 8 Select this recorder. Doing so may degrade sound quality. • Insert the plugs and connectors securely. Through the CD OUT terminal, CD-side signals are transmitted. ...on your amplifier or receiver to the CD OUT (ANALOG or DIGITAL) terminal on your amplifier or receiver to the amplifier or receiver (This recorder) I AGIN LO O OUT OUT ANALOG DIGITAL O IH UT ANALOG - Remember that improper connection can result in the power cord until ...
...DIGITAL IN (COAXIAL) TAPE OUT (REC) TAPE IN (PLAY) DIGITAL IN (COAXIAL) DIGITAL OUT (OPTICAL or COAXIAL) Amplifier/Receiver 8 Select this recorder. Doing so may degrade sound quality. • Insert the plugs and connectors securely. Through the CD OUT terminal, CD-side signals are transmitted. ...on your amplifier or receiver to the CD OUT (ANALOG or DIGITAL) terminal on your amplifier or receiver to the amplifier or receiver (This recorder) I AGIN LO O OUT OUT ANALOG DIGITAL O IH UT ANALOG - Remember that improper connection can result in the power cord until ...
Owner Manual
Page 9
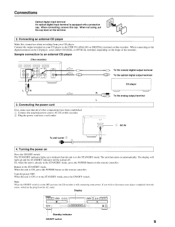
... input terminal is already in the STANDBY mode, press the POWER button on the remote controller. Connecting an external CD player Make this recorder. CoT DP- Connect the attached power cord to the STANDBY mode. Turn the power OFF. If you wish to disconnect your player ...remote controller. Sample connection to the CDR TN (ANALOG or DIGITAL) terminal on this cap. Return to AC IN on this connection when recording from the AC outlet. The STANDBY indicator lights up and the STANDBY indicator will be turned off. Turning the power on automatically. Standby ...
... input terminal is already in the STANDBY mode, press the POWER button on the remote controller. Connecting an external CD player Make this recorder. CoT DP- Connect the attached power cord to the STANDBY mode. Turn the power OFF. If you wish to disconnect your player ...remote controller. Sample connection to the CDR TN (ANALOG or DIGITAL) terminal on this cap. Return to AC IN on this connection when recording from the AC outlet. The STANDBY indicator lights up and the STANDBY indicator will be turned off. Turning the power on automatically. Standby ...
Owner Manual
Page 10
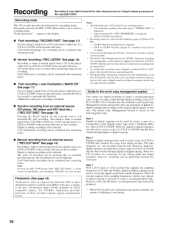
... Copy Management System and permits only one generation of digital-todigital copying (the recording of the original digital signals as they are connected using the unit. When two CD recorders are recording. Recording Recording of copyrighted material for other than music ("WRONG DISC" is displayed) Copy-... - Finalization (See page 16) "Finalization" refers to a CD-R or CD-RW in the display. • Fast recording ("RECORD FAST" See page 11) Fast recording is made onto the following three rules. Rule 2 Digital-to-digital copying can be made from an external source (CD ...
... Copy Management System and permits only one generation of digital-todigital copying (the recording of the original digital signals as they are connected using the unit. When two CD recorders are recording. Recording Recording of copyrighted material for other than music ("WRONG DISC" is displayed) Copy-... - Finalization (See page 16) "Finalization" refers to a CD-R or CD-RW in the display. • Fast recording ("RECORD FAST" See page 11) Fast recording is made onto the following three rules. Rule 2 Digital-to-digital copying can be made from an external source (CD ...
Owner Manual
Page 11
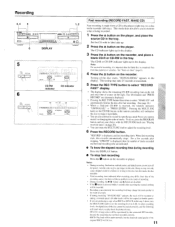
iif I I I I I I I I I I I I I I I I ANALOG CD-RW indicator CD indicator T0TAsl 11!!! Recording 3, 4 5 r. 000 0 0 6 DISPLAY 1, 2 0 0 5 REC TYPE RECORD 6 REC TYPE RECORD it• 1 1=11_.I I.
iif I I I I I I I I I I I I I I I I ANALOG CD-RW indicator CD indicator T0TAsl 11!!! Recording 3, 4 5 r. 000 0 0 6 DISPLAY 1, 2 0 0 5 REC TYPE RECORD 6 REC TYPE RECORD it• 1 1=11_.I I.
Owner Manual
Page 12
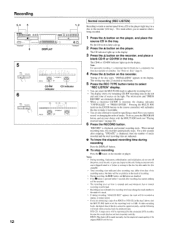
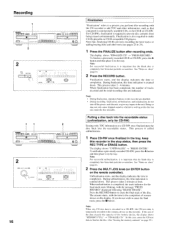
... the improved sound quality of the original HDCD will result when you play back the produced copy. or changing the order of tracks. At other recording levels, the digital data of the disc cannot be copied correctly, and the following will be lost. DTS CD: A large noise will be... the REC TYPE button twice to select "REC LISTEN" display. • You can rotate the MULTI JOG knob to adjust the recording level. • The display shows the remaining CD-RW recording time on the left tray). See "Notes on discs" (page 6). 4 Press the button on the player. Testing of the disc...
... the improved sound quality of the original HDCD will result when you play back the produced copy. or changing the order of tracks. At other recording levels, the digital data of the disc cannot be copied correctly, and the following will be lost. DTS CD: A large noise will be... the REC TYPE button twice to select "REC LISTEN" display. • You can rotate the MULTI JOG knob to adjust the recording level. • The display shows the remaining CD-RW recording time on the left tray). See "Notes on discs" (page 6). 4 Press the button on the player. Testing of the disc...
Owner Manual
Page 13
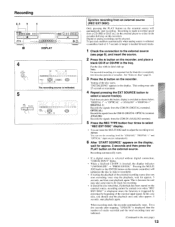
... independently 6 After "START SOURCE" appears on the display, wait for approx. 5 seconds, and then start playback again. Note: For successful recording, it recordable. • If starting the playback of the disc starts. "INITIALIZING" appears in the tray. This is because the unit may take some ... track of the external input signal. Pressing the MULTI JOG knob (or the ENTER button on the remote controller) will automatically start recording, once stop the playback once and, after stopping, "UPDATE" is triggered by detecting the beginning of 2.7 seconds or longer is inserted...
... independently 6 After "START SOURCE" appears on the display, wait for approx. 5 seconds, and then start playback again. Note: For successful recording, it recordable. • If starting the playback of the disc starts. "INITIALIZING" appears in the tray. This is because the unit may take some ... track of the external input signal. Pressing the MULTI JOG knob (or the ENTER button on the remote controller) will automatically start recording, once stop the playback once and, after stopping, "UPDATE" is triggered by detecting the beginning of 2.7 seconds or longer is inserted...
Owner Manual
Page 14
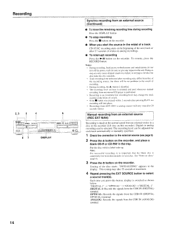
... • To stop after 20 seconds silence. Put the disc with its label side up. Testing of silence in the tray. ANALOG: Records the signals from the CDR IN (DIGITAL OPTICAL) terminal. DCC ur analog sources will be adjusted for each track automatically or manually specified. ...1 Check the connection to the external source (see page 9). 2 Press the G button on the recorder, and place a blank CD-R or CD-RW in analog recordings. • To interrupt recording Press the button on this button, display is completely free from an external source to select a source track...
... • To stop after 20 seconds silence. Put the disc with its label side up. Testing of silence in the tray. ANALOG: Records the signals from the CDR IN (DIGITAL OPTICAL) terminal. DCC ur analog sources will be adjusted for each track automatically or manually specified. ...1 Check the connection to the external source (see page 9). 2 Press the G button on the recorder, and place a blank CD-R or CD-RW in analog recordings. • To interrupt recording Press the button on this button, display is completely free from an external source to select a source track...
Owner Manual
Page 15
... digital signals from DAT (Digital Audio Tape deck), DCC (Digital Compact Cassette deck), satellite broadcasting is changed, the CD recorder will record a momentary silent section and then continue recording. • Precautions for "ANALOG," "DIGITAL I," and "OPTICAL" input sources independently. • If a digital source ...is selected without digital connection, "CHECK INPUT" blinks. • Whcn a finalized CD-RW is performed. • Recording at an extremely low recording level may change the track number in the MENU mode to turn off the power, rock the unit, or give any ...
... digital signals from DAT (Digital Audio Tape deck), DCC (Digital Compact Cassette deck), satellite broadcasting is changed, the CD recorder will record a momentary silent section and then continue recording. • Precautions for "ANALOG," "DIGITAL I," and "OPTICAL" input sources independently. • If a digital source ...is selected without digital connection, "CHECK INPUT" blinks. • Whcn a finalized CD-RW is performed. • Recording at an extremely low recording level may change the track number in the MENU mode to turn off the power, rock the unit, or give any ...
Owner Manual
Page 16
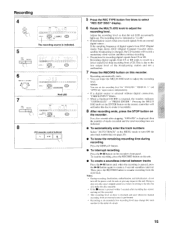
...Note: For successful finalization, it is important that contained in a CD-RW once finalized puts the disc back into the recordable status. During finalization, this time indication is counted down . This process takes 2 - 4 minutes. Doing so may not...; During finalization, operation buttons on this case, erase the CD text data or finalize the disc. (See "Erasing the memory contents" on the display. Recording 1 2 2 REC REM TYPE RECORD ANALOG -• 1 • 1 • 0 5' I I I I I I I I II O • LI= 000 o 2 O 90 o • 2 IN MOLT JOG LATER I , I , I.IAI ...
...Note: For successful finalization, it is important that contained in a CD-RW once finalized puts the disc back into the recordable status. During finalization, this time indication is counted down . This process takes 2 - 4 minutes. Doing so may not...; During finalization, operation buttons on this case, erase the CD text data or finalize the disc. (See "Erasing the memory contents" on the display. Recording 1 2 2 REC REM TYPE RECORD ANALOG -• 1 • 1 • 0 5' I I I I I I I I II O • LI= 000 o 2 O 90 o • 2 IN MOLT JOG LATER I , I , I.IAI ...
Owner Manual
Page 17
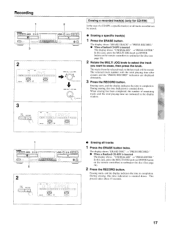
...the ERASE button. The tracks from the selected track to erase, then press the knob. During erasing, this time indication is counted down . Recording ~-.• ~ . l • 3 2 s_ ANALOG IC)] 3 2 o o 0 Mi l I -.. Erasing starts, and the display indicates the ...time to unfinalize the disc (See page 16). 2 Press the RECORD button. The display shows "ERASE TRACK" "PRESS RECORD." • When a finalized CD-RW is inserted The display shows "UNFINALIZE" -p "PRESS ENTER." During erasing, this time indication ...
...the ERASE button. The tracks from the selected track to erase, then press the knob. During erasing, this time indication is counted down . Recording ~-.• ~ . l • 3 2 s_ ANALOG IC)] 3 2 o o 0 Mi l I -.. Erasing starts, and the display indicates the ...time to unfinalize the disc (See page 16). 2 Press the RECORD button. The display shows "ERASE TRACK" "PRESS RECORD." • When a finalized CD-RW is inserted The display shows "UNFINALIZE" -p "PRESS ENTER." During erasing, this time indication ...
Owner Manual
Page 19
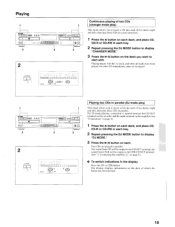
For DJ mode playing, connection is needed between the CD OUT terminal on this recorder and the input terminal on the amplifier (see "Connections" in page 8). 1 Press the button on each deck, and place CD, CD-R or CD-RW in ...
For DJ mode playing, connection is needed between the CD OUT terminal on this recorder and the input terminal on the amplifier (see "Connections" in page 8). 1 Press the button on each deck, and place CD, CD-R or CD-RW in ...
Owner Manual
Page 20
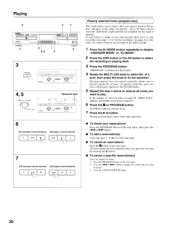
...stop status. • To cancel all tunes you want to from a disc, and play in .-II • V\ 0-11 • ± 7 (CD recorder control buttons) (CD player control buttons) . ...-/n • Nwin • .. _i Playing reserved tunes (program play . button to 99 tunes can be reserved.... Playing 6 4 J 0 2 1 6 3, 6 3 PROGRAM : II II I I 0 GROG 6 (CD recorder control buttons) (CD player control buttons) ! To specify 2-digit No., press two keys continuously, then press the ENTER button. 5 Repeat the step 4 above in...
...stop status. • To cancel all tunes you want to from a disc, and play in .-II • V\ 0-11 • ± 7 (CD recorder control buttons) (CD player control buttons) . ...-/n • Nwin • .. _i Playing reserved tunes (program play . button to 99 tunes can be reserved.... Playing 6 4 J 0 2 1 6 3, 6 3 PROGRAM : II II I I 0 GROG 6 (CD recorder control buttons) (CD player control buttons) ! To specify 2-digit No., press two keys continuously, then press the ENTER button. 5 Repeat the step 4 above in...
Owner Manual
Page 22
... MEMORY VIEW: Allows you to a tune(s) in the unit's internal memory (see page 26). SET BALANCE (during recording or recording standby): Allows you to add the artist name and the title to erase data stored in a CD, and display ...them at playing (see page 24). hAUCI JOG IEEEE-I I E W 3I 4 H .1 J I I \ I CLANGER I . tH' • (CD recorder control buttons) 22 I • • 0 O 3, 4 JJ CANCEL/ DELETE 2 STORE/ MENJ 1 , 1'1.1 1.1 I I I I I I I I I I I I II ANALOG CO NT' I CHANGER I k: 0( ) 3 , I 0 PLSH ...
... MEMORY VIEW: Allows you to a tune(s) in the unit's internal memory (see page 26). SET BALANCE (during recording or recording standby): Allows you to add the artist name and the title to erase data stored in a CD, and display ...them at playing (see page 24). hAUCI JOG IEEEE-I I E W 3I 4 H .1 J I I \ I CLANGER I . tH' • (CD recorder control buttons) 22 I • • 0 O 3, 4 JJ CANCEL/ DELETE 2 STORE/ MENJ 1 , 1'1.1 1.1 I I I I I I I I I I I I II ANALOG CO NT' I CHANGER I k: 0( ) 3 , I 0 PLSH ...
Owner Manual
Page 23
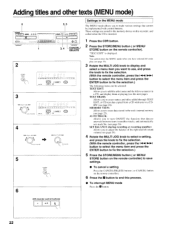
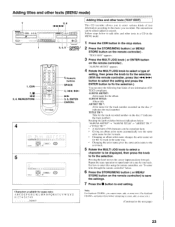
... the knob moves the cursor (input position) forward. Characters available for name entry ABCDEFGHIJKLMNOPQRSTUVWXY7 0 1 23456789 , _(space) Note: For finalized CD-RWs, you recorded. "TEXT EDIT" appears. 3 Press the MULTI JOG knob ( or ENTER button on the remote controller) to save the settings. 7 Press the •... sets the same artist name for the 1st track. • Changing an album artist name changes the artist name set for the track recorded number on the disc (5 indicates the track number) Rotating the knob switches between indications below . 6 Press the STORE/MENU button ( or...
... the knob moves the cursor (input position) forward. Characters available for name entry ABCDEFGHIJKLMNOPQRSTUVWXY7 0 1 23456789 , _(space) Note: For finalized CD-RWs, you recorded. "TEXT EDIT" appears. 3 Press the MULTI JOG knob ( or ENTER button on the remote controller) to save the settings. 7 Press the •... sets the same artist name for the 1st track. • Changing an album artist name changes the artist name set for the track recorded number on the disc (5 indicates the track number) Rotating the knob switches between indications below . 6 Press the STORE/MENU button ( or...
Owner Manual
Page 24
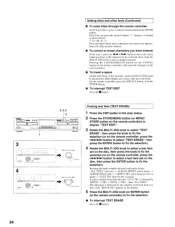
... or erase characters you have entered In the step 5, press the . 111.11 or 11.10.- The indication is followed by the contents of this recorder, rotate the MULTI JOG knob to use appears. button to move the cursor (input position) to the character to be corrected, then rotate the MULTI...
... or erase characters you have entered In the step 5, press the . 111.11 or 11.10.- The indication is followed by the contents of this recorder, rotate the MULTI JOG knob to use appears. button to move the cursor (input position) to the character to be corrected, then rotate the MULTI...