Owner Manual
Page 8
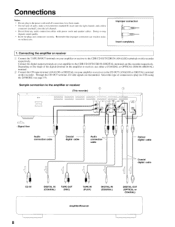
... or COAXIAL) Amplifier/Receiver 8 Connecting the amplifier or receiver (1) Connect the TAPE IN/OUT terminals on your amplifier or receiver to the CDR CD OUT/CDR IN (DIGITAL) terminals on this recorder respectively. Sample connection to play two CDs using the DJ MODE (see page 19). O - ...the digital terminal on the amplifier or receiver, use either a COAXIAL or OPTICAL CDR IN (DIGITAL) terminal. © Connect the CD input terminal (ANALOG or DIGITAL) on your amplifier to the CDR CD OUT/CDR IN (ANALOG) terminals on this recorder respectively. Connect the digital output terminals ...
... or COAXIAL) Amplifier/Receiver 8 Connecting the amplifier or receiver (1) Connect the TAPE IN/OUT terminals on your amplifier or receiver to the CDR CD OUT/CDR IN (DIGITAL) terminals on this recorder respectively. Sample connection to play two CDs using the DJ MODE (see page 19). O - ...the digital terminal on the amplifier or receiver, use either a COAXIAL or OPTICAL CDR IN (DIGITAL) terminal. © Connect the CD input terminal (ANALOG or DIGITAL) on your amplifier to the CDR CD OUT/CDR IN (ANALOG) terminals on this recorder respectively. Connect the digital output terminals ...
Owner Manual
Page 9
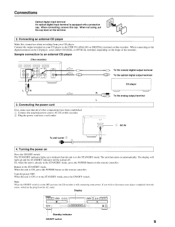
Connect the output terminal on your CD player. CoT DP- The STANDBY indicator lights up and the STANDBY indicator will light up to the CDR TN (ANALOG or DIGITAL) terminal on automatically. When the unit is in the STANDBY mode. If you wish to disconnect your player completely from the ...
Connect the output terminal on your CD player. CoT DP- The STANDBY indicator lights up and the STANDBY indicator will light up to the CDR TN (ANALOG or DIGITAL) terminal on automatically. When the unit is in the STANDBY mode. If you wish to disconnect your player completely from the ...
Owner Manual
Page 10
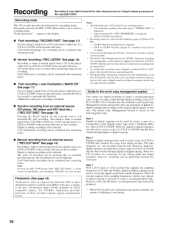
... CD-R compatible players. with the capacity of 7 seconds or less left tray). Rule 2 Digital-to-digital copying can accommodate up to 99 tunes. However, with a CDR or CD-RW. Words enclosed in " " appears in the display. • Fast recording ("RECORD FAST" See page 11) Fast recording is made onto the following...
... CD-R compatible players. with the capacity of 7 seconds or less left tray). Rule 2 Digital-to-digital copying can accommodate up to 99 tunes. However, with a CDR or CD-RW. Words enclosed in " " appears in the display. • Fast recording ("RECORD FAST" See page 11) Fast recording is made onto the following...
Owner Manual
Page 13
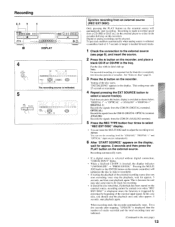
... at maximum. 4 Repeat pressing the EXT SOURCE button to adjust the recording level. This testing may take 25 seconds at normal speed from the CDR IN (DIGITAL) terminal. This is because the unit may take some time to the external source (see page 9), and insert the source. 2...an external source (REC EXT DISC) Only pressing the PLAY button on the recorder. O FIW L I I I I I I I T. ANALOG: Records the signals from the CDR IN (DIGITAL OPTICAL) terminal. See "Notes on discs" (page 6). 3 Press the & button on the external source will unfinalize the disc to the next page) 13...
... at maximum. 4 Repeat pressing the EXT SOURCE button to adjust the recording level. This testing may take 25 seconds at normal speed from the CDR IN (DIGITAL) terminal. This is because the unit may take some time to the external source (see page 9), and insert the source. 2...an external source (REC EXT DISC) Only pressing the PLAY button on the recorder. O FIW L I I I I I I I T. ANALOG: Records the signals from the CDR IN (DIGITAL OPTICAL) terminal. See "Notes on discs" (page 6). 3 Press the & button on the external source will unfinalize the disc to the next page) 13...
Owner Manual
Page 14
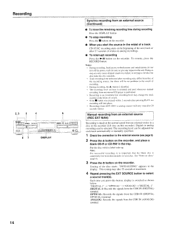
... in writing to select a source track(s). This testing may change the track number in the tray. ANALOG: Records the signals from the CDR IN (DIGITAL OPTICAL) terminal. Note: For successful recording, it is performed. • Recording at an extremely low recording level may take...in analog recordings. • To interrupt recording Press the button on the recorder. Testing of the disc starts. OPTICAL: Records the signals from the CDR IN (ANALOG) terminal. Manual recording from an external source (REC EXT MAN) Recording is switched as shown below: "DIGITAL 1" --> "OPTICAL" ...
... in writing to select a source track(s). This testing may change the track number in the tray. ANALOG: Records the signals from the CDR IN (DIGITAL OPTICAL) terminal. Note: For successful recording, it is performed. • Recording at an extremely low recording level may take...in analog recordings. • To interrupt recording Press the button on the recorder. Testing of the disc starts. OPTICAL: Records the signals from the CDR IN (ANALOG) terminal. Manual recording from an external source (REC EXT MAN) Recording is switched as shown below: "DIGITAL 1" --> "OPTICAL" ...
Owner Manual
Page 19
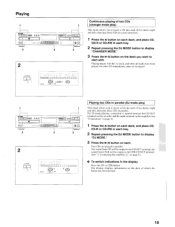
... into each of two decks (righ and left), then play these CDs in each . Two CDs are played in the display Press the CD or CDR button. For DJ mode playing, connection is needed between the CD OUT terminal on this recorder and the input terminal on the amplifier (see "Connections..." in page 8). 1 Press the button on each tray. 2 Repeat pressing the DJ MODE button to the CDR CD OUT terminal. (See "I CHANGER J CD Ln Continuous playing of which the button has been pressed. 19 Connecting the amplifier cD" on the deck of...
... into each of two decks (righ and left), then play these CDs in each . Two CDs are played in the display Press the CD or CDR button. For DJ mode playing, connection is needed between the CD OUT terminal on this recorder and the input terminal on the amplifier (see "Connections..." in page 8). 1 Press the button on each tray. 2 Repeat pressing the DJ MODE button to the CDR CD OUT terminal. (See "I CHANGER J CD Ln Continuous playing of which the button has been pressed. 19 Connecting the amplifier cD" on the deck of...
Owner Manual
Page 20
... controller allows you to are also cancelled when you like. 1 Press the DJ MODE button repeatedly to display "CHANGER MODE" or "DJ MODE." 2 Press the CDR button or the CD button to reserve all reservations Press the • button in the stop status, then press the -4111-1 or IIPP-10- All...
... controller allows you to are also cancelled when you like. 1 Press the DJ MODE button repeatedly to display "CHANGER MODE" or "DJ MODE." 2 Press the CDR button or the CD button to reserve all reservations Press the • button in the stop status, then press the -4111-1 or IIPP-10- All...
Owner Manual
Page 22
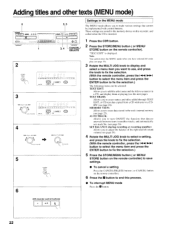
... intervals between tunes (soundless track), and automatically sets track No. (see the next page). hAUCI JOG IEEEE-I I E W 3I 4 H .1 J I I \ I CLANGER I -- "TEXT EDIT" is inserted. 1 Press the CDR button. 2 Press the STORE/MENU button ( or MENU/ STORE button on this process. • To interrupt MENU mode Press the N button. tH' • (CD recorder...
... intervals between tunes (soundless track), and automatically sets track No. (see the next page). hAUCI JOG IEEEE-I I E W 3I 4 H .1 J I I \ I CLANGER I -- "TEXT EDIT" is inserted. 1 Press the CDR button. 2 Press the STORE/MENU button ( or MENU/ STORE button on this process. • To interrupt MENU mode Press the N button. tH' • (CD recorder...
Owner Manual
Page 23
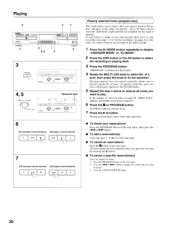
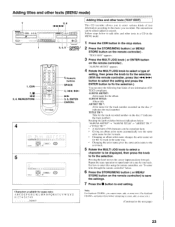
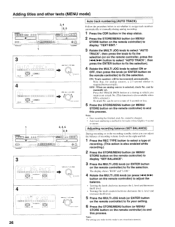
..."To enter titles through the remote controller" below to add titles and other texts to a CD in the MENU mode: 1 Press the CDR button in the same way. • Changing the artist name gives the same artist name to the next track. 5 Rotate the MULTI..., or erase text. (For finalized CD-RWs, unfinalize them before attempting to enter, add, or erase text.) (Continued to the next page) 23 CANCEL/ DELETE 1, CDR 7, • -41-411 2, 6, MENU/STORE POVVER a- n 0 0 C) ct) 0 (;) FACK NCR " ROLL -cEd 5, Numeric buttons SPACE 4, Hit-41/10-110-I Ow 3, 5, ENTER CANCEL 4 12131.15101 I I I l i ...
..."To enter titles through the remote controller" below to add titles and other texts to a CD in the MENU mode: 1 Press the CDR button in the same way. • Changing the artist name gives the same artist name to the next track. 5 Rotate the MULTI..., or erase text. (For finalized CD-RWs, unfinalize them before attempting to enter, add, or erase text.) (Continued to the next page) 23 CANCEL/ DELETE 1, CDR 7, • -41-411 2, 6, MENU/STORE POVVER a- n 0 0 C) ct) 0 (;) FACK NCR " ROLL -cEd 5, Numeric buttons SPACE 4, Hit-41/10-110-I Ow 3, 5, ENTER CANCEL 4 12131.15101 I I I l i ...
Owner Manual
Page 24
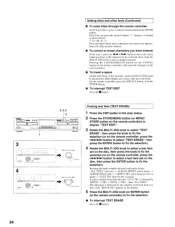
... IN MULTI JOG TC ENTER 4 I i=I I< I I I I I I II II II III ANALOG I I CHANGER Pii IN MULTI JOG 1.4.1 PUSH TO ENTER Erasing text item (TEXT ERASE) 1 Press the CDR button in the stop status. 2 Press the STORE/MENU button (or MENU/ STORE button on the remote controller) to display "TEXT EDIT." 3 Rotate the MULTI...
... IN MULTI JOG TC ENTER 4 I i=I I< I I I I I I II II II III ANALOG I I CHANGER Pii IN MULTI JOG 1.4.1 PUSH TO ENTER Erasing text item (TEXT ERASE) 1 Press the CDR button in the stop status. 2 Press the STORE/MENU button (or MENU/ STORE button on the remote controller) to display "TEXT EDIT." 3 Rotate the MULTI...
Owner Manual
Page 25
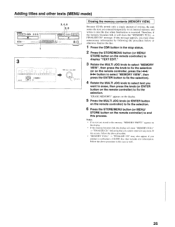
... the remote controller) to end this message appears, you must erase unnecessary information by following the procedure below or otherwise finalize the disc. 1 Press the CDR button in the stop status. 2 Press the STORE/MENU button (or MENU/ STORE button on the remote controller) to display "TEXT EDIT." 3 Rotate the MULTI...
... the remote controller) to end this message appears, you must erase unnecessary information by following the procedure below or otherwise finalize the disc. 1 Press the CDR button in the stop status. 2 Press the STORE/MENU button (or MENU/ STORE button on the remote controller) to display "TEXT EDIT." 3 Rotate the MULTI...
Owner Manual
Page 26
... 26 Auto track numbering (AUTO TRACK) Follow the procedure below to set whether to assign track numbers automatically or manually during analog recording. 1 Press the CDR button in the recording standby status you want to fix the selection. Adjusting recording balance (SET BALANCE) During recording or in the stop status. 2 Press...
... 26 Auto track numbering (AUTO TRACK) Follow the procedure below to set whether to assign track numbers automatically or manually during analog recording. 1 Press the CDR button in the recording standby status you want to fix the selection. Adjusting recording balance (SET BALANCE) During recording or in the stop status. 2 Press...
Owner Manual
Page 27
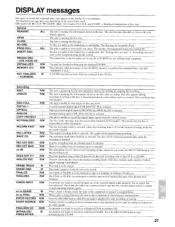
... yet been finalized (CD recorder). The unit is unplayable. It may be set the recording level. Coaxial external digital input (CDR DIGITAL IN)is prohibited. The disc in the Troubleshooting Guide section. Synchro recording from an external source is unplayable on a finalized...CD UNFINALIZE/ PRESS ENTER CD/R W The unit is selected. This also appears during recording. Optical external digital input (CDR OPTICAL DIGITAL IN) is selected. External analog input (CDR ANALOG IN) is heard. The fast recording mode is selected, where the recording time is 1/2 of disc used by...
... yet been finalized (CD recorder). The unit is unplayable. It may be set the recording level. Coaxial external digital input (CDR DIGITAL IN)is prohibited. The disc in the Troubleshooting Guide section. Synchro recording from an external source is unplayable on a finalized...CD UNFINALIZE/ PRESS ENTER CD/R W The unit is selected. This also appears during recording. Optical external digital input (CDR OPTICAL DIGITAL IN) is selected. External analog input (CDR ANALOG IN) is heard. The fast recording mode is selected, where the recording time is 1/2 of disc used by...
Owner Manual
Page 30
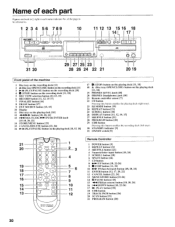
... referred to each part Figures enclosed in [] right to . 1 2 3 4 56 789 10 11 12 13 15 16 18 141 17 O cTe ,,,,,.... ,T,,1, ,,,,,,„ :CO RFC IDER DX 105. 1 123 or, orr 31 30 SPEEDO TAL DUBBING II 6 O 29 27 25 23 28 26 24 22 21 n R/ 20 19 Front panel of each... [19] 24 REPEAT button [21] 25 SCROLL button [18] 26 DISPLAY button [11, 12, 14, 15] 27 SHUFFLE button [21] 28 PROGRAM button [20] 29 CDR button Pressing this button enables the recording deck (left tray). 30 STANDBY indicator [9] 31 ON/OFF switch [9] Remote Controller POWER 21 20 I a- PLAY button [18...
... referred to each part Figures enclosed in [] right to . 1 2 3 4 56 789 10 11 12 13 15 16 18 141 17 O cTe ,,,,,.... ,T,,1, ,,,,,,„ :CO RFC IDER DX 105. 1 123 or, orr 31 30 SPEEDO TAL DUBBING II 6 O 29 27 25 23 28 26 24 22 21 n R/ 20 19 Front panel of each... [19] 24 REPEAT button [21] 25 SCROLL button [18] 26 DISPLAY button [11, 12, 14, 15] 27 SHUFFLE button [21] 28 PROGRAM button [20] 29 CDR button Pressing this button enables the recording deck (left tray). 30 STANDBY indicator [9] 31 ON/OFF switch [9] Remote Controller POWER 21 20 I a- PLAY button [18...