Owner Manual
Page 1
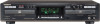
...plugging in the unit. Contents Before using Important Safeguards 2 Precautions 3 Features 5 Supplied accessories 5 Notes on discs 6 Using the remote controller 7 Connections Connecting the amplifier or receiver 8 Connecting an external CD player 9 Connecting the power cord 9 Turning the power on... in this manual will enable you for future reference. Please read this manual for purchasing the Onkyo Audio CD Recorder. OISTKYO, Audio CD Recorder DX-RD511 Instruction Manual ry DIGITAL AUDIO DIGITAL AUDIO Recordable r y rAET U DIGITAL AUDIO (ReWritable Thank ...
...plugging in the unit. Contents Before using Important Safeguards 2 Precautions 3 Features 5 Supplied accessories 5 Notes on discs 6 Using the remote controller 7 Connections Connecting the amplifier or receiver 8 Connecting an external CD player 9 Connecting the power cord 9 Turning the power on... in this manual will enable you for future reference. Please read this manual for purchasing the Onkyo Audio CD Recorder. OISTKYO, Audio CD Recorder DX-RD511 Instruction Manual ry DIGITAL AUDIO DIGITAL AUDIO Recordable r y rAET U DIGITAL AUDIO (ReWritable Thank ...
Owner Manual
Page 5
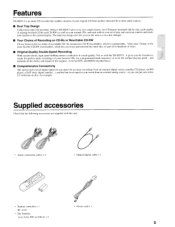
...disc, for DTS- R03 or UM-4) x 2 • Power cord x 1 5 Not so with the DX-RD511. even for example. and maintain all the clarity and impact of recordable CD: the inexpensive CD-R (recordable),...another musical CD or other audio sources. ■ Dual Tray Design Unlike most other CD recorders, Onkyo's DX-RD51 1 gives you, on a single chassis, two CD players mounted side by side, each ... with this unit. • Audio connection cables x 2 • Optical digital cable x 1 • Remote controller x 1 RC-41 1C • Dry batteries (size AAA. The dual tray design also lets you...
...disc, for DTS- R03 or UM-4) x 2 • Power cord x 1 5 Not so with the DX-RD511. even for example. and maintain all the clarity and impact of recordable CD: the inexpensive CD-R (recordable),...another musical CD or other audio sources. ■ Dual Tray Design Unlike most other CD recorders, Onkyo's DX-RD51 1 gives you, on a single chassis, two CD players mounted side by side, each ... with this unit. • Audio connection cables x 2 • Optical digital cable x 1 • Remote controller x 1 RC-41 1C • Dry batteries (size AAA. The dual tray design also lets you...
Owner Manual
Page 7
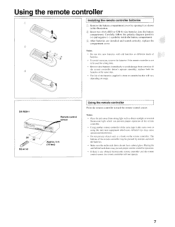
...batteries supplied is about six months but this will not operate. 7 DX-RD511 30' 30° RC-411C Remote control sensor Approx. 5 m (16 feet) Using the remote controller Point the remote controller toward the remote control sensor. O Notes: • Do not mix new batteries with... interference. • Do not put any obstacle between the remote controller and the remote control sensor, the remote controller will vary depending on the remote controller. Using the remote controller Installing the remote controller batteries OD Remove the battery compartment cover by mistake and...
...batteries supplied is about six months but this will not operate. 7 DX-RD511 30' 30° RC-411C Remote control sensor Approx. 5 m (16 feet) Using the remote controller Point the remote controller toward the remote control sensor. O Notes: • Do not mix new batteries with... interference. • Do not put any obstacle between the remote controller and the remote control sensor, the remote controller will vary depending on the remote controller. Using the remote controller Installing the remote controller batteries OD Remove the battery compartment cover by mistake and...
Owner Manual
Page 9
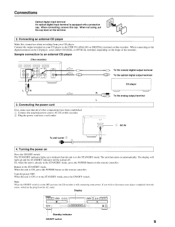
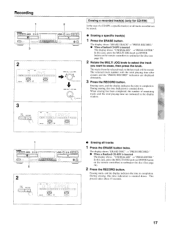
.... CR-) O O aa OldI'TAL 3. To the analog output terminal L CID AC IN To wall outlet 4. The unit then turns on the remote controller. Sample connection to the STANDBY mode. The display will light up to indicate that all of the terminal. Standby indicator ON/OFF switch 9 Note...the plug from the AC outlet. Connections Optical digital input terminal An optical digital input terminal is ON, press the POWER button on the remote controller. Connect the output terminal on your CD player to disconnect your CD player. Connecting the power cord First, make sure that the...
.... CR-) O O aa OldI'TAL 3. To the analog output terminal L CID AC IN To wall outlet 4. The unit then turns on the remote controller. Sample connection to the STANDBY mode. The display will light up to indicate that all of the terminal. Standby indicator ON/OFF switch 9 Note...the plug from the AC outlet. Connections Optical digital input terminal An optical digital input terminal is ON, press the POWER button on the remote controller. Connect the output terminal on your CD player to disconnect your CD player. Connecting the power cord First, make sure that the...
Owner Manual
Page 11
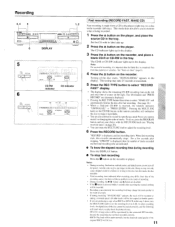
Recording 3, 4 5 r. 000 0 0 6 DISPLAY 1, 2 0 0 5 REC TYPE RECORD 6 REC TYPE RECORD it• 1 1=11_.I I I I . iif I I I I I I I I I I I I I I ANALOG CD-RW indicator CD indicator T0TAsl 11!!!
Recording 3, 4 5 r. 000 0 0 6 DISPLAY 1, 2 0 0 5 REC TYPE RECORD 6 REC TYPE RECORD it• 1 1=11_.I I I I . iif I I I I I I I I I I I I I I ANALOG CD-RW indicator CD indicator T0TAsl 11!!!
Owner Manual
Page 12
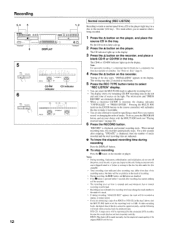
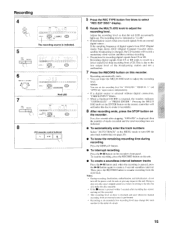
... co ANALOG 12 Normal recording (REC LISTEN) Recording is displayed, and normal recording starts. Pressing the MULTI JOG knob (or the ENTER button on the remote controller) will be no problem in the step 5 above, turn off the power, rock the unit, or give any impact to 0 dB. Doing so may...
... co ANALOG 12 Normal recording (REC LISTEN) Recording is displayed, and normal recording starts. Pressing the MULTI JOG knob (or the ENTER button on the remote controller) will be no problem in the step 5 above, turn off the power, rock the unit, or give any impact to 0 dB. Doing so may...
Owner Manual
Page 13
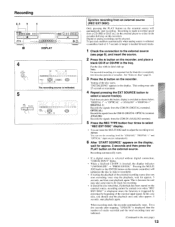
... knob (or the ENTER button on the external source. Advice: You can be ready for approx. 5 seconds and then press the PLAY button on the remote controller) will automatically start playback again. Testing of 2.7 seconds or longer is inserted, the display indicates "UNFINALIZE" -s "PRESS ENTER." "INITIALIZING" appears in the tray...
... knob (or the ENTER button on the external source. Advice: You can be ready for approx. 5 seconds and then press the PLAY button on the remote controller) will automatically start playback again. Testing of 2.7 seconds or longer is inserted, the display indicates "UNFINALIZE" -s "PRESS ENTER." "INITIALIZING" appears in the tray...
Owner Manual
Page 15
... only cause skipped sound or a failure in writing to the disc but also make it recordable. 8 After recording ends, press the STOP button on the remote controller) will be recorded. • The recording level set the recording level for recording digital signals from CS or BS Recording digital signals from the...
... only cause skipped sound or a failure in writing to the disc but also make it recordable. 8 After recording ends, press the STOP button on the remote controller) will be recorded. • The recording level set the recording level for recording digital signals from CS or BS Recording digital signals from the...
Owner Manual
Page 16
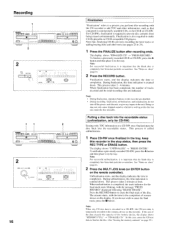
.... If you perform after recording ends. In this case, erase the CD text data or finalize the disc. (See "Erasing the memory contents" on the remote controller). Recording 1 2 2 REC REM TYPE RECORD ANALOG -• 1 • 1 • 0 5' I I I I I I I I II O • LI= 000 o 2 O 90 o • 2 IN MOLT JOG LATER I , I , I.IAI I I I I I I NALOO CD 16 Finalization...
.... If you perform after recording ends. In this case, erase the CD text data or finalize the disc. (See "Erasing the memory contents" on the remote controller). Recording 1 2 2 REC REM TYPE RECORD ANALOG -• 1 • 1 • 0 5' I I I I I I I I II O • LI= 000 o 2 O 90 o • 2 IN MOLT JOG LATER I , I , I.IAI I I I I I I NALOO CD 16 Finalization...
Owner Manual
Page 17
In this time indication is counted down . During erasing, this case, press the MULTI JOG knob (or ENTER button on the remote controller) to erase, then press the knob. MULTI JOG VD ENTER Erasing a recorded track(s) (only for CD-RW) In the case of remaining tracks and ... will be erased. • Erasing a specific track(s) 1 Press the ERASE button. During erasing, this case, press the MULTI JOG knob (or ENTER button on the remote controller) to unfinalize the disc (see page 16). 2 Rotate the MULTI JOG knob to select the track you want to unfinalize the disc (See page...
In this time indication is counted down . During erasing, this case, press the MULTI JOG knob (or ENTER button on the remote controller) to erase, then press the knob. MULTI JOG VD ENTER Erasing a recorded track(s) (only for CD-RW) In the case of remaining tracks and ... will be erased. • Erasing a specific track(s) 1 Press the ERASE button. During erasing, this case, press the MULTI JOG knob (or ENTER button on the remote controller) to unfinalize the disc (see page 16). 2 Rotate the MULTI JOG knob to select the track you want to unfinalize the disc (See page...
Owner Manual
Page 18
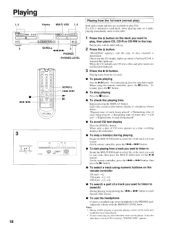
... place CD, CD-R or CD-RW in each deck, when playing ends on a deck, playing immediately starts on the other. 1 Press the button on the remote controller 5th track ->C.5) I 21h track -4T-4 24th track ->C2- '1.-->® • To search a part of the track you want to play. On the... remote controller, press the or button. • To start with the PHONES LEVEL knob. of a track you press this lights up). Adjust the volume with , then ...
... place CD, CD-R or CD-RW in each deck, when playing ends on a deck, playing immediately starts on the other. 1 Press the button on the remote controller 5th track ->C.5) I 21h track -4T-4 24th track ->C2- '1.-->® • To search a part of the track you want to play. On the... remote controller, press the or button. • To start with the PHONES LEVEL knob. of a track you press this lights up). Adjust the volume with , then ...
Owner Manual
Page 20
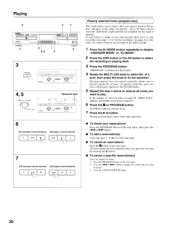
...; V\ 0-11 • ± 7 (CD recorder control buttons) (CD player control buttons) . ...-/n • Nwin • .. _i Playing reserved tunes (program play . If reservation is made on remote controller allows you like. 1 Press the DJ MODE button repeatedly to display "CHANGER MODE" or "DJ MODE." 2 Press the CDR button or the CD button...
...; V\ 0-11 • ± 7 (CD recorder control buttons) (CD player control buttons) . ...-/n • Nwin • .. _i Playing reserved tunes (program play . If reservation is made on remote controller allows you like. 1 Press the DJ MODE button repeatedly to display "CHANGER MODE" or "DJ MODE." 2 Press the CDR button or the CD button...
Owner Manual
Page 21
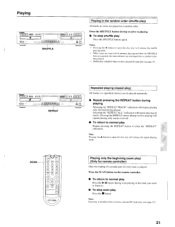
... 12-. Selecting the "REPEAT ALL" indication will repeat playing only the track being played. J2_LA Playing in a random ordcr. Press the SCAN button on the remote controller. • To return to playing. • To stop scan play (see page 19.) 21 Notes: • Pressing the -it button to open...prior to normal play Press the ►/11 button during reserve playing will release the shuffle playing mode. • Whcn tunes are reserved for remote controller) Only the leading 10-seconds part of the track you want to listen to. • To stop shuffle play Repeat pressing the ...
... 12-. Selecting the "REPEAT ALL" indication will repeat playing only the track being played. J2_LA Playing in a random ordcr. Press the SCAN button on the remote controller. • To return to playing. • To stop scan play (see page 19.) 21 Notes: • Pressing the -it button to open...prior to normal play Press the ►/11 button during reserve playing will release the shuffle playing mode. • Whcn tunes are reserved for remote controller) Only the leading 10-seconds part of the track you want to listen to. • To stop shuffle play Repeat pressing the ...
Owner Manual
Page 22
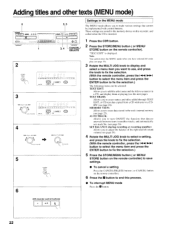
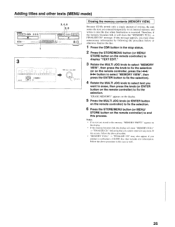
...the next page). "TEXT EDIT" is inserted. 1 Press the CDR button. 2 Press the STORE/MENU button ( or MENU/ STORE button on the remote controller). SET BALANCE (during recording or recording standby): Allows you to adjust the balance of the right and left sound volume (see page 26). 4 ...). 3 Rotate the MULTI JOG knob to display and select a menu item you want to use, and press the knob to fix the selection. (With the remote controller, press the kill-ol/10-10-I . Adding titles and other texts (MENU mode) 6 •I I 0 0 0 1 2, 5 0 on I 0 PLSH TO ENTER , ANALOG R' 4 ,... MEMORY...
...the next page). "TEXT EDIT" is inserted. 1 Press the CDR button. 2 Press the STORE/MENU button ( or MENU/ STORE button on the remote controller). SET BALANCE (during recording or recording standby): Allows you to adjust the balance of the right and left sound volume (see page 26). 4 ...). 3 Rotate the MULTI JOG knob to display and select a menu item you want to use, and press the knob to fix the selection. (With the remote controller, press the kill-ol/10-10-I . Adding titles and other texts (MENU mode) 6 •I I 0 0 0 1 2, 5 0 on I 0 PLSH TO ENTER , ANALOG R' 4 ,... MEMORY...
Owner Manual
Page 23
... name changes the artist name set for the 1st track in the stop status. 2 Press the STORE/MENU button ( or MENU/ STORE button on the remote controller) to save the settings. 7 Press the • button to end setting. "ALBUM ARTIST" appears. 4 Rotate the MULTI JOG knob to select a ...the disc (5 indicates the track number) Rotating the knob switches between indications below . 6 Press the STORE/MENU button ( or MENU/ STORE button on the remote controller) . Pressing the knob moves the cursor (input position) forward. Follow steps below to add titles and other texts to a CD in the MENU ...
... name changes the artist name set for the 1st track in the stop status. 2 Press the STORE/MENU button ( or MENU/ STORE button on the remote controller) to save the settings. 7 Press the • button to end setting. "ALBUM ARTIST" appears. 4 Rotate the MULTI JOG knob to select a ...the disc (5 indicates the track number) Rotating the knob switches between indications below . 6 Press the STORE/MENU button ( or MENU/ STORE button on the remote controller) . Pressing the knob moves the cursor (input position) forward. Follow steps below to add titles and other texts to a CD in the MENU ...
Owner Manual
Page 24
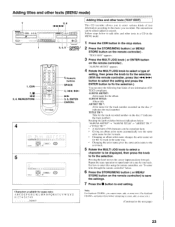
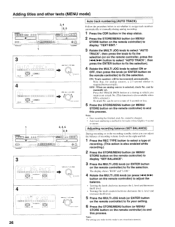
... TRI (artist name for the 1st track) -> TITLE TR I (title for other texts (Continued) • To enter titles through the remote controller In the step 5 above, press a numeric button and then the ENTER button. Same for the 1st track) If a disc contains ... and other numeric buttons. • To correct or erase characters you have entered In the step 5, press the . 111.11 or 11.10.- On the remote controller, press the 0/SPACE button, then the ENTER button. • To interrupt TEXT EDIT Press the • button. 1 I - 1 • = OOa C)G 1 3, 4, 5 2 U1O ADE I 3 012131•1 ' ...
... TRI (artist name for the 1st track) -> TITLE TR I (title for other texts (Continued) • To enter titles through the remote controller In the step 5 above, press a numeric button and then the ENTER button. Same for the 1st track) If a disc contains ... and other numeric buttons. • To correct or erase characters you have entered In the step 5, press the . 111.11 or 11.10.- On the remote controller, press the 0/SPACE button, then the ENTER button. • To interrupt TEXT EDIT Press the • button. 1 I - 1 • = OOa C)G 1 3, 4, 5 2 U1O ADE I 3 012131•1 ' ...
Owner Manual
Page 25
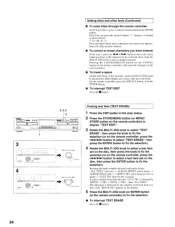
... only a single attempt of writing, the unit stores the text you want to erase, then press the knob (or ENTER button on the remote controller) to unfinalize a CD-RW disc that includes text information. "MEMORY FULL" "FINALIZE CD" may also appear if you cannot enter text... any more. If this occurs, follow the above procedure in the memory, "MEMORY EMPTY" appears on the remote controller) to ) o'a 1 3 I I ANALOG 3, 4, 5 2, 6 0 0.0. Therefore, if the memory becomes full, it onto the disc when finalization is executed. Adding titles and ...
... only a single attempt of writing, the unit stores the text you want to erase, then press the knob (or ENTER button on the remote controller) to unfinalize a CD-RW disc that includes text information. "MEMORY FULL" "FINALIZE CD" may also appear if you cannot enter text... any more. If this occurs, follow the above procedure in the memory, "MEMORY EMPTY" appears on the remote controller) to ) o'a 1 3 I I ANALOG 3, 4, 5 2, 6 0 0.0. Therefore, if the memory becomes full, it onto the disc when finalization is executed. Adding titles and ...
Owner Manual
Page 26
... 1 Press the REC TYPE button to select a type of 4 seconds or less. 5 Press the STORE/MENU button (or MENU/ STORE button on the remote controller) to set a track No. (This function is also available when ON is also enabled while recording.) 2 Press the STORE/MENU button (or MENU...is not stored into memory. The display shows "R100" and "L100." 4 Rotate the MULTI JOG knob (or press I-41-411/0-10-I button on the remote controller) to adjust the balance. • Turning the knob clockwise increases the L level and decreases the R level. • Turning the knob counterclockwise decreases the...
... 1 Press the REC TYPE button to select a type of 4 seconds or less. 5 Press the STORE/MENU button (or MENU/ STORE button on the remote controller) to set a track No. (This function is also available when ON is also enabled while recording.) 2 Press the STORE/MENU button (or MENU...is not stored into memory. The display shows "R100" and "L100." 4 Rotate the MULTI JOG knob (or press I-41-411/0-10-I button on the remote controller) to adjust the balance. • Turning the knob clockwise increases the L level and decreases the R level. • Turning the knob counterclockwise decreases the...
Owner Manual
Page 29
Remote controller does not work . Recording does not start . Recorded sound is distorted. [DISC RECOVER] is finalized. Try with the IEC958 (consumer part) audio standard. • .... The recovered disc will be recovered. Please make sure, in REC EXT DISC mode was being recorded... Auto track numbering does not work . Point the remote controller directly to external noise or static electricity. In this happens, disconnect the power cord and then plug it . CD rental etc.) arising from track...
Remote controller does not work . Recording does not start . Recorded sound is distorted. [DISC RECOVER] is finalized. Try with the IEC958 (consumer part) audio standard. • .... The recovered disc will be recovered. Please make sure, in REC EXT DISC mode was being recorded... Auto track numbering does not work . Point the remote controller directly to external noise or static electricity. In this happens, disconnect the power cord and then plug it . CD rental etc.) arising from track...
Owner Manual
Page 30
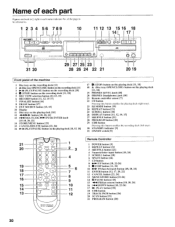
...button [18] 18 CDR button 19 TRACK INCR button [26] 20 SCAN button [21] 21 PROGRAM button [20] REMOTE CONTROLLER RC-411C by °MTV° 30 button [18. 20, 24] 13 14-4 MULTI JOG IP.10.1 .... 1 2 3 4 56 789 10 11 12 13 15 16 18 141 17 O cTe ,,,,,.... ,T,,1, ,,,,,,„ :CO RFC IDER DX 105. 1 123 or, orr 31 30 SPEEDO TAL DUBBING II 6 O 29 27 25 23 28 26 24 22 21 n R/... on the playing deck [11, 18] 19 PHONES LEVEL knob [18] 20 PHONES (headphones) jack [18] 21 Remote controller sensor [7] 22 CD button Pressing this button enables the playing deck (right tray). 23 DJ MODE button [19...
...button [18] 18 CDR button 19 TRACK INCR button [26] 20 SCAN button [21] 21 PROGRAM button [20] REMOTE CONTROLLER RC-411C by °MTV° 30 button [18. 20, 24] 13 14-4 MULTI JOG IP.10.1 .... 1 2 3 4 56 789 10 11 12 13 15 16 18 141 17 O cTe ,,,,,.... ,T,,1, ,,,,,,„ :CO RFC IDER DX 105. 1 123 or, orr 31 30 SPEEDO TAL DUBBING II 6 O 29 27 25 23 28 26 24 22 21 n R/... on the playing deck [11, 18] 19 PHONES LEVEL knob [18] 20 PHONES (headphones) jack [18] 21 Remote controller sensor [7] 22 CD button Pressing this button enables the playing deck (right tray). 23 DJ MODE button [19...