
User Manual English
Page 1
English Before using 2 Controls & connectors 12 Getting connected 18 Basic operation 30 Playing CDs 35 Listening to obtain optimum performance and maximum listening enjoyment from your new CR-N1. Please read this manual for purchasing the ONKYO CR-N1 CD Receiver. Please retain this manual thoroughly before making any connection or turning on the power. Follow these instructions to the radio 41 Using the timer 47 Using USB 51 Appendix 58 CD RECEIVER CR-N1 Instruction Manual Thank you for future reference.
English Before using 2 Controls & connectors 12 Getting connected 18 Basic operation 30 Playing CDs 35 Listening to obtain optimum performance and maximum listening enjoyment from your new CR-N1. Please read this manual for purchasing the ONKYO CR-N1 CD Receiver. Please retain this manual thoroughly before making any connection or turning on the power. Follow these instructions to the radio 41 Using the timer 47 Using USB 51 Appendix 58 CD RECEIVER CR-N1 Instruction Manual Thank you for future reference.
User Manual English
Page 3
... sure the antenna or cable system is grounded so as the original part. Never push objects of time, unplug it can result in a fire or electric shock. When the power-supply cord or plug is in the vicinity of the National Electrical Code, ANSI/NFPA 70, provides information with them might be sure the service technician has used replacement parts speci...
... sure the antenna or cable system is grounded so as the original part. Never push objects of time, unplug it can result in a fire or electric shock. When the power-supply cord or plug is in the vicinity of the National Electrical Code, ANSI/NFPA 70, provides information with them might be sure the service technician has used replacement parts speci...
User Manual English
Page 4
... some noise in the TV or tuner output. 7. Recording Copyright Recording of this unit Place this unit or power cord when your Onkyo authorized service station. 3. Power WARNING BEFORE PLUGGING IN THE UNIT FOR THE FIRST TIME, READ THE FOLLOWING SECTION CAREFULLY. If ventilation is not user-serviceable. If placed next to remove the condensation. When transporting this unit may malfunction. Setting the STANDBY button to bump it may overheat and...
... some noise in the TV or tuner output. 7. Recording Copyright Recording of this unit Place this unit or power cord when your Onkyo authorized service station. 3. Power WARNING BEFORE PLUGGING IN THE UNIT FOR THE FIRST TIME, READ THE FOLLOWING SECTION CAREFULLY. If ventilation is not user-serviceable. If placed next to remove the condensation. When transporting this unit may malfunction. Setting the STANDBY button to bump it may overheat and...
User Manual English
Page 5
... a circuit different from that the cable ground shall be determined by turning the equipment off and on, the user is connected. • Consult the dealer or an experienced radio/TV technician for help. When you have any complaints about instructions or explanations affecting the use of this manual. This equipment generates, uses and can be connected to the grounding system of...
... a circuit different from that the cable ground shall be determined by turning the equipment off and on, the user is connected. • Consult the dealer or an experienced radio/TV technician for help. When you have any complaints about instructions or explanations affecting the use of this manual. This equipment generates, uses and can be connected to the grounding system of...
User Manual English
Page 7
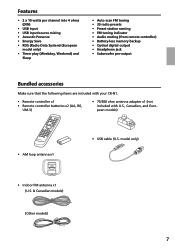
... channel into 4 ohms (DIN) • USB input • USB input/source mixing • Acoustic Presence • Energy Save • RDS (Radio Data System) (European model only) • Timer play (Weekday, Weekend) and Sleep • Auto scan FM tuning • 30 radio presets • Preset station naming • FM tuning indicator • Audio muting (from remote controller) • Battery-less memory backup • Optical digital output • Headphone jack • Subwoofer pre-output Bundled accessories Make...
... channel into 4 ohms (DIN) • USB input • USB input/source mixing • Acoustic Presence • Energy Save • RDS (Radio Data System) (European model only) • Timer play (Weekday, Weekend) and Sleep • Auto scan FM tuning • 30 radio presets • Preset station naming • FM tuning indicator • Audio muting (from remote controller) • Battery-less memory backup • Optical digital output • Headphone jack • Subwoofer pre-output Bundled accessories Make...
User Manual English
Page 11
Contents Playing CDs 35 Loading discs...35 Starting playback...35 Pausing playback...36 Stopping playback...36 Selecting tracks ...36 Searching tracks ...37 Random playback...38 Repeat playback ...38 Memory playback...39 Displaying track times & program numbers 40 Listening to the radio 41 Tuning the radio...41 Presetting FM stations automatically 42 Presetting FM/AM stations manually 42 Selecting preset stations 43 Naming presets ...44 Editing preset names ...45 Deleting presets ...45 Listening to stereo broadcasts 46 Using RDS (European models 46 Using the timer (remote controller ...
Contents Playing CDs 35 Loading discs...35 Starting playback...35 Pausing playback...36 Stopping playback...36 Selecting tracks ...36 Searching tracks ...37 Random playback...38 Repeat playback ...38 Memory playback...39 Displaying track times & program numbers 40 Listening to the radio 41 Tuning the radio...41 Presetting FM stations automatically 42 Presetting FM/AM stations manually 42 Selecting preset stations 43 Naming presets ...44 Editing preset names ...45 Deleting presets ...45 Listening to stereo broadcasts 46 Using RDS (European models 46 Using the timer (remote controller ...
User Manual English
Page 13
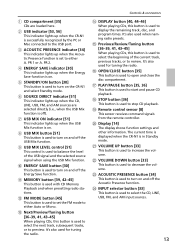
... Memory Playback and when presetting radio stations. U VOLUME UP button [33] This button is used to balance the level of the current track, previous tracks, or to either A. W ACOUSTIC PRESENCE button [34] This button is used to display the remaining track, disc, and program times. X INPUT selector button [33] This button is used to increase the volume. K MEMORY button [39, 42-45] This button is used when naming radio presets. Controls & connectors N DISPLAY button [40, 44-46] When playing CDs, this button is used to turn on the CR-N1...
... Memory Playback and when presetting radio stations. U VOLUME UP button [33] This button is used to balance the level of the current track, previous tracks, or to either A. W ACOUSTIC PRESENCE button [34] This button is used to display the remaining track, disc, and program times. X INPUT selector button [33] This button is used to increase the volume. K MEMORY button [39, 42-45] This button is used when naming radio presets. Controls & connectors N DISPLAY button [40, 44-46] When playing CDs, this button is used to turn on the CR-N1...
User Manual English
Page 18
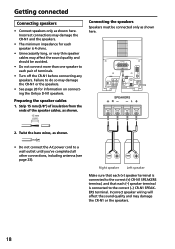
... AC power cord to a wall outlet until you've completed all other connections, including antenna (see page 23). -+ -+ Right speaker Left speaker Make sure that each (+) speaker terminal is connected to the correct (+) CR-N1 SPEAKERS terminal, and that each speaker is 4 ohms. • Unnecessarily long, or very thin speaker cables may damage the CR-N1 and the speakers. • The minimum impedance for information on connecting the Onkyo D-N1 speakers. Incorrect speaker...
... AC power cord to a wall outlet until you've completed all other connections, including antenna (see page 23). -+ -+ Right speaker Left speaker Make sure that each (+) speaker terminal is connected to the correct (+) CR-N1 SPEAKERS terminal, and that each speaker is 4 ohms. • Unnecessarily long, or very thin speaker cables may damage the CR-N1 and the speakers. • The minimum impedance for information on connecting the Onkyo D-N1 speakers. Incorrect speaker...
User Manual English
Page 20
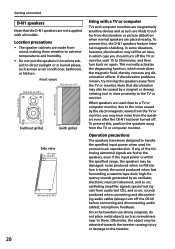
... monitor. Note that the D-N1 speakers are not supplied with a TV or computer TVs and computer monitors are magnetically sensitive devices and as such are placed nearby. the sound produced when fast forwarding a cassette tape deck; oscillating amplifier signals; Operation precautions The speakers have been designed to handle the specified input power when used close proximity to the TV...
... monitor. Note that the D-N1 speakers are not supplied with a TV or computer TVs and computer monitors are magnetically sensitive devices and as such are placed nearby. the sound produced when fast forwarding a cassette tape deck; oscillating amplifier signals; Operation precautions The speakers have been designed to handle the specified input power when used close proximity to the TV...
User Manual English
Page 23
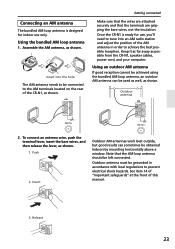
... mounting horizontally above a window. The AM antenna needs to be used as well, as shown. Insert Outdoor AM antennas work best outside, but good results can be connected to tune into the hole. Release 23 Insert into an AM radio station and adjust the position of this manual. 3. Once the CR-N1 is designed for use only. Outdoor antenna must be left connected. Assemble the AM...
... mounting horizontally above a window. The AM antenna needs to be used as well, as shown. Insert Outdoor AM antennas work best outside, but good results can be connected to tune into the hole. Release 23 Insert into an AM radio station and adjust the position of this manual. 3. Once the CR-N1 is designed for use only. Outdoor antenna must be left connected. Assemble the AM...
User Manual English
Page 26
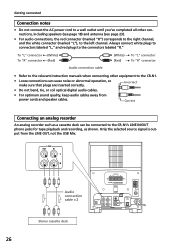
... the relevant instruction manuals when connecting other connections, including speakers (see page 18) and antenna (see page 23). • For audio connections, the red connector (marked "R") corresponds to the right channel, and the white connector (marked "L"), to the left channel. Audio connection cable x 2 Stereo cassette deck 26 Always connect white plugs to connectors labeled "L," and red plugs to the CR-N1's LINE IN/OUT phono jacks for tape playback and recording, as a cassette deck can...
... the relevant instruction manuals when connecting other connections, including speakers (see page 18) and antenna (see page 23). • For audio connections, the red connector (marked "R") corresponds to the right channel, and the white connector (marked "L"), to the left channel. Audio connection cable x 2 Stereo cassette deck 26 Always connect white plugs to connectors labeled "L," and red plugs to the CR-N1's LINE IN/OUT phono jacks for tape playback and recording, as a cassette deck can...
User Manual English
Page 29
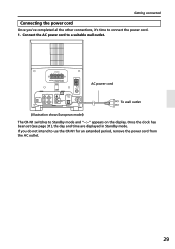
AC power cord To wall outlet (Illustration shows European model) The CR-N1 switches to use the CR-N1 for an extended period, remove the power cord from the AC outlet. 29 If you 've completed all the other connections, it's time to a suitable wall outlet. Getting connected Connecting the power cord Once you do not intend to Standby mode and "--:--" appears on the display. Connect the AC power cord to connect the power cord. 1. Once the clock has been set (see page 31), the day and time are displayed in Standby mode.
AC power cord To wall outlet (Illustration shows European model) The CR-N1 switches to use the CR-N1 for an extended period, remove the power cord from the AC outlet. 29 If you 've completed all the other connections, it's time to a suitable wall outlet. Getting connected Connecting the power cord Once you do not intend to Standby mode and "--:--" appears on the display. Connect the AC power cord to connect the power cord. 1. Once the clock has been set (see page 31), the day and time are displayed in Standby mode.
User Manual English
Page 30
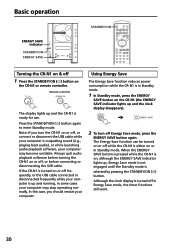
... Standby mode. Basic operation ENERGY SAVE indicator STANDBY/ON ENERGY SAVE STANDBY/ON Turning the CR-N1 on & off , or before turning the CR-N1 on or off 1 Press the STANDBY/ON ( ) button on the CR-N1 or remote controller. The Energy Save function can be turned on or off frequently, or the USB cable connected or disconnected frequently while your computer is turned off Energy Save mode, press the ENERGY SAVE button again. Always quit audio playback software...
... Standby mode. Basic operation ENERGY SAVE indicator STANDBY/ON ENERGY SAVE STANDBY/ON Turning the CR-N1 on & off , or before turning the CR-N1 on or off 1 Press the STANDBY/ON ( ) button on the CR-N1 or remote controller. The Energy Save function can be turned on or off frequently, or the USB cable connected or disconnected frequently while your computer is turned off Energy Save mode, press the ENERGY SAVE button again. Always quit audio playback software...
User Manual English
Page 33
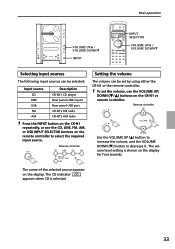
... display. Remote controller Setting the volume The volume can be set by using either the CR-N1 or the remote controller. 1 To set the volume, use the CD, LINE, FM, AM, or USB INPUT SELECTOR buttons on the CR-N1 or remote controller. Basic operation VOLUME UP / VOLUME DOWN INPUT INPUT SELECTOR VOLUME UP / VOLUME DOWN Selecting input sources The following input sources can be selected: Input source Description CD CR-N1's CD player LINE USB Rear panel LINE inputs Rear panel USB port FM CR-N1's FM radio AM CR-N1's AM radio...
... display. Remote controller Setting the volume The volume can be set by using either the CR-N1 or the remote controller. 1 To set the volume, use the CD, LINE, FM, AM, or USB INPUT SELECTOR buttons on the CR-N1 or remote controller. Basic operation VOLUME UP / VOLUME DOWN INPUT INPUT SELECTOR VOLUME UP / VOLUME DOWN Selecting input sources The following input sources can be selected: Input source Description CD CR-N1's CD player LINE USB Rear panel LINE inputs Rear panel USB port FM CR-N1's FM radio AM CR-N1's AM radio...
User Manual English
Page 39
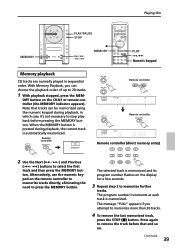
Alternatively, use the numeric key- The program number increments as each track is memorized and its program number flashes on the display for a few seconds. 3 Repeat step 2 to memorize further tracks. With Memory Playback, you attempt to memorize more than 20 tracks. 4 To remove the last memorized track, press the STOP ( ) button. ton. ORY button on the CR-N1 or remote controller (the MEMORY indicator appears). The selected track is memorized. Press...
Alternatively, use the numeric key- The program number increments as each track is memorized and its program number flashes on the display for a few seconds. 3 Repeat step 2 to memorize further tracks. With Memory Playback, you attempt to memorize more than 20 tracks. 4 To remove the last memorized track, press the STOP ( ) button. ton. ORY button on the CR-N1 or remote controller (the MEMORY indicator appears). The selected track is memorized. Press...
User Manual English
Page 48
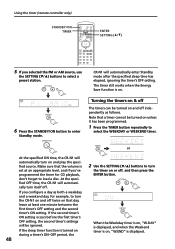
... button to select a preset station. Using the timer (remote controller only) STANDBY/ON TIMER ENTER SETTING ( / ) 5 If you configure a day as follows. If the second timer's ON setting occurs before the first timer's OFF setting, the second timer's settings will automatically enter Standby mode after the specified sleep time has elapsed, ignoring the timer's OFF setting. Note that the volume is displayed. Make...
... button to select a preset station. Using the timer (remote controller only) STANDBY/ON TIMER ENTER SETTING ( / ) 5 If you configure a day as follows. If the second timer's ON setting occurs before the first timer's OFF setting, the second timer's settings will automatically enter Standby mode after the specified sleep time has elapsed, ignoring the timer's OFF setting. Note that the volume is displayed. Make...
User Manual English
Page 51
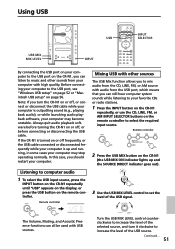
... USB cable. Turn the USB MIX LEVEL control counterclockwise to increase the level of the USB source. The Volume, Muting, and Acoustic Presence functions can still hear computer system sounds while listening to your favorite CDs or radio stations. 1 Press the INPUT button on the CR-N1 repeatedly, or use the CD, LINE, FM, or AM INPUT SELECTOR buttons on the remote controller to select the required input source. Always quit audio playback software before turning the CR-N1...
... USB cable. Turn the USB MIX LEVEL control counterclockwise to increase the level of the USB source. The Volume, Muting, and Acoustic Presence functions can still hear computer system sounds while listening to your favorite CDs or radio stations. 1 Press the INPUT button on the CR-N1 repeatedly, or use the CD, LINE, FM, or AM INPUT SELECTOR buttons on the remote controller to select the required input source. Always quit audio playback software before turning the CR-N1...
User Manual English
Page 53
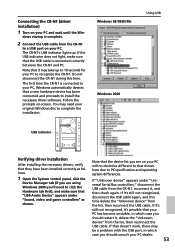
... on your PC. If "Unknown device" appears under "Sound, video and game controllers" as follows. 1 Open the System control panel, click the Device Manager tab (if you are using Windows 2000 you should consult your original Windows disc to complete the installation. If that it , delete the "Unknown device" from the list, then reconnect the USB cable. Connecting the CR-N1 (driver installation) 1 Turn on -screen. The CR-N1's USB indicator lights up to 10 seconds for...
... on your PC. If "Unknown device" appears under "Sound, video and game controllers" as follows. 1 Open the System control panel, click the Device Manager tab (if you are using Windows 2000 you should consult your original Windows disc to complete the installation. If that it , delete the "Unknown device" from the list, then reconnect the USB cable. Connecting the CR-N1 (driver installation) 1 Turn on -screen. The CR-N1's USB indicator lights up to 10 seconds for...
User Manual English
Page 58
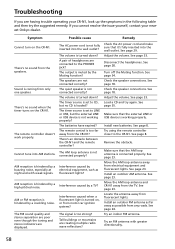
... wall outlet? The batteries have expired? Interference caused when a fluorescent light is hindered by the Muting function? Adjust the volume. If you are having trouble operating your nearest Onkyo dealer. The remote controller doesn't work properly. AM reception is turned on, or from any roads. The AC power cord is not connected correctly? The output is coming from the CR-N1? See page 35. Troubleshooting If you cannot...
... wall outlet? The batteries have expired? Interference caused when a fluorescent light is hindered by the Muting function? Adjust the volume. If you are having trouble operating your nearest Onkyo dealer. The remote controller doesn't work properly. AM reception is turned on, or from any roads. The AC power cord is not connected correctly? The output is coming from the CR-N1? See page 35. Troubleshooting If you cannot...
User Manual English
Page 59
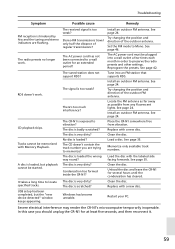
... disc is loaded? Install an outdoor FM antenna. Tracks cannot be plugged into an FM station that supports RDS. The received signal is badly scratched? The AC power cord has not been connected to preserve the radio presets and other settings. The CD doesn't contain the track number you should unplug the CR-N1 for several hours until the condensation has cleared. See page 24. Place the CR-N1 somewhere free from...
... disc is loaded? Install an outdoor FM antenna. Tracks cannot be plugged into an FM station that supports RDS. The received signal is badly scratched? The AC power cord has not been connected to preserve the radio presets and other settings. The CD doesn't contain the track number you should unplug the CR-N1 for several hours until the condensation has cleared. See page 24. Place the CR-N1 somewhere free from...