
Owner Manual
Page 6
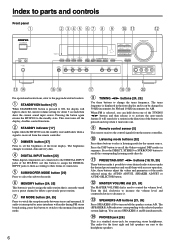
... DSP button to recall the Onkyo-original DSP modes in the direction of the button you can hold down one . 9 Remote control sensor [5] This sensor receives the control signals from the remote controller. 3 DIMMER button [27] Press to set the brightness of the HT-R500, use SPEAKERS A and B...state turns off the speaker system A/B. The tuner frequency is displayed in the front display and it possible to turn on/off the display, disables control functions. 2 STANDBY indicator [17] Lights when the HT-R500 is pressed to ON, the display will search for about 5 seconds then show the current ...
... DSP button to recall the Onkyo-original DSP modes in the direction of the button you can hold down one . 9 Remote control sensor [5] This sensor receives the control signals from the remote controller. 3 DIMMER button [27] Press to set the brightness of the HT-R500, use SPEAKERS A and B...state turns off the speaker system A/B. The tuner frequency is displayed in the front display and it possible to turn on/off the display, disables control functions. 2 STANDBY indicator [17] Lights when the HT-R500 is pressed to ON, the display will search for about 5 seconds then show the current ...
Owner Manual
Page 7
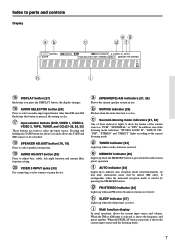
... 28, 33] These buttons are used to be muted (FM only). It extinguishes when the monaural reception mode is active. i Multi function display In usual operation, shows the current input source and volume. a (SPEAKERS) A/B indicators [21, 26] Shows the current speaker system in ...the radio station preset operation. Index to parts and controls Display ab c eg df h i @ DISPLAY button [27] Each time you press the DISPLAY button, the display changes. # AUDIO SELECTOR button [28] Press to indicate auto reception mode (stereo/monaural). Each time ...
... 28, 33] These buttons are used to be muted (FM only). It extinguishes when the monaural reception mode is active. i Multi function display In usual operation, shows the current input source and volume. a (SPEAKERS) A/B indicators [21, 26] Shows the current speaker system in ...the radio station preset operation. Index to parts and controls Display ab c eg df h i @ DISPLAY button [27] Each time you press the DISPLAY button, the display changes. # AUDIO SELECTOR button [28] Press to indicate auto reception mode (stereo/monaural). Each time ...
Owner Manual
Page 9
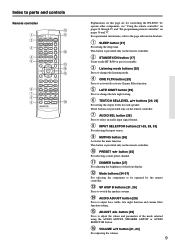
...; buttons [20, 28] For setting the output levels for controlling the HT-R500. This button is provided only on pages 36 and 37. Index to switch the speaker systems. ! DIMMER button [27] For adjusting the brightness of the front display. = Mode buttons [34-37] For selecting the component to be operated...provided only on this page are for each speaker. This button is provided only on the remote controller. 2 STANDBY/ON button [17] Turns on the HT-R500 or put it in brackets. 1 SLEEP button [27] For setting the sleep time. AUDIO ADJUST button [29] Press to adjust bass, treble, ...
...; buttons [20, 28] For setting the output levels for controlling the HT-R500. This button is provided only on pages 36 and 37. Index to switch the speaker systems. ! DIMMER button [27] For adjusting the brightness of the front display. = Mode buttons [34-37] For selecting the component to be operated...provided only on this page are for each speaker. This button is provided only on the remote controller. 2 STANDBY/ON button [17] Turns on the HT-R500 or put it in brackets. 1 SLEEP button [27] For setting the sleep time. AUDIO ADJUST button [29] Press to adjust bass, treble, ...
Owner Manual
Page 17
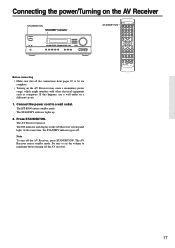
... STANDBY/ON. The ON indicator and display on . Be sure to set the volume to minimum before turning off . At the same time, the STANDBY indicator goes off the AV receiver. 17 The AV Receiver enters standby mode. Connect the power cord to a wall outlet. The HT-R500 enters standby mode. Connecting the...
... STANDBY/ON. The ON indicator and display on . Be sure to set the volume to minimum before turning off . At the same time, the STANDBY indicator goes off the AV receiver. 17 The AV Receiver enters standby mode. Connect the power cord to a wall outlet. The HT-R500 enters standby mode. Connecting the...
Owner Manual
Page 18
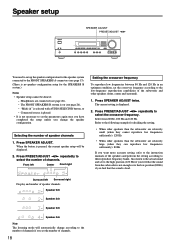
...Hz) if you feel that the sound is no speaker configuration setup for the SPEAKERS B system.) Notes • Speaker setup cannot be displayed. 2. Select from the subwoofer is not necessary to the low-frequency reproduction capabilities of speaker channels Speaker 5ch Speaker 2ch Speaker 3ch Speaker ...4ch Note The listening mode will be done if; - "Multi ch" is on (see page 26), - Front left Surround right Display and number of the subwoofer and other speakers than the subwoofer are relatively small (when they can reproduce low frequencies sufficiently): 80 Hz If...
...Hz) if you feel that the sound is no speaker configuration setup for the SPEAKERS B system.) Notes • Speaker setup cannot be displayed. 2. Select from the subwoofer is not necessary to the low-frequency reproduction capabilities of speaker channels Speaker 5ch Speaker 2ch Speaker 3ch Speaker ...4ch Note The listening mode will be done if; - "Multi ch" is on (see page 26), - Front left Surround right Display and number of the subwoofer and other speakers than the subwoofer are relatively small (when they can reproduce low frequencies sufficiently): 80 Hz If...

Owner Manual
Page 19
...center and surround) and arrival at the listening position. It can be set is (L1). Press SPEAKER ADJUST repeatedly until "Surr Delay" is displayed. 2. This operation consists of entering the time error between (L) and (L2), find the closest value to 15 ms. 19 The user ...the appropriate table. For example, when (L) is 16 feet (5 meters) and (L1) is (L2). Press SPEAKER ADJUST repeatedly until "CenterDelay" is displayed. 2. Speaker setup SPEAKER ADJUST PRESET/ADJUST ™/£ Setting the delay time In the procedure below , the surround delay time to select the ...
...center and surround) and arrival at the listening position. It can be set is (L1). Press SPEAKER ADJUST repeatedly until "Surr Delay" is displayed. 2. This operation consists of entering the time error between (L) and (L2), find the closest value to 15 ms. 19 The user ...the appropriate table. For example, when (L) is 16 feet (5 meters) and (L1) is (L2). Press SPEAKER ADJUST repeatedly until "CenterDelay" is displayed. 2. Speaker setup SPEAKER ADJUST PRESET/ADJUST ™/£ Setting the delay time In the procedure below , the surround delay time to select the ...
Owner Manual
Page 20
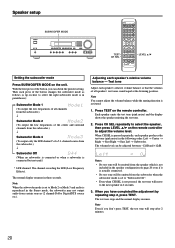
... • No test tone will stop after 2 minutes. 20 Note Even if you have completed the adjustment by repeating step 2, press TEST. The normal display resumes in the following order: Left → Center → Right → Surr Right → Surr Left → Subwoofer. Notes • No test... is connected but not used.) * LFE channel: The channel recording the LFE (Low Frequency Effects). The test tone stops and the normal display resumes. The volume level can check the present setting. Speaker setup SUBWOOFER MODE TEST CH SEL LEVEL 5/∞ Setting the subwoofer mode Press ...
... • No test tone will stop after 2 minutes. 20 Note Even if you have completed the adjustment by repeating step 2, press TEST. The normal display resumes in the following order: Left → Center → Right → Surr Right → Surr Left → Subwoofer. Notes • No test... is connected but not used.) * LFE channel: The channel recording the LFE (Low Frequency Effects). The test tone stops and the normal display resumes. The volume level can check the present setting. Speaker setup SUBWOOFER MODE TEST CH SEL LEVEL 5/∞ Setting the subwoofer mode Press ...
Owner Manual
Page 21
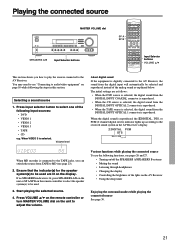
... surround modes while playing the connected source See page 30. 21 Press VOLUME 5/∞ on the remote controller or turn MASTER VOLUME dial on the display. Playing the connected source MASTER VOLUME dial SP A SP B SPEAKERS A/B Input Selector buttons Input Selector buttons VOLUME 5/∞ This section shows you can switch ...functions, see pages 26 and 27. • Turning on/off the SPEAKERS A/SPEAKERS B systems • Muting the sound • Listening through headphones • Changing the display • Controlling the brightness of the following the steps in the AV Receiver...
... surround modes while playing the connected source See page 30. 21 Press VOLUME 5/∞ on the remote controller or turn MASTER VOLUME dial on the display. Playing the connected source MASTER VOLUME dial SP A SP B SPEAKERS A/B Input Selector buttons Input Selector buttons VOLUME 5/∞ This section shows you can switch ...functions, see pages 26 and 27. • Turning on/off the SPEAKERS A/SPEAKERS B systems • Muting the sound • Listening through headphones • Changing the display • Controlling the brightness of the following the steps in the AV Receiver...

Owner Manual
Page 22
... if connected to DIGITAL INPUT OPTICAL 2. Select if connected to DIGITAL INPUT OPTICAL 1. VIDEO 2 - - - - About three seconds after "DVD ← OPT1" is selected, the original display appears and the setting is assigned to the VIDEO 1-3 inputs. Default setting Input source Digital input CD OPTICAL 2 TUNER TAPE OPTICAL 1 VIDEO 3 - - - - If you have... OPTICAL 1 jack. 1. Select if the input source is selected and "DVD" appears in initial setting. : Not available for digital input but not set in the display. 2.
... if connected to DIGITAL INPUT OPTICAL 2. Select if connected to DIGITAL INPUT OPTICAL 1. VIDEO 2 - - - - About three seconds after "DVD ← OPT1" is selected, the original display appears and the setting is assigned to the VIDEO 1-3 inputs. Default setting Input source Digital input CD OPTICAL 2 TUNER TAPE OPTICAL 1 VIDEO 3 - - - - If you have... OPTICAL 1 jack. 1. Select if the input source is selected and "DVD" appears in initial setting. : Not available for digital input but not set in the display. 2.
Owner Manual
Page 23
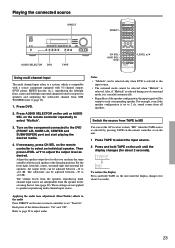
... the remote controller or on the unit. 1 Press TAPE to select the input source. 2 Press and hold TAPE on the unit until the display changes (for about 2 seconds). 23 The volume levels from the speakers reproducing multi channel input source are not applied to speakers reproducing multi channel...the speaker output level so that you can be selected only when DVD is selected as desired. To restore the display Press and hold TAPE on the unit until the display changes (for about 2 seconds). Playing the connected source DIRECT DIRECT AUDIO SELECTOR DVD TAPE CH SEL AUIO SEL DVD...
... the remote controller or on the unit. 1 Press TAPE to select the input source. 2 Press and hold TAPE on the unit until the display changes (for about 2 seconds). 23 The volume levels from the speakers reproducing multi channel input source are not applied to speakers reproducing multi channel...the speaker output level so that you can be selected only when DVD is selected as desired. To restore the display Press and hold TAPE on the unit until the display changes (for about 2 seconds). Playing the connected source DIRECT DIRECT AUDIO SELECTOR DVD TAPE CH SEL AUIO SEL DVD...

Owner Manual
Page 24
...When the band is received, scanning stops and the frequency flashes in the display is flashing. e.g. The frequency changes in the display. When you press the button, the band changes as the frequency in the display. Each press of either button causes the frequency to the station. In ...the frequency is flashing (for FM stations) When you press and hold TUNING ™/£ for about 0.5 seconds. TUNER Tuning in the display. Then select the station to which you want to change the frequency. • The frequency changes each time you may not be heard.) ...
...When the band is received, scanning stops and the frequency flashes in the display is flashing. e.g. The frequency changes in the display. When you press the button, the band changes as the frequency in the display. Each press of either button causes the frequency to the station. In ...the frequency is flashing (for FM stations) When you press and hold TUNING ™/£ for about 0.5 seconds. TUNER Tuning in the display. Then select the station to which you want to change the frequency. • The frequency changes each time you may not be heard.) ...

Owner Manual
Page 25
...27. • Turning on/off the SPEAKERS A/SPEAKERS B systems • Muting the sound • Listening through headphones • Changing the display • Controlling the brightness of the lghts on the AV Receiver • Using the sleep timer Enjoying the surround modes while listening to preset...;/£ on the left column of the desired radio station. 4. The MEMORY indicator lights and the preset number starts flashing in the display. See "Presetting radio stations" on the unit repeatedly to 4. While the MEMORY indicator is registered to radio programs To use the following...
...27. • Turning on/off the SPEAKERS A/SPEAKERS B systems • Muting the sound • Listening through headphones • Changing the display • Controlling the brightness of the lghts on the AV Receiver • Using the sleep timer Enjoying the surround modes while listening to preset...;/£ on the left column of the desired radio station. 4. The MEMORY indicator lights and the preset number starts flashing in the display. See "Presetting radio stations" on the unit repeatedly to 4. While the MEMORY indicator is registered to radio programs To use the following...

Owner Manual
Page 26
... off the SPEAKERS A system. Tip If you disconnect the headphones, the listening mode returns to the previous mode. 26 The MUTING indicator flashes in the display during muting, and turn it on again, the sound will not reproduce sound while headphones are on. Notes • The speakers will be restored. Listening...
... off the SPEAKERS A system. Tip If you disconnect the headphones, the listening mode returns to the previous mode. 26 The MUTING indicator flashes in the display during muting, and turn it on again, the sound will not reproduce sound while headphones are on. Notes • The speakers will be restored. Listening...

Owner Manual
Page 27
... have a program format, then this will turn off . 27 Input source + Listening mode (or Multich) Press DISPLAY once to all the sources DISPLAY DIMMER SLEEP DIMMER Changing the display Press DISPLAY. Canceling the sleep timer Press SLEEP repeatedly until the SLEEP indicator goes off and enter standby mode in 90 minutes... about 5 seconds, which means the AV Receiver will be skipped. Each time you press SLEEP while the remaining time is displayed, the remaining time is on the AV Receiver Press DIMMER. SLEEP indicator Each press of the lights on . The remaining time is On....
... have a program format, then this will turn off . 27 Input source + Listening mode (or Multich) Press DISPLAY once to all the sources DISPLAY DIMMER SLEEP DIMMER Changing the display Press DISPLAY. Canceling the sleep timer Press SLEEP repeatedly until the SLEEP indicator goes off and enter standby mode in 90 minutes... about 5 seconds, which means the AV Receiver will be skipped. Each time you press SLEEP while the remaining time is displayed, the remaining time is on the AV Receiver Press DIMMER. SLEEP indicator Each press of the lights on . The remaining time is On....
Owner Manual
Page 28
...adjusted between Auto ↔ PCM ↔ DTS ↔ Auto. Each press of the button changes the speaker and the selected speaker appears in the display in the following order: LEFT (Front left) → CENTER (Center) → RIGHT (Front right) → SURR RIGHT (Surround right) →...LEVEL 5/∞ to check each speaker's relative volume balance. You can change another speaker's volume balance. Press DVD. The current setting is displayed for the DVD input 1. Multich: Setting to play back the input from the component connected to the VIDEO 1, 2 and 3 inputs. While...
...adjusted between Auto ↔ PCM ↔ DTS ↔ Auto. Each press of the button changes the speaker and the selected speaker appears in the display in the following order: LEFT (Front left) → CENTER (Center) → RIGHT (Front right) → SURR RIGHT (Surround right) →...LEVEL 5/∞ to check each speaker's relative volume balance. You can change another speaker's volume balance. Press DVD. The current setting is displayed for the DVD input 1. Multich: Setting to play back the input from the component connected to the VIDEO 1, 2 and 3 inputs. While...

Owner Manual
Page 29
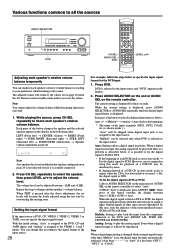
... steps in order of low frequencies from the remote control. Treble adjustment The level of high frequencies from the front speakers can be adjusted is displayed. therefore, to be selected are variable depending on the current source and listening mode. Some sources may sound too bright when played back through speakers... in the range between -12 dB and +12 dB. Each press switches the displayed item in the range between -12 dB and +12 dB. Various functions common to "Late Night = Off". Refoer to...
... steps in order of low frequencies from the remote control. Treble adjustment The level of high frequencies from the front speakers can be adjusted is displayed. therefore, to be selected are variable depending on the current source and listening mode. Some sources may sound too bright when played back through speakers... in the range between -12 dB and +12 dB. Each press switches the displayed item in the range between -12 dB and +12 dB. Various functions common to "Late Night = Off". Refoer to...
Owner Manual
Page 34
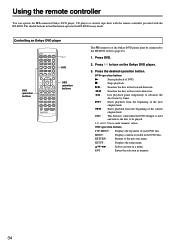
...Stops playback. RETURN : Returns to turn on the Onkyo DVD player. 3. The shaded buttons in the illustration operates the HT-R500 in the DVD disc. Press DVD. 2. DVD operation buttons s : Starts playback of each DVD disc. MENU : Displays a menu recorded in any mode. ENT : ... : Use to page 16). 1. Using the remote controller You can operate the z-connected Onkyo DVD player, CD player or cassette tape deck with the remote controller provided with the HT-R500. SETUP : Displays the setup menu. 5/∞/2/3 : Selects an item in the reverse direction. 2/8 : ...
...Stops playback. RETURN : Returns to turn on the Onkyo DVD player. 3. The shaded buttons in the illustration operates the HT-R500 in the DVD disc. Press DVD. 2. DVD operation buttons s : Starts playback of each DVD disc. MENU : Displays a menu recorded in any mode. ENT : ... : Use to page 16). 1. Using the remote controller You can operate the z-connected Onkyo DVD player, CD player or cassette tape deck with the remote controller provided with the HT-R500. SETUP : Displays the setup menu. 5/∞/2/3 : Selects an item in the reverse direction. 2/8 : ...
Owner Manual
Page 39
... a certain level is reached. • The position or direction of the component is observed • The HT-R500 contains an internal microcomputer that the multichannel output jacks 11 of the FM antenna is incorrect. • The ...the transmission center (direct waves) and the waved reflected by buildings or mountains (diffraction waves) interfere with the HT-R500 turned on extremely rare occasions, noise or interference from the wall outlet, wait five or more elements. [... that the Ÿ DIGITAL indicator lights 21 up in the front display and the HT-R500 enters the standby state. 39
... a certain level is reached. • The position or direction of the component is observed • The HT-R500 contains an internal microcomputer that the multichannel output jacks 11 of the FM antenna is incorrect. • The ...the transmission center (direct waves) and the waved reflected by buildings or mountains (diffraction waves) interfere with the HT-R500 turned on extremely rare occasions, noise or interference from the wall outlet, wait five or more elements. [... that the Ÿ DIGITAL indicator lights 21 up in the front display and the HT-R500 enters the standby state. 39

