
Owner Manual
Page 1
....... 12 Connecting antennas 14 Connections for remote control (z 16 Connecting the power/ Turning on the AV Receiver 17 Enjoying music or videos Speaker setup 18 Playing the connected source 21 Listening to the radio 24 Various functions common to obtain optimum performance and listening enjoyment from your new AV Receiver. AV Receiver HT-R500 Instruction Manual Thank you to all the sources 26 Enjoying the listening modes 30 Recording a source 33 Remote controller Using the remote controller 34 Pre-programming remote controller 36 Appendix Troubleshooting 38 Specifications back...
....... 12 Connecting antennas 14 Connections for remote control (z 16 Connecting the power/ Turning on the AV Receiver 17 Enjoying music or videos Speaker setup 18 Playing the connected source 21 Listening to the radio 24 Various functions common to obtain optimum performance and listening enjoyment from your new AV Receiver. AV Receiver HT-R500 Instruction Manual Thank you to all the sources 26 Enjoying the listening modes 30 Recording a source 33 Remote controller Using the remote controller 34 Pre-programming remote controller 36 Appendix Troubleshooting 38 Specifications back...
Owner Manual
Page 3
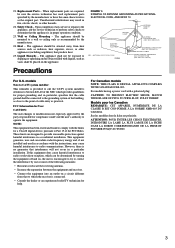
... provide reasonable protection against harmful interference in accordance with the instructions, may result in a particular installation. If this equipment does cause harmful interference to radio or television reception, which provides guidelines for User CAUTION: The user changes or modifications not expressly approved by the manufacturer. 24. When replacement parts are designed to the point of any service or repairs to the...
... provide reasonable protection against harmful interference in accordance with the instructions, may result in a particular installation. If this equipment does cause harmful interference to radio or television reception, which provides guidelines for User CAUTION: The user changes or modifications not expressly approved by the manufacturer. 24. When replacement parts are designed to the point of any service or repairs to the...
Owner Manual
Page 6
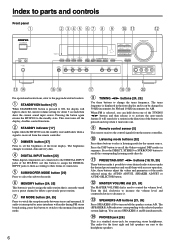
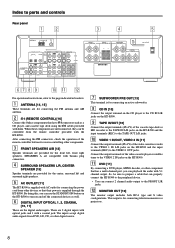
.... 1 STANDBY/ON button [17] When STANDBY/ON button is a standard stereo jack for connecting stereo headphones. The brightness changes to normal, dim and very dim. 4 DIGITAL INPUT button [22] When digital components are sent to control the volume level. You can hold down one . 9 Remote control sensor [5] This sensor receives the control signals from the remote controller. 3 DIMMER button [27] Press to turn on/off the display, disables control functions. 2 STANDBY indicator [17] Lights when the HT-R500 is in the standby state and flashes when a signal is displayed in...
.... 1 STANDBY/ON button [17] When STANDBY/ON button is a standard stereo jack for connecting stereo headphones. The brightness changes to normal, dim and very dim. 4 DIGITAL INPUT button [22] When digital components are sent to control the volume level. You can hold down one . 9 Remote control sensor [5] This sensor receives the control signals from the remote controller. 3 DIMMER button [27] Press to turn on/off the display, disables control functions. 2 STANDBY indicator [17] Lights when the HT-R500 is in the standby state and flashes when a signal is displayed in...
Owner Manual
Page 7
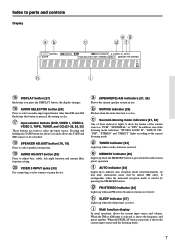
... setting cycles. $ Input selector buttons (DVD, VIDEO 1, VIDEO 2, VIDEO 3, TAPE, TUNER, and CD) [21-25, 28, 33] These buttons are used to indicate auto reception mode (stereo/monaural). a (SPEAKERS) A/B indicators [21, 26] Shows the current speaker system in the radio station preset operation. g FM STEREO indicator [24] Lights up when the sleep timer is received. Index to parts and controls Display ab c eg df h i @ DISPLAY button [27] Each time you press the DISPLAY button, the display changes. # AUDIO SELECTOR button [28] Press to adjust bass, treble, late night function...
... setting cycles. $ Input selector buttons (DVD, VIDEO 1, VIDEO 2, VIDEO 3, TAPE, TUNER, and CD) [21-25, 28, 33] These buttons are used to indicate auto reception mode (stereo/monaural). a (SPEAKERS) A/B indicators [21, 26] Shows the current speaker system in the radio station preset operation. g FM STEREO indicator [24] Lights up when the sleep timer is received. Index to parts and controls Display ab c eg df h i @ DISPLAY button [27] Each time you press the DISPLAY button, the display changes. # AUDIO SELECTOR button [28] Press to adjust bass, treble, late night function...
Owner Manual
Page 8
... speakers. p VIDEO 1 IN/OUT, VIDEO 2 IN [11] Connect the output terminals (PLAY) of the video cassette recorder to the VIDEO 1 IN L/R jacks on the HT-R500. So, be controlled from the remote controller provided with the HT-R500. Index to parts and controls Rear panel 12 3 4 5 ANTENNA AM FM 75 DIGITAL INPUT OPTICAL 2 1 COAXIAL REMOTE CONTROL VIDEO 2 IN VIDEO 1 OUT IN DVD MONITOR IN OUT VIDEO IN OUT IN SUBWOOFER PRE OUT CD TAPE S VIDEO IN OUT IN FRONT SURR CENTER L L R VIDEO 2 VIDEO 1 R DVD SUB WOOFER FRONT SPEAKERS A FRONT SPEAKERS B SURROUND SPEAKERS...
... speakers. p VIDEO 1 IN/OUT, VIDEO 2 IN [11] Connect the output terminals (PLAY) of the video cassette recorder to the VIDEO 1 IN L/R jacks on the HT-R500. So, be controlled from the remote controller provided with the HT-R500. Index to parts and controls Rear panel 12 3 4 5 ANTENNA AM FM 75 DIGITAL INPUT OPTICAL 2 1 COAXIAL REMOTE CONTROL VIDEO 2 IN VIDEO 1 OUT IN DVD MONITOR IN OUT VIDEO IN OUT IN SUBWOOFER PRE OUT CD TAPE S VIDEO IN OUT IN FRONT SURR CENTER L L R VIDEO 2 VIDEO 1 R DVD SUB WOOFER FRONT SPEAKERS A FRONT SPEAKERS B SURROUND SPEAKERS...
Owner Manual
Page 9
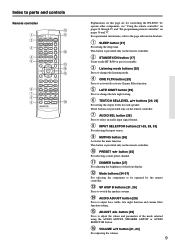
... a tuner preset channel. - DIMMER button [27] For adjusting the brightness of the mode selected using the AUDIO ADJUST, SPEAKER ADJUST or AUDIO SELECTOR button. # VOLUME 5/∞ button [21, 24] For adjusting the volume. 9 These buttons are for each speaker. AUDIO ADJUST button [29] Press to adjust bass, treble, late night function and cinema filter function setting. @ ADJUST 2/3 button [29] Press to adjust the values and parameters of the front display. = Mode buttons [34-37] For selecting the component to be operated by the remote controller. ~ SP A/SP B buttons [21, 26] Press to switch...
... a tuner preset channel. - DIMMER button [27] For adjusting the brightness of the mode selected using the AUDIO ADJUST, SPEAKER ADJUST or AUDIO SELECTOR button. # VOLUME 5/∞ button [21, 24] For adjusting the volume. 9 These buttons are for each speaker. AUDIO ADJUST button [29] Press to adjust bass, treble, late night function and cinema filter function setting. @ ADJUST 2/3 button [29] Press to adjust the values and parameters of the front display. = Mode buttons [34-37] For selecting the component to be operated by the remote controller. ~ SP A/SP B buttons [21, 26] Press to switch...
Owner Manual
Page 10
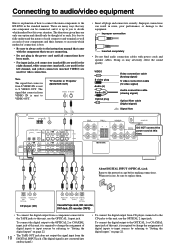
...) Audio connection cable (Analog signal) Optical fiber cable (Digital signal) Signal flow ANTENNA AM FM 75 DIGITAL INPUT OPTICAL 2 1 COAXIAL REMOTE CONTROL VIDEO 2 IN VIDEO 1 OUT IN DVD MONITOR IN OUT VIDEO IN OUT IN SUBWOOFER PRE OUT CD TAPE S VIDEO IN OUT IN FRONT SURR CENTER L L R VIDEO 2 VIDEO 1 R DVD SUB WOOFER FRONT SPEAKERS A FRONT SPEAKERS B SURROUND SPEAKERS L L L R R R AC OUTLET CENTER SPEAKER DO NOT connect the power cord at this unit, use , be thought of as each connector and terminal as well as such. To connect the digital output...
...) Audio connection cable (Analog signal) Optical fiber cable (Digital signal) Signal flow ANTENNA AM FM 75 DIGITAL INPUT OPTICAL 2 1 COAXIAL REMOTE CONTROL VIDEO 2 IN VIDEO 1 OUT IN DVD MONITOR IN OUT VIDEO IN OUT IN SUBWOOFER PRE OUT CD TAPE S VIDEO IN OUT IN FRONT SURR CENTER L L R VIDEO 2 VIDEO 1 R DVD SUB WOOFER FRONT SPEAKERS A FRONT SPEAKERS B SURROUND SPEAKERS L L L R R R AC OUTLET CENTER SPEAKER DO NOT connect the power cord at this unit, use , be thought of as each connector and terminal as well as such. To connect the digital output...
Owner Manual
Page 11
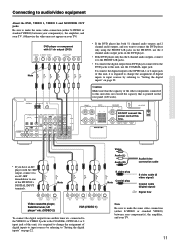
... FRONT L/R jacks. • To connect the digital output from satellite tuner etc. To connect the digital output to the OPTICAL 1 or 2 input jack of this unit does not exceed the capacity that the capacity of the HT-R500's DIGITAL INPUT terminals. ANTENNA AM FM 75 FRONT SPEAKERS A FRONT SPEAKERS B SURROUND SPEAKERS AC OUTLET L DIGITAL INPUT OPTICAL 2 1 COAXIAL REMOTE CONTROL VIDEO 2 IN VIDEO 1 OUT IN DVD MONITOR IN OUT VIDEO R S VIDEO IN OUT IN SUBWOOFER PRE OUT CD TAPE IN OUT IN FRONT SURR CENTER L L R VIDEO 2 VIDEO 1 R DVD SUB WOOFER Video Audio...
... FRONT L/R jacks. • To connect the digital output from satellite tuner etc. To connect the digital output to the OPTICAL 1 or 2 input jack of this unit does not exceed the capacity that the capacity of the HT-R500's DIGITAL INPUT terminals. ANTENNA AM FM 75 FRONT SPEAKERS A FRONT SPEAKERS B SURROUND SPEAKERS AC OUTLET L DIGITAL INPUT OPTICAL 2 1 COAXIAL REMOTE CONTROL VIDEO 2 IN VIDEO 1 OUT IN DVD MONITOR IN OUT VIDEO R S VIDEO IN OUT IN SUBWOOFER PRE OUT CD TAPE IN OUT IN FRONT SURR CENTER L L R VIDEO 2 VIDEO 1 R DVD SUB WOOFER Video Audio...
Owner Manual
Page 13
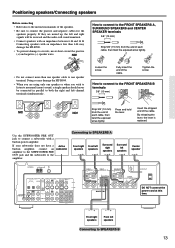
... left speakers Center speaker ANTENNA AM FM 75 DIGITAL INPUT OPTICAL 2 1 COAXIAL REMOTE CONTROL VIDEO 2 IN VIDEO 1 OUT IN DVD MONITOR IN OUT VIDEO IN OUT IN SUBWOOFER PRE OUT CD TAPE S VIDEO IN OUT IN FRONT SURR CENTER L L R VIDEO 2 VIDEO 1 R DVD SUB WOOFER FRONT SPEAKERS A FRONT SPEAKERS B SURROUND SPEAKERS L L L R R R CENTER SPEAKER AC OUTLET DO NOT connect the power cord at this time. How to connect to the FRONT SPEAKERS A, SURROUND SPEAKERS and CENTER SPEAKER terminals 5/8" (15 mm) Strip 5/8" (15 mm) from the end of the cable. R L R NO...
... left speakers Center speaker ANTENNA AM FM 75 DIGITAL INPUT OPTICAL 2 1 COAXIAL REMOTE CONTROL VIDEO 2 IN VIDEO 1 OUT IN DVD MONITOR IN OUT VIDEO IN OUT IN SUBWOOFER PRE OUT CD TAPE S VIDEO IN OUT IN FRONT SURR CENTER L L R VIDEO 2 VIDEO 1 R DVD SUB WOOFER FRONT SPEAKERS A FRONT SPEAKERS B SURROUND SPEAKERS L L L R R R CENTER SPEAKER AC OUTLET DO NOT connect the power cord at this time. How to connect to the FRONT SPEAKERS A, SURROUND SPEAKERS and CENTER SPEAKER terminals 5/8" (15 mm) Strip 5/8" (15 mm) from the end of the cable. R L R NO...
Owner Manual
Page 16
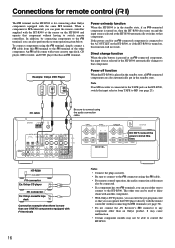
... 75 DIGITAL INPUT OPTICAL 2 1 COAXIAL REMOTE CONTROL VIDEO 2 IN VIDEO 1 OUT IN z cable FRONT SPEAKERS A L DVD MONITOR IN OUT VIDEO R S VIDEO IN OUT IN SUBWOOFER PRE OUT CD TAPE IN OUT IN FRONT SURR CENTER L L R VIDEO 2 VIDEO 1 R DVD SUB WOOFER FRONT SPEAKERS B SURROUND SPEAKERS L L R R AC OUTLET DO CENTER SPEAKER NOT connect the power cord at this z terminal to the z terminal of the other one to connect to daisy chain with the same z terminal. When a component is pressed at an z-connected component, the input source selected at the HT-R500...
... 75 DIGITAL INPUT OPTICAL 2 1 COAXIAL REMOTE CONTROL VIDEO 2 IN VIDEO 1 OUT IN z cable FRONT SPEAKERS A L DVD MONITOR IN OUT VIDEO R S VIDEO IN OUT IN SUBWOOFER PRE OUT CD TAPE IN OUT IN FRONT SURR CENTER L L R VIDEO 2 VIDEO 1 R DVD SUB WOOFER FRONT SPEAKERS B SURROUND SPEAKERS L L R R AC OUTLET DO CENTER SPEAKER NOT connect the power cord at this z terminal to the z terminal of the other one to connect to daisy chain with the same z terminal. When a component is pressed at an z-connected component, the input source selected at the HT-R500...
Owner Manual
Page 18
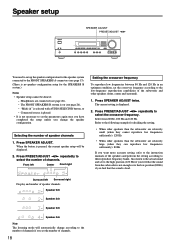
... setup unless you feel that the sound from 80 Hz, 100 Hz and 120 Hz. The FRONT SPEAKERS B system is displayed. 2. Press SPEAKER ADJUST. Front left Surround right Display and number of channels. Press PRESET/ADJUST ™/£ repeatedly to select the crossover frequency. The current setting is on (see page 26), - Refer to the low position (80 Hz) if you change the speaker configuration. Select from the subwoofer is selected with AUDIO SELECTOR button...
... setup unless you feel that the sound from 80 Hz, 100 Hz and 120 Hz. The FRONT SPEAKERS B system is displayed. 2. Press SPEAKER ADJUST. Front left Surround right Display and number of channels. Press PRESET/ADJUST ™/£ repeatedly to select the crossover frequency. The current setting is on (see page 26), - Refer to the low position (80 Hz) if you change the speaker configuration. Select from the subwoofer is selected with AUDIO SELECTOR button...
Owner Manual
Page 20
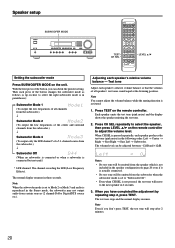
... the remote controller. When CH SEL is in the Stereo mode, the subwoofer may not output audio from the subwoofer.) ↓ Subwoofer Off (When no subwoofer is connected or when a subwoofer is connected but not used.) * LFE channel: The channel recording the LFE (Low Frequency Effects). Test tone Adjust each press of all speakers' test tones sound equal at the listening position. The test tone stops and the normal display resumes. The volume level can check the present setting. Press CH SEL repeatedly to select the speaker...
... the remote controller. When CH SEL is in the Stereo mode, the subwoofer may not output audio from the subwoofer.) ↓ Subwoofer Off (When no subwoofer is connected or when a subwoofer is connected but not used.) * LFE channel: The channel recording the LFE (Low Frequency Effects). Test tone Adjust each press of all speakers' test tones sound equal at the listening position. The test tone stops and the normal display resumes. The volume level can check the present setting. Press CH SEL repeatedly to select the speaker...
Owner Manual
Page 21
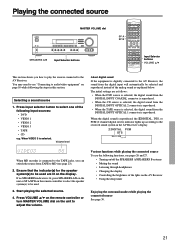
... Volume level About digital sound If the equipment is selected, the digital sound from TAPE to MD (see "Connecting to be used are as explained below. When the digital sound is reproduced, the ŸDIGITAL, DTS, or PCM (2 channel digital stereo) indicator lights up according to the received sound system in the AV Receiver's display. ŸDIGITAL PCM DTS When MD recorder is selected. You may need to adjust the volume. Various functions while playing the connected source To use the following input sources: • DVD • VIDEO...
... Volume level About digital sound If the equipment is selected, the digital sound from TAPE to MD (see "Connecting to be used are as explained below. When the digital sound is reproduced, the ŸDIGITAL, DTS, or PCM (2 channel digital stereo) indicator lights up according to the received sound system in the AV Receiver's display. ŸDIGITAL PCM DTS When MD recorder is selected. You may need to adjust the volume. Various functions while playing the connected source To use the following input sources: • DVD • VIDEO...
Owner Manual
Page 23
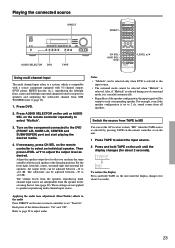
... settings are independent from SUB WOOFER (refer to page 13). 1. Refer to page 29 to the DVD (FRONT L/R, SURR L/R, CENTER and SUBWOOFER) port and start playing the desired media. 4. The volume levels from the speakers reproducing multi channel input source are not applied to select an individual speaker. To restore the display Press and hold TAPE on the remote controller to speakers reproducing multi channel input source. Turn on the remote controller repeatedly to adjust the output level as the input source. • The surround mode...
... settings are independent from SUB WOOFER (refer to page 13). 1. Refer to page 29 to the DVD (FRONT L/R, SURR L/R, CENTER and SUBWOOFER) port and start playing the desired media. 4. The volume levels from the speakers reproducing multi channel input source are not applied to select an individual speaker. To restore the display Press and hold TAPE on the remote controller to speakers reproducing multi channel input source. Turn on the remote controller repeatedly to adjust the output level as the input source. • The surround mode...
Owner Manual
Page 28
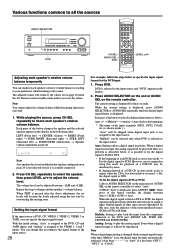
... speaker, then press LEVEL 5/∞ to select "Auto". 2) While "Auto" is changed while an input signal format other types are not reproduced. While the current setting is displayed, press AUDIO SELECTOR or AUDIO SEL repeatedly until the desired input signal format is DVD, CD, VIDEO 1, VIDEO 2, VIDEO 3 or TAPE, you save the values. Multich: Setting to the DVD port (FRONT L/R, SURR L/R, CENTER and SUBWOOFER). Analog: Setting to play back the input from the component connected to play the analog signal. "Auto" will become the levels adjusted using...
... speaker, then press LEVEL 5/∞ to select "Auto". 2) While "Auto" is changed while an input signal format other types are not reproduced. While the current setting is displayed, press AUDIO SELECTOR or AUDIO SEL repeatedly until the desired input signal format is DVD, CD, VIDEO 1, VIDEO 2, VIDEO 3 or TAPE, you save the values. Multich: Setting to the DVD port (FRONT L/R, SURR L/R, CENTER and SUBWOOFER). Analog: Setting to play back the input from the component connected to play the analog signal. "Auto" will become the levels adjusted using...
Owner Manual
Page 30
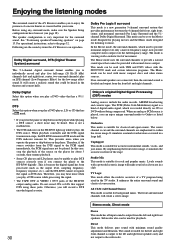
... Music mode can enjoy unique surround modes to the HT-R500 digitally. Dolby Digital Select this case, stop the playback of the source on the player for the low-range effect sound. If no surround speakers are the sound systems the AV Receiver can be heard in a club. Lively sounds with minimun sound quality adjustment and filtration. Following are connected, then the surround sound is output from the left and right front, center, two surround channels) plus an LFE channel (Low Frequency...
... Music mode can enjoy unique surround modes to the HT-R500 digitally. Dolby Digital Select this case, stop the playback of the source on the player for the low-range effect sound. If no surround speakers are the sound systems the AV Receiver can be heard in a club. Lively sounds with minimun sound quality adjustment and filtration. Following are connected, then the surround sound is output from the left and right front, center, two surround channels) plus an LFE channel (Low Frequency...

Owner Manual
Page 32
... selected. Lights up when "Stereo" mode is pressed, the listening mode cycles; STEREO: Set the listening mode to the beginning). DIRECT: Set the listening mode to "PLII" (when the sound is analog, PCM or Dolby Digital stereo source), "Dolby D" (when the sound is Dolby Digital) or "DTS" (when the sound is other than RCVR/TAPE (see "Cinema filter function" on page 29. This button is valid also when the remote control mode is DTS). Lights up when "Direct" mode is Dolby Digital To narrow the dynamic range of the listening mode buttons to...
... selected. Lights up when "Stereo" mode is pressed, the listening mode cycles; STEREO: Set the listening mode to the beginning). DIRECT: Set the listening mode to "PLII" (when the sound is analog, PCM or Dolby Digital stereo source), "Dolby D" (when the sound is Dolby Digital) or "DTS" (when the sound is other than RCVR/TAPE (see "Cinema filter function" on page 29. This button is valid also when the remote control mode is DTS). Lights up when "Direct" mode is Dolby Digital To narrow the dynamic range of the listening mode buttons to...
Owner Manual
Page 38
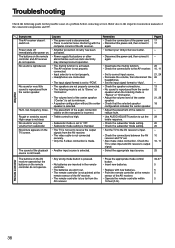
... the headphones. • Set the input signal format to "Auto". • Check the speaker connections. • No sound is reproduced from the center speaker when the listening mode is "Stereo" or "Orchestra". • Adjust the volume level of the center speaker. • Check that the selected speaker configuration includes the center speaker. • Adjust the placement of the audio connection cables on . Power shuts off immediately after power on the rear panel is incorrect. • Treble control too high. • Subwoofer mode is set to the respective instruction manuals...
... the headphones. • Set the input signal format to "Auto". • Check the speaker connections. • No sound is reproduced from the center speaker when the listening mode is "Stereo" or "Orchestra". • Adjust the volume level of the center speaker. • Check that the selected speaker configuration includes the center speaker. • Adjust the placement of the audio connection cables on . Power shuts off immediately after power on the rear panel is incorrect. • Treble control too high. • Subwoofer mode is set to the respective instruction manuals...
Owner Manual
Page 39
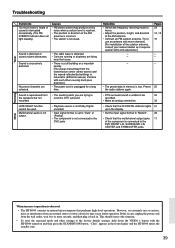
No preset channels are trying to record is DTS surround. • Playback source is not Dolby Digital encoded. • Input signal format is set to "Auto" or "Analog". • The component is not connected to the DVD jacks Remedies • Switch the frequency receiving mode to the factory default settings, hold down the VIDEO 1 button with the HT-R500 turned on extremely rare occasions, noise or interference from the transmission center (direct waves) and the waved reflected by buildings or mountains...
No preset channels are trying to record is DTS surround. • Playback source is not Dolby Digital encoded. • Input signal format is set to "Auto" or "Analog". • The component is not connected to the DVD jacks Remedies • Switch the frequency receiving mode to the factory default settings, hold down the VIDEO 1 button with the HT-R500 turned on extremely rare occasions, noise or interference from the transmission center (direct waves) and the waved reflected by buildings or mountains...
Owner Manual
Page 40
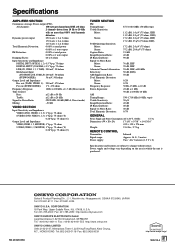
... ohms Pre out (SUBWOOFER): 1 V, 470 ohms Frequency Response: 10 Hz to 100 kHz, +1/-3 dB (Direct mode) Tone Control Bass: ±12 dB at 50 Hz Treble: ±12 dB at 20 kHz Signal-to-Noise Ratio: CD/TAPE: 100 dB (IHF-A, Direct mode) Muting: -50 dB VIDEO SECTION Input Sensitivity and Impedance VIDEO (DVD, VIDEO 1, 2, 3): 1 Vp-p, 75 ohms S VIDEO (DVD, VIDEO 1, 2, 3):1 Vp-p, 75 ohms (Y) 0.28 Vp-p, 75 ohms (C) Output Level and Impedance VIDEO (VIDEO 1, 2, MONITOR):1 Vp-p, 75 ohms S VIDEO (VIDEO 1, 2, MONITOR): 1 Vp-p, 75 ohms (Y) 0.28 Vp-p, 75 ohms (C) TUNER SECTION...
... ohms Pre out (SUBWOOFER): 1 V, 470 ohms Frequency Response: 10 Hz to 100 kHz, +1/-3 dB (Direct mode) Tone Control Bass: ±12 dB at 50 Hz Treble: ±12 dB at 20 kHz Signal-to-Noise Ratio: CD/TAPE: 100 dB (IHF-A, Direct mode) Muting: -50 dB VIDEO SECTION Input Sensitivity and Impedance VIDEO (DVD, VIDEO 1, 2, 3): 1 Vp-p, 75 ohms S VIDEO (DVD, VIDEO 1, 2, 3):1 Vp-p, 75 ohms (Y) 0.28 Vp-p, 75 ohms (C) Output Level and Impedance VIDEO (VIDEO 1, 2, MONITOR):1 Vp-p, 75 ohms S VIDEO (VIDEO 1, 2, MONITOR): 1 Vp-p, 75 ohms (Y) 0.28 Vp-p, 75 ohms (C) TUNER SECTION...


