

Owner Manual
Page 7
...DOCK PHONES MULTI CH A SPEAKERS B DVD TONE VCR/DVR CBL/SAT AUX TAPE TUNER CD SETUP RETURN MOVIE/TV MUSIC GAME DISPLAY DIGITAL INPUT RT/PTY/TP MEMORY TUNING MODE CLEAR SETUP MIC MASTER VOLUME or AUX INPUT VIDEO L AUDIO R AV RECEIVER HT-R560 Speaker set A On Off Speaker set B On Off On Off Indicator AB A B Output Set A: 5.1 channels Set B: 2 channels Set A: 7.1 channels Set B: 2 channels No sound Main Room (speaker set A) Front left speaker Subwoofer Center speaker Front right speaker Surround left speaker Surround back left speaker Surround right speaker Surround...
...DOCK PHONES MULTI CH A SPEAKERS B DVD TONE VCR/DVR CBL/SAT AUX TAPE TUNER CD SETUP RETURN MOVIE/TV MUSIC GAME DISPLAY DIGITAL INPUT RT/PTY/TP MEMORY TUNING MODE CLEAR SETUP MIC MASTER VOLUME or AUX INPUT VIDEO L AUDIO R AV RECEIVER HT-R560 Speaker set A On Off Speaker set B On Off On Off Indicator AB A B Output Set A: 5.1 channels Set B: 2 channels Set A: 7.1 channels Set B: 2 channels No sound Main Room (speaker set A) Front left speaker Subwoofer Center speaker Front right speaker Surround left speaker Surround back left speaker Surround right speaker Surround...
Owner Manual
Page 8
... HDMI*4 Inputs and 1 Output • HDTV-Ready Component Video Switching (2 Inputs/ 1 Output) • 4 Digital Inputs (2 Optical/2 Coaxial/4 Assignable) • 3 S-Video Inputs/2 Outputs • Color-Coded 7.1 Multichannel Inputs (Ready for Dolby Digital and DTS Formats for High-Definition Discs) • Subwoofer Pre Outs • Dedicated DOCK jack for quick and simple DS-A1L Dock connection and iPod playback Miscellaneous • 40 AM/FM/SIRIUS*5 Presets • Audyssey 2EQ*6 Room Correction and Speaker Cali- input power:130 W • Magnetically shielded • 8-ohm impedance...
... HDMI*4 Inputs and 1 Output • HDTV-Ready Component Video Switching (2 Inputs/ 1 Output) • 4 Digital Inputs (2 Optical/2 Coaxial/4 Assignable) • 3 S-Video Inputs/2 Outputs • Color-Coded 7.1 Multichannel Inputs (Ready for Dolby Digital and DTS Formats for High-Definition Discs) • Subwoofer Pre Outs • Dedicated DOCK jack for quick and simple DS-A1L Dock connection and iPod playback Miscellaneous • 40 AM/FM/SIRIUS*5 Presets • Audyssey 2EQ*6 Room Correction and Speaker Cali- input power:130 W • Magnetically shielded • 8-ohm impedance...

Owner Manual
Page 10
... Connecting the Power Cord 40 Turning On the AV Receiver 41 Turning On and Standby 41 First Time Setup 42 Automatic Speaker Setup (Audyssey 2EQ) ......... 42 HDMI Input Setup 44 Component Video Input Setup 45 Digital Input Setup 46 Changing the Input Display 46 Playing Your AV Components 47 Basic AV Receiver Operation 47 Common Functions 48 Setting the Display Brightness 48 Muting the AV Receiver 48 Using the Sleep Timer 48 Using Headphones 49 Displaying Source Information 49 Specifying the Digital Signal Format 50 Listening to the Radio...
... Connecting the Power Cord 40 Turning On the AV Receiver 41 Turning On and Standby 41 First Time Setup 42 Automatic Speaker Setup (Audyssey 2EQ) ......... 42 HDMI Input Setup 44 Component Video Input Setup 45 Digital Input Setup 46 Changing the Input Display 46 Playing Your AV Components 47 Basic AV Receiver Operation 47 Common Functions 48 Setting the Display Brightness 48 Muting the AV Receiver 48 Using the Sleep Timer 48 Using Headphones 49 Displaying Source Information 49 Specifying the Digital Signal Format 50 Listening to the Radio...
Owner Manual
Page 11
... AV Sources 73 Adjusting the Listening Modes 74 Using the Audio Adjust Settings 74 Using the Audio Settings 75 Advanced Setup 77 Speaker Setup 77 Controlling Other Components 82 Preprogrammed Remote Control Codes 82 Entering Remote Control Codes 82 Resetting the Remote Controller 83 Controlling a DVD Player, or DVD Recorder ......84 Controlling a VCR, or PVR 85 Controlling a Satellite Receiver or Cable Receiver 86 Controlling a CD Player, CD Recorder, or MD Player 87 Controlling a Cassette Recorder 88 Controlling a TV 89 Troubleshooting 90 Specifications 93 7.1ch Home Theater...
... AV Sources 73 Adjusting the Listening Modes 74 Using the Audio Adjust Settings 74 Using the Audio Settings 75 Advanced Setup 77 Speaker Setup 77 Controlling Other Components 82 Preprogrammed Remote Control Codes 82 Entering Remote Control Codes 82 Resetting the Remote Controller 83 Controlling a DVD Player, or DVD Recorder ......84 Controlling a VCR, or PVR 85 Controlling a Satellite Receiver or Cable Receiver 86 Controlling a CD Player, CD Recorder, or MD Player 87 Controlling a Cassette Recorder 88 Controlling a TV 89 Troubleshooting 90 Specifications 93 7.1ch Home Theater...
Owner Manual
Page 13
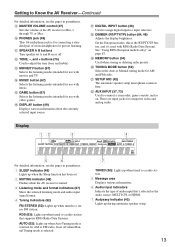
...) Adjusts the display brightness. I MASTER VOLUME control (47) Sets the volume of audio input that's selected as the audio source: MULTI CH, or HDMI. 7 Audyssey indicator (43) Lights up when tuned to a radio station that supports RDS (Radio Data System). M MOVIE/TV button (67) Selects the listening modes intended for use with movies and TV. S MEMORY button (54) Used when storing or deleting radio presets. V AUX INPUT (37, 73) Used to input selectors. There are input jacks for AM and FM radio. U SETUP MIC (42) The automatic speaker setup microphone connects here...
...) Adjusts the display brightness. I MASTER VOLUME control (47) Sets the volume of audio input that's selected as the audio source: MULTI CH, or HDMI. 7 Audyssey indicator (43) Lights up when tuned to a radio station that supports RDS (Radio Data System). M MOVIE/TV button (67) Selects the listening modes intended for use with movies and TV. S MEMORY button (54) Used when storing or deleting radio presets. V AUX INPUT (37, 73) Used to input selectors. There are input jacks for AM and FM radio. U SETUP MIC (42) The automatic speaker setup microphone connects here...
Owner Manual
Page 15
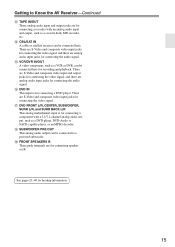
... composite video input and output jacks for connecting the video signal, and there are for connecting a DVD player. Q DVD FRONT L/R, CENTER, SUBWOOFER, SURR L/R, and SURR BACK L/R This analog multichannel input is for connecting speaker set B. S FRONT SPEAKERS B These push terminals are analog audio input jacks for connecting the audio signal. N CBL/SAT IN A cable or satellite receiver can be connected here for connecting a recorder with a 5.1/7.1-channel analog audio output, such as a DVD player, DVD-Audio or SACD-capable player, or an MPEG decoder. There are analog audio input...
... composite video input and output jacks for connecting the video signal, and there are for connecting a DVD player. Q DVD FRONT L/R, CENTER, SUBWOOFER, SURR L/R, and SURR BACK L/R This analog multichannel input is for connecting speaker set B. S FRONT SPEAKERS B These push terminals are analog audio input jacks for connecting the audio signal. N CBL/SAT IN A cable or satellite receiver can be connected here for connecting a recorder with a 5.1/7.1-channel analog audio output, such as a DVD player, DVD-Audio or SACD-capable player, or an MPEG decoder. There are analog audio input...
Owner Manual
Page 18
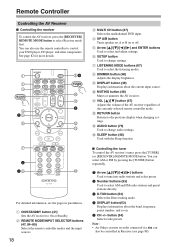
... [TUNER] button repeatedly. 1 Arrow buttons Used to tune into radio stations and select preset. 2 Number buttons (53) Used to control your DVD player, CD player, and other components. Note: • An Onkyo cassette recorder connected via can also use the remote controller to select AM and FM radio stations and preset stations directly. 3 D.TUN button (53) Selects the Direct tuning mode. 4 DISPLAY button(53) Displays information about the current input source. See page 82 for more details. E Arrow and ENTER buttons Used to On or Standby. H DIMMER button (48) Adjusts the display...
... [TUNER] button repeatedly. 1 Arrow buttons Used to tune into radio stations and select preset. 2 Number buttons (53) Used to control your DVD player, CD player, and other components. Note: • An Onkyo cassette recorder connected via can also use the remote controller to select AM and FM radio stations and preset stations directly. 3 D.TUN button (53) Selects the Direct tuning mode. 4 DISPLAY button(53) Displays information about the current input source. See page 82 for more details. E Arrow and ENTER buttons Used to On or Standby. H DIMMER button (48) Adjusts the display...

Owner Manual
Page 19
... remain off . Q PLAY MODE button Selects play modes. A ON/STANDBY button Turns the iPod on components with selectable play modes on or off when the remote controller transmits an Off command. Similarly, if your iPod is off, it will turn on connecting the DS-A1L Dock. K MENU button* Displays a menu. P Stop [ ] button Stops playback and displays a menu. D Rewind [ ] button Press and hold to navigate menus and select items. C Previous [ ] button Restarts the current song. A 7 8 DOCK 9 J K L 2 M 3 N 4 O 5 P 6 Q R * With some may not work at all...
... remain off . Q PLAY MODE button Selects play modes. A ON/STANDBY button Turns the iPod on components with selectable play modes on or off when the remote controller transmits an Off command. Similarly, if your iPod is off, it will turn on connecting the DS-A1L Dock. K MENU button* Displays a menu. P Stop [ ] button Stops playback and displays a menu. D Rewind [ ] button Press and hold to navigate menus and select items. C Previous [ ] button Restarts the current song. A 7 8 DOCK 9 J K L 2 M 3 N 4 O 5 P 6 Q R * With some may not work at all...

Owner Manual
Page 36
... FRONT SURR CENTER SURR BACK L R CBL/SAT VCR/DVR R SUB WOOFER DVD Tip! If the TV power is off or the TV is not guaranteed. Step 1: Connect your HDMI-compatible player to make a separate analog or digital audio connection. If you make a separate connection for details. 36 Refer to fully enjoy the AV receiver's listening modes, turn down the volume on your HDMI-compatible player to the AV receiver). Sound off . • The HDMI audio signal (sampling...
... FRONT SURR CENTER SURR BACK L R CBL/SAT VCR/DVR R SUB WOOFER DVD Tip! If the TV power is off or the TV is not guaranteed. Step 1: Connect your HDMI-compatible player to make a separate analog or digital audio connection. If you make a separate connection for details. 36 Refer to fully enjoy the AV receiver's listening modes, turn down the volume on your HDMI-compatible player to the AV receiver). Sound off . • The HDMI audio signal (sampling...

Owner Manual
Page 40
... connections (see page 83). Remote Control You can use the following special functions: Auto Power On/Standby When you 'll need to press the [MULTI CH] button repeatedly and select Multich to hear all your other manufacturer's components may cause a malfunction. • Some components may cause a momentary power surge that might interfere with an analog audio cable (RCA). REMOTE CONTROL HDMI ASSIGNABLE IN 3 IN 2 DIGITAL IN 1 (DVD) COAXIAL 2 (CBL/SAT) COMPONENT VIDEO Y CB/ PB 1 (VCR/DVR) OPTICAL...
... connections (see page 83). Remote Control You can use the following special functions: Auto Power On/Standby When you 'll need to press the [MULTI CH] button repeatedly and select Multich to hear all your other manufacturer's components may cause a malfunction. • Some components may cause a momentary power surge that might interfere with an analog audio cable (RCA). REMOTE CONTROL HDMI ASSIGNABLE IN 3 IN 2 DIGITAL IN 1 (DVD) COAXIAL 2 (CBL/SAT) COMPONENT VIDEO Y CB/ PB 1 (VCR/DVR) OPTICAL...

Owner Manual
Page 41
... 45, or "Digital Input Setup" on page 46. Turning On the AV Receiver ON/STANDBY STANDBY indicator ON/STANDBY STANDBY TUNING PRESET ENTER MASTER VOLUME DOCK PHONES MULTI CH A SPEAKERS B DVD VCR/DVR CBL/SAT AUX TAPE TUNER CD SETUP RETURN TONE MOVIE/TV MUSIC GAME DISPLAY DIGITAL INPUT RT/PTY/TP MEMORY TUNING MODE CLEAR SETUP MIC AUX INPUT VIDEO L AUDIO R AV RECEIVER HT-R560 ON/STANDBY RECEIVER Turning On and Standby AV receiver ON/STANDBY Remote controller or On the AV receiver, press the [ON/STANDBY] button. See "Automatic Speaker Setup (Audyssey 2EQ)" on...
... 45, or "Digital Input Setup" on page 46. Turning On the AV Receiver ON/STANDBY STANDBY indicator ON/STANDBY STANDBY TUNING PRESET ENTER MASTER VOLUME DOCK PHONES MULTI CH A SPEAKERS B DVD VCR/DVR CBL/SAT AUX TAPE TUNER CD SETUP RETURN TONE MOVIE/TV MUSIC GAME DISPLAY DIGITAL INPUT RT/PTY/TP MEMORY TUNING MODE CLEAR SETUP MIC AUX INPUT VIDEO L AUDIO R AV RECEIVER HT-R560 ON/STANDBY RECEIVER Turning On and Standby AV receiver ON/STANDBY Remote controller or On the AV receiver, press the [ON/STANDBY] button. See "Automatic Speaker Setup (Audyssey 2EQ)" on...
Owner Manual
Page 43
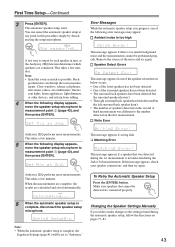
..., televisions, radios, air conditioners, fluorescent lights, home appliances, light dimmers, or other devices, and refrain from talking. 4 When the following display appears, move the speaker setup microphone to the number detected on pages 77-81. 43 Changing the Speaker Settings Manually If you wish to make changes to "Audyssey." Write Error Audyssey 2EQ performs more measurements. Note: • When the automatic speaker setup is complete, disconnect the speaker setup microphone. You can...
..., televisions, radios, air conditioners, fluorescent lights, home appliances, light dimmers, or other devices, and refrain from talking. 4 When the following display appears, move the speaker setup microphone to the number detected on pages 77-81. 43 Changing the Speaker Settings Manually If you wish to make changes to "Audyssey." Write Error Audyssey 2EQ performs more measurements. Note: • When the automatic speaker setup is complete, disconnect the speaker setup microphone. You can...
Owner Manual
Page 44
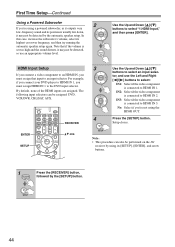
... appropriate volume level. Use the Up and Down [ ]/[ ] buttons to select: IN1: Select if the video component is set too high and the sound distorts, it outputs very low-frequency sound and its highest crossover frequency, and then try running the automatic speaker setup again. By default, none of the HDMI inputs are assigned. Press the [SETUP] button. No: Select if you 're using a powered subwoofer, as it may not be detected by the [SETUP] button. 44 Note that input to the DVD input...
... appropriate volume level. Use the Up and Down [ ]/[ ] buttons to select: IN1: Select if the video component is set too high and the sound distorts, it outputs very low-frequency sound and its highest crossover frequency, and then try running the automatic speaker setup again. By default, none of the HDMI inputs are assigned. Press the [SETUP] button. No: Select if you 're using a powered subwoofer, as it may not be detected by the [SETUP] button. 44 Note that input to the DVD input...

Owner Manual
Page 47
...] button. To set is designed for home theaters, it off . The MULTI CH indicator will appear on or off slightly. 5 Select a listening mode and enjoy! Playing Your AV Components Basic AV Receiver Operation ON/STANDBY STANDBY TUNING PRESET ENTER MASTER VOLUME DOCK PHONES MULTI CH A SPEAKERS B DVD VCR/DVR CBL/SAT AUX TAPE TUNER CD SETUP RETURN TONE MOVIE/TV MUSIC GAME DISPLAY DIGITAL INPUT RT/PTY/TP MEMORY TUNING MODE CLEAR SETUP MIC AUX INPUT VIDEO L AUDIO R AV RECEIVER HT-R560 1 3 Subwoofer's rear panel 1 3 4 MIN MAX OUTPUT LEVEL 1 AV receiver...
...] button. To set is designed for home theaters, it off . The MULTI CH indicator will appear on or off slightly. 5 Select a listening mode and enjoy! Playing Your AV Components Basic AV Receiver Operation ON/STANDBY STANDBY TUNING PRESET ENTER MASTER VOLUME DOCK PHONES MULTI CH A SPEAKERS B DVD VCR/DVR CBL/SAT AUX TAPE TUNER CD SETUP RETURN TONE MOVIE/TV MUSIC GAME DISPLAY DIGITAL INPUT RT/PTY/TP MEMORY TUNING MODE CLEAR SETUP MIC AUX INPUT VIDEO L AUDIO R AV RECEIVER HT-R560 1 3 Subwoofer's rear panel 1 3 4 MIN MAX OUTPUT LEVEL 1 AV receiver...
Owner Manual
Page 48
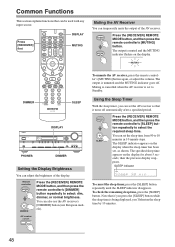
You can adjust the brightness of the AV receiver. SLEEP indicator To cancel the sleep timer, press the [SLEEP] button repeatedly until the SLEEP indicator disappears. Note that it turns off . DIMMER SLEEP DISPLAY ON/STANDBY STANDBY TUNING PRESET ENTER MASTER VOLUME DOCK PHONES MULTI CH A SPEAKERS B DVD TONE VCR/DVR CBL/SAT AUX TAPE TUNER CD SETUP RETURN MOVIE/TV MUSIC GAME DISPLAY DIGITAL INPUT DIMMER MEMORY TUNING MODE CLEAR SETUP MIC AUX INPUT VIDEO L AUDIO R AV RECEIVER HT-R560 PHONES DIMMER Setting the Display Brightness...
You can adjust the brightness of the AV receiver. SLEEP indicator To cancel the sleep timer, press the [SLEEP] button repeatedly until the SLEEP indicator disappears. Note that it turns off . DIMMER SLEEP DISPLAY ON/STANDBY STANDBY TUNING PRESET ENTER MASTER VOLUME DOCK PHONES MULTI CH A SPEAKERS B DVD TONE VCR/DVR CBL/SAT AUX TAPE TUNER CD SETUP RETURN MOVIE/TV MUSIC GAME DISPLAY DIGITAL INPUT DIMMER MEMORY TUNING MODE CLEAR SETUP MIC AUX INPUT VIDEO L AUDIO R AV RECEIVER HT-R560 PHONES DIMMER Setting the Display Brightness...
Owner Manual
Page 55
... connector cable SIRIUS SIRIUS antenna jack HDMI ASSIGNABLE IN 3 IN 2 DIGITAL IN 1 (DVD) COMPONENT VIDEO Y COAXIAL CB/ PB 2 (CBL/SAT) 1 (VCR/DVR) OPTICAL 2 (CD) ASSIGNABLE CR/ PR IN 2 IN 1(DVD) OUT ASSIGNABLE IN OUT IN L REMOTE CONTROL R CD TAPE IN 1 OUT DOCK CBL/SAT V VCR/DVR S SIRIUS DVD MONITOR OUT V S SURR BACK SPEAKERS L AM SURR SPEAKERS R ANTENNA FM 75 IN IN L OUT OUT IN IN IN FRONT SURR CENTER SURR BACK L PRE OUT L SUB WOOFER FRONT SPEAKERS A L CENTER SPEAKER R R CBL...
... connector cable SIRIUS SIRIUS antenna jack HDMI ASSIGNABLE IN 3 IN 2 DIGITAL IN 1 (DVD) COMPONENT VIDEO Y COAXIAL CB/ PB 2 (CBL/SAT) 1 (VCR/DVR) OPTICAL 2 (CD) ASSIGNABLE CR/ PR IN 2 IN 1(DVD) OUT ASSIGNABLE IN OUT IN L REMOTE CONTROL R CD TAPE IN 1 OUT DOCK CBL/SAT V VCR/DVR S SIRIUS DVD MONITOR OUT V S SURR BACK SPEAKERS L AM SURR SPEAKERS R ANTENNA FM 75 IN IN L OUT OUT IN IN IN FRONT SURR CENTER SURR BACK L PRE OUT L SUB WOOFER FRONT SPEAKERS A L CENTER SPEAKER R R CBL...
Owner Manual
Page 76
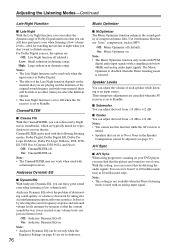
... out of sync. Use it from -12 dB to disturb anyone. Low: Small reduction in dynamic range. Note: • Audyssey Dynamic EQ can be set only when the Equalizer Settings on the material that you are : Off: Late Night function off (default). Note: • The Music Optimizer function only works with PCM digital audio input signals with an analog input signal. Note: • This setting is not available when the Direct listening mode is selected. CinemaFILTER can be adjusted (see...
... out of sync. Use it from -12 dB to disturb anyone. Low: Small reduction in dynamic range. Note: • Audyssey Dynamic EQ can be set only when the Equalizer Settings on the material that you are : Off: Late Night function off (default). Note: • The Music Optimizer function only works with PCM digital audio input signals with an analog input signal. Note: • This setting is not available when the Direct listening mode is selected. CinemaFILTER can be adjusted (see...

Owner Manual
Page 90
... PCM or DTS, set the volume to its power cord disconnected for 1 hour. Only the center speaker produces sound • If you use the Dolby Pro Logic IIx Movie or Dolby Pro Logic IIx Music listening mode with its factory defaults, turn on your DVD player's remote controller. • If your speakers and input sources. If you can 't resolve the issue yourself, contact your turntable uses an MC cartridge, you set it on the display and the AV receiver...
... PCM or DTS, set the volume to its power cord disconnected for 1 hour. Only the center speaker produces sound • If you use the Dolby Pro Logic IIx Movie or Dolby Pro Logic IIx Music listening mode with its factory defaults, turn on your DVD player's remote controller. • If your speakers and input sources. If you can 't resolve the issue yourself, contact your turntable uses an MC cartridge, you set it on the display and the AV receiver...
Owner Manual
Page 91
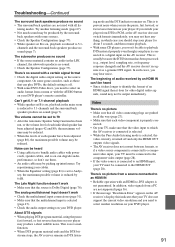
... selected. • While the Pure Audio listening mode is selected, the video circuitry is turned off . • With some CD players, you won't be output immediately. Noise can be heard • Using cable ties to a digital input on your player is reduced by 6 dB. The Late Night function doesn't work • Check the multichannel input connections (page 31). • Make sure that each speaker have been adjusted (page 80), the maximum possible volume...
... selected. • While the Pure Audio listening mode is selected, the video circuitry is turned off . • With some CD players, you won't be output immediately. Noise can be heard • Using cable ties to a digital input on your player is reduced by 6 dB. The Late Night function doesn't work • Check the multichannel input connections (page 31). • Make sure that each speaker have been adjusted (page 80), the maximum possible volume...

Owner Manual
Page 92
... antenna. If more than one code is set the AV receiver to Main or Sub (page 74). Others The sound changes when I change the "Input (Mux)" setting to Standby. How do I connect my headphones • When a pair of a multiplex source • On the "Audio Adjust" menu, change the language of headphones is connected, the listening mode is listed, try each one. • With some AV components, certain buttons may not work at all. • To control an Onkyo component...
... antenna. If more than one code is set the AV receiver to Main or Sub (page 74). Others The sound changes when I change the "Input (Mux)" setting to Standby. How do I connect my headphones • When a pair of a multiplex source • On the "Audio Adjust" menu, change the language of headphones is connected, the listening mode is listed, try each one. • With some AV components, certain buttons may not work at all. • To control an Onkyo component...


