

Owner Manual
Page 1
... manual will enable you for future reference. Following the instructions in the unit. 7.1ch Home Theater System HT-S5100 AV Receiver (HT-R560) Speaker Package (HTP-560) Front Speakers (SKF-560F L/R) Center Speaker (SKC-560C) Surround Speakers (SKM-560S L/R) Surround Back Speakers (SKB-560 L/R) Subwoofer (SKW-560) Dock for iPod (DS-A1L) Instruction Manual Thank you to obtain... Basic Operation Playing your new 7.1ch Home Theater System. Please read this manual thoroughly before making connections and plugging in this manual for purchasing an Onkyo 7.1ch Home Theater System.
... manual will enable you for future reference. Following the instructions in the unit. 7.1ch Home Theater System HT-S5100 AV Receiver (HT-R560) Speaker Package (HTP-560) Front Speakers (SKF-560F L/R) Center Speaker (SKC-560C) Surround Speakers (SKM-560S L/R) Surround Back Speakers (SKB-560 L/R) Subwoofer (SKW-560) Dock for iPod (DS-A1L) Instruction Manual Thank you to obtain... Basic Operation Playing your new 7.1ch Home Theater System. Please read this manual thoroughly before making connections and plugging in this manual for purchasing an Onkyo 7.1ch Home Theater System.

Owner Manual
Page 4
... and so on. 4. Fit a suitable fuse in humid places, such as such are likely to suffer discoloration or picture distortion when conventional speakers are free from your amplifier before connecting or disconnecting cables.) 7. Putting them , even if the input power is within the speci... mark or the BSI mark on the body of wood and is made out of the fuse. GROEBENZELL, GERMANY K. MIYAGI ONKYO EUROPE ELECTRONICS GmbH 4 Speaker Precautions Placement • The subwoofer cabinet is therefore sensitive to extreme temperatures and humidity, do not put water or other liquids...
... and so on. 4. Fit a suitable fuse in humid places, such as such are likely to suffer discoloration or picture distortion when conventional speakers are free from your amplifier before connecting or disconnecting cables.) 7. Putting them , even if the input power is within the speci... mark or the BSI mark on the body of wood and is made out of the fuse. GROEBENZELL, GERMANY K. MIYAGI ONKYO EUROPE ELECTRONICS GmbH 4 Speaker Precautions Placement • The subwoofer cabinet is therefore sensitive to extreme temperatures and humidity, do not put water or other liquids...

Owner Manual
Page 5
... subwoofer 5 Package Contents Make sure you have the following items: AV Receiver HT-R560 HT-R560 Remote controller and two batteries (AA/R6) Speaker setup microphone Indoor FM antenna Speaker Package HTP-560 Front speakers (SKF-560F L/R) Center speaker (SKC-560C) Surround speakers (SKM-560S L/R) Surround back speakers (SKB-560 L/R) Subwoofer (SKW-560) AM loop antenna * Power-plug adapter Only...
... subwoofer 5 Package Contents Make sure you have the following items: AV Receiver HT-R560 HT-R560 Remote controller and two batteries (AA/R6) Speaker setup microphone Indoor FM antenna Speaker Package HTP-560 Front speakers (SKF-560F L/R) Center speaker (SKC-560C) Surround speakers (SKM-560S L/R) Surround back speakers (SKB-560 L/R) Subwoofer (SKW-560) AM loop antenna * Power-plug adapter Only...

Owner Manual
Page 7
... L AUDIO R AV RECEIVER HT-R560 Speaker set A On Off Speaker set B On Off On Off Indicator AB A B Output Set A: 5.1 channels Set B: 2 channels Set A: 7.1 channels Set B: 2 channels No sound Main Room (speaker set A) Front left speaker Subwoofer Center speaker Front right speaker Surround left speaker Surround back left speaker Surround right speaker Surround back right speaker Sub Room (speaker set B) * While speaker set B is on...
... L AUDIO R AV RECEIVER HT-R560 Speaker set A On Off Speaker set B On Off On Off Indicator AB A B Output Set A: 5.1 channels Set B: 2 channels Set A: 7.1 channels Set B: 2 channels No sound Main Room (speaker set A) Front left speaker Subwoofer Center speaker Front right speaker Surround left speaker Surround back left speaker Surround right speaker Surround back right speaker Sub Room (speaker set B) * While speaker set B is on...
Owner Manual
Page 8
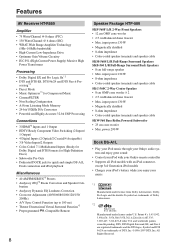
...-560F L/R 2-Way Front Speakers • 12 cm OMF cone woofer • 2.5 cm Balanced dome tweeter • Max. power:290 W Dock DS-A1L • Play your iPod music through your Onkyo audio system and enjoy great sound • Control your iPod with your Onkyo remote controller • Supports...Surround Speakers SKB-560 L/R Full-Range Surround Back Speakers • 8 cm full-range speaker • Max. DTS, DTS Digital Surround, ES, and Neo:6 are registered trademarks and the DTS logos, Symbol and DTS 96/24 are trademarks of DTS, Inc. ©1996-2007 DTS, Inc. Features AV Receiver HT-R560 ...
...-560F L/R 2-Way Front Speakers • 12 cm OMF cone woofer • 2.5 cm Balanced dome tweeter • Max. power:290 W Dock DS-A1L • Play your iPod music through your Onkyo audio system and enjoy great sound • Control your iPod with your Onkyo remote controller • Supports...Surround Speakers SKB-560 L/R Full-Range Surround Back Speakers • 8 cm full-range speaker • Max. DTS, DTS Digital Surround, ES, and Neo:6 are registered trademarks and the DTS logos, Symbol and DTS 96/24 are trademarks of DTS, Inc. ©1996-2007 DTS, Inc. Features AV Receiver HT-R560 ...

Owner Manual
Page 10
... Important Safety Instructions 2 Precautions 3 Speaker Precautions 4 Package Contents 5 AV Receiver HT-R560 5 Speaker Package HTP-560 5 Dock for iPod DS-A1L 6 Using Two Sets of Speakers 7 Speaker Sets A and B 7 Sub Room (speaker set B 7 Main Room (speaker set A 7 Features 8 AV Receiver HT-R560 8 Speaker Package HTP-560 8 Dock DS-A1L..., CDR, MiniDisc, or DAT Recorder 39 Connecting Onkyo Components 40 Connecting the Power Cord 40 Turning On the AV Receiver 41 Turning On and Standby 41 First Time Setup 42 Automatic Speaker Setup (Audyssey 2EQ) ......... 42 HDMI Input Setup...
... Important Safety Instructions 2 Precautions 3 Speaker Precautions 4 Package Contents 5 AV Receiver HT-R560 5 Speaker Package HTP-560 5 Dock for iPod DS-A1L 6 Using Two Sets of Speakers 7 Speaker Sets A and B 7 Sub Room (speaker set B 7 Main Room (speaker set A 7 Features 8 AV Receiver HT-R560 8 Speaker Package HTP-560 8 Dock DS-A1L..., CDR, MiniDisc, or DAT Recorder 39 Connecting Onkyo Components 40 Connecting the Power Cord 40 Turning On the AV Receiver 41 Turning On and Standby 41 First Time Setup 42 Automatic Speaker Setup (Audyssey 2EQ) ......... 42 HDMI Input Setup...
Owner Manual
Page 11
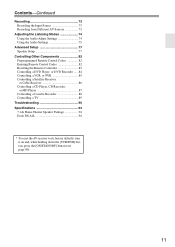
...Different AV Sources 73 Adjusting the Listening Modes 74 Using the Audio Adjust Settings 74 Using the Audio Settings 75 Advanced Setup 77 Speaker Setup 77 Controlling Other Components 82 Preprogrammed Remote Control Codes 82 Entering Remote Control Codes 82 Resetting the Remote Controller 83 Controlling a... CD Player, CD Recorder, or MD Player 87 Controlling a Cassette Recorder 88 Controlling a TV 89 Troubleshooting 90 Specifications 93 7.1ch Home Theater Speaker Package 94 Dock DS-A1L 94 * To reset the AV receiver to its factory defaults, turn it on and, while holding down the ...
...Different AV Sources 73 Adjusting the Listening Modes 74 Using the Audio Adjust Settings 74 Using the Audio Settings 75 Advanced Setup 77 Speaker Setup 77 Controlling Other Components 82 Preprogrammed Remote Control Codes 82 Entering Remote Control Codes 82 Resetting the Remote Controller 83 Controlling a... CD Player, CD Recorder, or MD Player 87 Controlling a Cassette Recorder 88 Controlling a TV 89 Troubleshooting 90 Specifications 93 7.1ch Home Theater Speaker Package 94 Dock DS-A1L 94 * To reset the AV receiver to its factory defaults, turn it on and, while holding down the ...
Owner Manual
Page 12
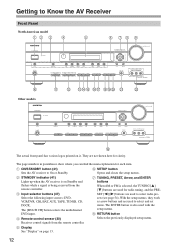
...MASTER VOLUME DOCK PHONES MULTI CH A SPEAKERS B DVD TONE VCR/DVR CBL/SAT AUX TAPE TUNER CD SETUP RETURN MOVIE/TV MUSIC GAME LISTENING MODE DISPLAY DIGITAL INPUT DIMMER MEMORY TUNING MODE CLEAR SETUP MIC AUX INPUT VIDEO L AUDIO R AV RECEIVER HT-R560 J K Other models ON/STANDBY ...STANDBY L MNO PQ RST U V TUNING PRESET ENTER MASTER VOLUME DOCK PHONES MULTI CH A SPEAKERS B DVD TONE VCR/DVR CBL/SAT AUX TAPE TUNER CD SETUP RETURN MOVIE/...
...MASTER VOLUME DOCK PHONES MULTI CH A SPEAKERS B DVD TONE VCR/DVR CBL/SAT AUX TAPE TUNER CD SETUP RETURN MOVIE/TV MUSIC GAME LISTENING MODE DISPLAY DIGITAL INPUT DIMMER MEMORY TUNING MODE CLEAR SETUP MIC AUX INPUT VIDEO L AUDIO R AV RECEIVER HT-R560 J K Other models ON/STANDBY ...STANDBY L MNO PQ RST U V TUNING PRESET ENTER MASTER VOLUME DOCK PHONES MULTI CH A SPEAKERS B DVD TONE VCR/DVR CBL/SAT AUX TAPE TUNER CD SETUP RETURN MOVIE/...
Owner Manual
Page 13
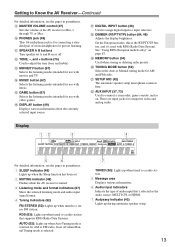
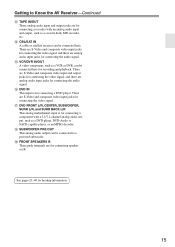
...control (47) Sets the volume of the AV receiver to connect a camcorder, game console, and so on. U SETUP MIC (42) The automatic speaker setup microphone connects here. Getting to Know the AV Receiver-Continued For detailed information, see the pages in parentheses. J PHONES jack (49) This 1/4-...inch phone jack is for connecting a standard pair of audio input that supports RDS (Radio Data System). K SPEAKER A B buttons Turn speaker set . 2 MUTING indicator (48) Flashes while the AV receiver is the RT/PTY/TP button, and it's used with movies and TV. ...
...control (47) Sets the volume of the AV receiver to connect a camcorder, game console, and so on. U SETUP MIC (42) The automatic speaker setup microphone connects here. Getting to Know the AV Receiver-Continued For detailed information, see the pages in parentheses. J PHONES jack (49) This 1/4-...inch phone jack is for connecting a standard pair of audio input that supports RDS (Radio Data System). K SPEAKER A B buttons Turn speaker set . 2 MUTING indicator (48) Flashes while the AV receiver is the RT/PTY/TP button, and it's used with movies and TV. ...

Owner Manual
Page 14
...(RCA) between the AV receiver and the other component, even if they are for connecting the front speakers, center, surround, and surround back speakers. See "Digital Input Setup" on another -capable Onkyo component for remote and system control. E HDMI IN 1-3 and OUT HDMI (High Definition ...for connecting components with an HDMI output, such as a CD player or DVD player. J FRONT L/R, CENTER, SURR L/R, and SURR BACK L/R SPEAKERS These terminal posts are connected digitally. They're assignable, which means you can be connected to a video input on page 46. See "Component Video...
...(RCA) between the AV receiver and the other component, even if they are for connecting the front speakers, center, surround, and surround back speakers. See "Digital Input Setup" on another -capable Onkyo component for remote and system control. E HDMI IN 1-3 and OUT HDMI (High Definition ...for connecting components with an HDMI output, such as a CD player or DVD player. J FRONT L/R, CENTER, SURR L/R, and SURR BACK L/R SPEAKERS These terminal posts are connected digitally. They're assignable, which means you can be connected to a video input on page 46. See "Component Video...
Owner Manual
Page 15
... B. See pages 21-40 for connecting the video signal. R SUBWOOFER PRE OUT This analog audio output can be connected here. Getting to a powered subwoofer. S FRONT SPEAKERS B These push terminals are analog audio input jacks for connecting the audio signal. O VCR/DVR IN/OUT A video component, such as a cassette deck, MD recorder...
... B. See pages 21-40 for connecting the video signal. R SUBWOOFER PRE OUT This analog audio output can be connected here. Getting to a powered subwoofer. S FRONT SPEAKERS B These push terminals are analog audio input jacks for connecting the audio signal. O VCR/DVR IN/OUT A video component, such as a cassette deck, MD recorder...
Owner Manual
Page 16
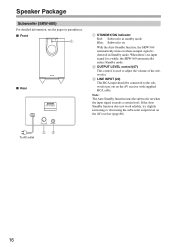
...) This RCA input should be connected to the subwoofer pre out on when an input signal is used to adjust the volume of the subwoofer. Speaker Package Subwoofer (SKW-560) For detailed information, see the pages in parentheses. ■ Front 1 ■ Rear A STANDBY/ON indicator Red: Subwoofer in Standby mode...
...) This RCA input should be connected to the subwoofer pre out on when an input signal is used to adjust the volume of the subwoofer. Speaker Package Subwoofer (SKW-560) For detailed information, see the pages in parentheses. ■ Front 1 ■ Rear A STANDBY/ON indicator Red: Subwoofer in Standby mode...
Owner Manual
Page 17
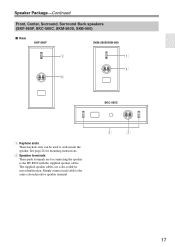
Speaker Package-Continued Front, Center, Surround, Surround Back speakers (SKF-560F, SKC-560C, SKM-560S, SKB-560) ■ Rear SKF-560F SKM-560S/SKB-560 1 1 2 2 SKC-560C 1 Keyhole slots These keyhole slots can be used to the same-colored positive speaker terminal. 1 2 17 Simply connect each cable to wall-mount the speaker. The supplied speaker cables are for easy identification. See page 24 for mounting instructions. 2 Speaker terminals These push terminals are color-coded for connecting the speaker to the HT-R560 with the supplied speaker cables.
Speaker Package-Continued Front, Center, Surround, Surround Back speakers (SKF-560F, SKC-560C, SKM-560S, SKB-560) ■ Rear SKF-560F SKM-560S/SKB-560 1 1 2 2 SKC-560C 1 Keyhole slots These keyhole slots can be used to the same-colored positive speaker terminal. 1 2 17 Simply connect each cable to wall-mount the speaker. The supplied speaker cables are for easy identification. See page 24 for mounting instructions. 2 Speaker terminals These push terminals are color-coded for connecting the speaker to the HT-R560 with the supplied speaker cables.
Owner Manual
Page 18
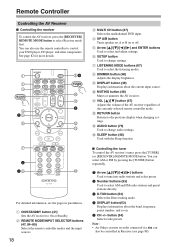
... and select preset. 2 Number buttons (53) Used to control your DVD player, CD player, and other components. Note: • An Onkyo cassette recorder connected via can also use the remote controller to select AM and FM radio stations and preset stations directly. 3 D.TUN button (53... MODE button. A 2 3 RECEIVER 4 15 6 94 TUNER J K 5 L M 7 2 38 N For detailed information, see the pages in Receiver (see page 88). D SP A/B button Turns speaker set A or B on . 5 CH +/- I DISPLAY button (49) Displays information about the band, frequency, preset number, and so on or off.
... and select preset. 2 Number buttons (53) Used to control your DVD player, CD player, and other components. Note: • An Onkyo cassette recorder connected via can also use the remote controller to select AM and FM radio stations and preset stations directly. 3 D.TUN button (53... MODE button. A 2 3 RECEIVER 4 15 6 94 TUNER J K 5 L M 7 2 38 N For detailed information, see the pages in Receiver (see page 88). D SP A/B button Turns speaker set A or B on . 5 CH +/- I DISPLAY button (49) Displays information about the band, frequency, preset number, and so on or off.
Owner Manual
Page 21
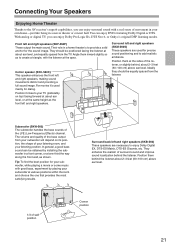
...enjoy Dolby Pro Logic IIx, DTS Neo:6, or Onkyo's original DSP listening modes. Front left and right speakers, making sound movements distinct and providing a full sound image. Center speaker (SKC-560C) This speaker enhances the front left and right speakers (SKF-560F) These output the main sound. In... They should be positioned facing the listener at one that provides the most satisfying results. Surround left and right speakers (SKB-560) These speakers are used mainly for precise sound positioning and to add realistic ambience. Subwoofer (SKW-560) The subwoofer handles the...
...enjoy Dolby Pro Logic IIx, DTS Neo:6, or Onkyo's original DSP listening modes. Front left and right speakers, making sound movements distinct and providing a full sound image. Center speaker (SKC-560C) This speaker enhances the front left and right speakers (SKF-560F) These output the main sound. In... They should be positioned facing the listener at one that provides the most satisfying results. Surround left and right speakers (SKB-560) These speakers are used mainly for precise sound positioning and to add realistic ambience. Subwoofer (SKW-560) The subwoofer handles the...
Owner Manual
Page 22
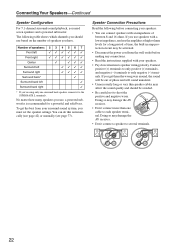
...built-in amp protection circuit may affect the sound quality and should use based on the number of speakers you need seven speakers and a powered subwoofer. You can connect speakers with an impedance of speakers: 2 3 4 5 6 7 Front left Front right Center ✓ ✓✓✓ ...right ✓✓✓✓ Surround back* ✓ Surround back left ✓ Surround back right ✓ * If you use speakers with your speakers: • You can do this automatically (see page 42) or manually (see page 77). Doing so may damage the AV receiver...
...built-in amp protection circuit may affect the sound quality and should use based on the number of speakers you need seven speakers and a powered subwoofer. You can connect speakers with an impedance of speakers: 2 3 4 5 6 7 Front left Front right Center ✓ ✓✓✓ ...right ✓✓✓✓ Surround back* ✓ Surround back left ✓ Surround back right ✓ * If you use speakers with your speakers: • You can do this automatically (see page 42) or manually (see page 77). Doing so may damage the AV receiver...
Owner Manual
Page 23
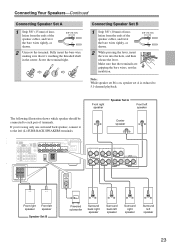
... CENTER SURR BACK L PRE OUT L SUB WOOFER FRONT SPEAKERS A L CENTER SPEAKER R R CBL/SAT VCR/DVR R SUB WOOFER DVD R FRONT SPEAKERS B SURR BACK SPEAKERS L SURR SPEAKERS FRONT SPEAKERS A L R R CENTER SPEAKER Front right Front left speaker speaker Speaker Set B Powered subwoofer Surround back right speaker Surround back left speaker Surround right speaker Surround left (L) SURR BACK SPEAKERS terminals. If you're using only one surround back...
... CENTER SURR BACK L PRE OUT L SUB WOOFER FRONT SPEAKERS A L CENTER SPEAKER R R CBL/SAT VCR/DVR R SUB WOOFER DVD R FRONT SPEAKERS B SURR BACK SPEAKERS L SURR SPEAKERS FRONT SPEAKERS A L R R CENTER SPEAKER Front right Front left speaker speaker Speaker Set B Powered subwoofer Surround back right speaker Surround back left speaker Surround right speaker Surround left (L) SURR BACK SPEAKERS terminals. If you're using only one surround back...
Owner Manual
Page 24
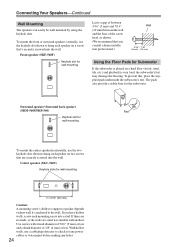
... stud. The pads also provide a stable base for Subwoofer If the subwoofer is placed on two screws that you have hollow walls, screw each speaker on a hard floor (wood, vinyl, tile, etc.) and playback is very loud, the subwoofer's feet may damage the flooring. Surround... speaker/ Surround back speaker (SKM-560S/SKB-560) Pad Keyhole slot for any power cables or water pipes before making any holes. 24 To prevent this, place the ...
... stud. The pads also provide a stable base for Subwoofer If the subwoofer is placed on two screws that you have hollow walls, screw each speaker on a hard floor (wood, vinyl, tile, etc.) and playback is very loud, the subwoofer's feet may damage the flooring. Surround... speaker/ Surround back speaker (SKM-560S/SKB-560) Pad Keyhole slot for any power cables or water pipes before making any holes. 24 To prevent this, place the ...
Owner Manual
Page 25
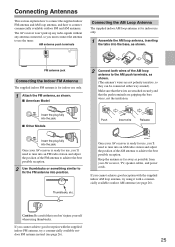
... Release AM ANTENNA Once your AV receiver is for use, you'll need to tune into the base, as possible from your AV receiver, TV, speaker cables, and power cords. If you cannot achieve good reception with a commercially available outdoor AM antenna (see page 26). 25 Once your AV receiver is...
... Release AM ANTENNA Once your AV receiver is for use, you'll need to tune into the base, as possible from your AV receiver, TV, speaker cables, and power cords. If you cannot achieve good reception with a commercially available outdoor AM antenna (see page 26). 25 Once your AV receiver is...

Owner Manual
Page 27
... PR CR/PR S V Description HDMI connections can cause noise or malfunctions). • To prevent interference, keep audio and video cables away from power cords and speaker cables. It's the most common connection format for coaxial. Several standard analog audio cables can be used to OPTICAL enjoy Dolby Digital and DTS. Connecting...
... PR CR/PR S V Description HDMI connections can cause noise or malfunctions). • To prevent interference, keep audio and video cables away from power cords and speaker cables. It's the most common connection format for coaxial. Several standard analog audio cables can be used to OPTICAL enjoy Dolby Digital and DTS. Connecting...


