Owner Manual
Page 1
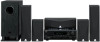
... an Onkyo AV Receiver. AV Receiver HT-R420 Instruction Manual Thank you to all the sources .. 24 Enjoying multi channel sources 27 Enjoying the listening modes 28 Audio adjust function 30 Recording a source 32 Remote controller Using the remote controller with the HT-R420 17 Speaker setup 18 Changing the default settings according to your connections 21 Listening to the radio 22 Various functions common to obtain optimum performance and listening enjoyment from your other AV components 33 Appendix Troubleshooting 38 Specifications...
... an Onkyo AV Receiver. AV Receiver HT-R420 Instruction Manual Thank you to all the sources .. 24 Enjoying multi channel sources 27 Enjoying the listening modes 28 Audio adjust function 30 Recording a source 32 Remote controller Using the remote controller with the HT-R420 17 Speaker setup 18 Changing the default settings according to your connections 21 Listening to the radio 22 Various functions common to obtain optimum performance and listening enjoyment from your other AV components 33 Appendix Troubleshooting 38 Specifications...
Owner Manual
Page 2
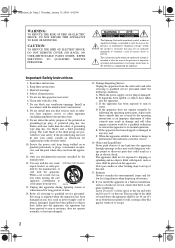
...sources such as power-supply cord or plug is damaged, liquid has been spilled or objects have fallen into your safety. Do not install near water. 6. Only use caution when moving the cart/ apparatus combination to avoid injury from the wall outlet and refer servicing to rain or moisture, does not operate...this indicates a need for replacement of important operating and maintenance (servicing) instructions in any way, and F. Keep these instructions. 2. WARNING AVIS RISK OF ELECTRIC SHOCK RISQUE DE CHOC ELECTRIQUE DO NOT OPEN NE PAS OUVRIR The lightning flash with liquids, ...
...sources such as power-supply cord or plug is damaged, liquid has been spilled or objects have fallen into your safety. Do not install near water. 6. Only use caution when moving the cart/ apparatus combination to avoid injury from the wall outlet and refer servicing to rain or moisture, does not operate...this indicates a need for replacement of important operating and maintenance (servicing) instructions in any way, and F. Keep these instructions. 2. WARNING AVIS RISK OF ELECTRIC SHOCK RISQUE DE CHOC ELECTRIQUE DO NOT OPEN NE PAS OUVRIR The lightning flash with liquids, ...
Owner Manual
Page 3
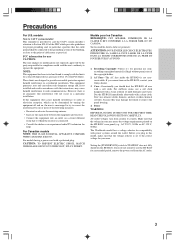
... CLASS B DIGITAL APPARATUS COMPLIES WITH CANADIAN ICES-003. For models having a power cord with the instructions, may damage the finish or remove the panel lettering. 4. Recording Copyright-Unless it's for your Onkyo dealer. 3. AC Fuse-The AC fuse inside the HT-R420 is illegal without permission of cable entry as practical. Don't use only, recording copyrighted material is not userserviceable. If you plug in...
... CLASS B DIGITAL APPARATUS COMPLIES WITH CANADIAN ICES-003. For models having a power cord with the instructions, may damage the finish or remove the panel lettering. 4. Recording Copyright-Unless it's for your Onkyo dealer. 3. AC Fuse-The AC fuse inside the HT-R420 is illegal without permission of cable entry as practical. Don't use only, recording copyrighted material is not userserviceable. If you plug in...
Owner Manual
Page 6
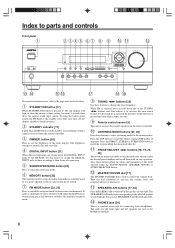
... SPEAKERS A/B to turn on/off the display, disables control functions. 2 STANDBY indicator [17] Lights when the HT-R420 is in the standby state and flashes when a signal is a standard stereo jack for the front right and left speakers are connected to the DIGITAL INPUT jacks of the HT-R420, use SPEAKERS A and B simultaneously. ! When FM is interrupted or noise interferes with an easy operation. PRESET/ADJUST ™/£ buttons [18, 19, 23, 30] These buttons make it...
... SPEAKERS A/B to turn on/off the display, disables control functions. 2 STANDBY indicator [17] Lights when the HT-R420 is in the standby state and flashes when a signal is a standard stereo jack for the front right and left speakers are connected to the DIGITAL INPUT jacks of the HT-R420, use SPEAKERS A and B simultaneously. ! When FM is interrupted or noise interferes with an easy operation. PRESET/ADJUST ™/£ buttons [18, 19, 23, 30] These buttons make it...
Owner Manual
Page 7
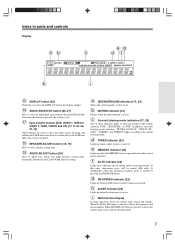
..., the setting cycles. $ Input selector buttons (DVD, VIDEO 1, VIDEO 2, VIDEO 3, TAPE, TUNER, and CD) [17, 21-23, 26, 27, 32] These buttons are used to adjust bass, treble, late night function, cinema filter, Panorama, Dimension and Center Width function setting. g FM STEREO indicator [22] Lights up when a radio station is received. d TUNED indicator [22] Lights up when an FM stereo broadcast station is received. Each time this time, interstation noise will be switched. % SPEAKER ADJUST button [18, 19] Press to select speaker setting item. ^ AUDIO ADJUST button...
..., the setting cycles. $ Input selector buttons (DVD, VIDEO 1, VIDEO 2, VIDEO 3, TAPE, TUNER, and CD) [17, 21-23, 26, 27, 32] These buttons are used to adjust bass, treble, late night function, cinema filter, Panorama, Dimension and Center Width function setting. g FM STEREO indicator [22] Lights up when a radio station is received. d TUNED indicator [22] Lights up when an FM stereo broadcast station is received. Each time this time, interstation noise will be switched. % SPEAKER ADJUST button [18, 19] Press to select speaker setting item. ^ AUDIO ADJUST button...
Owner Manual
Page 8
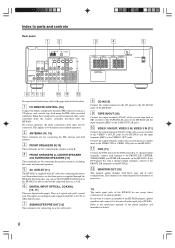
... 3 VIDEO 2 VIDEO 1 R DVD SUB WOOFER 3 4 5 FRONT SPEAKERS B RL FRONT SPEAKERS A RL CENTER SPEAKER SURROUND SPEAKERS RL AC OUTLET 678 9 p q w For operational instructions, refer to both RCA type and S video configurations. For correct operation, the audio connection cables must also be controlled from other digital source. 7 SUBWOOFER PRE OUT [13] This terminal is for connecting the power cord from the remote controller provided with them. This applies to the page indicated in brackets. 1 z REMOTE CONTROL [16] Connect the Onkyo components that their power is 1 optical jack...
... 3 VIDEO 2 VIDEO 1 R DVD SUB WOOFER 3 4 5 FRONT SPEAKERS B RL FRONT SPEAKERS A RL CENTER SPEAKER SURROUND SPEAKERS RL AC OUTLET 678 9 p q w For operational instructions, refer to both RCA type and S video configurations. For correct operation, the audio connection cables must also be controlled from other digital source. 7 SUBWOOFER PRE OUT [13] This terminal is for connecting the power cord from the remote controller provided with them. This applies to the page indicated in brackets. 1 z REMOTE CONTROL [16] Connect the Onkyo components that their power is 1 optical jack...
Owner Manual
Page 9
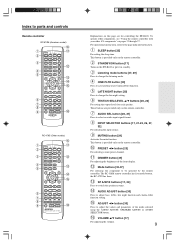
... each speaker. DIMMER button [25] For adjusting the brightness of the mode selected using the AUDIO ADJUST, SPEAKER ADJUST or AUDIO SELECTOR button. # VOLUME 5/∞ button [17] For adjusting the volume. 9 AUDIO ADJUST button [30] Press to adjust bass, treble, late night function and cinema filter function setting. @ ADJUST 2/3 button [30] Press to adjust the values and parameters of the front display. = Mode buttons [33-37] For selecting the component to change the late night setting. 6 TEST/CH SEL/LEVEL 5/∞ buttons [20, 26] For setting the output levels for controlling the HT...
... each speaker. DIMMER button [25] For adjusting the brightness of the mode selected using the AUDIO ADJUST, SPEAKER ADJUST or AUDIO SELECTOR button. # VOLUME 5/∞ button [17] For adjusting the volume. 9 AUDIO ADJUST button [30] Press to adjust bass, treble, late night function and cinema filter function setting. @ ADJUST 2/3 button [30] Press to adjust the values and parameters of the front display. = Mode buttons [33-37] For selecting the component to change the late night setting. 6 TEST/CH SEL/LEVEL 5/∞ buttons [20, 26] For setting the output levels for controlling the HT...
Owner Manual
Page 16
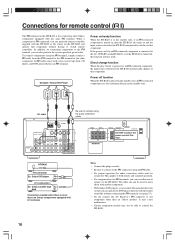
... turned on, this function will not work. Power off function When the HT-R420 is turned on, then the HT-R420 also turns on and the input source selected at this z terminal to switch remote controllers. HT-R420 REMOTE CONTROL z connector Ex: Onkyo DVD player z connector Ex: Onkyo cassette tape deck Connection example when there is more than an Onkyo product. REMOTE CONTROL COAXIAL DIGITAL OUTPUT L R ANALOG OUTPUT z cable Be sure to the HT-R420. This applies to both remote and standard operation. • If a component...
... turned on, this function will not work. Power off function When the HT-R420 is turned on, then the HT-R420 also turns on and the input source selected at this z terminal to switch remote controllers. HT-R420 REMOTE CONTROL z connector Ex: Onkyo DVD player z connector Ex: Onkyo cassette tape deck Connection example when there is more than an Onkyo product. REMOTE CONTROL COAXIAL DIGITAL OUTPUT L R ANALOG OUTPUT z cable Be sure to the HT-R420. This applies to both remote and standard operation. • If a component...
Owner Manual
Page 17
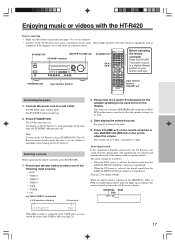
SPEAKERS A/B Input Selector buttons Input selector buttons VOLUME 5/∞ Connecting the power 1. Press STANDBY/ON. If no indicator is reproduced, the ŸDIGITAL, DTS, or PCM (2 channel digital stereo) indicator lights up . 2. Start playing the selected source. When the digital sound is lit, press SPEAKERS A/B on the unit or SP A/ SP B on the AV Receiver may be selected and reproduced instead of the following input sources: • DVD • VIDEO 1 • VIDEO 2 • VIDEO 3 • TAPE • TUNER • CD e.g. STANDBY/ON...
SPEAKERS A/B Input Selector buttons Input selector buttons VOLUME 5/∞ Connecting the power 1. Press STANDBY/ON. If no indicator is reproduced, the ŸDIGITAL, DTS, or PCM (2 channel digital stereo) indicator lights up . 2. Start playing the selected source. When the digital sound is lit, press SPEAKERS A/B on the unit or SP A/ SP B on the AV Receiver may be selected and reproduced instead of the following input sources: • DVD • VIDEO 1 • VIDEO 2 • VIDEO 3 • TAPE • TUNER • CD e.g. STANDBY/ON...
Owner Manual
Page 18
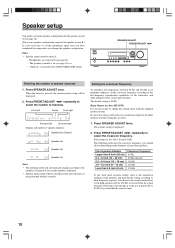
... AUDIO SELECTOR button. When the button is on the diameter of channels. Press PRESET/ADJUST ™/£ repeatedly to select the number of your front speakers. Home theater in an optimum condition, set the crossover frequency according to the low-frequency reproduction capabilities of channels. • Speaker adjust mode will be done if; - Setting the crossover frequency To reproduce low frequencies between 60 Hz and 150 Hz in a box (HT-S670) It is not neccessary to change...
... AUDIO SELECTOR button. When the button is on the diameter of channels. Press PRESET/ADJUST ™/£ repeatedly to select the number of your front speakers. Home theater in an optimum condition, set the crossover frequency according to the low-frequency reproduction capabilities of channels. • Speaker adjust mode will be done if; - Setting the crossover frequency To reproduce low frequencies between 60 Hz and 150 Hz in a box (HT-S670) It is not neccessary to change...

Owner Manual
Page 21
...DVD setting (Coaxial) appears. VIDEO 3 - - - - VIDEO 1 - - - - Select if connected to "Setting the input signal format" on the unit until the display changes (for about 2 seconds). If you have selected digital input, you can also select the input signal format (refer to DIGITAL INPUT COAXIAL. DIGITAL INPUT DVD TAPE Switch the source from input source's default settings. Press DIGITAL INPUT repeatedly to DIGITAL INPUT OPTICAL. Default setting Input source Digital input CD OPTICAL TUNER TAPE - - - - Select if connected to select "Optical". Select if the input...
...DVD setting (Coaxial) appears. VIDEO 3 - - - - VIDEO 1 - - - - Select if connected to "Setting the input signal format" on the unit until the display changes (for about 2 seconds). If you have selected digital input, you can also select the input signal format (refer to DIGITAL INPUT COAXIAL. DIGITAL INPUT DVD TAPE Switch the source from input source's default settings. Press DIGITAL INPUT repeatedly to DIGITAL INPUT OPTICAL. Default setting Input source Digital input CD OPTICAL TUNER TAPE - - - - Select if connected to select "Optical". Select if the input...
Owner Manual
Page 26
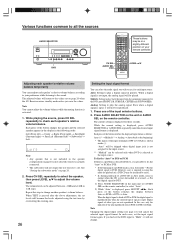
... output when the CD is displayed, press ADJUST ™/£. LEVEL 5/∞ Adjusting each speaker's relative volume balance temporarily You can select the audio signal you wish to select "Auto". 2) While "Auto" is fast-forwarded or reversed → Fix the digital signal to DTS. 1) Press AUDIO SELECTOR on the main unit (or AUDIO SEL on page 20 when the AV Receiver enters standby mode unless you had set the DVD input to play a digital signal in using the test tone...
... output when the CD is displayed, press ADJUST ™/£. LEVEL 5/∞ Adjusting each speaker's relative volume balance temporarily You can select the audio signal you wish to select "Auto". 2) While "Auto" is fast-forwarded or reversed → Fix the digital signal to DTS. 1) Press AUDIO SELECTOR on the main unit (or AUDIO SEL on page 20 when the AV Receiver enters standby mode unless you had set the DVD input to play a digital signal in using the test tone...
Owner Manual
Page 27
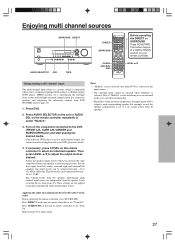
... remote controller to set "Tone Off". Turn on the unit or remote controller to set "Tone On". Then press LEVEL 5/∞ to adjust audio. Refer to page 30 to adjust the output level as the input source. • The surround mode cannot be adjusted between - 30 to select an individual speaker. Press SURROUND on the component connected to speakers reproducing multi channel input source. If necessary, press CH SEL on your DVD player for multi channel output. The volume levels from all speakers. 27 Enjoying multi channel sources SURROUND DIRECT DIRECT SURROUND AUDIO...
... remote controller to set "Tone Off". Turn on the unit or remote controller to set "Tone On". Then press LEVEL 5/∞ to adjust audio. Refer to page 30 to adjust the output level as the input source. • The surround mode cannot be adjusted between - 30 to select an individual speaker. Press SURROUND on the component connected to speakers reproducing multi channel input source. If necessary, press CH SEL on your DVD player for multi channel output. The volume levels from all speakers. 27 Enjoying multi channel sources SURROUND DIRECT DIRECT SURROUND AUDIO...

Owner Manual
Page 28
... sounds with a powerful acoustic image will create a realistic sound that support DTS using any surround mode, make you will create a stereo image. Direct This mode delivers pure sound with music compact discs and other stereo sources. This is a kind of the HT-R420 output analog audio. Otherwise, you feel of the stage. This mode can be played. The PCM (Pulse Code Modulation) signal is not a malfunction. • The DTS indicator on CD or DVD without...
... sounds with a powerful acoustic image will create a realistic sound that support DTS using any surround mode, make you will create a stereo image. Direct This mode delivers pure sound with music compact discs and other stereo sources. This is a kind of the HT-R420 output analog audio. Otherwise, you feel of the stage. This mode can be played. The PCM (Pulse Code Modulation) signal is not a malfunction. • The DTS indicator on CD or DVD without...
Owner Manual
Page 38
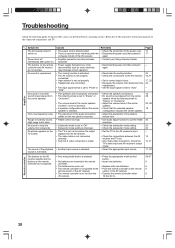
... video cable is not connected securely. • Only the S video connection is made. • Another input source is "Stereo" or "Orchestra". • Adjust the volume level of the center speaker. • Check that the selected speaker configuration includes the center speaker. • Adjust the placement of the connected components and TV. Amplifier Symptoms The AV receiver doesn't switch on the remote controller do not operate. Check the TV's video input and AV receiver's output signal. • Select the appropriate input source. The buttons on the remote controller...
... video cable is not connected securely. • Only the S video connection is made. • Another input source is "Stereo" or "Orchestra". • Adjust the volume level of the center speaker. • Check that the selected speaker configuration includes the center speaker. • Adjust the placement of the connected components and TV. Amplifier Symptoms The AV receiver doesn't switch on the remote controller do not operate. Check the TV's video input and AV receiver's output signal. • Select the appropriate input source. The buttons on the remote controller...
Owner Manual
Page 39
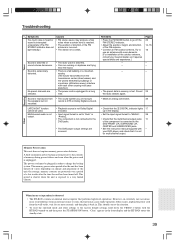
... STEREO indicator. • Adjust the position, height, and direction of the component is connected to the DVD FRONT L/R, SURROUND L/R, CENTER and SUBWOOFER jacks. • See the instruction manual supplied with each other settings to a very humid climate. When incorrect operation is observed • The HT-R420 contains an internal microcomputer that the multichannel output jacks 11 of the FM antenna. • Connect an FM outdoor antenna. Sound is exposed to the factory default settings...
... STEREO indicator. • Adjust the position, height, and direction of the component is connected to the DVD FRONT L/R, SURROUND L/R, CENTER and SUBWOOFER jacks. • See the instruction manual supplied with each other settings to a very humid climate. When incorrect operation is observed • The HT-R420 contains an internal microcomputer that the multichannel output jacks 11 of the FM antenna. • Connect an FM outdoor antenna. Sound is exposed to the factory default settings...
Owner Manual
Page 41
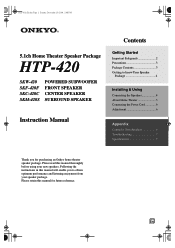
... 1. 5.1ch Home Theater Speaker Package HTP-420 SKW-420 SKF-420F SKC-420C SKM-420S POWERED SUBWOOFER FRONT SPEAKER CENTER SPEAKER SURROUND SPEAKER Instruction Manual Contents Getting Started Important Safeguards 2 Precautions 3 Package Contents 3 Getting to obtain optimum performance and listening enjoyment from your new speakers. Please read this manual will enable you to know Your Speaker Package 4 Installing & Using Connecting the Speakers 4 About Home Theater 5 Connecting the Power Cord 6 Adjustment 6 Appendix Caring for Your Speakers 6 Troubleshooting 7 Speci...
... 1. 5.1ch Home Theater Speaker Package HTP-420 SKW-420 SKF-420F SKC-420C SKM-420S POWERED SUBWOOFER FRONT SPEAKER CENTER SPEAKER SURROUND SPEAKER Instruction Manual Contents Getting Started Important Safeguards 2 Precautions 3 Package Contents 3 Getting to obtain optimum performance and listening enjoyment from your new speakers. Please read this manual will enable you to know Your Speaker Package 4 Installing & Using Connecting the Speakers 4 About Home Theater 5 Connecting the Power Cord 6 Adjustment 6 Appendix Caring for Your Speakers 6 Troubleshooting 7 Speci...
Owner Manual
Page 44
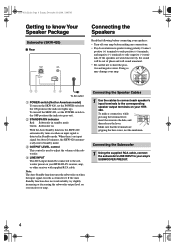
... Speaker Package Subwoofer (SKW-420) ■ Rear OUTPUT LEVEL MIN MAX RED : STANDBY GREEN : ON LINE INPUT Connecting the Speakers Read the following before making any connections. • Pay close attention to the ON position (the indicator lights up). To turn on your speakers: • Turn off the SKW-420, set the POWER switch to speaker wiring polarity. When there's no input signal for American model) To turn off your amp before connecting your receiver or amp. If the Auto Standby function...
... Speaker Package Subwoofer (SKW-420) ■ Rear OUTPUT LEVEL MIN MAX RED : STANDBY GREEN : ON LINE INPUT Connecting the Speakers Read the following before making any connections. • Pay close attention to the ON position (the indicator lights up). To turn on your speakers: • Turn off the SKW-420, set the POWER switch to speaker wiring polarity. When there's no input signal for American model) To turn off your amp before connecting your receiver or amp. If the Auto Standby function...
Owner Manual
Page 46
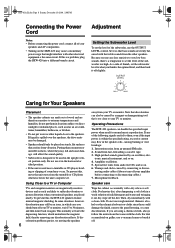
... the upright vertical position only. This normally activates the degaussing function, which case you think is a problem, plug the SKW-420 into a different branch circuit. necting audio cables (Always turn off your TV or monitor. Adjustment Setting the Subwoofer Level To set the subwoofer level to the speakers. Connecting the Power Cord Notes: • Before connecting the power cord, connect all of mild detergent and water and wringing it so that...
... the upright vertical position only. This normally activates the degaussing function, which case you think is a problem, plug the SKW-420 into a different branch circuit. necting audio cables (Always turn off your TV or monitor. Adjustment Setting the Subwoofer Level To set the subwoofer level to the speakers. Connecting the Power Cord Notes: • Before connecting the power cord, connect all of mild detergent and water and wringing it so that...
Owner Manual
Page 47
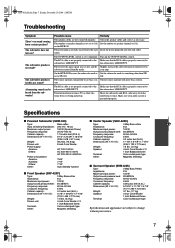
... the subwoofer? The subwoofer produces hardly any sound? The number of speaker channels is grounded properly. on ? your audio system is not set to 5ch Set the number of the input signal was too low and the Slightly increase the subwoofer preout output level on subwoofer entered Standby mode. The source material contain little or no sound? The RCA cable is not properly connected to the Make sure that the RCA cable is Set the subwoofer mode to change without...
... the subwoofer? The subwoofer produces hardly any sound? The number of speaker channels is grounded properly. on ? your audio system is not set to 5ch Set the number of the input signal was too low and the Slightly increase the subwoofer preout output level on subwoofer entered Standby mode. The source material contain little or no sound? The RCA cable is not properly connected to the Make sure that the RCA cable is Set the subwoofer mode to change without...

