
Owner Manual
Page 1
... read this manual thoroughly before making connections and plugging in this manual for purchasing an Onkyo 6.1ch Home Theater System. 6.1ch Home Theater System HT-S680 AV Receiver (HT-R430) Front Speakers (SKF-330F L/R) Center Speaker (SKC-330C) Surround Speakers (SKM-330S L/R) Surround Back Speaker (SKB-330) Powered Subwoofer (SKW-420) Instruction Manual Thank you to obtain optimum performance and listening enjoyment from your AV components ....... 34 Using the Tuner 36 Enjoying the Listening Modes ..... 40 Advanced Operation 44 Troubleshooting 52...
... read this manual thoroughly before making connections and plugging in this manual for purchasing an Onkyo 6.1ch Home Theater System. 6.1ch Home Theater System HT-S680 AV Receiver (HT-R430) Front Speakers (SKF-330F L/R) Center Speaker (SKC-330C) Surround Speakers (SKM-330S L/R) Surround Back Speaker (SKB-330) Powered Subwoofer (SKW-420) Instruction Manual Thank you to obtain optimum performance and listening enjoyment from your AV components ....... 34 Using the Tuner 36 Enjoying the Listening Modes ..... 40 Advanced Operation 44 Troubleshooting 52...

Owner Manual
Page 3
... AV receiver will be plugged into an outlet on the environment and will retain the settings for compatibility with the instructions, may not work properly the next time you should dust the unit all over with a clean cloth. NOTE: This equipment has been tested and found to Part 15 of mild detergent and water. For models having a power cord with the...
... AV receiver will be plugged into an outlet on the environment and will retain the settings for compatibility with the instructions, may not work properly the next time you should dust the unit all over with a clean cloth. NOTE: This equipment has been tested and found to Part 15 of mild detergent and water. For models having a power cord with the...

Owner Manual
Page 4
...-bit DSP Processing Audio/Video • Adjustable crossover (60, 80, 100, 120, 150 Hz) • 3 S-Video inputs, 2 outputs • 2 assignable digital inputs (1 optical, 1 coaxial) • Subwoofer pre out • Color-coded multichannel input for normal music reproduction. Putting them , even if the input power is used near a turntable or CD player, howling or slipping of sound may be damaged. • Speakers should turn it in locations subject to direct sunlight or...
...-bit DSP Processing Audio/Video • Adjustable crossover (60, 80, 100, 120, 150 Hz) • 3 S-Video inputs, 2 outputs • 2 assignable digital inputs (1 optical, 1 coaxial) • Subwoofer pre out • Color-coded multichannel input for normal music reproduction. Putting them , even if the input power is used near a turntable or CD player, howling or slipping of sound may be damaged. • Speakers should turn it in locations subject to direct sunlight or...
Owner Manual
Page 5
... Receiver 38 Using the Sleep Timer 39 Using Headphones 39 Adjusting Speaker Levels 39 Enjoying the Listening Modes Using the Listening Modes 40 Selecting Listening Modes 40 Advanced Operation Adjusting the Listening Modes 44 Using the Audio Adjust Functions 44 Using the Late Night Function (Dolby Digital only 45 Using the CinemaFILTER 45 Advanced Setup 46 Advanced Speaker Settings 46 Digital Input Signal Formats 50 Recording 51 Recording the Input Source 51 Recording from Different AV Sources ..........51 Troubleshooting 52 Power 52 Audio 52 Video 53 Tuner 53 Remote...
... Receiver 38 Using the Sleep Timer 39 Using Headphones 39 Adjusting Speaker Levels 39 Enjoying the Listening Modes Using the Listening Modes 40 Selecting Listening Modes 40 Advanced Operation Adjusting the Listening Modes 44 Using the Audio Adjust Functions 44 Using the Late Night Function (Dolby Digital only 45 Using the CinemaFILTER 45 Advanced Setup 46 Advanced Speaker Settings 46 Digital Input Signal Formats 50 Recording 51 Recording the Input Source 51 Recording from Different AV Sources ..........51 Troubleshooting 52 Power 52 Audio 52 Video 53 Tuner 53 Remote...
Owner Manual
Page 8
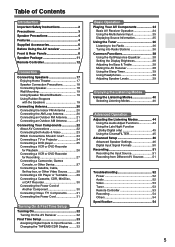
... Rear Panels Front Panel 1 2 3 4 5 6 78 9JK L STANDBY/ON A SPEAKERS B PHONES TUNING / PRESET STANDBY ENTER TONE MULTl CH + STEREO LISTENING MODE DISPLAY DIGITAL INPUT DVD VIDEO 1/VCR VIDEO 2 VIDEO 3 DIMMER MEMORY TUNING MODE RETURN SETUP CLEAR TAPE TUNER CD M MASTER VOLUME NO P Q RS For detailed information, see page 37). A STANDBY/ON button (32) This button is also used to specify the format of stereo headphones for connecting a standard pair of digital input signals. H DIGITAL INPUT button (33) This button is used to assign the digital inputs and to set...
... Rear Panels Front Panel 1 2 3 4 5 6 78 9JK L STANDBY/ON A SPEAKERS B PHONES TUNING / PRESET STANDBY ENTER TONE MULTl CH + STEREO LISTENING MODE DISPLAY DIGITAL INPUT DVD VIDEO 1/VCR VIDEO 2 VIDEO 3 DIMMER MEMORY TUNING MODE RETURN SETUP CLEAR TAPE TUNER CD M MASTER VOLUME NO P Q RS For detailed information, see page 37). A STANDBY/ON button (32) This button is also used to specify the format of stereo headphones for connecting a standard pair of digital input signals. H DIGITAL INPUT button (33) This button is used to assign the digital inputs and to set...

Owner Manual
Page 11
... instructions. Note: The Auto Standby function turns the subwoofer on the SKW-420, set the POWER switch to the HT-R430 with supplied RCA cable. North American models require 1/4-inch screws. E STANDBY/ON indicator Red: Subwoofer in standby mode Green: Subwoofer on With the Auto Standby function, the SKW-420 automatically turns on when an input signal is used to wall-mount the speaker. If the Auto Standby function does not work reliably, try slightly increasing or decreasing the subwoofer output level on your receiver...
... instructions. Note: The Auto Standby function turns the subwoofer on the SKW-420, set the POWER switch to the HT-R430 with supplied RCA cable. North American models require 1/4-inch screws. E STANDBY/ON indicator Red: Subwoofer in standby mode Green: Subwoofer on With the Auto Standby function, the SKW-420 automatically turns on when an input signal is used to wall-mount the speaker. If the Auto Standby function does not work reliably, try slightly increasing or decreasing the subwoofer output level on your receiver...

Owner Manual
Page 12
... control an DVD Onkyo DVD player and CD/MD/CDR player/recorder. DIMMER SLEEP CH DISC VOL TOP MENU SP A / B ENTER MENU MUTING RETURN SETUP RECEIVER M N O P Q J K L LISTENING MODE STEREO SURROUND AUDIO SUBTITLE RANDOM REPEAT TEST TONE CH SEL LEVEL- LEVEL+ PLAY MODE DISPLAY OR-EQ L NIGHT CINE FLTR RC-606S R S T 12 C D MD CDR 1 Use the REMOTE MODE buttons to select a mode. 2 Use the buttons supported by using the five REMOTE MODE buttons. ■ RECEIVER/TAPE Mode In RECEIVER/TAPE mode, you can control the AV receiver and an Onkyo cassette recorder connected...
... control an DVD Onkyo DVD player and CD/MD/CDR player/recorder. DIMMER SLEEP CH DISC VOL TOP MENU SP A / B ENTER MENU MUTING RETURN SETUP RECEIVER M N O P Q J K L LISTENING MODE STEREO SURROUND AUDIO SUBTITLE RANDOM REPEAT TEST TONE CH SEL LEVEL- LEVEL+ PLAY MODE DISPLAY OR-EQ L NIGHT CINE FLTR RC-606S R S T 12 C D MD CDR 1 Use the REMOTE MODE buttons to select a mode. 2 Use the buttons supported by using the five REMOTE MODE buttons. ■ RECEIVER/TAPE Mode In RECEIVER/TAPE mode, you can control the AV receiver and an Onkyo cassette recorder connected...

Owner Manual
Page 13
... used to adjust the volume of the AV receiver regardless of each speaker. D MULTI CH button (35) This button is used to return to mute the AV receiver. P MUTING button (38) This button is used to select the multichannel DVD input. Remote Controller-Continued For detailed information, see the pages in the HTP-430 Home Theater Speaker Package. I RETURN button This button is used to turn on the remote controller, the REMOTE MODE button for the currently selected mode lights up. SURROUND button This button selects the Dolby...
... used to adjust the volume of the AV receiver regardless of each speaker. D MULTI CH button (35) This button is used to return to mute the AV receiver. P MUTING button (38) This button is used to select the multichannel DVD input. Remote Controller-Continued For detailed information, see the pages in the HTP-430 Home Theater Speaker Package. I RETURN button This button is used to turn on the remote controller, the REMOTE MODE button for the currently selected mode lights up. SURROUND button This button selects the Dolby...
Owner Manual
Page 14
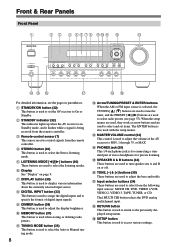
...to access the DVD player's onscreen setup menus. LEVEL+ PLAY MODE DISPLAY OR-EQ L NIGHT CINE FLTR RC-606S DVD L M N O P Q A STANDBY button This button sets the DVD player to select the DVD player as the input source. O RANDOM button This button is used to turn on a component with the random playback function. DIMMER SLEEP CH DISC VOL TOP MENU SP A / B ENTER MENU MUTING RETURN SETUP LISTENING MODE STEREO SURROUND AUDIO SUBTITLE RANDOM REPEAT TEST TONE CH SEL LEVEL- J AUDIO button This button selects foreign language soundtracks and audio formats (e.g., Dolby Digital or DTS...
...to access the DVD player's onscreen setup menus. LEVEL+ PLAY MODE DISPLAY OR-EQ L NIGHT CINE FLTR RC-606S DVD L M N O P Q A STANDBY button This button sets the DVD player to select the DVD player as the input source. O RANDOM button This button is used to turn on a component with the random playback function. DIMMER SLEEP CH DISC VOL TOP MENU SP A / B ENTER MENU MUTING RETURN SETUP LISTENING MODE STEREO SURROUND AUDIO SUBTITLE RANDOM REPEAT TEST TONE CH SEL LEVEL- J AUDIO button This button selects foreign language soundtracks and audio formats (e.g., Dolby Digital or DTS...

Owner Manual
Page 17
..., and your subwoofer will depend on , speaker set A is reduced to get the very best from your surround-sound system, you like. Corner Surround left and right speakers. Center speaker (SKC-330C) This speaker enhances the front left and right speakers (SKF-330F L/R) These output the overall sound. Position them inward so as shown. Connecting Speakers Enjoying Home Theater You can use two sets of speakers with Dolby Digital and DTS surround material. Their...
..., and your subwoofer will depend on , speaker set A is reduced to get the very best from your surround-sound system, you like. Corner Surround left and right speakers. Center speaker (SKC-330C) This speaker enhances the front left and right speakers (SKF-330F L/R) These output the overall sound. Position them inward so as shown. Connecting Speakers Enjoying Home Theater You can use two sets of speakers with Dolby Digital and DTS surround material. Their...

Owner Manual
Page 22
... white plugs to enjoy surround sound (e.g., Dolby Digital, DTS). Wrong! AV Cables & Jacks Video S-Video cable Cable Composite video cable Audio Optical digital audio cable Coaxial digital audio cable Analog audio cable (RCA) Cable Multichannel analog audio cable (RCA) Jack S V Description S-Video separates the luminance and color signals and provides better picture quality than composite video. Several standard analog audio cables can be found on TVs, VCRs, and other AV components. • Don't connect the power cord until you to connect left-channel audio inputs and outputs...
... white plugs to enjoy surround sound (e.g., Dolby Digital, DTS). Wrong! AV Cables & Jacks Video S-Video cable Cable Composite video cable Audio Optical digital audio cable Coaxial digital audio cable Analog audio cable (RCA) Cable Multichannel analog audio cable (RCA) Jack S V Description S-Video separates the luminance and color signals and provides better picture quality than composite video. Several standard analog audio cables can be found on TVs, VCRs, and other AV components. • Don't connect the power cord until you to connect left-channel audio inputs and outputs...

Owner Manual
Page 23
... AV receiver, you can select both the audio and video simultaneously simply by any composite video output. For example, audio signals connected to an OPTICAL or COAXIAL digital input are not output by your other AV components to the analog CD IN. Audio Input/Output Diagram for compatibility with a wide range of AV equipment. For video components, such as a DVD player, you must also connect it to the AV receiver using one for connection information) Which Connections Should I Use? DVD player...
... AV receiver, you can select both the audio and video simultaneously simply by any composite video output. For example, audio signals connected to an OPTICAL or COAXIAL digital input are not output by your other AV components to the analog CD IN. Audio Input/Output Diagram for compatibility with a wide range of AV equipment. For video components, such as a DVD player, you must also connect it to the AV receiver using one for connection information) Which Connections Should I Use? DVD player...

Owner Manual
Page 30
.... Connection a b c HT-R430 TAPE IN L/R TAPE OUT L/R DIGITAL IN COAXIAL DIGITAL IN OPTICAL Signal flow Cassette/CDR/MD/DAT recorder Analog audio L/R output Analog audio L/R input Digital coaxial output Digital optical output Connecting the Power Cord of Another Component The AV receiver has an AC outlet on its rear panel for playback purposes, use connections a and b or a and c . Notes: • Onkyo components with the recorder. • To connect the recorder digitally for connecting the power cord of the component that it turns...
.... Connection a b c HT-R430 TAPE IN L/R TAPE OUT L/R DIGITAL IN COAXIAL DIGITAL IN OPTICAL Signal flow Cassette/CDR/MD/DAT recorder Analog audio L/R output Analog audio L/R input Digital coaxial output Digital optical output Connecting the Power Cord of Another Component The AV receiver has an AC outlet on its rear panel for playback purposes, use connections a and b or a and c . Notes: • Onkyo components with the recorder. • To connect the recorder digitally for connecting the power cord of the component that it turns...

Owner Manual
Page 31
...is set to the AV receiver. Connecting Your Components-Continued Connecting Onkyo Components Step 1: Be sure that the Onkyo component is started on a component connected via , the AV receiver automatically selects that component as the input source automatically. Step 2: Make the connection. REMOTE CONTROL e.g., CD player e.g., DVD player IN L R CD FRONT L R DVD R L ANALOG AUDIO OUT R L ANALOG AUDIO OUT Connecting the Power Cord Notes: • Before connecting the power cord, connect all channels because the Direct Change function selects only the DVD IN FRONT jacks.
...is set to the AV receiver. Connecting Your Components-Continued Connecting Onkyo Components Step 1: Be sure that the Onkyo component is started on a component connected via , the AV receiver automatically selects that component as the input source automatically. Step 2: Make the connection. REMOTE CONTROL e.g., CD player e.g., DVD player IN L R CD FRONT L R DVD R L ANALOG AUDIO OUT R L ANALOG AUDIO OUT Connecting the Power Cord Notes: • Before connecting the power cord, connect all channels because the Direct Change function selects only the DVD IN FRONT jacks.
Owner Manual
Page 32
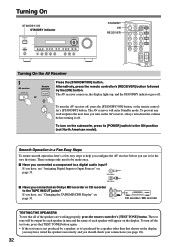
...to Input Sources" on the subwoofer, press its [POWER] switch to help you connected an Onkyo MD recorder or CD recorder OUT IN to a digital audio input? DIMMER SLEEP CH DISC VOL TOP MENU SP A / B MENU MUTING 1 AV receiver Remote controller STANDBY/ON or Press the [STANDBY/ON] button. Turning On STANDBY/ON STANDBY indicator STANDBY/ON A SPEAKERS B PHONES TUNING / PRESET STANDBY ENTER TONE MULTl CH + STEREO LISTENING MODE DISPLAY DIGITAL INPUT RT/PTY/TP MEMORY TUNING MODE RETURN SETUP CLEAR DVD VIDEO 1/VCR VIDEO 2 VIDEO 3 TAPE TUNER CD MASTER VOLUME...
...to Input Sources" on the subwoofer, press its [POWER] switch to help you connected an Onkyo MD recorder or CD recorder OUT IN to a digital audio input? DIMMER SLEEP CH DISC VOL TOP MENU SP A / B MENU MUTING 1 AV receiver Remote controller STANDBY/ON or Press the [STANDBY/ON] button. Turning On STANDBY/ON STANDBY indicator STANDBY/ON A SPEAKERS B PHONES TUNING / PRESET STANDBY ENTER TONE MULTl CH + STEREO LISTENING MODE DISPLAY DIGITAL INPUT RT/PTY/TP MEMORY TUNING MODE RETURN SETUP CLEAR DVD VIDEO 1/VCR VIDEO 2 VIDEO 3 TAPE TUNER CD MASTER VOLUME...

Owner Manual
Page 38
...that can be used with movies or music. Press the remote controller's [DIMMER] button repeatedly to + adjust. Press the remote controller's [MUTING] button. Muting the AV Receiver With this function, you can use the [DIMMER] button on or off . TONE, -, + STANDBY/ON A SPEAKERS B PHONES TUNING / PRESET STANDBY ENTER TONE MULTl CH + STEREO LISTENING MODE DISPLAY DIGITAL INPUT DVD VIDEO 1/VCR VIDEO 2 VIDEO 3 DIMMER MEMORY TUNING MODE RETURN SETUP CLEAR TAPE TUNER CD MASTER VOLUME PHONES DIMMER Using the OptiResponse Equalizer When using the HT-R430 with the...
...that can be used with movies or music. Press the remote controller's [DIMMER] button repeatedly to + adjust. Press the remote controller's [MUTING] button. Muting the AV Receiver With this function, you can use the [DIMMER] button on or off . TONE, -, + STANDBY/ON A SPEAKERS B PHONES TUNING / PRESET STANDBY ENTER TONE MULTl CH + STEREO LISTENING MODE DISPLAY DIGITAL INPUT DVD VIDEO 1/VCR VIDEO 2 VIDEO 3 DIMMER MEMORY TUNING MODE RETURN SETUP CLEAR TAPE TUNER CD MASTER VOLUME PHONES DIMMER Using the OptiResponse Equalizer When using the HT-R430 with the...
Owner Manual
Page 45
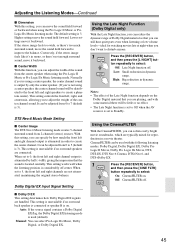
... mode. The default setting is set to select: Off: Late Night function off. Higher settings move it backward. ■ Center Width With this function, you can adjust the width of the center channel sound. Normally if you're using a center speaker, the center channel sound will be adjusted from 2-channel (stereo) sources. When set to Standby. Using the CinemaFILTER With the CinemaFILTER, you 're not using a center speaker, the center channel sound is output by only the center speaker. (If you can select Pro Logic IIx Music, Dolby Digital...
... mode. The default setting is set to select: Off: Late Night function off. Higher settings move it backward. ■ Center Width With this function, you can adjust the width of the center channel sound. Normally if you're using a center speaker, the center channel sound will be adjusted from 2-channel (stereo) sources. When set to Standby. Using the CinemaFILTER With the CinemaFILTER, you 're not using a center speaker, the center channel sound is output by only the center speaker. (If you can select Pro Logic IIx Music, Dolby Digital...

Owner Manual
Page 52
... the power cord, and then set the volume to the subwoofer's LINE INPUT. • The subwoofer outputs no sound while only speaker set B is set to the PHONES jack, no sound (page 40). • Depending on the source and current listening mode, not much sound may be produced by the surround back speaker with some DVD-Video discs, you need to MIN, 1 through 79, or MAX (page 34). Press the [DIGITAL INPUT] button repeatedly. • Make sure...
... the power cord, and then set the volume to the subwoofer's LINE INPUT. • The subwoofer outputs no sound while only speaker set B is set to the PHONES jack, no sound (page 40). • Depending on the source and current listening mode, not much sound may be produced by the surround back speaker with some DVD-Video discs, you need to MIN, 1 through 79, or MAX (page 34). Press the [DIGITAL INPUT] button repeatedly. • Make sure...

Owner Manual
Page 53
... AM station, operating the remote controller may be heard? • Using cable ties to VIDEO 1 OUT). 53 Tuner Reception is selected. • To prevent signal loops and damage to the AV receiver, input signals are not fed through to outputs with the same name (e.g., TAPE IN to TAPE OUT, or VIDEO 1 IN to bundle audio cables with the cor- Troubleshooting-Continued There's no picture? • Make sure that all video connecting plugs are...
... AM station, operating the remote controller may be heard? • Using cable ties to VIDEO 1 OUT). 53 Tuner Reception is selected. • To prevent signal loops and damage to the AV receiver, input signals are not fed through to outputs with the same name (e.g., TAPE IN to TAPE OUT, or VIDEO 1 IN to bundle audio cables with the cor- Troubleshooting-Continued There's no picture? • Make sure that all video connecting plugs are...

Owner Manual
Page 54
... a multiplex source? • Use the "Multiplex" setting on and, while holding down the [VIDEO 1/VCR] button, press the [STANDBY/ON] button. In the unlikely event that the material will enter Standby mode. To reset the AV receiver to Stereo, Mono, Direct. Troubleshooting-Continued Others The sound changes when I change the language of headphones is connected, the listening mode is not responsible for signal processing and control functions. Audio Adjust" menu to select Main or Sub (page 44...
... a multiplex source? • Use the "Multiplex" setting on and, while holding down the [VIDEO 1/VCR] button, press the [STANDBY/ON] button. In the unlikely event that the material will enter Standby mode. To reset the AV receiver to Stereo, Mono, Direct. Troubleshooting-Continued Others The sound changes when I change the language of headphones is connected, the listening mode is not responsible for signal processing and control functions. Audio Adjust" menu to select Main or Sub (page 44...


