

Owner Manual
Page 1
... instructions in this manual thoroughly before using Important Safeguards 2 Precautions 3 Feature 3 Facilities and connections Control positions and names 4 Mounting the speakers 5 Connecting the speakers 6 Thank you to obtain optimum performance and listening enjoyment from your new speaker system. Speaker System HTP-120 Instruction Manual Contents Before using it. Speaker setups and adjustments Positioning the speaker 7 Volume adjustment 7 Appendix Trouleshooting guide ........ Please retain this manual for purchasing the Onkyo speaker system. back cover Specifications...
... instructions in this manual thoroughly before using Important Safeguards 2 Precautions 3 Feature 3 Facilities and connections Control positions and names 4 Mounting the speakers 5 Connecting the speakers 6 Thank you to obtain optimum performance and listening enjoyment from your new speaker system. Speaker System HTP-120 Instruction Manual Contents Before using it. Speaker setups and adjustments Positioning the speaker 7 Volume adjustment 7 Appendix Trouleshooting guide ........ Please retain this manual for purchasing the Onkyo speaker system. back cover Specifications...
Owner Manual
Page 2
... likely to the appliance. The appliance may be sure the service technician has used replacement parts specified by the manufacturer. 6. If the plug should be placed in the operating instructions should never be moved with arrowhead symbol, within the product's enclosure that they exit from the type of power source indicated on the appliance. 2 Lightning - Overloading - If liquid has...
... likely to the appliance. The appliance may be sure the service technician has used replacement parts specified by the manufacturer. 6. If the plug should be placed in the operating instructions should never be moved with arrowhead symbol, within the product's enclosure that they exit from the type of power source indicated on the appliance. 2 Lightning - Overloading - If liquid has...
Owner Manual
Page 3
... on a level and rigid surface free from the unit. Special test signals produced by using the receiver's tone controls, a graphic equalizer, etc., or when a source whose bass range is abnormally boosted is being played This state called "rattling" occurs when the signal is used meets the required voltage (e.g., AC 120 V 60 Hz) written on the rear panel. 5. It consists of four satellite speakers, one center speaker, and one subwoofer with...
... on a level and rigid surface free from the unit. Special test signals produced by using the receiver's tone controls, a graphic equalizer, etc., or when a source whose bass range is abnormally boosted is being played This state called "rattling" occurs when the signal is used meets the required voltage (e.g., AC 120 V 60 Hz) written on the rear panel. 5. It consists of four satellite speakers, one center speaker, and one subwoofer with...
Owner Manual
Page 4
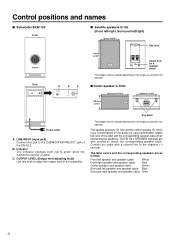
... (3-3/8") Key hole Rear A LINE INPUT B C OUTPUT LEVEL RED : STANDBY GREEN : ON MIN MAX 120mm (4-3/4") Screw hole for easy identification. B. C. Match the color of the label with a colored line to the SUBWOOFER PREOUT jack of the subwoofer. Control positions and names I Subwoofer SKW-120 Front I Center speaker D-120C 265mm (10-7/16") 180mm (7-1/16") 130.5mm (5-1/8") To AC outlet A. LINE INPUT (input jack) Connect this knob to green when the subwoofer receives a signal.
... (3-3/8") Key hole Rear A LINE INPUT B C OUTPUT LEVEL RED : STANDBY GREEN : ON MIN MAX 120mm (4-3/4") Screw hole for easy identification. B. C. Match the color of the label with a colored line to the SUBWOOFER PREOUT jack of the subwoofer. Control positions and names I Subwoofer SKW-120 Front I Center speaker D-120C 265mm (10-7/16") 180mm (7-1/16") 130.5mm (5-1/8") To AC outlet A. LINE INPUT (input jack) Connect this knob to green when the subwoofer receives a signal.
Owner Manual
Page 5
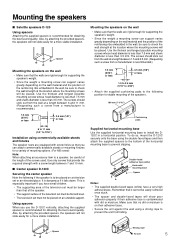
I Satellite speakers D-120 Using spacers Attaching the supplied spacers is recommended for a more stable installation. Also, by attaching the provided spacers, the speakers will not slide easily for obtaining the best sound quality. Remember that of the speaker. • The support surface of the television set must not be careful of the length of the screws used. This is on their adhesive...
I Satellite speakers D-120 Using spacers Attaching the supplied spacers is recommended for a more stable installation. Also, by attaching the provided spacers, the speakers will not slide easily for obtaining the best sound quality. Remember that of the speaker. • The support surface of the television set must not be careful of the length of the screws used. This is on their adhesive...
Owner Manual
Page 6
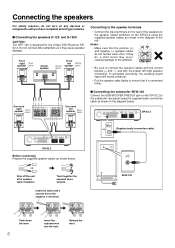
..., the resulting sound space will sound unnatural. • Pull the speaker cable lightly to ensure that the positive (+) and negative (-) speaker cables do not contact each other amplifiers as shown in the diagram below . I Connecting the subwoofer SKW-120 Connect the SUB WOOFER PREOUT jack on the DR-S2.2 using the supplied audio connection cable as shown below . Front right Red speaker label Center speaker Green label Front left -right speaker orientation. LINE INPUT OUTPUT LEVEL RED : STANDBY GREEN : ON...
..., the resulting sound space will sound unnatural. • Pull the speaker cable lightly to ensure that the positive (+) and negative (-) speaker cables do not contact each other amplifiers as shown in the diagram below . I Connecting the subwoofer SKW-120 Connect the SUB WOOFER PREOUT jack on the DR-S2.2 using the supplied audio connection cable as shown below . Front right Red speaker label Center speaker Green label Front left -right speaker orientation. LINE INPUT OUTPUT LEVEL RED : STANDBY GREEN : ON...
Owner Manual
Page 7
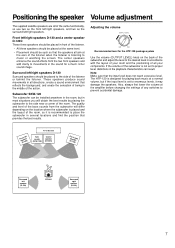
... all directions, create a sound environment that provides the best results. These speakers produce sound movements in the sound for the HTP-120 package system Use the volume (OUTPUT LEVEL) knob on the location where the subwoofer is placed and the layout of the room, so it may damage the speakers. Fsrop(nDeta-1lke2ef0rt) TV or Screen Subwoofer (SKW-120) Center speaker (D-120C) F(sDrpo-e1na2tk0re)igr ht Surround left /right speakers. Adjusting the volume OUTPUT LEVEL...
... all directions, create a sound environment that provides the best results. These speakers produce sound movements in the sound for the HTP-120 package system Use the volume (OUTPUT LEVEL) knob on the location where the subwoofer is placed and the layout of the room, so it may damage the speakers. Fsrop(nDeta-1lke2ef0rt) TV or Screen Subwoofer (SKW-120) Center speaker (D-120C) F(sDrpo-e1na2tk0re)igr ht Surround left /right speakers. Adjusting the volume OUTPUT LEVEL...
Owner Manual
Page 8
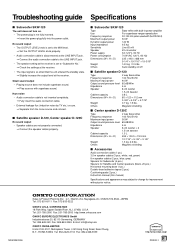
... noise source and connect. No sound output • The OUTPUT LEVEL knob is set to the MIN level. © Set the OUTPUT LEVEL knob properly. • Audio connection cable is disconnected at the LINE INPUT jack. © Connect the audio connection cable to the LINE INPUT jack. • The speaker setting at the receiver is set to change for Satellite and Center speakers (black, 20 pcs.) Horizontal mounting base (1 pc.) Double-faced adhesive tapes (2 pcs.) Cushioning pads (2 pcs.) Instruction manual (this manual) Specifications...
... noise source and connect. No sound output • The OUTPUT LEVEL knob is set to the MIN level. © Set the OUTPUT LEVEL knob properly. • Audio connection cable is disconnected at the LINE INPUT jack. © Connect the audio connection cable to the LINE INPUT jack. • The speaker setting at the receiver is set to change for Satellite and Center speakers (black, 20 pcs.) Horizontal mounting base (1 pc.) Double-faced adhesive tapes (2 pcs.) Cushioning pads (2 pcs.) Instruction manual (this manual) Specifications...


