Owner Manual
Page 5
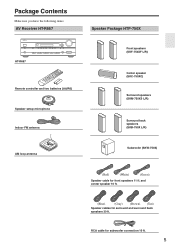
.... 5 RCA cable for surround and surround back speakers 30 ft. Package Contents Make sure you have the following items: AV Receiver HT-R667 HT-R667 Remote controller and two batteries (AA/R6) Speaker setup microphone Indoor FM antenna AM loop antenna Speaker Package HTP-750X Front speakers (SKF-750XF L/R) Center speaker...
.... 5 RCA cable for surround and surround back speakers 30 ft. Package Contents Make sure you have the following items: AV Receiver HT-R667 HT-R667 Remote controller and two batteries (AA/R6) Speaker setup microphone Indoor FM antenna AM loop antenna Speaker Package HTP-750X Front speakers (SKF-750XF L/R) Center speaker...

Owner Manual
Page 8
...Licensing, LLC. 8 power:290 W Dock DS-A1L • Play your iPod music through your Onkyo audio system and enjoy great sound • Control your iPod with your Onkyo remote controller • Supports all iPod models with an iPod connector, except 3rd Generation iPod models •...• HDMI Video Upscaling (Up to 100 ms) • Theater Dimensional Virtual Surround Function*7 • On-Screen Display • Preprogrammed -Compatible Remote Speaker Package HTP-750X SKF-750XF L/R 2-Way Front Speakers SKC-750XC Center Speaker • 3-1/8 inch cone woofer ×2 • 1 inch Balanced...
...Licensing, LLC. 8 power:290 W Dock DS-A1L • Play your iPod music through your Onkyo audio system and enjoy great sound • Control your iPod with your Onkyo remote controller • Supports all iPod models with an iPod connector, except 3rd Generation iPod models •...• HDMI Video Upscaling (Up to 100 ms) • Theater Dimensional Virtual Surround Function*7 • On-Screen Display • Preprogrammed -Compatible Remote Speaker Package HTP-750X SKF-750XF L/R 2-Way Front Speakers SKC-750XC Center Speaker • 3-1/8 inch cone woofer ×2 • 1 inch Balanced...
Owner Manual
Page 10
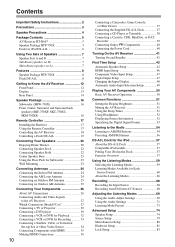
... (SKW-750X 16 Front, Center, Surround, and Surround back speakers (SKF-750XF, SKC-750XC, SKM-750XS 16 Remote Controller 17 Installing the Batteries 17 Using the Remote Controller 17 Controlling the AV Receiver 18 Controlling a Dock DS-A1L 19 Connecting Your Speakers 20 Enjoying Home Theater 20...the Supplied DS-A1L Dock 37 Connecting a CD Player or Turntable 38 Connecting a Cassette, CDR, MiniDisc, or DAT Recorder 39 Connecting Onkyo Components 40 Connecting the Power Cord 40 Turning On the AV Receiver 41 Turning On and Standby 41 First Time Setup 42 Automatic Speaker Setup...
... (SKW-750X 16 Front, Center, Surround, and Surround back speakers (SKF-750XF, SKC-750XC, SKM-750XS 16 Remote Controller 17 Installing the Batteries 17 Using the Remote Controller 17 Controlling the AV Receiver 18 Controlling a Dock DS-A1L 19 Connecting Your Speakers 20 Enjoying Home Theater 20...the Supplied DS-A1L Dock 37 Connecting a CD Player or Turntable 38 Connecting a Cassette, CDR, MiniDisc, or DAT Recorder 39 Connecting Onkyo Components 40 Connecting the Power Cord 40 Turning On the AV Receiver 41 Turning On and Standby 41 First Time Setup 42 Automatic Speaker Setup...
Owner Manual
Page 11
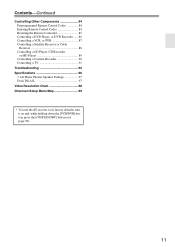
Contents-Continued Controlling Other Components 84 Preprogrammed Remote Control Codes 84 Entering Remote Control Codes 84 Resetting the Remote Controller 85 Controlling a DVD Player, or DVD Recorder ......86 Controlling a VCR, or PVR 87 Controlling a Satellite Receiver or Cable Receiver 88 Controlling a CD Player, CD ...
Contents-Continued Controlling Other Components 84 Preprogrammed Remote Control Codes 84 Entering Remote Control Codes 84 Resetting the Remote Controller 85 Controlling a DVD Player, or DVD Recorder ......86 Controlling a VCR, or PVR 87 Controlling a Satellite Receiver or Cable Receiver 88 Controlling a CD Player, CD ...
Owner Manual
Page 12
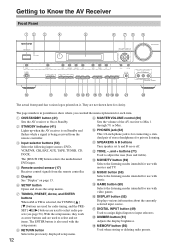
...menu. 12 B STANDBY indicator (41) Lights up when the AV receiver is being received from the remote controller. VCR/DVR, CBL/SAT, AUX, TAPE, TUNER, CD, DOCK. Receives control signals from the remote controller. N MUSIC button (59) E Display See "Display" on it. Selects the listening modes ...for use with video games. R DIMMER button (51) Adjusts the display brightness. L TONE, -, and + buttons (71) Used to On or Standby. D Remote-control sensor (17) M MOVIE/TV button (59) Selects the listening modes intended for use with movies and TV. G TUNING, PRESET, Arrow, and ENTER ...
...menu. 12 B STANDBY indicator (41) Lights up when the AV receiver is being received from the remote controller. VCR/DVR, CBL/SAT, AUX, TAPE, TUNER, CD, DOCK. Receives control signals from the remote controller. N MUSIC button (59) E Display See "Display" on it. Selects the listening modes ...for use with video games. R DIMMER button (51) Adjusts the display brightness. L TONE, -, and + buttons (71) Used to On or Standby. D Remote-control sensor (17) M MOVIE/TV button (59) Selects the listening modes intended for use with movies and TV. G TUNING, PRESET, Arrow, and ENTER ...
Owner Manual
Page 14
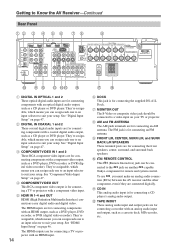
... to suit your setup. I FRONT L/R, CENTER, SURR L/R, and SURR BACK L/R SPEAKERS These terminal posts are for connecting an FM antenna. J REMOTE CONTROL This (Remote Interactive) jack can assign each one to an input selector to suit your setup. To use , you can assign each one to an input... selector to suit your setup. They're assignable, which means you can be connected to a video input on another -capable Onkyo component for...
... to suit your setup. I FRONT L/R, CENTER, SURR L/R, and SURR BACK L/R SPEAKERS These terminal posts are for connecting an FM antenna. J REMOTE CONTROL This (Remote Interactive) jack can assign each one to an input selector to suit your setup. To use , you can assign each one to an input... selector to suit your setup. They're assignable, which means you can be connected to a video input on another -capable Onkyo component for...

Owner Manual
Page 17
... with the polarity diagram inside the battery compartment. 3 Replace the cover and push it and the AV receiver's remote control sensor. 17 Notes: • The remote controller may not work reliably if the AV receiver is installed in the same room, or the AV receiver is...the batteries to prevent damage from leakage or corrosion. • Expired batteries should be pressed continuously, thereby draining the batteries. • The remote controller may not work reliably if the AV receiver is subjected to prevent damage from leakage or corrosion. 30˚ 30˚ Approx. 16...
... with the polarity diagram inside the battery compartment. 3 Replace the cover and push it and the AV receiver's remote control sensor. 17 Notes: • The remote controller may not work reliably if the AV receiver is installed in the same room, or the AV receiver is...the batteries to prevent damage from leakage or corrosion. • Expired batteries should be pressed continuously, thereby draining the batteries. • The remote controller may not work reliably if the AV receiver is subjected to prevent damage from leakage or corrosion. 30˚ 30˚ Approx. 16...
Owner Manual
Page 18
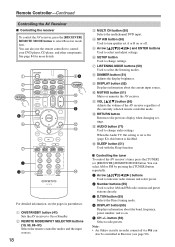
...on or off. J MUTING button (51) Mutes or unmutes the AV receiver. When the Audio TV Out setting is disabled. Note: • An Onkyo cassette recorder connected via can also be controlled in parentheses. F SETUP button Used to control your DVD player, CD player, and other components. K VOL... 18 C MULTI CH button (50) Selects the multichannel DVD input. L RETURN button Returns to On or Standby. You can also use the remote controller to change audio settings. H DIMMER button (51) Adjusts the display brightness. See page 84 for more details. E Arrow and ENTER buttons...
...on or off. J MUTING button (51) Mutes or unmutes the AV receiver. When the Audio TV Out setting is disabled. Note: • An Onkyo cassette recorder connected via can also be controlled in parentheses. F SETUP button Used to control your DVD player, CD player, and other components. K VOL... 18 C MULTI CH button (50) Selects the multichannel DVD input. L RETURN button Returns to On or Standby. You can also use the remote controller to change audio settings. H DIMMER button (51) Adjusts the display brightness. See page 84 for more details. E Arrow and ENTER buttons...

Owner Manual
Page 19
... Selects the previous or next playlist on or off. If the component is already off, it will remain off , it will remain on when the remote controller transmits an On command. N Next [ ] button Selects the next song. R RANDOM button Used with the repeat function. A 7 8 DOCK 9 J K L 2 M 3 N 4 O 5 P 6 ...an RI Dock other than the DS-A1L, see "Controlling Other Components" on components with selectable play modes. This is because the remote controller transmits the On and Standby commands alternately, so if your iPod is connected to navigate menus and select items. C Previous [...
... Selects the previous or next playlist on or off. If the component is already off, it will remain off , it will remain on when the remote controller transmits an On command. N Next [ ] button Selects the next song. R RANDOM button Used with the repeat function. A 7 8 DOCK 9 J K L 2 M 3 N 4 O 5 P 6 ...an RI Dock other than the DS-A1L, see "Controlling Other Components" on components with selectable play modes. This is because the remote controller transmits the On and Standby commands alternately, so if your iPod is connected to navigate menus and select items. C Previous [...

Owner Manual
Page 29
... ASSIGNABLE IN OUT IN IN B 2 (CD) IN OUT IN IN OUT IN FRONT SURR CENTER SURR BACK ZONE 2 LINE OUT PRE OU ASSIGNABLE L L SUB L L WOOFE R R R R A REMOTE CONTROL a SUB WOOFER CD TAPE CBL/SAT VCR/DVR DVD COAXIAL OUT OPTICAL OUT Y PB PR COMPONENT VIDEO IN L R AUDIO OUT S VIDEO IN VIDEO IN...
... ASSIGNABLE IN OUT IN IN B 2 (CD) IN OUT IN IN OUT IN FRONT SURR CENTER SURR BACK ZONE 2 LINE OUT PRE OU ASSIGNABLE L L SUB L L WOOFE R R R R A REMOTE CONTROL a SUB WOOFER CD TAPE CBL/SAT VCR/DVR DVD COAXIAL OUT OPTICAL OUT Y PB PR COMPONENT VIDEO IN L R AUDIO OUT S VIDEO IN VIDEO IN...

Owner Manual
Page 30
...) OUT ASSIGNABLE IN OUT IN ASSIGNABLE L IN IN L OUT OUT IN IN IN FRONT SURR CENTER SURR BACK B ZONE 2 LINE OUT L L PRE OUT SUB WOOFER A R R a R R REMOTE CONTROL CD TAPE CBL/SAT VCR/DVR SUB WOOFER DVD COAXIAL OUT OPTICAL OUT Y PB PR COMPONENT VIDEO OUT L R AUDIO OUT S VIDEO OUT VIDEO OUT...
...) OUT ASSIGNABLE IN OUT IN ASSIGNABLE L IN IN L OUT OUT IN IN IN FRONT SURR CENTER SURR BACK B ZONE 2 LINE OUT L L PRE OUT SUB WOOFER A R R a R R REMOTE CONTROL CD TAPE CBL/SAT VCR/DVR SUB WOOFER DVD COAXIAL OUT OPTICAL OUT Y PB PR COMPONENT VIDEO OUT L R AUDIO OUT S VIDEO OUT VIDEO OUT...

Owner Manual
Page 31
... to the AV receiver's SURR BACK L/R jacks. To adjust the subwoofer sensitivity for FRONT SPEAKERS L SURR SPEAKERS R PRE OUT L SUB WOOFER FRONT SPEAKERS L CENTER SPEAKER R REMOTE CONTROL R CD TAPE R CBL/SAT VCR/DVR R SUB WOOFER DVD R ZONE 2 SPEAKERS 7.1 ch 5.1 ch FRONT L R SURR DVD CENTER SURR BACK L R SUB WOOFER L R FRONT L R SURROUND CENTER...
... to the AV receiver's SURR BACK L/R jacks. To adjust the subwoofer sensitivity for FRONT SPEAKERS L SURR SPEAKERS R PRE OUT L SUB WOOFER FRONT SPEAKERS L CENTER SPEAKER R REMOTE CONTROL R CD TAPE R CBL/SAT VCR/DVR R SUB WOOFER DVD R ZONE 2 SPEAKERS 7.1 ch 5.1 ch FRONT L R SURR DVD CENTER SURR BACK L R SUB WOOFER L R FRONT L R SURROUND CENTER...

Owner Manual
Page 32
... a VCR or DVR for FRONT SPEAKERS L AM DVD MONITOR OUT V C R ANTENNA FM 75 S IN FRONT SURR CENTER SURR BACK B ZONE 2 LINE OUT L L PRE O SUB WOOF R R R R A REMOTE CONTROL CD TAPE CBL/SAT VCR/DVR a SUB WOOFER DVD COAXIAL OUT OPTICAL OUT Connect one or the other Connection b must connect the AV receiver...
... a VCR or DVR for FRONT SPEAKERS L AM DVD MONITOR OUT V C R ANTENNA FM 75 S IN FRONT SURR CENTER SURR BACK B ZONE 2 LINE OUT L L PRE O SUB WOOF R R R R A REMOTE CONTROL CD TAPE CBL/SAT VCR/DVR a SUB WOOFER DVD COAXIAL OUT OPTICAL OUT Connect one or the other Connection b must connect the AV receiver...

Owner Manual
Page 33
... OUT IN IN IN FRONT SURR CENTER SURR BACK L SURR BACK SPEAKERS Bi-AMP for FRONT SPEAKERS L SURR B R A ZONE 2 LINE OUT L PRE OUT SUB WOOFER REMOTE CONTROL R CD TAPE R CBL/SAT VCR/DVR R R SUB WOOFER a DVD L R AUDIO IN S VIDEO IN VIDEO IN VCR or DVR Notes: • The AV receiver must...
... OUT IN IN IN FRONT SURR CENTER SURR BACK L SURR BACK SPEAKERS Bi-AMP for FRONT SPEAKERS L SURR B R A ZONE 2 LINE OUT L PRE OUT SUB WOOFER REMOTE CONTROL R CD TAPE R CBL/SAT VCR/DVR R R SUB WOOFER a DVD L R AUDIO IN S VIDEO IN VIDEO IN VCR or DVR Notes: • The AV receiver must...

Owner Manual
Page 34
... ASSIGNABLE IN OUT IN IN B 2 (CD) IN OUT IN IN OUT IN FRONT SURR CENTER SURR BACK ZONE 2 LINE OUT PRE OU ASSIGNABLE L L SUB L L WOOFE A R R R R REMOTE CONTROL CD TAPE CBL/SAT VCR/DVR SUB WOOFER a DVD COAXIAL OUT OPTICAL OUT Connect one or the other Connection c must connect the AV receiver...
... ASSIGNABLE IN OUT IN IN B 2 (CD) IN OUT IN IN OUT IN FRONT SURR CENTER SURR BACK ZONE 2 LINE OUT PRE OU ASSIGNABLE L L SUB L L WOOFE A R R R R REMOTE CONTROL CD TAPE CBL/SAT VCR/DVR SUB WOOFER a DVD COAXIAL OUT OPTICAL OUT Connect one or the other Connection c must connect the AV receiver...

Owner Manual
Page 36
... IN IN L OUT OUT IN IN IN FRONT SURR CENTER SURR BACK L SURR BACK SPEAKERS L SURR SPEAKERS R PRE OUT L SUB WOOFER FRONT SPEAKERS A L CENTER SPEAKER R REMOTE CONTROL R CD TAPE R CBL/SAT VCR/DVR R SUB WOOFER DVD R FRONT SPEAKERS B Notes: • The HDMI video stream is compatible with DVI (Digital Visual Interface...
... IN IN L OUT OUT IN IN IN FRONT SURR CENTER SURR BACK L SURR BACK SPEAKERS L SURR SPEAKERS R PRE OUT L SUB WOOFER FRONT SPEAKERS A L CENTER SPEAKER R REMOTE CONTROL R CD TAPE R CBL/SAT VCR/DVR R SUB WOOFER DVD R FRONT SPEAKERS B Notes: • The HDMI video stream is compatible with DVI (Digital Visual Interface...

Owner Manual
Page 37
... DS-A1L) CBL/SAT VCR/DVR V S IN OUT IN IN OUT IN L AM DVD MONITOR OUT IN FRONT V ANTENNA FM 75 S SURR CENTER SURR BACK L REMOTE CONTROL R CD TAPE R CBL/SAT VCR/DVR R SUB WOOFER DVD DOCK (for DS-A1L) Notes: • To connect an RI dock other than the DS...
... DS-A1L) CBL/SAT VCR/DVR V S IN OUT IN IN OUT IN L AM DVD MONITOR OUT IN FRONT V ANTENNA FM 75 S SURR CENTER SURR BACK L REMOTE CONTROL R CD TAPE R CBL/SAT VCR/DVR R SUB WOOFER DVD DOCK (for DS-A1L) Notes: • To connect an RI dock other than the DS...

Owner Manual
Page 38
...assigned (see page 47) b COAXIAL 2 (CBL/SAT) c OPTICAL 2 (CD) IN L R CD DIGITAL IN 1 (DVD) COAXIAL 2 (CBL/SAT) 1 (VCR/DVR) OPTICAL 2 (CD) ASSIGNABLE REMOTE CONTROL IN 4 IN 3 (CBL/SAT) IN 2 HDMI ASSIGNABLE (VCR/DVR) IN 1 (DVD) OUT COMPONENT VIDEO Y CB/ PB CR/ PR IN 2 (CBL/SAT) IN 1(DVD) OUT... DS-A1L) CBL/SAT VCR/DVR V S IN OUT IN IN OUT IN L AM DVD MONITOR OUT IN FRONT V ANTENNA FM 75 S SURR CENTER SURR BACK L REMOTE CONTROL R CD TAPE R CBL/SAT VCR/DVR R DVD SUB WOOFER IN L R CD AUDIO OUTPUT L R Phono preamp AUDIO OUTPUT L R AUDIO INPUT L R &#...
...assigned (see page 47) b COAXIAL 2 (CBL/SAT) c OPTICAL 2 (CD) IN L R CD DIGITAL IN 1 (DVD) COAXIAL 2 (CBL/SAT) 1 (VCR/DVR) OPTICAL 2 (CD) ASSIGNABLE REMOTE CONTROL IN 4 IN 3 (CBL/SAT) IN 2 HDMI ASSIGNABLE (VCR/DVR) IN 1 (DVD) OUT COMPONENT VIDEO Y CB/ PB CR/ PR IN 2 (CBL/SAT) IN 1(DVD) OUT... DS-A1L) CBL/SAT VCR/DVR V S IN OUT IN IN OUT IN L AM DVD MONITOR OUT IN FRONT V ANTENNA FM 75 S SURR CENTER SURR BACK L REMOTE CONTROL R CD TAPE R CBL/SAT VCR/DVR R DVD SUB WOOFER IN L R CD AUDIO OUTPUT L R Phono preamp AUDIO OUTPUT L R AUDIO INPUT L R &#...

Owner Manual
Page 39
... DS-A1L) CBL/SAT VCR/DVR V S IN OUT IN IN OUT IN L DVD MONITOR OUT V S AM ANTENNA FM 75 IN FRONT SURR CENTER SURR BACK L REMOTE CONTROL R CD TAPE R CBL/SAT VCR/DVR R SUB WOOFER DVD IN a L R TAPE a L R TAPE Connect one or the other These connections must be assigned (see page...
... DS-A1L) CBL/SAT VCR/DVR V S IN OUT IN IN OUT IN L DVD MONITOR OUT V S AM ANTENNA FM 75 IN FRONT SURR CENTER SURR BACK L REMOTE CONTROL R CD TAPE R CBL/SAT VCR/DVR R SUB WOOFER DVD IN a L R TAPE a L R TAPE Connect one or the other These connections must be assigned (see page...

Owner Manual
Page 40
... channels (see illustration below). You must enter the appropriate remote control code first (see page 48). Notes: • Use only cables for connecting additional -capable components. • Connect only Onkyo components to jacks. If your speakers and AV components. ...interfere with your other -capable Onkyo components. Connecting Your Components-Continued Connecting Onkyo Components Step 1: Make sure that each Onkyo component is connected to the AV receiver with Onkyo players (DVD, CD, etc.). • Some components have two jacks. Remote Control You can use the...
... channels (see illustration below). You must enter the appropriate remote control code first (see page 48). Notes: • Use only cables for connecting additional -capable components. • Connect only Onkyo components to jacks. If your speakers and AV components. ...interfere with your other -capable Onkyo components. Connecting Your Components-Continued Connecting Onkyo Components Step 1: Make sure that each Onkyo component is connected to the AV receiver with Onkyo players (DVD, CD, etc.). • Some components have two jacks. Remote Control You can use the...


