Owner Manual
Page 2
... injury from the rear panel or wall, creating a flue-like gap for service. 16. If the apparatus does not operate normally by the manufacturer. 12. Object and Liquid Entry Never push objects of electric shock to escape. 2 The apparatus shall not be set 10 cm (4") away from tip-over. Don...
... injury from the rear panel or wall, creating a flue-like gap for service. 16. If the apparatus does not operate normally by the manufacturer. 12. Object and Liquid Entry Never push objects of electric shock to escape. 2 The apparatus shall not be set 10 cm (4") away from tip-over. Don...
Owner Manual
Page 10
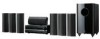
... Sub Room (speaker set B 7 Main Room (speaker set A 7 Features 8 Speaker Package HTP-750X 8 Dock DS-A1L 8 Getting to Know the AV Receiver 12 Front Panel 12 Display 13 Rear Panel 14 Speaker Package 16 Subwoofer (SKW-750X 16 Front, Center, Surround, and Surround back speakers (SKF-750XF, SKC-750XC, SKM...the Supplied DS-A1L Dock 37 Connecting a CD Player or Turntable 38 Connecting a Cassette, CDR, MiniDisc, or DAT Recorder 39 Connecting Onkyo Components 40 Connecting the Power Cord 40 Turning On the AV Receiver 41 Turning On and Standby 41 First Time Setup 42 Automatic Speaker ...
... Sub Room (speaker set B 7 Main Room (speaker set A 7 Features 8 Speaker Package HTP-750X 8 Dock DS-A1L 8 Getting to Know the AV Receiver 12 Front Panel 12 Display 13 Rear Panel 14 Speaker Package 16 Subwoofer (SKW-750X 16 Front, Center, Surround, and Surround back speakers (SKF-750XF, SKC-750XC, SKM...the Supplied DS-A1L Dock 37 Connecting a CD Player or Turntable 38 Connecting a Cassette, CDR, MiniDisc, or DAT Recorder 39 Connecting Onkyo Components 40 Connecting the Power Cord 40 Turning On the AV Receiver 41 Turning On and Standby 41 First Time Setup 42 Automatic Speaker ...
Owner Manual
Page 12
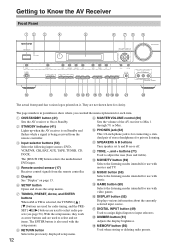
...the following input sources: DVD, K SPEAKERS A B buttons Turn speaker set items. The ENTER button is also used to Know the AV Receiver Front Panel 12 3 4 5 6 78 9 ON/STANDBY STANDBY TUNING PRESET ENTER MASTER VOLUME DOCK PHONES MULTI CH A SPEAKERS B DVD VCR/DVR CBL/SAT AUX TAPE... pair of the AV receiver to Min, 1 through 79, or Max. Receives control signals from the remote controller. Selects the previously displayed setup menu. 12 A ON/STANDBY button (41) I MASTER VOLUME control (50) Sets the AV receiver to select radio presets (see page 56). J PHONES jack (...
...the following input sources: DVD, K SPEAKERS A B buttons Turn speaker set items. The ENTER button is also used to Know the AV Receiver Front Panel 12 3 4 5 6 78 9 ON/STANDBY STANDBY TUNING PRESET ENTER MASTER VOLUME DOCK PHONES MULTI CH A SPEAKERS B DVD VCR/DVR CBL/SAT AUX TAPE... pair of the AV receiver to Min, 1 through 79, or Max. Receives control signals from the remote controller. Selects the previously displayed setup menu. 12 A ON/STANDBY button (41) I MASTER VOLUME control (50) Sets the AV receiver to select radio presets (see page 56). J PHONES jack (...
Owner Manual
Page 13
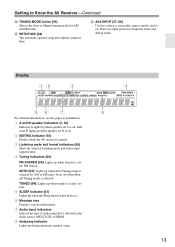
Display 12 3 4 56 7 8 For detailed information, see the pages in parentheses. 1 A and B speaker indicators (7, 50) Indicator A lights up when the Sleep function has been set B is on. 2 ...
Display 12 3 4 56 7 8 For detailed information, see the pages in parentheses. 1 A and B speaker indicators (7, 50) Indicator A lights up when the Sleep function has been set B is on. 2 ...
Owner Manual
Page 14
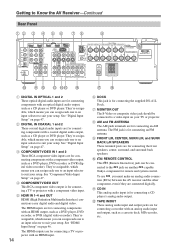
Getting to Know the AV Receiver-Continued Rear Panel 12 3 4 5 6 7 8 9 DIGITAL IN 1 (DVD) COAXIAL 2 (CBL/SAT) 1 (VCR/DVR) OPTICAL 2 (CD) ASSIGNABLE IN 4 IN 3 (CBL/SAT) IN 2 HDMI ASSIGNABLE (VCR/DVR) IN 1 (DVD) OUT COMPONENT VIDEO Y .... See "Digital Input Setup" on page 47. H AM and FM ANTENNA The AM push terminals are connected digitally. nected to a video input on another -capable Onkyo component for connecting the front speakers, center, surround, and surround back speakers. To use , you can assign each one to an input selector to suit...
Getting to Know the AV Receiver-Continued Rear Panel 12 3 4 5 6 7 8 9 DIGITAL IN 1 (DVD) COAXIAL 2 (CBL/SAT) 1 (VCR/DVR) OPTICAL 2 (CD) ASSIGNABLE IN 4 IN 3 (CBL/SAT) IN 2 HDMI ASSIGNABLE (VCR/DVR) IN 1 (DVD) OUT COMPONENT VIDEO Y .... See "Digital Input Setup" on page 47. H AM and FM ANTENNA The AM push terminals are connected digitally. nected to a video input on another -capable Onkyo component for connecting the front speakers, center, surround, and surround back speakers. To use , you can assign each one to an input selector to suit...
Owner Manual
Page 72
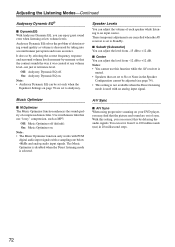
... Dynamic EQ off (default). You can set to Standby. ■ Subwfr (Subwoofer) You can adjust the level from -15 dB to +12 dB. ■ Center You can enjoy great sound even when listening at reference level. The Music Optimizer is disabled when the Direct listening mode... is set it from -12 dB to Audyssey. Off: Music Optimizer off . Music Optimizer ■ M.Optimizer The Music Optimizer function enhances the sound quality of deteriorating...
... Dynamic EQ off (default). You can set to Standby. ■ Subwfr (Subwoofer) You can adjust the level from -15 dB to +12 dB. ■ Center You can enjoy great sound even when listening at reference level. The Music Optimizer is disabled when the Direct listening mode... is set it from -12 dB to Audyssey. Off: Music Optimizer off . Music Optimizer ■ M.Optimizer The Music Optimizer function enhances the sound quality of deteriorating...
Owner Manual
Page 76
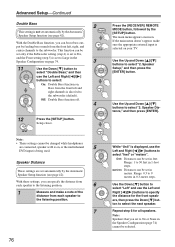
...," and then use the Left and Right [ ]/[ ] buttons to select "feet" or "meters". While "Unit" is set in 1-foot steps. Off: Double Bass function off. 4 12 Press the [SETUP] button. With these settings, you can be selected. The main menu appears onscreen. feet: Distances can boost bass out- Note: Speakers that...
...," and then use the Left and Right [ ]/[ ] buttons to select "feet" or "meters". While "Unit" is set in 1-foot steps. Off: Double Bass function off. 4 12 Press the [SETUP] button. With these settings, you can be selected. The main menu appears onscreen. feet: Distances can boost bass out- Note: Speakers that...
Owner Manual
Page 77
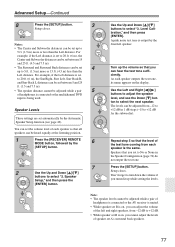
...tone, its name appears on , you set automatically by the front left and right speakers, from -12 to +12 dB in 1 dB steps (-15 to No or None in the Speaker Configuration (page ...74) do not output the test tone. Speaker Levels These settings are set to +12 dB for the subwoofer). Level Calibration," and then press [ENTER]. The levels can hear the test tone... or the AV receiver is muted. • While speaker set B is on, you can be adjusted from -12 dB to +12 dB. • While speaker set B is set to 20 ft. (6 m), the SurrRight, Surr Left, Surr...
...tone, its name appears on , you set automatically by the front left and right speakers, from -12 to +12 dB in 1 dB steps (-15 to No or None in the Speaker Configuration (page ...74) do not output the test tone. Speaker Levels These settings are set to +12 dB for the subwoofer). Level Calibration," and then press [ENTER]. The levels can hear the test tone... or the AV receiver is muted. • While speaker set B is on, you can be adjusted from -12 dB to +12 dB. • While speaker set B is set to 20 ft. (6 m), the SurrRight, Surr Left, Surr...
Owner Manual
Page 79
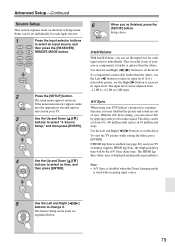
...delay to select an item, and then press [ENTER]. 6 When you've finished, press the [SETUP] button. Items can set from -12 dB to increase its input level. To view the TV picture while setting the delay, press [ENTER]. Advanced Setup-Continued Source Setup This section explains... . Note: • A/V Sync is disabled when the Direct listening mode is noticeably louder than the others , use the Right [ ] button to +12 dB in 10 millisecond steps. If it . The delay can be set individually for each input selector. 1 Press the input selector buttons to reduce its...
...delay to select an item, and then press [ENTER]. 6 When you've finished, press the [SETUP] button. Items can set from -12 dB to increase its input level. To view the TV picture while setting the delay, press [ENTER]. Advanced Setup-Continued Source Setup This section explains... . Note: • A/V Sync is disabled when the Direct listening mode is noticeably louder than the others , use the Right [ ] button to +12 dB in 10 millisecond steps. If it . The delay can be set individually for each input selector. 1 Press the input selector buttons to reduce its...
Owner Manual
Page 80
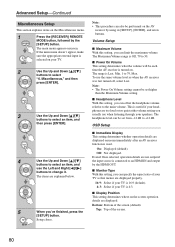
...determines what the volume will be performed on the AV receiver by using its [SETUP], [ENTER], and arrow buttons. This is Last, Min, 1 to +12 dB. On: Displayed (default). Top: Top of the screen (default). If the main menu doesn't appear, make sure the appropriate external input is used.... 've finished, press the [SETUP] button. To use the Left and Right [ ]/[ ] buttons to select "6. The headphone level can be set from -12 dB to 79, Max. OSD Setup ■ Immediate Display This setting determines whether operation details are not output if the input source is connected to...
...determines what the volume will be performed on the AV receiver by using its [SETUP], [ENTER], and arrow buttons. This is Last, Min, 1 to +12 dB. On: Displayed (default). Top: Top of the screen (default). If the main menu doesn't appear, make sure the appropriate external input is used.... 've finished, press the [SETUP] button. To use the Left and Right [ ]/[ ] buttons to select "6. The headphone level can be set from -12 dB to 79, Max. OSD Setup ■ Immediate Display This setting determines whether operation details are not output if the input source is connected to...
Owner Manual
Page 87
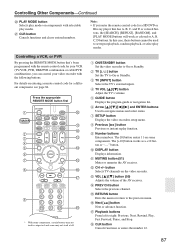
... or A, B, C, D buttons. K MUTING button (51) Mutes or unmutes the AV receiver. P Next [ ] button Next or advance function. R CLR button Cancels functions or enters the number 12. 87 Controlling a VCR, or PVR By pressing the REMOTE MODE button that has A, B, C, and D or colored buttons, the [SEARCH], [REPEAT], [RANDOM], and [PLAY MODE] buttons...
... or A, B, C, D buttons. K MUTING button (51) Mutes or unmutes the AV receiver. P Next [ ] button Next or advance function. R CLR button Cancels functions or enters the number 12. 87 Controlling a VCR, or PVR By pressing the REMOTE MODE button that has A, B, C, and D or colored buttons, the [SEARCH], [REPEAT], [RANDOM], and [PLAY MODE] buttons...
Owner Manual
Page 91
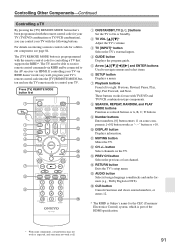
.... O AUDIO button Selects foreign language soundtracks and audio formats (e.g., Dolby Digital or DTS). P CLR button Cancels functions and clears entered numbers, or enters 12. * The RIHD is Onkyo's name for the CEC (Consumer Electronics Control) system, which is preprogrammed with the remote control code for use the TV remote mode to control...
.... O AUDIO button Selects foreign language soundtracks and audio formats (e.g., Dolby Digital or DTS). P CLR button Cancels functions and clears entered numbers, or enters 12. * The RIHD is Onkyo's name for the CEC (Consumer Electronics Control) system, which is preprogrammed with the remote control code for use the TV remote mode to control...
Owner Manual
Page 100
...-4401-0 Fax: +49-8142-4401-555 http://www.eu.onkyo.com/ ONKYO EUROPE UK Office Suite 1, Gregories Court, Gregories Road, Beaconsfield, Buckinghamshire, HP9 1HQ UNITED KINGDOM Tel: +44-(0)1494-681515 Fax: +44(0)-1494-680452 ONKYO CHINA LIMITED Unit 1&12, 9/F, Ever Gain PlazaTower 1, 88, Container Port Road, ...Kwai Chung, N.T., HONG KONG Tel: 852-2429-3118 Fax: 852-2428-9039 http://www.ch.onkyo.com/ HOMEPAGE http://www.onkyo.com/ I0808-3 SN 29344677B 100 (C) Copyright ...
...-4401-0 Fax: +49-8142-4401-555 http://www.eu.onkyo.com/ ONKYO EUROPE UK Office Suite 1, Gregories Court, Gregories Road, Beaconsfield, Buckinghamshire, HP9 1HQ UNITED KINGDOM Tel: +44-(0)1494-681515 Fax: +44(0)-1494-680452 ONKYO CHINA LIMITED Unit 1&12, 9/F, Ever Gain PlazaTower 1, 88, Container Port Road, ...Kwai Chung, N.T., HONG KONG Tel: 852-2429-3118 Fax: 852-2428-9039 http://www.ch.onkyo.com/ HOMEPAGE http://www.onkyo.com/ I0808-3 SN 29344677B 100 (C) Copyright ...