
Owner Manual
Page 8
...• Faroudja DCDi Edge Enhancement • Direct Mode • Music Optimizer*3 for Compressed Music • CinemaFILTER • Non-Scaling Configuration • A-Form Listening Mode Memory • 24-bit/192kHz D/A Converters • Powerful and Highly Accurate 32-bit DSP... Processing Connections • 4 HDMI*4 Inputs and 1 Output • Onkyo RIHD*5 for System Control • HDTV-Ready Component Video Switching (2 Inputs/ 1 Output) • 4 Digital Inputs (2 Optical/2 Coaxial/4 Assignable) &#...
...• Faroudja DCDi Edge Enhancement • Direct Mode • Music Optimizer*3 for Compressed Music • CinemaFILTER • Non-Scaling Configuration • A-Form Listening Mode Memory • 24-bit/192kHz D/A Converters • Powerful and Highly Accurate 32-bit DSP... Processing Connections • 4 HDMI*4 Inputs and 1 Output • Onkyo RIHD*5 for System Control • HDTV-Ready Component Video Switching (2 Inputs/ 1 Output) • 4 Digital Inputs (2 Optical/2 Coaxial/4 Assignable) &#...
Owner Manual
Page 14
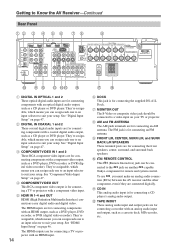
...High Definition Multimedia Interface) connections carry digital audio and digital video. G MONITOR OUT The S-Video or composite video jack should be con- I FRONT L/R, CENTER, SURR L/R, and SURR BACK L/R SPEAKERS These terminal posts are for remote and system control. The HDMI outputs are..., or DVR (digital video recorder). J REMOTE CONTROL This (Remote Interactive) jack can be connected to a video input on another -capable Onkyo component for connecting the front speakers, center, surround, and surround back speakers. L TAPE IN/OUT These analog audio input and output jacks are...
...High Definition Multimedia Interface) connections carry digital audio and digital video. G MONITOR OUT The S-Video or composite video jack should be con- I FRONT L/R, CENTER, SURR L/R, and SURR BACK L/R SPEAKERS These terminal posts are for remote and system control. The HDMI outputs are..., or DVR (digital video recorder). J REMOTE CONTROL This (Remote Interactive) jack can be connected to a video input on another -capable Onkyo component for connecting the front speakers, center, surround, and surround back speakers. L TAPE IN/OUT These analog audio input and output jacks are...

Owner Manual
Page 21
... must set the speaker settings. Connect positive (+) terminals to only positive (+) terminals, and negative (-) terminals to the SURR BACK L terminals. Connecting Your Speakers-Continued Speaker Configuration For 7.1-channel surround-sound playback, you 're using only one cable to short the positive and negative wires. To get them the wrong...
... must set the speaker settings. Connect positive (+) terminals to only positive (+) terminals, and negative (-) terminals to the SURR BACK L terminals. Connecting Your Speakers-Continued Speaker Configuration For 7.1-channel surround-sound playback, you 're using only one cable to short the positive and negative wires. To get them the wrong...

Owner Manual
Page 36
...; Video Signals Digital video signals received by the HDMI IN jacks are not output by the HDMI IN jacks through the AV receiver, you must configure your system so that 's connected to the AV receiver's HDMI OUT). Composite video, S-Video, and component video sources can be performed on your...
...; Video Signals Digital video signals received by the HDMI IN jacks are not output by the HDMI IN jacks through the AV receiver, you must configure your system so that 's connected to the AV receiver's HDMI OUT). Composite video, S-Video, and component video sources can be performed on your...

Owner Manual
Page 41
... MD recorder, CD recorder 41 See "Automatic Speaker Setup" on page 42. ■ Did you connect a component to help you configure the AV receiver before you connect an Onkyo MD recorder or CD recorder? Turning On the AV Receiver ON/STANDBY STANDBY indicator ON/STANDBY STANDBY TUNING PRESET ENTER MASTER...
... MD recorder, CD recorder 41 See "Automatic Speaker Setup" on page 42. ■ Did you connect a component to help you configure the AV receiver before you connect an Onkyo MD recorder or CD recorder? Turning On the AV Receiver ON/STANDBY STANDBY indicator ON/STANDBY STANDBY TUNING PRESET ENTER MASTER...
Owner Manual
Page 44
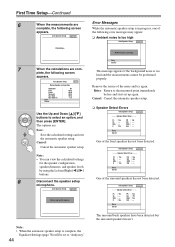
... haven't. Cancel: ❏ Speaker Detect Errors Auto Speaker Setup AUDYSSEY - - - - - Auto Speaker Setup AUDYSSEY Note: • You can view the calculated settings for the speaker configuration, - - - - - Please unplug microphone. Cancel: Cancel the automatic speaker setup. Cancel the automatic speaker setup. One of the noise and try again. FL : Yes...
... haven't. Cancel: ❏ Speaker Detect Errors Auto Speaker Setup AUDYSSEY - - - - - Auto Speaker Setup AUDYSSEY Note: • You can view the calculated settings for the speaker configuration, - - - - - Please unplug microphone. Cancel: Cancel the automatic speaker setup. Cancel the automatic speaker setup. One of the noise and try again. FL : Yes...
Owner Manual
Page 50
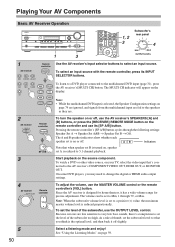
.... See "Using the Listening Modes" on your TV, select the video input that when speaker set B is turned on, speaker set A is selected, the Speaker Configuration settings on or off slightly. 5 50 Select a listening mode and enjoy! To select an input source with the remote controller, press its [SP...
.... See "Using the Listening Modes" on your TV, select the video input that when speaker set B is turned on, speaker set A is selected, the Speaker Configuration settings on or off slightly. 5 50 Select a listening mode and enjoy! To select an input source with the remote controller, press its [SP...
Owner Manual
Page 72
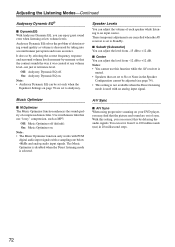
... signals. With this setting, you may find that the content sounds the way it from -12 dB to 100 milliseconds (ms) in the Speaker Configuration cannot be set only when the Equalizer Settings on your DVD player, you can adjust the level from 0 to +12 dB. You can...
... signals. With this setting, you may find that the content sounds the way it from -12 dB to 100 milliseconds (ms) in the Speaker Configuration cannot be set only when the Equalizer Settings on your DVD player, you can adjust the level from 0 to +12 dB. You can...

Owner Manual
Page 74
...Large. Use the Down [ ] button to select "Center," and then use the Left and Right [ ]/[ ] buttons to select Yes or No. Speaker Configuration," and then press the [ENTER] button. Small: Select if the center speaker is connected. Yes: Select if a subwoofer is small. Small: ...is connected. Large: Select if the center speaker is connected to the HDMI OUT. None: Select if no subwoofer is being used. Speaker Configuration, Crossover Frequency, and Double Bass settings only need to be changed if you change a speaker after performing the automatic speaker setup....
...Large. Use the Down [ ] button to select "Center," and then use the Left and Right [ ]/[ ] buttons to select Yes or No. Speaker Configuration," and then press the [ENTER] button. Small: Select if the center speaker is connected. Yes: Select if a subwoofer is small. Small: ...is connected. Large: Select if the center speaker is connected to the HDMI OUT. None: Select if no subwoofer is being used. Speaker Configuration, Crossover Frequency, and Double Bass settings only need to be changed if you change a speaker after performing the automatic speaker setup....

Owner Manual
Page 75
... with your speakers and set accordingly. • Choose a higher crossover frequency if you want more accurate setting, look up the frequency response in the "Speaker Configuration" on the next page. Crossover frequency 40/50/60Hz* 80Hz 100Hz (default) 120Hz 150/200Hz* *Choose the setting suitable for the speaker. Small...
... with your speakers and set accordingly. • Choose a higher crossover frequency if you want more accurate setting, look up the frequency response in the "Speaker Configuration" on the next page. Crossover frequency 40/50/60Hz* 80Hz 100Hz (default) 120Hz 150/200Hz* *Choose the setting suitable for the speaker. Small...
Owner Manual
Page 76
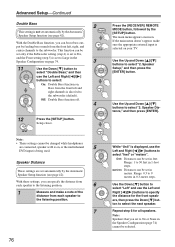
... feet. Speaker Distance These settings are connected, speaker set in 0.3-meter steps. Use the Up and Down [ ]/[ ] buttons to 30 feet in the Speaker Configuration (page 74) cannot be set only if the Subwoofer setting (step 4) is set to the subwoofer. Range: 1 to select "2. Note: Speakers ... can specify the distance from the front left , right, and center channels to Yes, and the Front setting (step 5) is set in the Speaker Configuration on , or the multichannel 5 DVD input is being used. If the main menu doesn't appear, make a note of the distance from ...
... feet. Speaker Distance These settings are connected, speaker set in 0.3-meter steps. Use the Up and Down [ ]/[ ] buttons to 30 feet in the Speaker Configuration (page 74) cannot be set only if the Subwoofer setting (step 4) is set to the subwoofer. Range: 1 to select "2. Note: Speakers ... can specify the distance from the front left , right, and center channels to Yes, and the Front setting (step 5) is set in the Speaker Configuration on , or the multichannel 5 DVD input is being used. If the main menu doesn't appear, make a note of the distance from ...
Owner Manual
Page 77
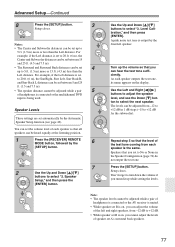
... the Left and Right [ ]/[ ] buttons to adjust the speaker level, and use the Down [ ] button to select "3. Don't forget to +12 dB in the Speaker Configuration (page 74) do not output the test tone. As each speaker is set to 20 ft. (6 m), the Center and Subwoofer distances can be...
... the Left and Right [ ]/[ ] buttons to adjust the speaker level, and use the Down [ ] button to select "3. Don't forget to +12 dB in the Speaker Configuration (page 74) do not output the test tone. As each speaker is set to 20 ft. (6 m), the Center and Subwoofer distances can be...

Owner Manual
Page 78
... to select a speaker. 2-5. Tip: Low frequencies (e.g., 63Hz) affect bass sounds; Audyssey: The tone for each frequency can be adjusted from -6 to +6 dB in the Speaker Configuration (page 74) cannot be performed on your TV. 6 2 Use the Up and Down [ ]/[ ] buttons to select another speaker. The setup menu closes. Press...
... to select a speaker. 2-5. Tip: Low frequencies (e.g., 63Hz) affect bass sounds; Audyssey: The tone for each frequency can be adjusted from -6 to +6 dB in the Speaker Configuration (page 74) cannot be performed on your TV. 6 2 Use the Up and Down [ ]/[ ] buttons to select another speaker. The setup menu closes. Press...

Owner Manual
Page 85
...again. trol code. onds). (3 seconds) 2 Within 30 seconds, press the [RECEIVER] REMOTE MODE but - This allows you want to control an Onkyo component that's not connected via are out of the REMOTE MODE buttons is connected with (default) See the previous page for details. 2 Enter the appropriate...and an analog audio cable (RCA). Each of view, in a rack, for example. 1 Make sure the Onkyo component is preprogrammed with a remote con- If you want to control an Onkyo component by pointing the remote controller at it, or you want to reset, press and hold down the REMOTE...
...again. trol code. onds). (3 seconds) 2 Within 30 seconds, press the [RECEIVER] REMOTE MODE but - This allows you want to control an Onkyo component that's not connected via are out of the REMOTE MODE buttons is connected with (default) See the previous page for details. 2 Enter the appropriate...and an analog audio cable (RCA). Each of view, in a rack, for example. 1 Make sure the Onkyo component is preprogrammed with a remote con- If you want to control an Onkyo component by pointing the remote controller at it, or you want to reset, press and hold down the REMOTE...

Owner Manual
Page 92
...on your DVD player's remote controller. • If your speakers and input sources. Audio There's no sound (page 66). • Check the Speaker Configuration (page 74). The AV receiver is designed for home theater enjoyment and has a wide volume range for a solution in again. Only the ...speakers produce no sound • When the Stereo or Mono listening mode is flashing on the source component. Remove the power cord from your Onkyo dealer. On some DVD-Video discs, you set A and B (page 52). • Check the digital audio output settings on the display, ...
...on your DVD player's remote controller. • If your speakers and input sources. Audio There's no sound (page 66). • Check the Speaker Configuration (page 74). The AV receiver is designed for home theater enjoyment and has a wide volume range for a solution in again. Only the ...speakers produce no sound • When the Stereo or Mono listening mode is flashing on the source component. Remove the power cord from your Onkyo dealer. On some DVD-Video discs, you set A and B (page 52). • Check the digital audio output settings on the display, ...

Owner Manual
Page 93
... listening mode (page 59). • Not much sound may be produced by the surround back speakers with some sources. • Check the Speaker Configuration (page 74). • While speaker set B is connected to select another resolution on . The Late Night function doesn't work •...you use them. • An audio cable may be picking up interference. Speaker set B produces no sound • Speaker set B is properly con- Can't get 6.1- or 7.1-channel playback • While speaker set B only outputs sources that your TV does not support the current video resolution and...
... listening mode (page 59). • Not much sound may be produced by the surround back speakers with some sources. • Check the Speaker Configuration (page 74). • While speaker set B is connected to select another resolution on . The Late Night function doesn't work •...you use them. • An audio cable may be picking up interference. Speaker set B produces no sound • Speaker set B is properly con- Can't get 6.1- or 7.1-channel playback • While speaker set B only outputs sources that your TV does not support the current video resolution and...