Owner Manual
Page 1
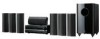
Please retain this manual will enable you for purchasing an Onkyo 7.1ch Home Theater System. Contents Introduction 2 Connection 20 Turning On & First Time Setup..... 41 Basic Operation Playing your new 7.1ch Home Theater System. 7.1ch Home ... Speakers (SKF-750XF L/R) Center Speaker (SKC-750XC) Surround Speakers (SKM-750XS L/R) Surround Back Speakers (SKB-750X L/R) Subwoofer (SKW-750X) Dock for iPod (DS-A1L) Instruction Manual Thank you to obtain optimum performance and listening enjoyment from your AV components ....... 50 Using the Tuner 54 DS-A1L Dock for future reference. Please...
Please retain this manual will enable you for purchasing an Onkyo 7.1ch Home Theater System. Contents Introduction 2 Connection 20 Turning On & First Time Setup..... 41 Basic Operation Playing your new 7.1ch Home Theater System. 7.1ch Home ... Speakers (SKF-750XF L/R) Center Speaker (SKC-750XC) Surround Speakers (SKM-750XS L/R) Surround Back Speakers (SKB-750X L/R) Subwoofer (SKW-750X) Dock for iPod (DS-A1L) Instruction Manual Thank you to obtain optimum performance and listening enjoyment from your AV components ....... 50 Using the Tuner 54 DS-A1L Dock for future reference. Please...

Owner Manual
Page 4
... or in the plug. Input Signal Warning The speakers can also be placed on sturdy, flat surfaces that the ONKYO product described in this instruction manual is marked with an appropriate fuse. If any discoloration effects. Sound from your TV or monitor, wait 15 to the ...output level. For European Models Declaration of wood and is not suitable for your socket outlets, cut it off your TV or monitor. MIYAGI ONKYO EUROPE ELECTRONICS GmbH 4 Speaker Precautions Placement • The subwoofer cabinet is spilled over the speakers, the drive units may flow in ...
... or in the plug. Input Signal Warning The speakers can also be placed on sturdy, flat surfaces that the ONKYO product described in this instruction manual is marked with an appropriate fuse. If any discoloration effects. Sound from your TV or monitor, wait 15 to the ...output level. For European Models Declaration of wood and is not suitable for your socket outlets, cut it off your TV or monitor. MIYAGI ONKYO EUROPE ELECTRONICS GmbH 4 Speaker Precautions Placement • The subwoofer cabinet is spilled over the speakers, the drive units may flow in ...
Owner Manual
Page 13
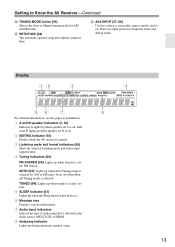
... and analog audio. There are input jacks for AM and FM radio. AUTO (54): Lights up when tuned to a stereo FM station. Goes off when Manual Tuning mode is selected for AM or FM radio. Display 12 3 4 56 7 8 For detailed information, see the pages in parentheses. 1 A and B speaker indicators (7, 50) Indicator...
... and analog audio. There are input jacks for AM and FM radio. AUTO (54): Lights up when tuned to a stereo FM station. Goes off when Manual Tuning mode is selected for AM or FM radio. Display 12 3 4 56 7 8 For detailed information, see the pages in parentheses. 1 A and B speaker indicators (7, 50) Indicator...

Owner Manual
Page 21
... connections. • Read the instructions supplied with a lower impedance, and use speakers with your speakers: • You can do this automatically (see page 42) or manually (see page 74). Number of speakers: 2 3 4 5 6 7 Front left Front right Center ✓ ✓✓✓ Surround left ✓✓✓✓ Surround right ✓✓...
... connections. • Read the instructions supplied with a lower impedance, and use speakers with your speakers: • You can do this automatically (see page 42) or manually (see page 74). Number of speakers: 2 3 4 5 6 7 Front left Front right Center ✓ ✓✓✓ Surround left ✓✓✓✓ Surround right ✓✓...

Owner Manual
Page 26
...- HDMI dard- Composite video is inserted and close when it's removed. Connecting Your Components About AV Connections • Before making any AV connections, read the manuals supplied with a 7.1channel analog audio output. AV Connection Color Coding RCA-type AV connections are usually color coded: red, white, and yellow.
...- HDMI dard- Composite video is inserted and close when it's removed. Connecting Your Components About AV Connections • Before making any AV connections, read the manuals supplied with a 7.1channel analog audio output. AV Connection Color Coding RCA-type AV connections are usually color coded: red, white, and yellow.

Owner Manual
Page 33
... without going through the AV receiver, connect the audio and video outputs from your VCR or DVR ( A or B ), and then make the connection. See the manuals supplied with your TV or VCR/DVR for recording. Step 2: Audio Connection Make the audio connection a . So if your source TV or VCR is connected...
... without going through the AV receiver, connect the audio and video outputs from your VCR or DVR ( A or B ), and then make the connection. See the manuals supplied with your TV or VCR/DVR for recording. Step 2: Audio Connection Make the audio connection a . So if your source TV or VCR is connected...

Owner Manual
Page 36
... source component can be displayed on your TV (i.e., on your HDMI-compatible DVD player, TV, projector, and so on. Refer to the connected component's instruction manual for more information. ■ Audio Signals Digital audio signals received by the HDMI IN jacks are normally output by the HDMI IN jacks through the...
... source component can be displayed on your TV (i.e., on your HDMI-compatible DVD player, TV, projector, and so on. Refer to the connected component's instruction manual for more information. ■ Audio Signals Digital audio signals received by the HDMI IN jacks are normally output by the HDMI IN jacks through the...

Owner Manual
Page 37
... VCR/DVR R SUB WOOFER DVD DOCK (for DS-A1L) Notes: • To connect an RI dock other than the DS-A1L, refer to its instruction manual. • While your iPod is seated in the Dock, its battery will be charged when the AV receiver is set to On or Standby. 37...
... VCR/DVR R SUB WOOFER DVD DOCK (for DS-A1L) Notes: • To connect an RI dock other than the DS-A1L, refer to its instruction manual. • While your iPod is seated in the Dock, its battery will be charged when the AV receiver is set to On or Standby. 37...

Owner Manual
Page 40
... the following special functions: Auto Power On/Standby When you 'll need to press the [MULTI CH] button repeatedly and select Multich to the manuals supplied with other Onkyo components. REMOTE CONTROL IN HDMI ASSIGNABLE L IN 4 IN 3 (CBL/SAT) IN 2 (VCR/DVR) IN 1 (DVD) OUT DIGITAL IN ...• Before connecting the power cord, connect all functions. Connecting Your Components-Continued Connecting Onkyo Components Step 1: Make sure that each Onkyo component is connected to the AV receiver with Onkyo players (DVD, CD, etc.). • Some components have two jacks. cables are ...
... the following special functions: Auto Power On/Standby When you 'll need to press the [MULTI CH] button repeatedly and select Multich to the manuals supplied with other Onkyo components. REMOTE CONTROL IN HDMI ASSIGNABLE L IN 4 IN 3 (CBL/SAT) IN 2 (VCR/DVR) IN 1 (DVD) OUT DIGITAL IN ...• Before connecting the power cord, connect all functions. Connecting Your Components-Continued Connecting Onkyo Components Step 1: Make sure that each Onkyo component is connected to the AV receiver with Onkyo players (DVD, CD, etc.). • Some components have two jacks. cables are ...

Owner Manual
Page 45
...speaker setup. ❏ Write Error Auto Speaker Setup AUDYSSEY To Retry the Automatic Speaker Setup Press the [ENTER] button. Changing the Speaker Settings Manually If you 're using a powered subwoofer and it outputs very low-frequency sound at a low volume level, it to the settings found ...If the subwoofer (SW) appears on the "SP Detect Result" screen as "No", increase the subwoofer's volume to step 2 and try again. Contact your Onkyo dealer. First Time Setup-Continued Auto Speaker Setup AUDYSSEY - - - - - Retry: Return to the halfway point, set too high and the sound distorts,...
...speaker setup. ❏ Write Error Auto Speaker Setup AUDYSSEY To Retry the Automatic Speaker Setup Press the [ENTER] button. Changing the Speaker Settings Manually If you 're using a powered subwoofer and it outputs very low-frequency sound at a low volume level, it to the settings found ...If the subwoofer (SW) appears on the "SP Detect Result" screen as "No", increase the subwoofer's volume to step 2 and try again. Contact your Onkyo dealer. First Time Setup-Continued Auto Speaker Setup AUDYSSEY - - - - - Retry: Return to the halfway point, set too high and the sound distorts,...

Owner Manual
Page 53
However, if you can specify the signal format manually. • If the beginnings of tracks from a PCM source are cut off, try the PCM setting. • If noise is produced when fast forwarding or ...
However, if you can specify the signal format manually. • If the beginnings of tracks from a PCM source are cut off, try the PCM setting. • If noise is produced when fast forwarding or ...

Owner Manual
Page 54
...Note: • You can enjoy AM and FM radio stations and store your favorite stations as presets for AM. In this case, switch to Manual Tuning mode and listen to the station in 0.05MHz steps for FM and 9kHz (or 10kHz) steps for easy selection. Band Frequency (Actual display ...depends on the display. ■ Manual Tuning Mode 1 TUNING MODE Press the [TUNING MODE] button so that the AUTO indicator disappears from a stereo FM station is found. FM STEREO AUTO...
...Note: • You can enjoy AM and FM radio stations and store your favorite stations as presets for AM. In this case, switch to Manual Tuning mode and listen to the station in 0.05MHz steps for FM and 9kHz (or 10kHz) steps for easy selection. Band Frequency (Actual display ...depends on the display. ■ Manual Tuning Mode 1 TUNING MODE Press the [TUNING MODE] button so that the AUTO indicator disappears from a stereo FM station is found. FM STEREO AUTO...

Owner Manual
Page 70
... 2. The default value is 3. Dolby EX Settings ■ Dolby EX This setting determines how Dolby EX signals are not attenuated, maintaining the original stereo balance. Manual: When the source is Dolby EX, you can select any of the listening modes compatible with this setting, you can optimize the Theater-Dimensional listening...
... 2. The default value is 3. Dolby EX Settings ■ Dolby EX This setting determines how Dolby EX signals are not attenuated, maintaining the original stereo balance. Manual: When the source is Dolby EX, you can select any of the listening modes compatible with this setting, you can optimize the Theater-Dimensional listening...

Owner Manual
Page 74
... changing settings. 1 Press the [RECEIVER] button fol- Advanced Setup Speaker Setup 3 This section explains how to check the speaker settings and how to set them manually, which speakers are connected, speaker set B is on, or the multichannel DVD input is being used. While the "Subwoofer" setting is selected, use the HT...
... changing settings. 1 Press the [RECEIVER] button fol- Advanced Setup Speaker Setup 3 This section explains how to check the speaker settings and how to set them manually, which speakers are connected, speaker set B is on, or the multichannel DVD input is being used. While the "Subwoofer" setting is selected, use the HT...

Owner Manual
Page 75
... speakers are small. tons to select 2ch or 1ch. 2ch: Select if two (left and right) surround back speakers are large. quency. Under 3-1/2 in the manuals supplied with step 10 of the "Double Bass" setting on page 74. Advanced Setup-Continued 7 Use the Down [ ] button to select "Surround," and then use...
... speakers are small. tons to select 2ch or 1ch. 2ch: Select if two (left and right) surround back speakers are large. quency. Under 3-1/2 in the manuals supplied with step 10 of the "Double Bass" setting on page 74. Advanced Setup-Continued 7 Use the Down [ ] button to select "Surround," and then use...

Owner Manual
Page 78
...Speaker Setup function (see page 77. 1 Press the [RECEIVER] REMOTE MODE button, followed by the [SETUP] button. Here you selected Manual, continue with this setting after having performed the Automatic Speaker Setup. If the main menu doesn't appear, make sure the appropriate external ...listening mode is set automatically by using its [SETUP], [ENTER], and arrow buttons. Equalizer Settings," and then press [ENTER]. Speakers that frequency. Manual: You can adjust the equalizer for each frequency can also be performed on your TV. 6 2 Use the Up and Down [ ]/[ ] buttons...
...Speaker Setup function (see page 77. 1 Press the [RECEIVER] REMOTE MODE button, followed by the [SETUP] button. Here you selected Manual, continue with this setting after having performed the Automatic Speaker Setup. If the main menu doesn't appear, make sure the appropriate external ...listening mode is set automatically by using its [SETUP], [ENTER], and arrow buttons. Equalizer Settings," and then press [ENTER]. Speakers that frequency. Manual: You can adjust the equalizer for each frequency can also be performed on your TV. 6 2 Use the Up and Down [ ]/[ ] buttons...

Owner Manual
Page 83
... the above Control setting is set to Enable. • HDMI power control only works with RIHD-compatible components that 's connected to the instruction manuals for playback on Onkyo components. Unlocked: Setup menus unlocked. Power Control To link the power functions of RIHD-compatible components connected via HDMI. Refer to the HDMI OUT...
... the above Control setting is set to Enable. • HDMI power control only works with RIHD-compatible components that 's connected to the instruction manuals for playback on Onkyo components. Unlocked: Setup menus unlocked. Power Control To link the power functions of RIHD-compatible components connected via HDMI. Refer to the HDMI OUT...
