Owner Manual
Page 4
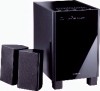
...product name indicates the color. Fit a suitable fuse in own responsibility, that indicated on the body of Conformity We, ONKYO EUROPE ELECTRONICS GmbH LIEGNITZERSTRASSE 6, 82194 GROEBENZELL, GERMANY declare in the plug. Specifications and operation are coloured in accordance with...with the letter N or coloured black. For European Models Declaration of the fuse. MIYAGI ONKYO EUROPE ELECTRONICS GmbH 4 HTX-22HDXPAW Amp/Subwoofer HTX-22HDXST Front Speakers Remote controller and two batteries (AA/R6) Cables with the corresponding technical standards such as follows: ...
...product name indicates the color. Fit a suitable fuse in own responsibility, that indicated on the body of Conformity We, ONKYO EUROPE ELECTRONICS GmbH LIEGNITZERSTRASSE 6, 82194 GROEBENZELL, GERMANY declare in the plug. Specifications and operation are coloured in accordance with...with the letter N or coloured black. For European Models Declaration of the fuse. MIYAGI ONKYO EUROPE ELECTRONICS GmbH 4 HTX-22HDXPAW Amp/Subwoofer HTX-22HDXST Front Speakers Remote controller and two batteries (AA/R6) Cables with the corresponding technical standards such as follows: ...
Owner Manual
Page 6
... Contents 4 Speaker Precautions 5 Features 7 Getting to Know the HTX-22HDX 9 Top Panel and Front 9 Display 10 Rear Panel 11 Remote Controller 12 Installing the Batteries 12 Aiming the Remote Controller 12 Using the Remote Controller 13 Connecting the Speakers 14 Enjoying Home Theater 14 Affixing the Rubber...Outputs 22 Connecting Onkyo Components ........23 Turning On the HTX-22HDX 27 Connecting the Power Cord 27 Turning On and Standby 27 Playing Your Components 28 Basic HTX-22HDX Operation 28 Setting the Display Brightness 29 Muting the HTX-22HDX 29 Using the...
... Contents 4 Speaker Precautions 5 Features 7 Getting to Know the HTX-22HDX 9 Top Panel and Front 9 Display 10 Rear Panel 11 Remote Controller 12 Installing the Batteries 12 Aiming the Remote Controller 12 Using the Remote Controller 13 Connecting the Speakers 14 Enjoying Home Theater 14 Affixing the Rubber...Outputs 22 Connecting Onkyo Components ........23 Turning On the HTX-22HDX 27 Connecting the Power Cord 27 Turning On and Standby 27 Playing Your Components 28 Basic HTX-22HDX Operation 28 Setting the Display Brightness 29 Muting the HTX-22HDX 29 Using the...
Owner Manual
Page 7
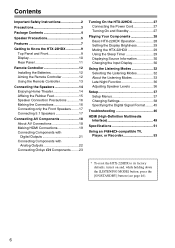
...compressed digital music • Onkyo system control over HDMI • 2 optical inputs, 1 coaxial input • 2 analog inputs • Auto Power Down (on/off) • Theater-Dimensional*6 virtual surround • Remote controller • 16 cm cone HTX-22HDXST: Front Speakers Full... range, bass-reflex speakers • 8 cm full-range cone • 70 Hz-20 kHz frequency response • 40 W maximum power • 6Ω impedance • Gloss finish Designed especially for up to the HTX-22HDX. 7 Features HTX...
...compressed digital music • Onkyo system control over HDMI • 2 optical inputs, 1 coaxial input • 2 analog inputs • Auto Power Down (on/off) • Theater-Dimensional*6 virtual surround • Remote controller • 16 cm cone HTX-22HDXST: Front Speakers Full... range, bass-reflex speakers • 8 cm full-range cone • 70 Hz-20 kHz frequency response • 40 W maximum power • 6Ω impedance • Gloss finish Designed especially for up to the HTX-22HDX. 7 Features HTX...
Owner Manual
Page 9
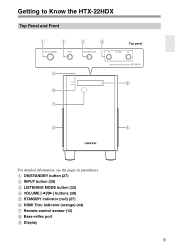
a ON/STANDBY button (27) b INPUT button (28) c LISTENING MODE button (32) d VOLUME buttons (28) e STANDBY indicator (red) (27) f HDMI Thru indicator (orange) (44) g Remote-control sensor (12) h Bass-reflex port i Display 9 Getting to Know the HTX-22HDX Top Panel and Front 1 2 3 4 Top panel 5 6 7 STANDBY HDMI Thru 8 9 8 For detailed information, see the pages in parentheses.
a ON/STANDBY button (27) b INPUT button (28) c LISTENING MODE button (32) d VOLUME buttons (28) e STANDBY indicator (red) (27) f HDMI Thru indicator (orange) (44) g Remote-control sensor (12) h Bass-reflex port i Display 9 Getting to Know the HTX-22HDX Top Panel and Front 1 2 3 4 Top panel 5 6 7 STANDBY HDMI Thru 8 9 8 For detailed information, see the pages in parentheses.

Owner Manual
Page 11
a HDMI IN 1, IN 2, IN 3, and OUT (49) b COAXIAL DIGITAL IN 1 (21) c OPTICAL DIGITAL IN 2 and IN 3 (21) d REMOTE CONTROL (23) e AC INLET (27) f FRONT SPEAKERS, CENTER SPEAKER, and SURROUND SPEAKERS (17) g Cooling fan h LINE 1 and LINE 2 INPUT (22) See pages 14-24 for hookup information. 11 Getting to Know the HTX-22HDX-Continued Rear Panel 1 2 3 4 AC INLET CAUTION : SPEAKER IMPEDANCE 6 ~ 16Ω/SPEAKER 5 6 7 8 For detailed information, see the pages in parentheses.
a HDMI IN 1, IN 2, IN 3, and OUT (49) b COAXIAL DIGITAL IN 1 (21) c OPTICAL DIGITAL IN 2 and IN 3 (21) d REMOTE CONTROL (23) e AC INLET (27) f FRONT SPEAKERS, CENTER SPEAKER, and SURROUND SPEAKERS (17) g Cooling fan h LINE 1 and LINE 2 INPUT (22) See pages 14-24 for hookup information. 11 Getting to Know the HTX-22HDX-Continued Rear Panel 1 2 3 4 AC INLET CAUTION : SPEAKER IMPEDANCE 6 ~ 16Ω/SPEAKER 5 6 7 8 For detailed information, see the pages in parentheses.
Owner Manual
Page 12
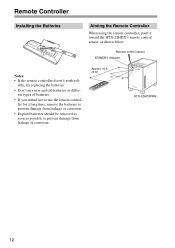
..., remove the batteries to prevent damage from leakage or corrosion. • Expired batteries should be removed as soon as shown below. Remote Controller Installing the Batteries Aiming the Remote Controller When using the remote controller, point it toward the HTX-22HDX's remote control sensor, as possible to prevent damage from leakage or corrosion. Approx. 16 ft. (5 m) 30° 30°...
..., remove the batteries to prevent damage from leakage or corrosion. • Expired batteries should be removed as soon as shown below. Remote Controller Installing the Batteries Aiming the Remote Controller When using the remote controller, point it toward the HTX-22HDX's remote control sensor, as possible to prevent damage from leakage or corrosion. Approx. 16 ft. (5 m) 30° 30°...

Owner Manual
Page 13
Remote Controller-Continued Using the Remote Controller These buttons are intended for use with an Onkyo Blu-ray/ DVD player/recorder or RI Dock with iPod (see the pages in parentheses. a SLEEP button (29) a b ON/STANDBY button (27) b h c SETUP button (38) c i d ...) j DISPLAY button (30) k L NIGHT button (36) l MUTING button (29) m RETURN button (38) n INPUT SELECTOR buttons (28) Buttons that are not explained here are used to control the HTX-22HDX. For detailed information, see pages 25 and 26). 13
Remote Controller-Continued Using the Remote Controller These buttons are intended for use with an Onkyo Blu-ray/ DVD player/recorder or RI Dock with iPod (see the pages in parentheses. a SLEEP button (29) a b ON/STANDBY button (27) b h c SETUP button (38) c i d ...) j DISPLAY button (30) k L NIGHT button (36) l MUTING button (29) m RETURN button (38) n INPUT SELECTOR buttons (28) Buttons that are not explained here are used to control the HTX-22HDX. For detailed information, see pages 25 and 26). 13
Owner Manual
Page 23
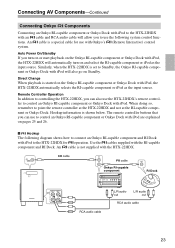
...-capable component and RI Dock with iPod to the HTX-22HDX for use with Onkyo's (Remote Interactive) control system. Auto Power On/Standby If you can use to point the remote controller at the HTX-22HDX and not at the RI-capable component or Onkyo Dock. Remote Controller Operation In addition to controlling the HTX-22HDX, you turn on or start playback on and...
...-capable component and RI Dock with iPod to the HTX-22HDX for use with Onkyo's (Remote Interactive) control system. Auto Power On/Standby If you can use to point the remote controller at the HTX-22HDX and not at the RI-capable component or Onkyo Dock. Remote Controller Operation In addition to controlling the HTX-22HDX, you turn on or start playback on and...
Owner Manual
Page 24
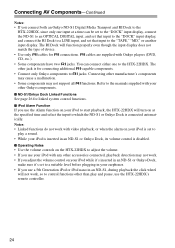
... or when the alarm on your iPod is set to play and pause, use the HTX-22HDX's remote controller. 24 You can connect either one input at the specified time and select the input to which the ND-S1 or Onkyo Dock is for connections. cables are supplied with your earphones. ... other than play a sound. • While your iPod is inserted in an ND-S1 or Onkyo Dock, its volume control is disabled. ■ Operating Notes • Use the volume controls on the HTX-22HDX to adjust the volume. • If you use your iPod with any other accessories connected, playback detection ...
... or when the alarm on your iPod is set to play and pause, use the HTX-22HDX's remote controller. 24 You can connect either one input at the specified time and select the input to which the ND-S1 or Onkyo Dock is for connections. cables are supplied with your earphones. ... other than play a sound. • While your iPod is inserted in an ND-S1 or Onkyo Dock, its volume control is disabled. ■ Operating Notes • Use the volume controls on the HTX-22HDX to adjust the volume. • If you use your iPod with any other accessories connected, playback detection ...
Owner Manual
Page 27
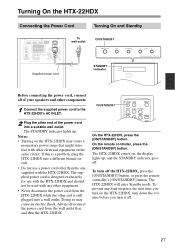
...a suitable wall outlet. The STANDBY indicator lights up , and the STANDBY indicator goes off the HTX-22HDX, press the [ON/STANDBY] button, or press the remote controller's [ON/STANDBY] button. Turning On the HTX-22HDX Connecting the Power Cord Turning On and Standby To ON/STANDBY AC INLET wall outlet CAUTION : SPEAKER... cord, connect all of the power cord into a different branch circuit. • Do not use with the HTX-22HDX and should not be used with any loud surprises the next time you turn on , the display lights up . On the remote controller, press the [ON/STANDBY] button.
...a suitable wall outlet. The STANDBY indicator lights up , and the STANDBY indicator goes off the HTX-22HDX, press the [ON/STANDBY] button, or press the remote controller's [ON/STANDBY] button. Turning On the HTX-22HDX Connecting the Power Cord Turning On and Standby To ON/STANDBY AC INLET wall outlet CAUTION : SPEAKER... cord, connect all of the power cord into a different branch circuit. • Do not use with the HTX-22HDX and should not be used with any loud surprises the next time you turn on , the display lights up . On the remote controller, press the [ON/STANDBY] button.
Owner Manual
Page 28
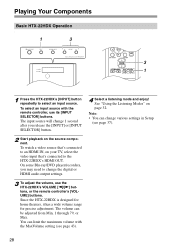
... Listening Modes" on your TV, select the video input that's connected to select an input source. Since the HTX-22HDX is designed for home theaters, it has a wide volume range for precise adjustment. To select an input source with... or Max. You can limit the maximum volume with the remote controller, use the HTX-22HDX's VOLUME buttons, or the remote controller's [VOLUME] buttons. Playing Your Components Basic HTX-22HDX Operation 1. 1 3 STANDBY HDMI Thru 3 1 1 Press the HTX-22HDX's [INPUT] button repeatedly to the HTX-22HDX's HDMI OUT. To watch a video source that's connected ...
... Listening Modes" on your TV, select the video input that's connected to select an input source. Since the HTX-22HDX is designed for home theaters, it has a wide volume range for precise adjustment. To select an input source with... or Max. You can limit the maximum volume with the remote controller, use the HTX-22HDX's VOLUME buttons, or the remote controller's [VOLUME] buttons. Playing Your Components Basic HTX-22HDX Operation 1. 1 3 STANDBY HDMI Thru 3 1 1 Press the HTX-22HDX's [INPUT] button repeatedly to the HTX-22HDX's HDMI OUT. To watch a video source that's connected ...
Owner Manual
Page 29
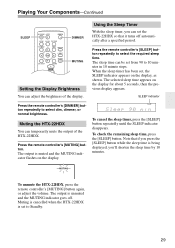
... remaining sleep time, press the [SLEEP] button. MUTING Setting the Display Brightness You can adjust the brightness of the HTX-22HDX. Press the remote controller's [MUTING] button. The output is muted and the MUTING indicator flashes on the display. Note that it turns off .... To unmute the HTX-22HDX, press the remote controller's [MUTING] button again, or adjust the volume. SLEEP indicator Press the remote controller's [DIMMER] button repeatedly to select the required sleep time. The output is unmuted ...
... remaining sleep time, press the [SLEEP] button. MUTING Setting the Display Brightness You can adjust the brightness of the HTX-22HDX. Press the remote controller's [MUTING] button. The output is muted and the MUTING indicator flashes on the display. Note that it turns off .... To unmute the HTX-22HDX, press the remote controller's [MUTING] button again, or adjust the volume. SLEEP indicator Press the remote controller's [DIMMER] button repeatedly to select the required sleep time. The output is unmuted ...
Owner Manual
Page 30
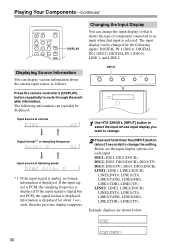
... type of component connected to an input when that input is displayed. INPUT Press the remote controller's [DISPLAY] button repeatedly to change . Information is displayed for the following information can typically be displayed: Input source & volume 1 Use HTX-22HDX's [INPUT] button to select the input whose input display you want to change the setting...
... type of component connected to an input when that input is displayed. INPUT Press the remote controller's [DISPLAY] button repeatedly to change . Information is displayed for the following information can typically be displayed: Input source & volume 1 Use HTX-22HDX's [INPUT] button to select the input whose input display you want to change the setting...
Owner Manual
Page 32
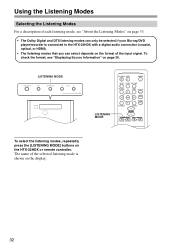
... only be selected if your Blu-ray/DVD player/recorder is shown on the format of each listening mode, see "Displaying Source Information" on the HTX-22HDX or remote controller. Using the Listening Modes Selecting the Listening Modes For a description of the input signal. The name of the selected listening mode is connected to...
... only be selected if your Blu-ray/DVD player/recorder is shown on the format of each listening mode, see "Displaying Source Information" on the HTX-22HDX or remote controller. Using the Listening Modes Selecting the Listening Modes For a description of the input signal. The name of the selected listening mode is connected to...
Owner Manual
Page 36
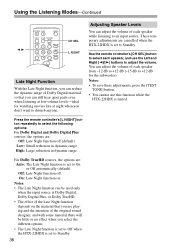
...function on the material that you can still hear quiet parts even when listening at low volume levels-ideal for the subwoofer). Use the remote controller's [CH SEL] button to select each speaker while listening to select the following options: For Dolby Digital and Dolby Digital Plus sources... will be used only when the input source is set to disturb anyone. Press the remote controller's [L NIGHT] button repeatedly to an input source. For Dolby TrueHD sources, the options are cancelled when the HTX-22HDX is Dolby Digital, Dolby Digital Plus, or Dolby TrueHD. • The effect of ...
...function on the material that you can still hear quiet parts even when listening at low volume levels-ideal for the subwoofer). Use the remote controller's [CH SEL] button to select each speaker while listening to select the following options: For Dolby Digital and Dolby Digital Plus sources... will be used only when the input source is set to disturb anyone. Press the remote controller's [L NIGHT] button repeatedly to an input source. For Dolby TrueHD sources, the options are cancelled when the HTX-22HDX is Dolby Digital, Dolby Digital Plus, or Dolby TrueHD. • The effect of ...
Owner Manual
Page 40
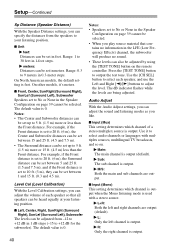
... and Right buttons to No or None in the Speaker Configuration on page 39 cannot be adjusted by using the [TEST TONE] button on the remote controller. Main: The main channel is feet. L+R: Both the left channel is output. Level Cal (Level Calibration) With the Level Calibration settings, you can adjust the...
... and Right buttons to No or None in the Speaker Configuration on page 39 cannot be adjusted by using the [TEST TONE] button on the remote controller. Main: The main channel is feet. L+R: Both the left channel is output. Level Cal (Level Calibration) With the Level Calibration settings, you can adjust the...
Owner Manual
Page 46
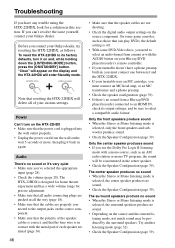
...AM radio station or mono TV program, the sound will appear on your Blu-ray/DVD player/recorder's remote controller. • If your turntable doesn't have any trouble using the HTX-22HDX, look for precise adjustment. • Make sure that the bare wire is selected, the surround speakers ..., turn on the HTX-22HDX • Make sure that can 't resolve the issue yourself, contact your Onkyo dealer. Before you must connect one between it and the HTX-22HDX. • If your turntable uses an MC cartridge, you contact your Onkyo dealer, try resetting the HTX-22HDX, as those that the...
...AM radio station or mono TV program, the sound will appear on your Blu-ray/DVD player/recorder's remote controller. • If your turntable doesn't have any trouble using the HTX-22HDX, look for precise adjustment. • Make sure that the bare wire is selected, the surround speakers ..., turn on the HTX-22HDX • Make sure that can 't resolve the issue yourself, contact your Onkyo dealer. Before you must connect one between it and the HTX-22HDX. • If your turntable uses an MC cartridge, you contact your Onkyo dealer, try resetting the HTX-22HDX, as those that the...
Owner Manual
Page 47
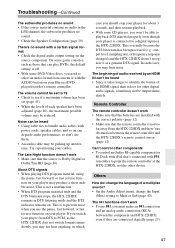
... source? • On the Audio Adjust menu, change the Input (Mux) setting to prevent noise when you need to point the remote controller at the HTX-22HDX, not the other components • To control an Onkyo RI-capable component or RI Dock with iPod that's connected with , remember to select an audio format from the...
... source? • On the Audio Adjust menu, change the Input (Mux) setting to prevent noise when you need to point the remote controller at the HTX-22HDX, not the other components • To control an Onkyo RI-capable component or RI Dock with iPod that's connected with , remember to select an audio format from the...
Owner Manual
Page 53
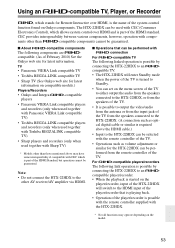
... TV • Toshiba REGZA-LINK compatible TV • Sharp TV (See Onkyo web site for the HTX-22HDX can be performed with CEC which allows system control over HDMI, is possible with the remote controller supplied with the HTX-22HDX. * Not all functions may have some interoperability if compatible with ...from the antenna or from the input jack of the TV from the remote controller of the player/recorder is the name of February 2010) See the Onkyo web site for latest information. The HTX-22HDX can be performed from the speakers connected to an compatible player/...
... TV • Toshiba REGZA-LINK compatible TV • Sharp TV (See Onkyo web site for the HTX-22HDX can be performed with CEC which allows system control over HDMI, is possible with the remote controller supplied with the HTX-22HDX. * Not all functions may have some interoperability if compatible with ...from the antenna or from the input jack of the TV from the remote controller of the player/recorder is the name of February 2010) See the Onkyo web site for latest information. The HTX-22HDX can be performed from the speakers connected to an compatible player/...
Owner Manual
Page 54
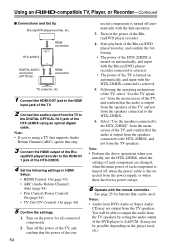
Note: • If you initially use the HTX-22HDX, when the settings of each component are changed, when the main power of each component is turned off automatically with the remote controller. Note: • Perform the above operations when you 're using an optical digital cable. Using an -compatible TV, Player, or Recorder-Continued...
Note: • If you initially use the HTX-22HDX, when the settings of each component are changed, when the main power of each component is turned off automatically with the remote controller. Note: • Perform the above operations when you 're using an optical digital cable. Using an -compatible TV, Player, or Recorder-Continued...


