Owner Manual
Page 2
... parts that produce heat. 9. Do not install near water. 6. tors, heat registers, stoves, or other burning objects on the apparatus. A polarized plug has two blades with dry cloth. 7. Protect the power cord from the wall outlet and refer servicing to dripping or splashing and no objects filled with the apparatus. The rear edge of this apparatus near any heat sources...
... parts that produce heat. 9. Do not install near water. 6. tors, heat registers, stoves, or other burning objects on the apparatus. A polarized plug has two blades with dry cloth. 7. Protect the power cord from the wall outlet and refer servicing to dripping or splashing and no objects filled with the apparatus. The rear edge of this apparatus near any heat sources...
Owner Manual
Page 5
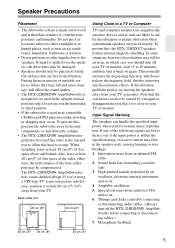
... sound quality. • The HTX-22HDXPAW Amp/Subwoofer is designed to them on again. Bass-reflex port 20 cm (8") STANDBY HDMI Thru 20 cm (8") Using Close to a TV or Computer TVs and computer monitors are fed to be caused by connecting or disconnecting audio cables. (Always turn off your TV or monitor, wait 15 to 30 minutes, and then turn down the volume. • The HTX...
... sound quality. • The HTX-22HDXPAW Amp/Subwoofer is designed to them on again. Bass-reflex port 20 cm (8") STANDBY HDMI Thru 20 cm (8") Using Close to a TV or Computer TVs and computer monitors are fed to be caused by connecting or disconnecting audio cables. (Always turn off your TV or monitor, wait 15 to 30 minutes, and then turn down the volume. • The HTX...
Owner Manual
Page 6
... Analog Outputs 22 Connecting Onkyo Components ........23 Turning On the HTX-22HDX 27 Connecting the Power Cord 27 Turning On and Standby 27 Playing Your Components 28 Basic HTX-22HDX Operation 28 Setting the Display Brightness 29 Muting the HTX-22HDX 29 Using the Sleep Timer 29 Displaying Source Information 30 Changing the Input Display 30 Using the Listening Modes 32 Selecting the Listening Modes 32 About the Listening Modes 33 Late Night Function 36 Adjusting Speaker Levels 36 Setup 37 Setup Menus 37 Changing Settings 38 Specifying the Digital Signal Format...
... Analog Outputs 22 Connecting Onkyo Components ........23 Turning On the HTX-22HDX 27 Connecting the Power Cord 27 Turning On and Standby 27 Playing Your Components 28 Basic HTX-22HDX Operation 28 Setting the Display Brightness 29 Muting the HTX-22HDX 29 Using the Sleep Timer 29 Displaying Source Information 30 Changing the Input Display 30 Using the Listening Modes 32 Selecting the Listening Modes 32 About the Listening Modes 33 Late Night Function 36 Adjusting Speaker Levels 36 Setup 37 Setup Menus 37 Changing Settings 38 Specifying the Digital Signal Format...
Owner Manual
Page 7
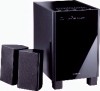
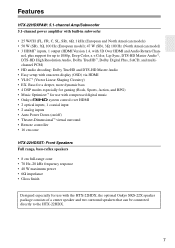
... (North American model) • 3 HDMI*1 inputs, 1 output (HDMI Version 1.4, with the HTX-22HDX, the optional Onkyo SKS-22X speaker package consists of a center speaker and two surround speakers that can be connected directly to 1080p, Deep Color, x.v.Color, Lip Sync, DTS-HD Master Audio*2, DTS-HD High Resolution Audio, Dolby TrueHD*3, Dolby Digital Plus, SACD, and multichannel PCM) • HD audio decoding: Dolby TrueHD and DTS-HD Master Audio • Easy setup with onscreen display (OSD) via HDMI • VLSC...
... (North American model) • 3 HDMI*1 inputs, 1 output (HDMI Version 1.4, with the HTX-22HDX, the optional Onkyo SKS-22X speaker package consists of a center speaker and two surround speakers that can be connected directly to 1080p, Deep Color, x.v.Color, Lip Sync, DTS-HD Master Audio*2, DTS-HD High Resolution Audio, Dolby TrueHD*3, Dolby Digital Plus, SACD, and multichannel PCM) • HD audio decoding: Dolby TrueHD and DTS-HD Master Audio • Easy setup with onscreen display (OSD) via HDMI • VLSC...
Owner Manual
Page 14
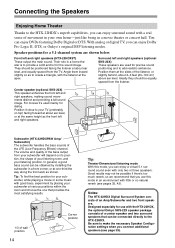
... your listening position. Notes: The HTX-22HDX Digital Surround System consists of the LFE (Low-Frequency Effects) channel. Surround left and right speakers. Center speaker (optional SKS-22X) This speaker enhances the front left and right speakers (HTX-22HDXST) These output the main sound. Subwoofer (HTX-22HDXPAW Amp/ Subwoofer) The subwoofer handles the bass sounds of an Amp/Subwoofer and two front speakers. Be sure to make the necessary Speaker Configuration settings when you connect additional speakers (see pages 35, 42...
... your listening position. Notes: The HTX-22HDX Digital Surround System consists of the LFE (Low-Frequency Effects) channel. Surround left and right speakers. Center speaker (optional SKS-22X) This speaker enhances the front left and right speakers (HTX-22HDXST) These output the main sound. Subwoofer (HTX-22HDXPAW Amp/ Subwoofer) The subwoofer handles the bass sounds of an Amp/Subwoofer and two front speakers. Be sure to make the necessary Speaker Configuration settings when you connect additional speakers (see pages 35, 42...
Owner Manual
Page 19
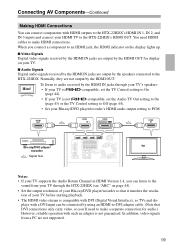
... audio.) However, reliable operation with HDMI outputs to the HTX-22HDX's HDMI IN 1, IN 2, and IN 3 inputs and connect your HDMI TV to PCM. You need to make a separate connection for display on the display lights up. ■ Video Signals Digital video signals received by the HDMI IN jacks are output by the HDMI OUT. Normally, they are not supported. 19 Hint! In addition, video signals from your TV through your TV's speakers: • If your TV is -compatible, set the TV Control setting...
... audio.) However, reliable operation with HDMI outputs to the HTX-22HDX's HDMI IN 1, IN 2, and IN 3 inputs and connect your HDMI TV to PCM. You need to make a separate connection for display on the display lights up. ■ Video Signals Digital video signals received by the HDMI IN jacks are output by the HDMI OUT. Normally, they are not supported. 19 Hint! In addition, video signals from your TV through your TV's speakers: • If your TV is -compatible, set the TV Control setting...
Owner Manual
Page 21
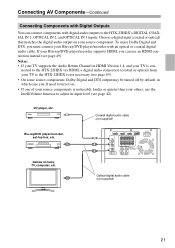
... your TV supports the Audio Return Channel in which case you'll need to turn it on your Blu-ray/DVD player/recorder with an optical or coaxial digital audio cable. CD player, etc. Blu-ray/DVD player/recorder, set-top box, etc. To enjoy Dolby Digital and DTS, you can connect components with digital audio outputs to the HTX-22HDX's DIGITAL COAXIAL IN 1, OPTICAL IN 2, and OPTICAL IN 3 inputs. Games console, TV, computer, etc. nected to the HTX-22HDX via HDMI, a digital audio connection (coaxial or optical) from your...
... your TV supports the Audio Return Channel in which case you'll need to turn it on your Blu-ray/DVD player/recorder with an optical or coaxial digital audio cable. CD player, etc. Blu-ray/DVD player/recorder, set-top box, etc. To enjoy Dolby Digital and DTS, you can connect components with digital audio outputs to the HTX-22HDX's DIGITAL COAXIAL IN 1, OPTICAL IN 2, and OPTICAL IN 3 inputs. Games console, TV, computer, etc. nected to the HTX-22HDX via HDMI, a digital audio connection (coaxial or optical) from your...
Owner Manual
Page 23
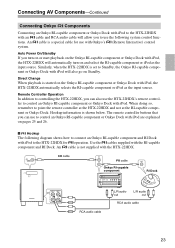
... iPod. The remote controller buttons that you turn on and select the RI-capable component or iPod as the input source. Auto Power On/Standby If you can also use the HTX-22HDX's remote controller to control an Onkyo RI-capable component or Onkyo Dock with the HTX-22HDX. cable cable Onkyo RI-capable component RI Dock STANDBY HDMI Thru SUPER AUDIO CD & DVD AUDIO / VIDEO PLAYER STANDBY / ON STANDBY DISPLAY REPEAT SURROUND PROGRESSIVE VIDEO OFF L/R audio out L/R audio out RCA audio cable RCA audio cable 23 Connecting AV Components-Continued Connecting Onkyo...
... iPod. The remote controller buttons that you turn on and select the RI-capable component or iPod as the input source. Auto Power On/Standby If you can also use the HTX-22HDX's remote controller to control an Onkyo RI-capable component or Onkyo Dock with the HTX-22HDX. cable cable Onkyo RI-capable component RI Dock STANDBY HDMI Thru SUPER AUDIO CD & DVD AUDIO / VIDEO PLAYER STANDBY / ON STANDBY DISPLAY REPEAT SURROUND PROGRESSIVE VIDEO OFF L/R audio out L/R audio out RCA audio cable RCA audio cable 23 Connecting AV Components-Continued Connecting Onkyo...
Owner Manual
Page 24
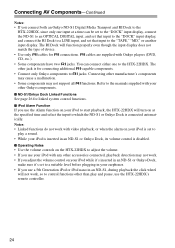
... the manuals supplied with Onkyo players (DVD, CD, etc.). • Some components have two jacks. Connecting other Onkyo components. ■ ND-S1/Onkyo Dock Linked Functions See page 26 for connections. cables are supplied with your iPod is set that input to the "TAPE," "MD," or another input display. Connecting AV Components-Continued Notes: • If you connect both an Onkyo ND-S1 Digital Media Transport and RI Dock to the HTX-22HDX, since...
... the manuals supplied with Onkyo players (DVD, CD, etc.). • Some components have two jacks. Connecting other Onkyo components. ■ ND-S1/Onkyo Dock Linked Functions See page 26 for connections. cables are supplied with your iPod is set that input to the "TAPE," "MD," or another input display. Connecting AV Components-Continued Notes: • If you connect both an Onkyo ND-S1 Digital Media Transport and RI Dock to the HTX-22HDX, since...
Owner Manual
Page 25
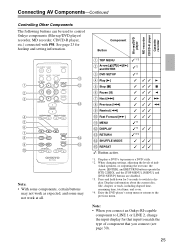
...;✓ ✓: Button active. *1. When changing settings, adjusting the levels of component that you connect an Onkyo RI-capable component to LINE 1 or LINE 2, change the input display for that input to display. Blu-ray/DVD player MD recorder CD/CD-R player Cassette recorder 25 Displays a DVD's top menu or a DVD's title. *2. vidual speakers, or outputting the test tone, the Arrow, [ENTER], and [RETURN] buttons operate the HTX-22HDX, and the [TOP MENU], [MENU], and [DVD SETUP] buttons are disabled. *3. Displays information about the current disc, title, chapter...
...;✓ ✓: Button active. *1. When changing settings, adjusting the levels of component that you connect an Onkyo RI-capable component to LINE 1 or LINE 2, change the input display for that input to display. Blu-ray/DVD player MD recorder CD/CD-R player Cassette recorder 25 Displays a DVD's top menu or a DVD's title. *2. vidual speakers, or outputting the test tone, the Arrow, [ENTER], and [RETURN] buttons operate the HTX-22HDX, and the [TOP MENU], [MENU], and [DVD SETUP] buttons are disabled. *3. Displays information about the current disc, title, chapter...
Owner Manual
Page 26
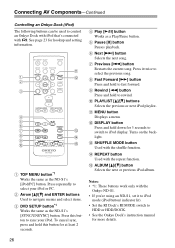
... select items. c DVD SETUP button*1 Works the same as the ND-S1's [SYNC/UNSYNC] button. b Arrow and ENTER buttons Used to select your iPod. e Pause [] button Pauses playback. Turns on the backlight. m SHUFFLE MODE button Used with the repeat function. Connecting AV Components-Continued Controlling an Onkyo Dock (iPod) The following buttons can be used to fast forward. d Play [/] button Works as the ND-S1's [iPod/PC] button. h Fast Forward [] button Press and hold to iPod display. i Rewind [] button...
... select items. c DVD SETUP button*1 Works the same as the ND-S1's [SYNC/UNSYNC] button. b Arrow and ENTER buttons Used to select your iPod. e Pause [] button Pauses playback. Turns on the backlight. m SHUFFLE MODE button Used with the repeat function. Connecting AV Components-Continued Controlling an Onkyo Dock (iPod) The following buttons can be used to fast forward. d Play [/] button Works as the ND-S1's [iPod/PC] button. h Fast Forward [] button Press and hold to iPod display. i Rewind [] button...
Owner Manual
Page 28
...some Blu-ray/DVD player/recorders, you release the [INPUT] or [INPUT SELECTOR] button. 4 Select a listening mode and enjoy! The input source will change 1 second after you may need to an HDMI IN, on page 32. Since the HTX-22HDX is designed for home theaters, it has a wide volume range for precise adjustment. The volume can limit the maximum volume with the remote controller, use the HTX-22HDX's VOLUME buttons, or the remote controller's [VOLUME] buttons. Playing Your Components Basic HTX-22HDX Operation 1. 1 3 STANDBY HDMI Thru 3 1 1 Press the HTX-22HDX's [INPUT] button...
...some Blu-ray/DVD player/recorders, you release the [INPUT] or [INPUT SELECTOR] button. 4 Select a listening mode and enjoy! The input source will change 1 second after you may need to an HDMI IN, on page 32. Since the HTX-22HDX is designed for home theaters, it has a wide volume range for precise adjustment. The volume can limit the maximum volume with the remote controller, use the HTX-22HDX's VOLUME buttons, or the remote controller's [VOLUME] buttons. Playing Your Components Basic HTX-22HDX Operation 1. 1 3 STANDBY HDMI Thru 3 1 1 Press the HTX-22HDX's [INPUT] button...
Owner Manual
Page 40
... default value is output. Press the [TEST TONE] button to select audio channels or languages with a stereo source. meters: Distances can be set in the Speaker Configuration on page 39 cannot be selected. Notes: • The Center and Subwoofer distances can be adjusted by using the [TEST TONE] button on . The dB indicator flashes while the levels are output (default). Sub: The sub channel is 0. On other models, it to output the test tone. L: Only the left and right channels are being adjusted. Use...
... default value is output. Press the [TEST TONE] button to select audio channels or languages with a stereo source. meters: Distances can be set in the Speaker Configuration on page 39 cannot be selected. Notes: • The Center and Subwoofer distances can be adjusted by using the [TEST TONE] button on . The dB indicator flashes while the levels are output (default). Sub: The sub channel is 0. On other models, it to output the test tone. L: Only the left and right channels are being adjusted. Use...
Owner Manual
Page 42
... Source Setup menu. Use the Left and Right buttons to set the level. For components that the picture and sound are set from -12 dB to +12 dB in 10 millisecond steps. If it with a sampling rate below 48 kHz and analog audio input signals. Source Setup This section explains items on . The default value is applied by applying a delay to the audio signal. Note: • The Music Optimizer function only works with PCM digital audio input signals...
... Source Setup menu. Use the Left and Right buttons to set the level. For components that the picture and sound are set from -12 dB to +12 dB in 10 millisecond steps. If it with a sampling rate below 48 kHz and analog audio input signals. Source Setup This section explains items on . The default value is applied by applying a delay to the audio signal. Note: • The Music Optimizer function only works with PCM digital audio input signals...
Owner Manual
Page 43
... Setup menu, the names of connected -compatible components and "RIHD On" are displayed on the HTX-22HDX. 43 The default value is set to Auto. • With some TVs and input signals, no sound may want to listen to audio from an HDMI component through your TV's speakers instead of the HTX-22HDX's speakers. Note: • The Power On Volume setting cannot be out- Disable: HDMI lip sync disabled (default). The default value is output by the HDMI OUT. HDMI Setup...
... Setup menu, the names of connected -compatible components and "RIHD On" are displayed on the HTX-22HDX. 43 The default value is set to Auto. • With some TVs and input signals, no sound may want to listen to audio from an HDMI component through your TV's speakers instead of the HTX-22HDX's speakers. Note: • The Power On Volume setting cannot be out- Disable: HDMI lip sync disabled (default). The default value is output by the HDMI OUT. HDMI Setup...
Owner Manual
Page 46
..., check its factory defaults, turn on the source component. The HTX-22HDX is designed for home theater enjoyment and has a wide volume range for a solution in again. Only the center speaker produces sound • If you use the Dolby Pro Logic II listening mode with a mono source, such as an AM radio station or mono TV program, the sound will be concentrated in contact with the AUDIO button on your Blu-ray/DVD player/recorder's remote controller. • If...
..., check its factory defaults, turn on the source component. The HTX-22HDX is designed for home theater enjoyment and has a wide volume range for a solution in again. Only the center speaker produces sound • If you use the Dolby Pro Logic II listening mode with a mono source, such as an AM radio station or mono TV program, the sound will be concentrated in contact with the AUDIO button on your Blu-ray/DVD player/recorder's remote controller. • If...
Owner Manual
Page 47
... use the pause, fast forward, or fast reverse function on your Blu-ray/DVD player/recorder's remote controller. On some game consoles, such as those that can play DVDs, the default setting is usually because the DTS bitstream has been processed (e.g., output level, sampling rate, or frequency response changed) and the HTX-22HDX doesn't recognize it takes longer to bundle audio cables with a certain signal format • Check the digital audio output setting on can 't be output...
... use the pause, fast forward, or fast reverse function on your Blu-ray/DVD player/recorder's remote controller. On some game consoles, such as those that can play DVDs, the default setting is usually because the DTS bitstream has been processed (e.g., output level, sampling rate, or frequency response changed) and the HTX-22HDX doesn't recognize it takes longer to bundle audio cables with a certain signal format • Check the digital audio output setting on can 't be output...
Owner Manual
Page 50
..., video signals from a component connected via HDMI, check its setup. Refer to make a separate connection for details. 50 plays with DVI (Digital Visual Interface), so TVs and dis- HDMI (High-Definition Multimedia Interface)-Continued Notes: • The HDMI video stream is compatible with a DVI input can be restricted by using an HDMI-to-DVI adapter cable. (Note that DVI connections only carry video, so you'll need to the connected component's instruction manual for audio.) However, reliable operation...
..., video signals from a component connected via HDMI, check its setup. Refer to make a separate connection for details. 50 plays with DVI (Digital Visual Interface), so TVs and dis- HDMI (High-Definition Multimedia Interface)-Continued Notes: • The HDMI video stream is compatible with a DVI input can be restricted by using an HDMI-to-DVI adapter cable. (Note that DVI connections only carry video, so you'll need to the connected component's instruction manual for audio.) However, reliable operation...
Owner Manual
Page 53
...) * Models other than those mentioned above the HDMI cable.) • Input to the HDMI input of the player/recorder that can be selected with CEC which is part of the HDMI standard. Note: • Do not connect the HTX-22HDX to output the video/audio from the antenna or from the input jack of the TV from the remote controller of the TV. CEC provides interoperability between various components, however, operation with components other...
...) * Models other than those mentioned above the HDMI cable.) • Input to the HDMI input of the player/recorder that can be selected with CEC which is part of the HDMI standard. Note: • Do not connect the HTX-22HDX to output the video/audio from the antenna or from the input jack of the TV from the remote controller of the TV. CEC provides interoperability between various components, however, operation with components other...
Owner Manual
Page 54
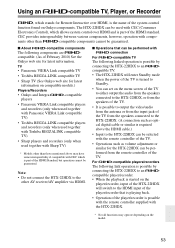
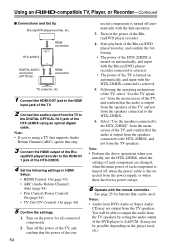
...the HTX-22HDX connected is turned on the power of the Blu-ray/DVD player/recorder, and confirm the following settings in HDMI Setup: • HDMI Control: On (page 43) • ARC (Audio Return Channel): Auto (page 44) • Pow Control (Power Control): On (page 44) • TV Ctrl (TV Control): On (page 44) 5 Confirm the settings. 1. Turn on the player models.) STANDBY HDMI Thru HTX-22HDX HDMI connection DIGITAL AUDIO connection (OPTICAL) HDMI connection TV, projector, etc. 1 Connect the HDMI OUT jack to the HTX-22HDX. 6. Select "Use the speakers connected to the HTX-22HDX...
...the HTX-22HDX connected is turned on the power of the Blu-ray/DVD player/recorder, and confirm the following settings in HDMI Setup: • HDMI Control: On (page 43) • ARC (Audio Return Channel): Auto (page 44) • Pow Control (Power Control): On (page 44) • TV Ctrl (TV Control): On (page 44) 5 Confirm the settings. 1. Turn on the player models.) STANDBY HDMI Thru HTX-22HDX HDMI connection DIGITAL AUDIO connection (OPTICAL) HDMI connection TV, projector, etc. 1 Connect the HDMI OUT jack to the HTX-22HDX. 6. Select "Use the speakers connected to the HTX-22HDX...


