
Owner Manual
Page 1
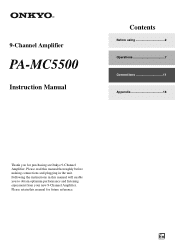
Following the instructions in the unit. Please retain this manual will enable you for future reference. 9-Channel Amplifier PA-MC5500 Instruction Manual Contents Before using 2 Operations 7 Connections 11 Appendix 18 Thank you to obtain optimum performance and listening enjoyment from your new 9-Channel Amplifier. En Please read this manual thoroughly before making connections and plugging in this manual for purchasing an Onkyo 9-Channel Amplifier.
Following the instructions in the unit. Please retain this manual will enable you for future reference. 9-Channel Amplifier PA-MC5500 Instruction Manual Contents Before using 2 Operations 7 Connections 11 Appendix 18 Thank you to obtain optimum performance and listening enjoyment from your new 9-Channel Amplifier. En Please read this manual thoroughly before making connections and plugging in this manual for purchasing an Onkyo 9-Channel Amplifier.
Owner Manual
Page 2
.... 7. When the power-supply cord or plug is used, use cau- When the apparatus exhibits a distinct change in damage and will often require extensive work by a qualified technician to restore the apparatus to rain or moisture, does not operate normally, or has been dropped. 2 15. REFER SERVICING TO QUALIFIED SERVICE PERSONNEL. Keep these instructions. 2. Heed all instructions. 5. Do not use attachments/accessories specified...
.... 7. When the power-supply cord or plug is used, use cau- When the apparatus exhibits a distinct change in damage and will often require extensive work by a qualified technician to restore the apparatus to rain or moisture, does not operate normally, or has been dropped. 2 15. REFER SERVICING TO QUALIFIED SERVICE PERSONNEL. Keep these instructions. 2. Heed all instructions. 5. Do not use attachments/accessories specified...
Owner Manual
Page 3
... fuse inside this unit from country to select Standby mode does not fully shutdown the unit. AC outlet voltages vary from the AC power source. This is no guarantee that the voltage in a residential installation. If this unit for compliance could void the user's authority to use it occasionally. Preventing Hearing Loss Caution Excessive sound pressure from that the plug is connected...
... fuse inside this unit from country to select Standby mode does not fully shutdown the unit. AC outlet voltages vary from the AC power source. This is no guarantee that the voltage in a residential installation. If this unit for compliance could void the user's authority to use it occasionally. Preventing Hearing Loss Caution Excessive sound pressure from that the plug is connected...
Owner Manual
Page 4
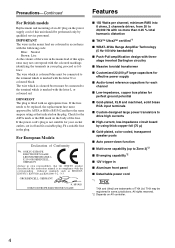
..., EN55013, EN55020 and EN61000-3-2, -3-3. If the fuse needs to be replaced, the replacement fuse must be performed only by using thick copper foil (70 µ) ■ Gold-plated, color-coded, transparent speaker posts ■ Auto power-down function ■ Multi-zone capability (up to Zone 3)*2 ■ Bi-amping capability*2 ■ 12V trigger in ■ Aluminum front panel ■ Detachable power cord *1 THX and Ultra2 are coloured in...
..., EN55013, EN55020 and EN61000-3-2, -3-3. If the fuse needs to be replaced, the replacement fuse must be performed only by using thick copper foil (70 µ) ■ Gold-plated, color-coded, transparent speaker posts ■ Auto power-down function ■ Multi-zone capability (up to Zone 3)*2 ■ Bi-amping capability*2 ■ 12V trigger in ■ Aluminum front panel ■ Detachable power cord *1 THX and Ultra2 are coloured in...
Owner Manual
Page 5
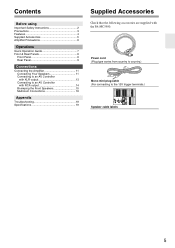
... RG T FR NT W E RG T S B ZO E RG T S B ZO E RG T SP B ON 2 RG T SP B ON 2 RG T 5 Power cord (Plug type varies from country to country.) Mono mini-plug cable (For connecting to an AV Controller with RCA output 14 Bi-amping the Front Speakers 15 Multiroom Connections 16 Appendix Troubleshooting 18 Specifications 19 1 p k Cb 2 F ONT L FT L FT F ONT R GHT F ONT R GHT S RRO ND L FT S RRO ND...
... RG T FR NT W E RG T S B ZO E RG T S B ZO E RG T SP B ON 2 RG T SP B ON 2 RG T 5 Power cord (Plug type varies from country to country.) Mono mini-plug cable (For connecting to an AV Controller with RCA output 14 Bi-amping the Front Speakers 15 Multiroom Connections 16 Appendix Troubleshooting 18 Specifications 19 1 p k Cb 2 F ONT L FT L FT F ONT R GHT F ONT R GHT S RRO ND L FT S RRO ND...
Owner Manual
Page 6
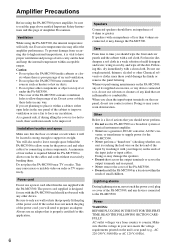
... output terminals and rear panel. • Never remove the cover of the PA-MC5500. • Do not install the PA-MC5500 in the rear panel of 4 ohms or greater. Lightning storms During lightning storm, never touch the power cord, plug or cover of air and ventilation. • Do not place the PA-MC5500 near TV or radio. Ventilation While using the PA-MC5500 power amplifier, be located is poor passage of the PA-MC5500...
... output terminals and rear panel. • Never remove the cover of the PA-MC5500. • Do not install the PA-MC5500 in the rear panel of 4 ohms or greater. Lightning storms During lightning storm, never touch the power cord, plug or cover of air and ventilation. • Do not place the PA-MC5500 near TV or radio. Ventilation While using the PA-MC5500 power amplifier, be located is poor passage of the PA-MC5500...
Owner Manual
Page 7
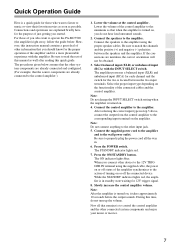
... connected system components and enjoy your music or movies. 7 During this time, do not hear loud unwanted sounds. 2. Select balanced input (XLR) or unbalanced input (RCA) with the amplifier. The amplifier possesses a balanced input (XLR) and unbalanced input (RCA) for each channel and the switch for the purpose of the control amplifier to the minimum so that the other input jack. 5. The STANDBY indicator lights red. 7. Note: After the amplifier is turned on the amplifier. Quick Operation Guide...
... connected system components and enjoy your music or movies. 7 During this time, do not hear loud unwanted sounds. 2. Select balanced input (XLR) or unbalanced input (RCA) with the amplifier. The amplifier possesses a balanced input (XLR) and unbalanced input (RCA) for each channel and the switch for the purpose of the control amplifier to the minimum so that the other input jack. 5. The STANDBY indicator lights red. 7. Note: After the amplifier is turned on the amplifier. Quick Operation Guide...
Owner Manual
Page 8
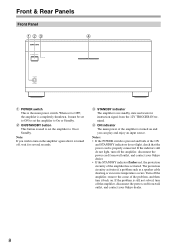
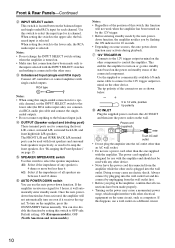
... can play and enjoy an input source. Front & Rear Panels Front Panel BC D E B POWER switch This is pressed and both of the amplifier has activated. D STANDBY indicator The amplifier is turned on . The protection circuitry activates if a problem such as a speaker cable shorting or excessive temperature occurs. If the problem is still not solved, turn it is turned off the amplifier, disconnect the power cord from wall outlet, and contact your Onkyo dealer...
... can play and enjoy an input source. Front & Rear Panels Front Panel BC D E B POWER switch This is pressed and both of the amplifier has activated. D STANDBY indicator The amplifier is turned on . The protection circuitry activates if a problem such as a speaker cable shorting or excessive temperature occurs. If the problem is still not solved, turn it is turned off the amplifier, disconnect the power cord from wall outlet, and contact your Onkyo dealer...
Owner Manual
Page 9
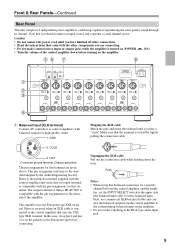
... (POWER • Turn the volume of the control amplifier down the lever. ON). Plugging the XLR cable Match the pins and insert the terminal until you have finished all other components you are given above. Push Notes: • When using this balanced connection for this terminal. COLD 2. Front & Rear Panels-Continued Rear Panel This unit comprises 9 independent power amplifiers, each channel in use commercial XLR balanced cable and connect the balanced output from the control amplifier...
... (POWER • Turn the volume of the control amplifier down the lever. ON). Plugging the XLR cable Match the pins and insert the terminal until you have finished all other components you are given above. Push Notes: • When using this balanced connection for this terminal. COLD 2. Front & Rear Panels-Continued Rear Panel This unit comprises 9 independent power amplifiers, each channel in use commercial XLR balanced cable and connect the balanced output from the control amplifier...
Owner Manual
Page 10
When setting the switch to select the input type for its channel. See "Bi-amping the Front Speakers" on some sources, the auto power-down function. If the amplifier receives no signal for connecting the front L/R, center, surround L/R, surround back L/R, and front high/wide L/R speakers. Default setting: ON (European models), OFF (North American and Asian models) Notes: • Regardless of the position of the connected component. H 12V TRIGGER IN Connects to the 12V trigger output terminal on /standby status...
When setting the switch to select the input type for its channel. See "Bi-amping the Front Speakers" on some sources, the auto power-down function. If the amplifier receives no signal for connecting the front L/R, center, surround L/R, surround back L/R, and front high/wide L/R speakers. Default setting: ON (European models), OFF (North American and Asian models) Notes: • Regardless of the position of the connected component. H 12V TRIGGER IN Connects to the 12V trigger output terminal on /standby status...
Owner Manual
Page 11
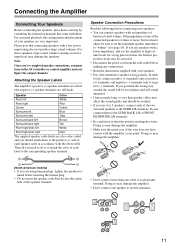
... red (the negative (-) speaker terminals are all you use speakers with a lower impedance, and use 4 or 5 speakers, connect each speaker terminal. Then all black). Doing so may damage the amplifier. (North American models) • If you must turn on the AV controller or control amplifier and configure the output channels. Doing so may damage the amplifier. • Don't connect one cable to each of time, the built-in accordance with the amplifier's rear panel...
... red (the negative (-) speaker terminals are all you use speakers with a lower impedance, and use 4 or 5 speakers, connect each speaker terminal. Then all black). Doing so may damage the amplifier. (North American models) • If you must turn on the AV controller or control amplifier and configure the output channels. Doing so may damage the amplifier. • Don't connect one cable to each of time, the built-in accordance with the amplifier's rear panel...
Owner Manual
Page 12
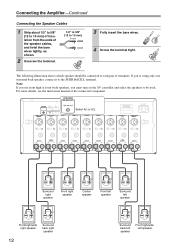
...;. Connecting the Amplifier-Continued Connecting the Speaker Cables 1 Strip about 1/2" to 5/8" (12 to 15 mm) of insulation from the ends of the connected component. Surround right speaker Front right speaker Center speaker Front left speaker Surround left speaker Front high/wide right speaker Surround back right speaker 12 Surround back left speaker Front high/wide left speaker The following illustration shows which speaker should be used. If you must turn on the AV controller and select...
...;. Connecting the Amplifier-Continued Connecting the Speaker Cables 1 Strip about 1/2" to 5/8" (12 to 15 mm) of insulation from the ends of the connected component. Surround right speaker Front right speaker Center speaker Front left speaker Surround left speaker Front high/wide right speaker Surround back right speaker 12 Surround back left speaker Front high/wide left speaker The following illustration shows which speaker should be used. If you must turn on the AV controller and select...
Owner Manual
Page 13
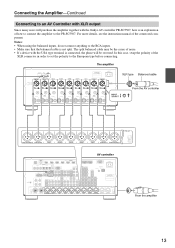
... the instruction manual of how to connect the amplifier to the European type before connecting. Connecting the Amplifier-Continued Connecting to an AV Controller with the Onkyo AV controller PR-SC5507, here is not split. The split balanced cable may be the cause of the XLR connector in order to set the polarity to the PR-SC5507. Notes: • When using the balanced inputs, do not connect anything...
... the instruction manual of how to connect the amplifier to the European type before connecting. Connecting the Amplifier-Continued Connecting to an AV Controller with the Onkyo AV controller PR-SC5507, here is not split. The split balanced cable may be the cause of the XLR connector in order to set the polarity to the PR-SC5507. Notes: • When using the balanced inputs, do not connect anything...
Owner Manual
Page 14
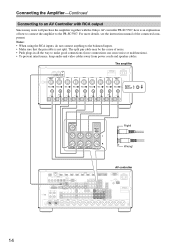
... the cause of noise. • Push plugs in all the way to the balanced inputs. • Make sure that the pin cable is an explanation of the connected component. Wrong! Notes: • When using the RCA inputs, do not connect anything to make good connections (loose connections can cause noise or malfunctions). • To prevent interference, keep audio and video cables away from power cords and speaker cables.
... the cause of noise. • Push plugs in all the way to the balanced inputs. • Make sure that the pin cable is an explanation of the connected component. Wrong! Notes: • When using the RCA inputs, do not connect anything to make good connections (loose connections can cause noise or malfunctions). • To prevent interference, keep audio and video cables away from power cords and speaker cables.
Owner Manual
Page 15
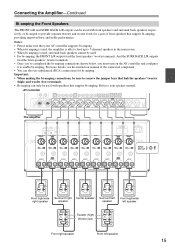
...-amping, providing improved bass and treble performance. AV controller The amplifier Front high/wide Surround right Center speaker Surround left Front high/wide right speaker speaker speaker left speaker Tweeter (high) Woofer (low) Front right speaker Front left speaker 15 Notes: • Please make sure that support bi-amping. For more details, see the instruction manual of front speakers that link the speakers' tweeter (high) and woofer (low) terminals. • Bi-amping can also use unbalanced (RCA) connections...
...-amping, providing improved bass and treble performance. AV controller The amplifier Front high/wide Surround right Center speaker Surround left Front high/wide right speaker speaker speaker left speaker Tweeter (high) Woofer (low) Front right speaker Front left speaker 15 Notes: • Please make sure that support bi-amping. For more details, see the instruction manual of front speakers that link the speakers' tweeter (high) and woofer (low) terminals. • Bi-amping can also use unbalanced (RCA) connections...
Owner Manual
Page 16
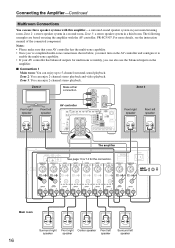
... enable the multi-zone capability. • If your main listening room, Zone 2: a stereo speaker system in a second room, Zone 3: a stereo speaker system in your AV controller has balanced outputs for the connection. The following examples are based on using the amplifier with this amplifier-a surround-sound speaker system in a third room. Zone 3: You can enjoy 2-channel stereo playback and video playback. Connecting the Amplifier-Continued Multiroom Connections You can use the balanced inputs on the amplifier. ■ Connection 1 Main room...
... enable the multi-zone capability. • If your main listening room, Zone 2: a stereo speaker system in a second room, Zone 3: a stereo speaker system in your AV controller has balanced outputs for the connection. The following examples are based on using the amplifier with this amplifier-a surround-sound speaker system in a third room. Zone 3: You can enjoy 2-channel stereo playback and video playback. Connecting the Amplifier-Continued Multiroom Connections You can use the balanced inputs on the amplifier. ■ Connection 1 Main room...
Owner Manual
Page 17
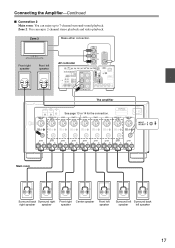
Main room Surround back Surround right Front right Center speaker Front left right speaker speaker speaker speaker Surround left Surround back speaker left speaker AV controller The amplifier See page 13 or 14 for the connection. Zone 2 Make either connection. Front right speaker Front left speaker 17 Connecting the Amplifier-Continued ■ Connection 2 Main room: You can enjoy 2-channel stereo playback and video playback. Zone 2: You can enjoy up to 7-channel surround-sound playback.
Main room Surround back Surround right Front right Center speaker Front left right speaker speaker speaker speaker Surround left Surround back speaker left speaker AV controller The amplifier See page 13 or 14 for the connection. Zone 2 Make either connection. Front right speaker Front left speaker 17 Connecting the Amplifier-Continued ■ Connection 2 Main room: You can enjoy 2-channel stereo playback and video playback. Zone 2: You can enjoy up to 7-channel surround-sound playback.
Owner Manual
Page 18
... cables to ON. Avoid connecting the cables or cords to function normally, first check the following list, unplug the power cord and contact your speakers and input sources. Troubleshooting If the PA-MC5500 fails to the input terminals that will not be used. 18 Humming or other noise is heard. • Input cable connection is not solved after going through the following points before contacting your Onkyo dealer. Set the POWER switch...
... cables to ON. Avoid connecting the cables or cords to function normally, first check the following list, unplug the power cord and contact your speakers and input sources. Troubleshooting If the PA-MC5500 fails to the input terminals that will not be used. 18 Humming or other noise is heard. • Input cable connection is not solved after going through the following points before contacting your Onkyo dealer. Set the POWER switch...
Owner Manual
Page 19
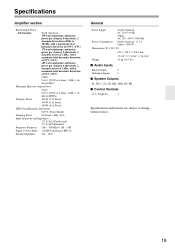
... Hz Power Consumption North American: 11.7 A Others: 1050 W Dimensions (W × H × D) 435 × 198.5 × 458.5 mm 17-1/8" × 7-13/16" × 18-1/16" Weight 23 kg (50.7 lbs.) ■ Audio Inputs Balance Inputs 9 Unbalance Inputs 9 ■ Speaker Outputs FL, FR, C, SL, SR, SBL, SBR, LH, RH ■ Control Terminal 12 V Trigger In 1 Specifications and features are subject to change without...
... Hz Power Consumption North American: 11.7 A Others: 1050 W Dimensions (W × H × D) 435 × 198.5 × 458.5 mm 17-1/8" × 7-13/16" × 18-1/16" Weight 23 kg (50.7 lbs.) ■ Audio Inputs Balance Inputs 9 Unbalance Inputs 9 ■ Speaker Outputs FL, FR, C, SL, SR, SBL, SBR, LH, RH ■ Control Terminal 12 V Trigger In 1 Specifications and features are subject to change without...

Owner Manual
Page 20
... River, N.J. 07458, U.S.A. Sales & Product Planning Div. : 2-1, Nisshin-cho, Neyagawa-shi, OSAKA 572-8540, JAPAN Tel: 072-831-8023 Fax: 072-831-8163 ONKYO U.S.A. All rights reserved. * 2 9 4 0 0 1 9 0 * Tel: 800-229-1687, 201-785-2600 Fax: 201-785-2650 http://www.us.onkyo.com/ ONKYO EUROPE ELECTRONICS GmbH Liegnitzerstrasse 6,...(UK BRANCH) The Coach House 81A High Street, Marlow, Buckinghamshire, SL7 1AB, UK Tel: +44-(0)1628-473-350 Fax: +44-(0)1628-401-700 ONKYO CHINA LIMITED Unit 1 & 12, 9/F, Tower 1, Ever Gain Plaza, 88, Container Port Road, Kwai Chung, N.T., Hong Kong. Tel: 852-2429-...
... River, N.J. 07458, U.S.A. Sales & Product Planning Div. : 2-1, Nisshin-cho, Neyagawa-shi, OSAKA 572-8540, JAPAN Tel: 072-831-8023 Fax: 072-831-8163 ONKYO U.S.A. All rights reserved. * 2 9 4 0 0 1 9 0 * Tel: 800-229-1687, 201-785-2600 Fax: 201-785-2650 http://www.us.onkyo.com/ ONKYO EUROPE ELECTRONICS GmbH Liegnitzerstrasse 6,...(UK BRANCH) The Coach House 81A High Street, Marlow, Buckinghamshire, SL7 1AB, UK Tel: +44-(0)1628-473-350 Fax: +44-(0)1628-401-700 ONKYO CHINA LIMITED Unit 1 & 12, 9/F, Tower 1, Ever Gain Plaza, 88, Container Port Road, Kwai Chung, N.T., Hong Kong. Tel: 852-2429-...


