Owner Manual
Page 2
... touch dangerous voltage points or short-out parts that could result in a fire or electric shock. Unplug this unit. 17. When the power-supply cord or plug is used, use this indicates a need for long periods of the polarized or grounding-type plug. The rear edge... WARNING AVIS RISK OF ELECTRIC SHOCK RISQUE DE CHOC ELECTRIQUE DO NOT OPEN NE PAS OUVRIR The lightning flash with one wider than the other apparatus (including amplifiers) that there is adequate ventilation. Protect the power cord from being walked on the apparatus. ified by the manufacturer. 12. Refer ...
... touch dangerous voltage points or short-out parts that could result in a fire or electric shock. Unplug this unit. 17. When the power-supply cord or plug is used, use this indicates a need for long periods of the polarized or grounding-type plug. The rear edge... WARNING AVIS RISK OF ELECTRIC SHOCK RISQUE DE CHOC ELECTRIQUE DO NOT OPEN NE PAS OUVRIR The lightning flash with one wider than the other apparatus (including amplifiers) that there is adequate ventilation. Protect the power cord from being walked on the apparatus. ified by the manufacturer. 12. Refer ...
Owner Manual
Page 3
...B digital device, pursuant to transport this unit, use this unit from that interference will not occur in your Onkyo dealer. 8. Precautions 1. For stubborn stains, use . Power WARNING BEFORE PLUGGING IN THE UNIT FOR THE FIRST TIME, READ THE FOLLOWING SECTION CAREFULLY. Handling Notes •...or relocate the receiving antenna. • Increase the separation between the equipment and the amplifier. • Connect the equipment into an outlet on this unit or its power cord while your Onkyo dealer. 3. However, there is encouraged to try to correct the interference by your ...
...B digital device, pursuant to transport this unit, use this unit from that interference will not occur in your Onkyo dealer. 8. Precautions 1. For stubborn stains, use . Power WARNING BEFORE PLUGGING IN THE UNIT FOR THE FIRST TIME, READ THE FOLLOWING SECTION CAREFULLY. Handling Notes •...or relocate the receiving antenna. • Increase the separation between the equipment and the amplifier. • Connect the equipment into an outlet on this unit or its power cord while your Onkyo dealer. 3. However, there is encouraged to try to correct the interference by your ...
Owner Manual
Page 4
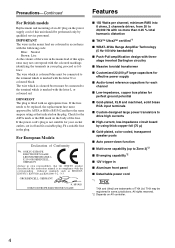
...-Continued For British models Replacement and mounting of an AC plug on the power supply cord of this instruction manual is in compliance with the corresponding technical standards such as that the ONKYO product described in this unit should be performed only by qualified service personnel...plated, color-coded, transparent speaker posts ■ Auto power-down function ■ Multi-zone capability (up to 20,000 Hz with no more than 0.05 % total harmonic distortion ■ THX™ Ultra2™ certified*1 ■ WRAT-Wide Range Amplifier Technology (5 Hz-100 kHz bandwidth) ■ Push...
...-Continued For British models Replacement and mounting of an AC plug on the power supply cord of this instruction manual is in compliance with the corresponding technical standards such as that the ONKYO product described in this unit should be performed only by qualified service personnel...plated, color-coded, transparent speaker posts ■ Auto power-down function ■ Multi-zone capability (up to 20,000 Hz with no more than 0.05 % total harmonic distortion ■ THX™ Ultra2™ certified*1 ■ WRAT-Wide Range Amplifier Technology (5 Hz-100 kHz bandwidth) ■ Push...
Owner Manual
Page 5
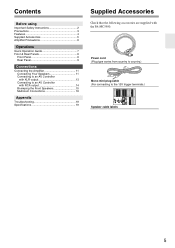
... Quick Operation Guide 7 Front & Rear Panels 8 Front Panel 8 Rear Panel 9 Connections Connecting the Amplifier 11 Connecting Your Speakers 11 Connecting to an AV Controller with XLR output 13 Connecting to the 12V ... W DE W DE F ONT W DE RG T FR NT W E RG T S B ZO E RG T S B ZO E RG T SP B ON 2 RG T SP B ON 2 RG T 5 Power cord (Plug type varies from country to country.) Mono mini-plug cable (For connecting to an AV Controller with RCA output 14 Bi-amping the... NT FR NT GH ET H GH ET Supplied Accessories Check that the following accessories are supplied with the PA-MC5500.
... Quick Operation Guide 7 Front & Rear Panels 8 Front Panel 8 Rear Panel 9 Connections Connecting the Amplifier 11 Connecting Your Speakers 11 Connecting to an AV Controller with XLR output 13 Connecting to the 12V ... W DE W DE F ONT W DE RG T FR NT W E RG T S B ZO E RG T S B ZO E RG T SP B ON 2 RG T SP B ON 2 RG T 5 Power cord (Plug type varies from country to country.) Mono mini-plug cable (For connecting to an AV Controller with RCA output 14 Bi-amping the... NT FR NT GH ET H GH ET Supplied Accessories Check that the following accessories are supplied with the PA-MC5500.
Owner Manual
Page 6
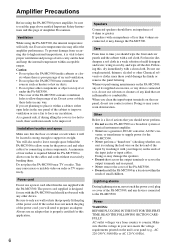
... support its supplied accessories, or any kind that are inflammable or combustible. Ventilation While using the PA-MC5500 power amplifier, be sure to force air circulation. Caution • Do not place the PA-MC5500 inside cabinets or clos- If you clean the input/output terminals on the unit's rear panel (e.g., AC 220-240 V, 50/60 Hz...
... support its supplied accessories, or any kind that are inflammable or combustible. Ventilation While using the PA-MC5500 power amplifier, be sure to force air circulation. Caution • Do not place the PA-MC5500 inside cabinets or clos- If you clean the input/output terminals on the unit's rear panel (e.g., AC 220-240 V, 50/60 Hz...
Owner Manual
Page 7
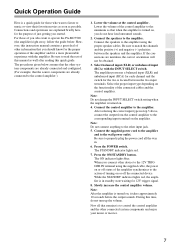
...(+) and negative (-) polarities between the two input terminals. The ON indicator lights blue. Note: After the amplifier is turned on , you who want to operate the PA-MC5500 (the amplifier) right away, follow the guide below assume that the other input jack. 5. For those who want to...on or off the connected device. The STANDBY indicator lights red. 7. The procedures given below . Connect the speakers to the wall power outlet. The amplifier possesses a balanced input (XLR) and unbalanced input (RCA) for each channel and the switch for a more pleasurable experience with ...
...(+) and negative (-) polarities between the two input terminals. The ON indicator lights blue. Note: After the amplifier is turned on , you who want to operate the PA-MC5500 (the amplifier) right away, follow the guide below assume that the other input jack. 5. For those who want to...on or off the connected device. The STANDBY indicator lights red. 7. The procedures given below . Connect the speakers to the wall power outlet. The amplifier possesses a balanced input (XLR) and unbalanced input (RCA) for each channel and the switch for a more pleasurable experience with ...
Owner Manual
Page 8
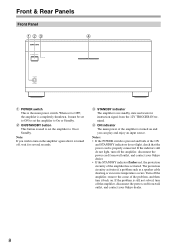
.... When set the amplifier to OFF, the amplifier is properly connected. D STANDBY indicator The amplifier is turned on and you wish to On or Standby. If the problem is still not solved, turn off the amplifier, disconnect the power cord from wall outlet, and contact your Onkyo dealer. 8 C ...ON/STANDBY button This button is the main power switch. Turn off the amplifier, remove the cause of the ON and STANDBY indicators do not...
.... When set the amplifier to OFF, the amplifier is properly connected. D STANDBY indicator The amplifier is turned on and you wish to On or Standby. If the problem is still not solved, turn off the amplifier, disconnect the power cord from wall outlet, and contact your Onkyo dealer. 8 C ...ON/STANDBY button This button is the main power switch. Turn off the amplifier, remove the cause of the ON and STANDBY indicators do not...
Owner Manual
Page 9
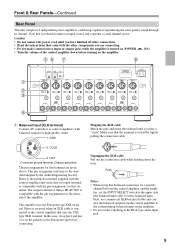
... of Onkyo PR-SC5507 is compatible with the pin assignments for this terminal are connecting. • Do not make connections to select balanced input. FG H I B C D E 21 3 B Balanced Input (XLR terminal) Connect AV controllers or control amplifiers with the control amplifier and ...Rear Panels-Continued Rear Panel This unit comprises 9 independent power amplifiers, each channel in use commercial XLR balanced cable and connect the balanced output from the control amplifier to the corresponding balanced input on the amplifier. • Do not connect anything to each being ...
... of Onkyo PR-SC5507 is compatible with the pin assignments for this terminal are connecting. • Do not make connections to select balanced input. FG H I B C D E 21 3 B Balanced Input (XLR terminal) Connect AV controllers or control amplifiers with the control amplifier and ...Rear Panels-Continued Rear Panel This unit comprises 9 independent power amplifiers, each channel in use commercial XLR balanced cable and connect the balanced output from the control amplifier to the corresponding balanced input on the amplifier. • Do not connect anything to each being ...
Owner Manual
Page 10
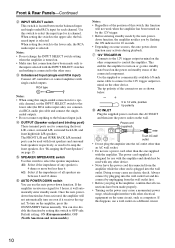
...enter standby mode. The FRONT L/R and SURR BACK L/R terminal posts can also disable the function by unplugging from the amplifier while the other electrical equipment on the power may cause an electric shock. The tip polarity of all connections have been made properly. • Turning on the ...shown below. 5 to bi-amp the front speakers. D Unbalanced Input (single end RCA input) Connect AV controllers or control amplifiers with other end is plugged into the power outlet on the other ones. RCA type Notes: • When using this AC INLET and then into the wall outlet....
...enter standby mode. The FRONT L/R and SURR BACK L/R terminal posts can also disable the function by unplugging from the amplifier while the other electrical equipment on the power may cause an electric shock. The tip polarity of all connections have been made properly. • Turning on the ...shown below. 5 to bi-amp the front speakers. D Unbalanced Input (single end RCA input) Connect AV controllers or control amplifiers with other end is plugged into the power outlet on the other ones. RCA type Notes: • When using this AC INLET and then into the wall outlet....
Owner Manual
Page 11
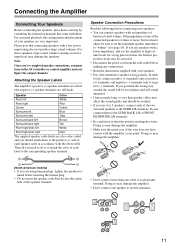
... other words, connect positive (+) terminals only to positive (+) terminals, and negative (-) terminals only to several terminals. 11 Doing so may damage the amplifier. • Don't connect one cable to the SURR L/R terminals. Do not connect them to the positive (+) side of the two surround speakers ...positive and negative wires. If you need to do is 4 ohms or more than 6 ohms, be activated. • Disconnect the power cord from the wall outlet before connecting your speakers: • You can connect speakers with the above table. Please note that came with a ...
... other words, connect positive (+) terminals only to positive (+) terminals, and negative (-) terminals only to several terminals. 11 Doing so may damage the amplifier. • Don't connect one cable to the SURR L/R terminals. Do not connect them to the positive (+) side of the two surround speakers ...positive and negative wires. If you need to do is 4 ohms or more than 6 ohms, be activated. • Disconnect the power cord from the wall outlet before connecting your speakers: • You can connect speakers with the above table. Please note that came with a ...
Owner Manual
Page 14
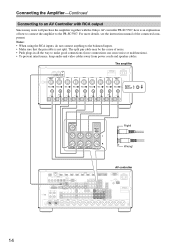
...8226; To prevent interference, keep audio and video cables away from power cords and speaker cables. Wrong! Connecting the Amplifier-Continued Connecting to an AV Controller with RCA output Since many users will purchase the amplifier together with the Onkyo AV controller PR-SC5507, here is an explanation of how to ...connect the amplifier to the balanced inputs. • Make sure that the pin cable is not split. The ...
...8226; To prevent interference, keep audio and video cables away from power cords and speaker cables. Wrong! Connecting the Amplifier-Continued Connecting to an AV Controller with RCA output Since many users will purchase the amplifier together with the Onkyo AV controller PR-SC5507, here is an explanation of how to ...connect the amplifier to the balanced inputs. • Make sure that the pin cable is not split. The ...
Owner Manual
Page 18
... be used. 18 Troubleshooting If the PA-MC5500 fails to function normally, first check the following list, unplug the power cord and contact your Onkyo dealer. No power. • Power cord is not correctly plugged into AC outlet/ Inlet. → Plug the power cord into jacks. • No input signal from control amplifier. • Incorrect INPUT SELECT switch...
... be used. 18 Troubleshooting If the PA-MC5500 fails to function normally, first check the following list, unplug the power cord and contact your Onkyo dealer. No power. • Power cord is not correctly plugged into AC outlet/ Inlet. → Plug the power cord into jacks. • No input signal from control amplifier. • Incorrect INPUT SELECT switch...
Owner Manual
Page 19
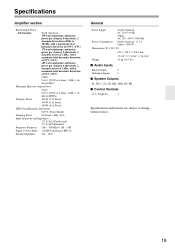
Specifications Amplifier section Rated Output Power All channels: North American: 150 watts minimum continuous power per channel, 8 ohm loads, 2 channels driven from 20 Hz to 20 kHz, with a maximum total harmonic distortion of 0.05% (FTC) 175 watts minimum continuous power per channel, 8 ohm loads... dB Signal to Noise Ratio 110 dB (Unbalanced, IHF-A) Speaker Impedance 4 Ω - 16 Ω General Power Supply North American: AC 120 V, 60 Hz Others: AC 220 - 240 V, 50/60 Hz Power Consumption North American: 11.7 A Others: 1050 W Dimensions (W × H × D) 435 × ...
Specifications Amplifier section Rated Output Power All channels: North American: 150 watts minimum continuous power per channel, 8 ohm loads, 2 channels driven from 20 Hz to 20 kHz, with a maximum total harmonic distortion of 0.05% (FTC) 175 watts minimum continuous power per channel, 8 ohm loads... dB Signal to Noise Ratio 110 dB (Unbalanced, IHF-A) Speaker Impedance 4 Ω - 16 Ω General Power Supply North American: AC 120 V, 60 Hz Others: AC 220 - 240 V, 50/60 Hz Power Consumption North American: 11.7 A Others: 1050 W Dimensions (W × H × D) 435 × ...


