Owner Manual
Page 4
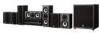
... locations subject to direct sunlight or in the speaker coils, causing burning or wire breakage: 1. Input Signal Warning The speakers can also be used in your plug, proceed as EN60065, EN55013, EN55020 and EN61000-3-2, -3-3. High-pitched sounds generated by qualified service personnel. Microphone feedback. 4 Precautions-Continued Speaker Precautions For British models Replacement and mounting of an AC plug on the power supply cord of this...
... locations subject to direct sunlight or in the speaker coils, causing burning or wire breakage: 1. Input Signal Warning The speakers can also be used in your plug, proceed as EN60065, EN55013, EN55020 and EN61000-3-2, -3-3. High-pitched sounds generated by qualified service personnel. Microphone feedback. 4 Precautions-Continued Speaker Precautions For British models Replacement and mounting of an AC plug on the power supply cord of this...

Owner Manual
Page 6
... RI Dock 39 Connecting Onkyo Components 40 Connecting the Power Cord 40 Turning On the AV Receiver 41 Turning On and Standby 41 First Time Setup 42 Automatic Speaker Setup 42 HDMI Input Setup 46 Component Video Input Setup 47 Digital Input Setup 47 Changing the Input Display 48 Automatic Audio Input Selection Setup 49 Playing Your AV Components 50 Basic AV Receiver Operation 50 Common Functions 51 Setting the Display Brightness 51 Muting the AV Receiver 51 Using the Sleep Timer 51 Using Headphones 52 Displaying Source Information 52 Specifying the Digital Signal Format 53...
... RI Dock 39 Connecting Onkyo Components 40 Connecting the Power Cord 40 Turning On the AV Receiver 41 Turning On and Standby 41 First Time Setup 42 Automatic Speaker Setup 42 HDMI Input Setup 46 Component Video Input Setup 47 Digital Input Setup 47 Changing the Input Display 48 Automatic Audio Input Selection Setup 49 Playing Your AV Components 50 Basic AV Receiver Operation 50 Common Functions 51 Setting the Display Brightness 51 Muting the AV Receiver 51 Using the Sleep Timer 51 Using Headphones 52 Displaying Source Information 52 Specifying the Digital Signal Format 53...
Owner Manual
Page 8
...; 4 assignable digital inputs (2 optical, 2 coaxial) • 3 S-Video inputs and 2 outputs • Color-coded 7.1 multichannel input • A/B speaker drive Miscellaneous • 40 AM/FM presets • Audyssey 2EQ®*8 Room Correction and Speaker Cal- ibration • Audyssey Dynamic EQ®*8 loudness correction • A/V sync adjustment (up to 1080i) • HDMI video upconversion • Dolby TrueHD*3 • DTS-HD Master Audio*4 • Faroudja DCDi edge enhancement • Direct listening mode • Music Optimizer...
...; 4 assignable digital inputs (2 optical, 2 coaxial) • 3 S-Video inputs and 2 outputs • Color-coded 7.1 multichannel input • A/B speaker drive Miscellaneous • 40 AM/FM presets • Audyssey 2EQ®*8 Room Correction and Speaker Cal- ibration • Audyssey Dynamic EQ®*8 loudness correction • A/V sync adjustment (up to 1080i) • HDMI video upconversion • Dolby TrueHD*3 • DTS-HD Master Audio*4 • Faroudja DCDi edge enhancement • Direct listening mode • Music Optimizer...

Owner Manual
Page 12
... video signal, and there are analog audio input jacks for connecting the front speakers, center, surround, and surround back speakers. See "HDMI Input Setup" on page 47. See "Digital Input Setup" on page 46. I REMOTE CONTROL This (Remote Interactive) jack can be connected to a video input on another -capable Onkyo component for connecting components with an HDMI output, such as a CD player or DVD player. nected to the jack on your setup. The HDMI inputs are for remote and system control. They're assignable, which means you must make an analog audio connection...
... video signal, and there are analog audio input jacks for connecting the front speakers, center, surround, and surround back speakers. See "HDMI Input Setup" on page 47. See "Digital Input Setup" on page 46. I REMOTE CONTROL This (Remote Interactive) jack can be connected to a video input on another -capable Onkyo component for connecting components with an HDMI output, such as a CD player or DVD player. nected to the jack on your setup. The HDMI inputs are for remote and system control. They're assignable, which means you must make an analog audio connection...
Owner Manual
Page 15
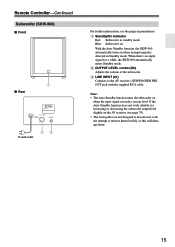
C LINE INPUT (21) Connects to remove them forcibly, as this will damage them. 15 B OUTPUT LEVEL control (50) Adjusts the volume of the subwoofer. A Standby/On indicator Red: Subwoofer in standby mode Blue: Subwoofer on With the Auto Standby function, the SKW-960 automatically turns on when the input signal exceeds a certain level. Remote Controller-Continued Subwoofer (SKW-960) ■ Front 1 ■ Rear To wall outlet 23 For further information, see page 79). • The front grilles are not...
C LINE INPUT (21) Connects to remove them forcibly, as this will damage them. 15 B OUTPUT LEVEL control (50) Adjusts the volume of the subwoofer. A Standby/On indicator Red: Subwoofer in standby mode Blue: Subwoofer on With the Auto Standby function, the SKW-960 automatically turns on when the input signal exceeds a certain level. Remote Controller-Continued Subwoofer (SKW-960) ■ Front 1 ■ Rear To wall outlet 23 For further information, see page 79). • The front grilles are not...
Owner Manual
Page 16
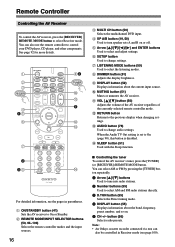
...input sources. 16 C MULTI CH button (50) Selects the multichannel DVD input. G LISTENING MODE buttons (59) Used to select Receiver mode. Remote Controller Controlling the AV Receiver To control the AV receiver, press the [RECEIVER] REMOTE MODE button to select the listening modes. L RETURN button Returns to turn speaker sets A and B on . 5 CH +/- button (56) Selects radio presets. Note: • An Onkyo cassette recorder connected via can select AM or FM by pressing the [TUNER] button repeatedly. 1 Arrow [ ]/[ ] buttons Used to tune into radio stations. 2 Number buttons...
...input sources. 16 C MULTI CH button (50) Selects the multichannel DVD input. G LISTENING MODE buttons (59) Used to select Receiver mode. Remote Controller Controlling the AV Receiver To control the AV receiver, press the [RECEIVER] REMOTE MODE button to select the listening modes. L RETURN button Returns to turn speaker sets A and B on . 5 CH +/- button (56) Selects radio presets. Note: • An Onkyo cassette recorder connected via can select AM or FM by pressing the [TUNER] button repeatedly. 1 Arrow [ ]/[ ] buttons Used to tune into radio stations. 2 Number buttons...
Owner Manual
Page 19
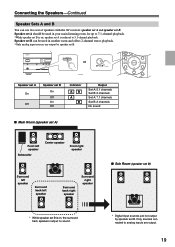
.../STANDBY STANDBY A SPEAKETRUNSING BPRESET ENTER THX PHONES MULTI CH A SPEAKERS B DVD TONE VCR/DVR CBL/SAT AUX TAPE TUNER CD SETUP RETURN MOVIE/TV MUSIC GAME LISTENING MODE DISPLAY DIGITAL INPUT RT/PTY/TP MEMORY TUNING MODE CLEAR SETUP MIC MASTER VOLUME or AUX INPUT VIDEO L AUDIO R AV RECEIVER HT-R960 Speaker set A On Off Speaker set B On Off On Off Indicator AB A B Output Set A: 5.1 channels Set B: 2 channels Set A: 7.1 channels Set B: 2 channels No sound ■ Main Room (speaker set A) Front left speaker Subwoofer Center speaker Front right speaker Surround...
.../STANDBY STANDBY A SPEAKETRUNSING BPRESET ENTER THX PHONES MULTI CH A SPEAKERS B DVD TONE VCR/DVR CBL/SAT AUX TAPE TUNER CD SETUP RETURN MOVIE/TV MUSIC GAME LISTENING MODE DISPLAY DIGITAL INPUT RT/PTY/TP MEMORY TUNING MODE CLEAR SETUP MIC MASTER VOLUME or AUX INPUT VIDEO L AUDIO R AV RECEIVER HT-R960 Speaker set A On Off Speaker set B On Off On Off Indicator AB A B Output Set A: 5.1 channels Set B: 2 channels Set A: 7.1 channels Set B: 2 channels No sound ■ Main Room (speaker set A) Front left speaker Subwoofer Center speaker Front right speaker Surround...
Owner Manual
Page 25
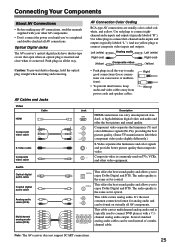
... use yellow plugs to connect left-channel audio inputs and outputs (typically labeled "L"). Wrong! Composite video is typically used instead of a multichannel cable. This offers the best sound quality and allows you to connect DVD players with your other video equipment. FRONT CENTER SURR SURR BACK SUBWOOFER MULTI CH This cable carries multichannel analog audio and is commonly used on virtually all the way to make good connections (loose connections can be used to COAXIAL enjoy Dolby Digital...
... use yellow plugs to connect left-channel audio inputs and outputs (typically labeled "L"). Wrong! Composite video is typically used instead of a multichannel cable. This offers the best sound quality and allows you to connect DVD players with your other video equipment. FRONT CENTER SURR SURR BACK SUBWOOFER MULTI CH This cable carries multichannel analog audio and is commonly used on virtually all the way to make good connections (loose connections can be used to COAXIAL enjoy Dolby Digital...
Owner Manual
Page 35
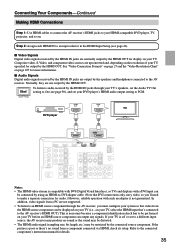
... the connected component's instruction manual for audio.) However, reliable operation with a DVI input can be displayed on your TV (i.e., on your TV, select the HDMI input that's connected to your HDMI-compatible DVD player, TV, projector, and so on your TV before an HDMI source component can be connected by using an HDMI-to-DVI adapter cable. (Note that video from a component connected via HDMI, check its setup. setting to On (see page 46). ■ Video Signals Digital video signals received by the HDMI IN jacks are not output...
... the connected component's instruction manual for audio.) However, reliable operation with a DVI input can be displayed on your TV (i.e., on your TV, select the HDMI input that's connected to your HDMI-compatible DVD player, TV, projector, and so on your TV before an HDMI source component can be connected by using an HDMI-to-DVI adapter cable. (Note that video from a component connected via HDMI, check its setup. setting to On (see page 46). ■ Video Signals Digital video signals received by the HDMI IN jacks are not output...
Owner Manual
Page 40
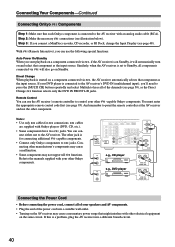
...L L REMOTE CONTROL R CD TAPE R CBL/SAT VCR/DVR SUB WOOFER DVD L R R DVD e.g., CD player e.g., DVD player R L ANALOG AUDIO OUT R L ANALOG AUDIO OUT Connecting the Power Cord • Before connecting the power cord, connect all functions. Direct Change When playback is a problem, plug the AV receiver into a suitable wall outlet. • Turning on the AV receiver may not support all of the power cord into a different branch circuit. 40 Notes: • Use only cables for connecting additional -capable components. • Connect only Onkyo components to the manuals...
...L L REMOTE CONTROL R CD TAPE R CBL/SAT VCR/DVR SUB WOOFER DVD L R R DVD e.g., CD player e.g., DVD player R L ANALOG AUDIO OUT R L ANALOG AUDIO OUT Connecting the Power Cord • Before connecting the power cord, connect all functions. Direct Change When playback is a problem, plug the AV receiver into a suitable wall outlet. • Turning on the AV receiver may not support all of the power cord into a different branch circuit. 40 Notes: • Use only cables for connecting additional -capable components. • Connect only Onkyo components to the manuals...
Owner Manual
Page 50
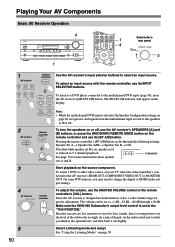
... 4 ON/STANDBY STANDBY TUNING PRESET ENTER MASTER VOLUME THX PHONES MULTI CH A SPEAKERS B DVD TONE VCR/DVR CBL/SAT AUX TAPE TUNER CD SETUP RETURN MOVIE/TV MUSIC GAME LISTENING MODE DISPLAY DIGITAL INPUT RT/PTY/TP MEMORY TUNING MODE CLEAR SETUP MIC AUX INPUT VIDEO L AUDIO R AV RECEIVER HT-R960 1 Subwoofer's 1 rear panel 4 4 1 AV receiver DVD VCR/DVR CBL/SAT AUX TAPE TUNER CD Remote controller Use the AV receiver's input selector buttons to the AV receiver's HDMI OUT, COMPONENT VIDEO OUT, or MONITOR OUT. Indicators See page 19 for precise adjustment...
... 4 ON/STANDBY STANDBY TUNING PRESET ENTER MASTER VOLUME THX PHONES MULTI CH A SPEAKERS B DVD TONE VCR/DVR CBL/SAT AUX TAPE TUNER CD SETUP RETURN MOVIE/TV MUSIC GAME LISTENING MODE DISPLAY DIGITAL INPUT RT/PTY/TP MEMORY TUNING MODE CLEAR SETUP MIC AUX INPUT VIDEO L AUDIO R AV RECEIVER HT-R960 1 Subwoofer's 1 rear panel 4 4 1 AV receiver DVD VCR/DVR CBL/SAT AUX TAPE TUNER CD Remote controller Use the AV receiver's input selector buttons to the AV receiver's HDMI OUT, COMPONENT VIDEO OUT, or MONITOR OUT. Indicators See page 19 for precise adjustment...
Owner Manual
Page 51
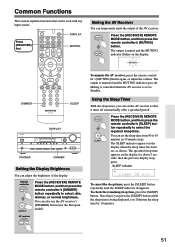
... off automatically after a specified period. DIMMER SLEEP DISPLAY ON/STANDBY STANDBY TUNING PRESET ENTER MASTER VOLUME THX PHONES MULTI CH A SPEAKERS B DVD TONE VCR/DVR CBL/SAT AUX TAPE TUNER CD SETUP RETURN MOVIE/TV MUSIC GAME LISTENING MODE DISPLAY DIGITAL INPUT DIMMER MEMORY TUNING MODE CLEAR SETUP MIC AUX INPUT VIDEO L AUDIO R AV RECEIVER HT-R960 PHONES DIMMER Setting the Display Brightness You can temporarily mute the output of the display. You can also use the AV receiver's [DIMMER] button (not the European model).
... off automatically after a specified period. DIMMER SLEEP DISPLAY ON/STANDBY STANDBY TUNING PRESET ENTER MASTER VOLUME THX PHONES MULTI CH A SPEAKERS B DVD TONE VCR/DVR CBL/SAT AUX TAPE TUNER CD SETUP RETURN MOVIE/TV MUSIC GAME LISTENING MODE DISPLAY DIGITAL INPUT DIMMER MEMORY TUNING MODE CLEAR SETUP MIC AUX INPUT VIDEO L AUDIO R AV RECEIVER HT-R960 PHONES DIMMER Setting the Display Brightness You can temporarily mute the output of the display. You can also use the AV receiver's [DIMMER] button (not the European model).
Owner Manual
Page 77
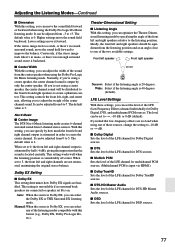
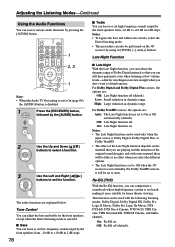
...;/40˚ Narrow: Select if the listening angle is output by specifying the angle of the sound from 2-channel stereo sources. Manual: When the source is 40 degrees (default). Normally, if you're using one of the LFE (Low Frequency Effects) channel individually for DTS-HD Master Audio sources. ■ DSD Sets the level of the listening modes compatible with this format (e.g., Dolby EX, Dolby Pro Logic IIx, etc.). Theater-Dimensional Setting ■ Listening Angle...
...;/40˚ Narrow: Select if the listening angle is output by specifying the angle of the sound from 2-channel stereo sources. Manual: When the source is 40 degrees (default). Normally, if you're using one of the LFE (Low Frequency Effects) channel individually for DTS-HD Master Audio sources. ■ DSD Sets the level of the listening modes compatible with this format (e.g., Dolby EX, Dolby Pro Logic IIx, etc.). Theater-Dimensional Setting ■ Listening Angle...
Owner Manual
Page 78
... Surround EX, THX I/S Cinema, and Multichannel. For Dolby TrueHD sources, it more suitable for home theater viewing. Re-EQ (THX) With the Re-EQ function, you are : Auto: The Late Night function is set to disturb anyone. The audio functions are : Off: Late Night function off (default). Notes: • To bypass the bass and treble tone circuits, select the Direct listening mode. • This procedure can also be set to set the function...
... Surround EX, THX I/S Cinema, and Multichannel. For Dolby TrueHD sources, it more suitable for home theater viewing. Re-EQ (THX) With the Re-EQ function, you are : Auto: The Late Night function is set to disturb anyone. The audio functions are : Off: Late Night function off (default). Notes: • To bypass the bass and treble tone circuits, select the Direct listening mode. • This procedure can also be set to set the function...
Owner Manual
Page 81
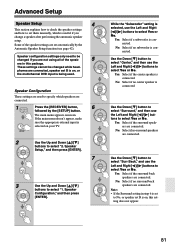
... menu doesn't appear, make sure the appropriate external input is connected. No: Select if no subwoofer is selected on , this package. Yes: Select if a subwoofer is connected. No: Select if no surround back speakers are connected. No: Select if no center speaker is connected. Use the Down [ ] button to select "Surround," and then use the Left and Right [ ]/[ ] buttons to select Yes or No. Some of the speak- 5 ers in step 6 is set to No, or speaker set...
... menu doesn't appear, make sure the appropriate external input is connected. No: Select if no subwoofer is selected on , this package. Yes: Select if a subwoofer is connected. No: Select if no surround back speakers are connected. No: Select if no center speaker is connected. Use the Down [ ] button to select "Surround," and then use the Left and Right [ ]/[ ] buttons to select Yes or No. Some of the speak- 5 ers in step 6 is set to No, or speaker set...
Owner Manual
Page 90
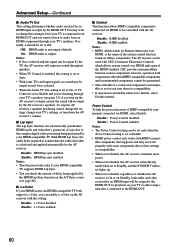
... various components, however, operation with components other than RIHD-compatible components and recommended components cannot be used with CEC (Consumer Electronics Control), which stands for playback on Onkyo components. Enable: Power Control enabled. Enable: x.v.Color enabled. ■ Control This function allows RIHD-compatible components connected via HDMI, select Enable. Off: HDMI audio is output. Enable: HDMI lip sync enabled. On: HDMI audio is not output (default). To stop the AV receiver's speakers producing sound, change the settings, change this setting...
... various components, however, operation with components other than RIHD-compatible components and recommended components cannot be used with CEC (Consumer Electronics Control), which stands for playback on Onkyo components. Enable: Power Control enabled. Enable: x.v.Color enabled. ■ Control This function allows RIHD-compatible components connected via HDMI, select Enable. Off: HDMI audio is output. Enable: HDMI lip sync enabled. On: HDMI audio is not output (default). To stop the AV receiver's speakers producing sound, change the settings, change this setting...
Owner Manual
Page 93
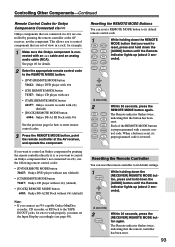
... the [AUDIO] button until the Remote indicator lights up (about 3 sec- Resetting the REMOTE MODE Buttons You can reset the remote controller to control an Onkyo component that are connected via , use the following remote control codes: • [DVD] REMOTE MODE button 30627: Onkyo DVD player without (default) • [CD] REMOTE MODE button 71817: Onkyo CD player without (default) • [DOCK] REMOTE MODE button 6003: Onkyo DS-A2 RI Dock without (default) Note: • If you connect an -capable Onkyo MiniDisc recorder, CD recorder, or RI Dock to the TAPE IN/OUT jacks, for...
... the [AUDIO] button until the Remote indicator lights up (about 3 sec- Resetting the REMOTE MODE Buttons You can reset the remote controller to control an Onkyo component that are connected via , use the following remote control codes: • [DVD] REMOTE MODE button 30627: Onkyo DVD player without (default) • [CD] REMOTE MODE button 71817: Onkyo CD player without (default) • [DOCK] REMOTE MODE button 6003: Onkyo DS-A2 RI Dock without (default) Note: • If you connect an -capable Onkyo MiniDisc recorder, CD recorder, or RI Dock to the TAPE IN/OUT jacks, for...
Owner Manual
Page 101
... some DVD-Video discs, you need to select an audio format from a menu or with its factory defaults, turn on the AV receiver • Make sure that the power cord is in contact with a mono source, such as it's turned on a TV that the bare wire is plugged into the wall outlet properly. • Unplug the power cord from the wall outlet immediately. The surround speakers produce no sound • When the Stereo or Mono listening mode is connected...
... some DVD-Video discs, you need to select an audio format from a menu or with its factory defaults, turn on the AV receiver • Make sure that the power cord is in contact with a mono source, such as it's turned on a TV that the bare wire is plugged into the wall outlet properly. • Unplug the power cord from the wall outlet immediately. The surround speakers produce no sound • When the Stereo or Mono listening mode is connected...

Owner Manual
Page 102
... selected. • If the video source is connected to an HDMI input, you need to select an audio format from DTS to 5.1-channels and the surround back speakers produce no sound (page 19). This is usually because the DTS bitstream has been processed (e.g., output level, sampling rate, or frequency response changed) and the AV receiver doesn't recognize it does for about 3 seconds, and then resume playback. • With some DVD-Video discs...
... selected. • If the video source is connected to an HDMI input, you need to select an audio format from DTS to 5.1-channels and the surround back speakers produce no sound (page 19). This is usually because the DTS bitstream has been processed (e.g., output level, sampling rate, or frequency response changed) and the AV receiver doesn't recognize it does for about 3 seconds, and then resume playback. • With some DVD-Video discs...
Owner Manual
Page 103
...). • Make sure you've selected the correct remote controller mode. • Make sure you need to select another manufacturer's component, point the remote controller at the AV receiver. How do I connect my headphones • When a pair of a multiplex source • On the Audio Adjust menu, change the Input Ch set to Stereo, Mono, or Direct, in which case it stays the same. The following setting can cause interference. • Concrete walls weaken radio signals. •...
...). • Make sure you've selected the correct remote controller mode. • Make sure you need to select another manufacturer's component, point the remote controller at the AV receiver. How do I connect my headphones • When a pair of a multiplex source • On the Audio Adjust menu, change the Input Ch set to Stereo, Mono, or Direct, in which case it stays the same. The following setting can cause interference. • Concrete walls weaken radio signals. •...


