
Owner Manual
Page 1
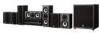
Using the Listening Modes .......... 59 Advanced Operation 76 Troubleshooting 101 En Please retain this Onkyo product. 7.1ch THX Certified Digital Surround Receiver and Speaker Package HT-S9100THX AV Receiver (HT-R960) Front Speakers (SKF-960F) Center Speaker (SKC-960C) Surround Speakers (SKM-...Manual Contents Introduction 2 Connection 18 Turning On & First Time Setup..... 41 Basic Operation Playing your AV components ....... 50 Listening to obtain optimum performance and listening enjoyment from your new Onkyo product. Please read this manual will enable you to the Radio...
Using the Listening Modes .......... 59 Advanced Operation 76 Troubleshooting 101 En Please retain this Onkyo product. 7.1ch THX Certified Digital Surround Receiver and Speaker Package HT-S9100THX AV Receiver (HT-R960) Front Speakers (SKF-960F) Center Speaker (SKC-960C) Surround Speakers (SKM-...Manual Contents Introduction 2 Connection 18 Turning On & First Time Setup..... 41 Basic Operation Playing your AV components ....... 50 Listening to obtain optimum performance and listening enjoyment from your new Onkyo product. Please read this manual will enable you to the Radio...
Owner Manual
Page 5
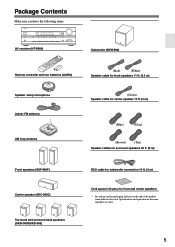
Package Contents Make sure you have the following items: AV receiver (HT-R960) Subwoofer (SKW-960) Remote controller and two batteries (AA/R6) Speaker setup microphone Indoor FM antenna AM loop antenna (Red) (White) Speaker cable for front speakers 11 ft. (3.5 m) (Green) Speaker cable for center speaker 10 ft. (3 m) (Blue) (...
Package Contents Make sure you have the following items: AV receiver (HT-R960) Subwoofer (SKW-960) Remote controller and two batteries (AA/R6) Speaker setup microphone Indoor FM antenna AM loop antenna (Red) (White) Speaker cable for front speakers 11 ft. (3.5 m) (Green) Speaker cable for center speaker 10 ft. (3 m) (Blue) (...

Owner Manual
Page 6
... 15 Remote Controller 16 Controlling the AV Receiver 16 Installing the Batteries 17 Using the Remote Controller 17 Connecting the Speakers 18 Enjoying Home Theater 18 Speaker Sets A and B 19 Wall Mounting the Speakers 20 Speaker Connection Precautions 21 Connecting Speaker Set A 21 Connecting Speaker ...an RI Dock 39 Connecting Onkyo Components 40 Connecting the Power Cord 40 Turning On the AV Receiver 41 Turning On and Standby 41 First Time Setup 42 Automatic Speaker Setup 42 HDMI Input Setup 46 Component Video Input Setup 47 Digital Input Setup 47 Changing the Input Display...
... 15 Remote Controller 16 Controlling the AV Receiver 16 Installing the Batteries 17 Using the Remote Controller 17 Connecting the Speakers 18 Enjoying Home Theater 18 Speaker Sets A and B 19 Wall Mounting the Speakers 20 Speaker Connection Precautions 21 Connecting Speaker Set A 21 Connecting Speaker ...an RI Dock 39 Connecting Onkyo Components 40 Connecting the Power Cord 40 Turning On the AV Receiver 41 Turning On and Standby 41 First Time Setup 42 Automatic Speaker Setup 42 HDMI Input Setup 46 Component Video Input Setup 47 Digital Input Setup 47 Changing the Input Display...
Owner Manual
Page 7
Contents-Continued Controlling a CD Player, CD Recorder, or MD Player 98 Controlling an RI Dock 99 Controlling a Cassette Recorder 100 Troubleshooting 101 Specifications 105 AV receiver HT-R960 105 Speaker Package HTP-960 106 Video Resolution Chart 107 Onscreen Setup Menu Map 108 * To reset the AV receiver to its factory defaults, turn it on and, while holding down the [VCR/DVR] button, press the [ON/STANDBY] button (see page 101). 7
Contents-Continued Controlling a CD Player, CD Recorder, or MD Player 98 Controlling an RI Dock 99 Controlling a Cassette Recorder 100 Troubleshooting 101 Specifications 105 AV receiver HT-R960 105 Speaker Package HTP-960 106 Video Resolution Chart 107 Onscreen Setup Menu Map 108 * To reset the AV receiver to its factory defaults, turn it on and, while holding down the [VCR/DVR] button, press the [ON/STANDBY] button (see page 101). 7
Owner Manual
Page 8
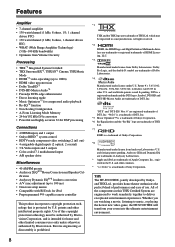
...HT-S9100THX, jointly developed by U.S. patents and other U.S. Reverse engineering or disassembly is a trademark of use. which may be authorized by Macrovision Corporation, and is protected by Onkyo and THX Ltd., provides home theater...HDMI*2 video upscaling (up to 100 ms) • Onscreen setup menus • Compatible with RI Dock for iPod • Preprogrammed...Powerful and highly accurate 32-bit DSP processing Connections • 4 HDMI inputs and 1 output • Onkyo RIHD*7 system control • HDTV-ready component video switching (2 in/1 out) • 4 assignable digital inputs ...
...HT-S9100THX, jointly developed by U.S. patents and other U.S. Reverse engineering or disassembly is a trademark of use. which may be authorized by Macrovision Corporation, and is protected by Onkyo and THX Ltd., provides home theater...HDMI*2 video upscaling (up to 100 ms) • Onscreen setup menus • Compatible with RI Dock for iPod • Preprogrammed...Powerful and highly accurate 32-bit DSP processing Connections • 4 HDMI inputs and 1 output • Onkyo RIHD*7 system control • HDTV-ready component video switching (2 in/1 out) • 4 assignable digital inputs ...
Owner Manual
Page 9
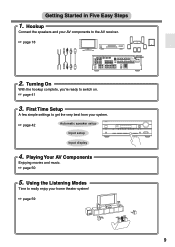
... music. ☞ page 50 5. Getting Started in Five Easy Steps 1. Hookup Connect the speakers and your AV components to really enjoy your system. ☞ page 42 Automatic speaker setup Input setup Input display 4. Using the Listening Modes Time to the AV receiver. ☞ page 18 DIGITAL IN 1 (DVD) COAXIAL 2 (CBL/SAT) 1 (... CBL/SAT VCR/DVR R SUB WOOFER DVD R FRONT SPEAKERS B 2. Turning On With the hookup complete, you're ready to get the very best from your home theater system! ☞ page 59 9 First Time Setup A few simple settings to switch on. ☞ page 41 3.
... music. ☞ page 50 5. Getting Started in Five Easy Steps 1. Hookup Connect the speakers and your AV components to really enjoy your system. ☞ page 42 Automatic speaker setup Input setup Input display 4. Using the Listening Modes Time to the AV receiver. ☞ page 18 DIGITAL IN 1 (DVD) COAXIAL 2 (CBL/SAT) 1 (... CBL/SAT VCR/DVR R SUB WOOFER DVD R FRONT SPEAKERS B 2. Turning On With the hookup complete, you're ready to get the very best from your home theater system! ☞ page 59 9 First Time Setup A few simple settings to switch on. ☞ page 41 3.
Owner Manual
Page 10
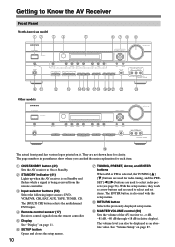
...MULTI CH A SPEAKERS B DVD TONE VCR/DVR CBL/SAT AUX TAPE TUNER CD SETUP RETURN MOVIE/TV MUSIC GAME LISTENING MODE DISPLAY DIGITAL INPUT DIMMER MEMORY TUNING MODE CLEAR SETUP MIC AUX INPUT VIDEO L AUDIO R AV RECEIVER HT-R960 JK Other models L M NOP QR STU V ON/STANDBY STANDBY TUNING ... MOVIE/TV MUSIC GAME LISTENING MODE DISPLAY DIGITAL INPUT RT/PTY/TP MEMORY TUNING MODE CLEAR SETUP MIC AUX INPUT VIDEO L AUDIO R AV RECEIVER HT-R960 S The actual front panel has various logos printed on Standby and flashes while a signal is being received from the remote ...
...MULTI CH A SPEAKERS B DVD TONE VCR/DVR CBL/SAT AUX TAPE TUNER CD SETUP RETURN MOVIE/TV MUSIC GAME LISTENING MODE DISPLAY DIGITAL INPUT DIMMER MEMORY TUNING MODE CLEAR SETUP MIC AUX INPUT VIDEO L AUDIO R AV RECEIVER HT-R960 JK Other models L M NOP QR STU V ON/STANDBY STANDBY TUNING ... MOVIE/TV MUSIC GAME LISTENING MODE DISPLAY DIGITAL INPUT RT/PTY/TP MEMORY TUNING MODE CLEAR SETUP MIC AUX INPUT VIDEO L AUDIO R AV RECEIVER HT-R960 S The actual front panel has various logos printed on Standby and flashes while a signal is being received from the remote ...
Owner Manual
Page 11
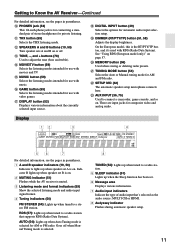
...): Lights up when tuned to a radio station that 's selected as the audio source: MULTI CH or HDMI. 8 Audyssey indicator Flashes during automatic speaker setup. 11 Getting to Know the AV Receiver-Continued For detailed information, see the pages in parentheses. O MUSIC button (59) Selects the listening modes intended...the type of stereo headphones for AM or FM radio. P GAME button (59) Selects the listening modes intended for use with RDS (Radio Data System). R DIGITAL INPUT button (49) Selects the options for AM and FM radio. See "Using RDS (European model only)" on or off when ...
...): Lights up when tuned to a radio station that 's selected as the audio source: MULTI CH or HDMI. 8 Audyssey indicator Flashes during automatic speaker setup. 11 Getting to Know the AV Receiver-Continued For detailed information, see the pages in parentheses. O MUSIC button (59) Selects the listening modes intended...the type of stereo headphones for AM or FM radio. P GAME button (59) Selects the listening modes intended for use with RDS (Radio Data System). R DIGITAL INPUT button (49) Selects the options for AM and FM radio. See "Using RDS (European model only)" on or off when ...

Owner Manual
Page 12
... back speakers. nected to a video input on page 47. K TAPE IN/OUT These analog audio input and output jacks are for remote and system control. The HDMI inputs are for connecting a TV or projector with an analog audio input and output, such as a CD player or DVD...CD player's analog audio output. They're assignable, which means you can assign each one to an input selector to suit your setup. See "Digital Input Setup" on another -capable Onkyo component for connecting components with a component video output, such as a DVD player, DVD recorder, or DVR (digital video recorder...
... back speakers. nected to a video input on page 47. K TAPE IN/OUT These analog audio input and output jacks are for remote and system control. The HDMI inputs are for connecting a TV or projector with an analog audio input and output, such as a CD player or DVD...CD player's analog audio output. They're assignable, which means you can assign each one to an input selector to suit your setup. See "Digital Input Setup" on another -capable Onkyo component for connecting components with a component video output, such as a DVD player, DVD recorder, or DVR (digital video recorder...
Owner Manual
Page 16
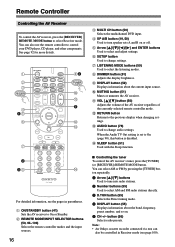
... number, and so on or off. When the Audio TV Out setting is set to turn speaker sets A and B on . 5 CH +/- F SETUP button Used to change audio settings. L RETURN button Returns to On or Standby. A ON/STANDBY button (41) Sets the AV receiver to the previous ... settings. A 2 3 RECEIVER 4 15 6 7 2 38 94 TUNER J K 5 L M N For detailed information, see the pages in Receiver mode (see page 100). Note: • An Onkyo cassette recorder connected via can also use the remote controller to select the listening modes. G LISTENING MODE buttons (59) Used to control your DVD player...
... number, and so on or off. When the Audio TV Out setting is set to turn speaker sets A and B on . 5 CH +/- F SETUP button Used to change audio settings. L RETURN button Returns to On or Standby. A ON/STANDBY button (41) Sets the AV receiver to the previous ... settings. A 2 3 RECEIVER 4 15 6 7 2 38 94 TUNER J K 5 L M N For detailed information, see the pages in Receiver mode (see page 100). Note: • An Onkyo cassette recorder connected via can also use the remote controller to select the listening modes. G LISTENING MODE buttons (59) Used to control your DVD player...
Owner Manual
Page 19
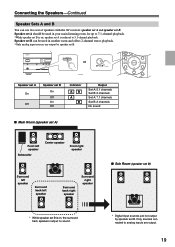
... MOVIE/TV MUSIC GAME LISTENING MODE DISPLAY DIGITAL INPUT RT/PTY/TP MEMORY TUNING MODE CLEAR SETUP MIC MASTER VOLUME or AUX INPUT VIDEO L AUDIO R AV RECEIVER HT-R960 Speaker set A On Off Speaker set B On Off On Off Indicator AB A B Output Set A: 5.1 channels Set B: 2 channels Set A: 7.1 channels Set B: 2 channels No sound...
... MOVIE/TV MUSIC GAME LISTENING MODE DISPLAY DIGITAL INPUT RT/PTY/TP MEMORY TUNING MODE CLEAR SETUP MIC MASTER VOLUME or AUX INPUT VIDEO L AUDIO R AV RECEIVER HT-R960 Speaker set A On Off Speaker set B On Off On Off Indicator AB A B Output Set A: 5.1 channels Set B: 2 channels Set A: 7.1 channels Set B: 2 channels No sound...

Owner Manual
Page 26
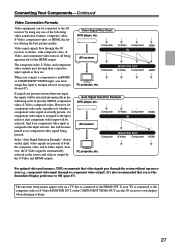
... Video Video Audio Audio TV, projector, etc. Audio Signal Flow Chart DVD player, etc. You can be selected automatically in the "Automatic Audio Input Selection Setup" on the formats supported by the analog TAPE OUT. If signals are not output by your DVD player and other components. Audio Connection Formats Audio...
... Video Video Audio Audio TV, projector, etc. Audio Signal Flow Chart DVD player, etc. You can be selected automatically in the "Automatic Audio Input Selection Setup" on the formats supported by the analog TAPE OUT. If signals are not output by your DVD player and other components. Audio Connection Formats Audio...
Owner Manual
Page 27
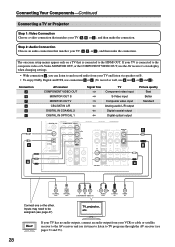
...MONITOR OUT S-Video Component TV, projector, etc. If your TV is assigned to the input selector, that video signals pass through the system without upconversion (e.g., component video input through to component video output). If signals are present at both the composite video and S-Video inputs,...the following video connection formats: composite video, S-Video, component video, or HDMI, the latter offering the best picture quality. The onscreen setup menus appear only on the right, video signals are . However, for the HDMI output. HDMI HDMI HDMI HDMI For optimal video performance,...
...MONITOR OUT S-Video Component TV, projector, etc. If your TV is assigned to the input selector, that video signals pass through the system without upconversion (e.g., component video input through to component video output). If signals are present at both the composite video and S-Video inputs,...the following video connection formats: composite video, S-Video, component video, or HDMI, the latter offering the best picture quality. The onscreen setup menus appear only on the right, video signals are . However, for the HDMI output. HDMI HDMI HDMI HDMI For optimal video performance,...
Owner Manual
Page 28
The onscreen setup menus appear only on a TV that matches your TV ( a , b , or c ), and then make the connection. If your TV is connected to TV programs through the ...
The onscreen setup menus appear only on a TV that matches your TV ( a , b , or c ), and then make the connection. If your TV is connected to TV programs through the ...

Owner Manual
Page 30
... vityFROfNoTr L R SURR DVD CENTER SURR BACK L R SUB WOOFER L R FRONT L R SURROUND CENTER L R SUB WOOFER SURR BACK DVD player 30 To select the multichannel input, see "Hardware Setup" on your DVD player has a 5.1-channel analog audio output, don't connect anything to the AV receiver's multichannel input.
... vityFROfNoTr L R SURR DVD CENTER SURR BACK L R SUB WOOFER L R FRONT L R SURROUND CENTER L R SUB WOOFER SURR BACK DVD player 30 To select the multichannel input, see "Hardware Setup" on your DVD player has a 5.1-channel analog audio output, don't connect anything to the AV receiver's multichannel input.
Owner Manual
Page 35
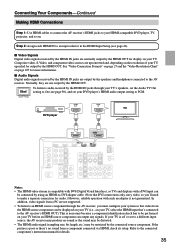
... connection for output by using an HDMI-to-DVI adapter cable. (Note that DVI connections only carry video, so you must configure your system so that 's connected to the AV receiver's HDMI OUT). Normally, they are not supported. • To listen to an HDMI source component through your ...TV's speakers, set your DVD player's HDMI audio output setting to PCM. Step 2: Assign each HDMI IN to an input selector in the HDMI Input Setup (see page 90), and set the Audio TV Out Hint! If the picture is not guaranteed. Connecting Your Components-Continued Making HDMI Connections Step 1: Use...
... connection for output by using an HDMI-to-DVI adapter cable. (Note that DVI connections only carry video, so you must configure your system so that 's connected to the AV receiver's HDMI OUT). Normally, they are not supported. • To listen to an HDMI source component through your ...TV's speakers, set your DVD player's HDMI audio output setting to PCM. Step 2: Assign each HDMI IN to an input selector in the HDMI Input Setup (see page 90), and set the Audio TV Out Hint! If the picture is not guaranteed. Connecting Your Components-Continued Making HDMI Connections Step 1: Use...
Owner Manual
Page 36
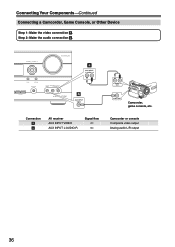
Camcorder or console Composite video output Analog audio L/R output 36 TUNING PRESET ENTER MASTER VOLUME a AUX INPUT L AUDIO R SETUP RETURN P MEMORY TUNING MODE CLEAR SETUP MIC AUX INPUT VIDEO L AUDIO R AV RECEIVER HT-R960 A AUX INPUT VIDEO Connection A a AV receiver AUX INPUT VIDEO AUX INPUT L-AUDIO-R Signal flow ⇐ ⇐ L AUDIO R OUT VIDEO OUT Camcorder, game console, etc. Connecting Your Components-Continued Connecting a Camcorder, Game Console, or Other Device Step 1: Make the video connection A . Step 2: Make the audio connection a .
Camcorder or console Composite video output Analog audio L/R output 36 TUNING PRESET ENTER MASTER VOLUME a AUX INPUT L AUDIO R SETUP RETURN P MEMORY TUNING MODE CLEAR SETUP MIC AUX INPUT VIDEO L AUDIO R AV RECEIVER HT-R960 A AUX INPUT VIDEO Connection A a AV receiver AUX INPUT VIDEO AUX INPUT L-AUDIO-R Signal flow ⇐ ⇐ L AUDIO R OUT VIDEO OUT Camcorder, game console, etc. Connecting Your Components-Continued Connecting a Camcorder, Game Console, or Other Device Step 1: Make the video connection A . Step 2: Make the audio connection a .
Owner Manual
Page 41
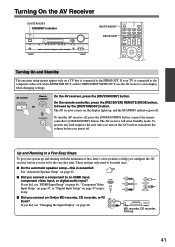
If your system up , and the STANDBY indicator goes off , press the [ON/STANDBY] button, or press the ...PR tively. The AV receiver will enter Standby mode. These settings only need to the HDMI OUT. If you connect an Onkyo MD recorder, CD recorder, or RI Dock? OUT IN TAPE MD recorder, CD recorder, RI Dock 41 Up and Running...LISTENING MODE DISPLAY DIGITAL INPUT RT/PTY/TP MEMORY TUNING MODE CLEAR SETUP MIC AUX INPUT VIDEO L AUDIO R AV RECEIVER HT-R960 ON/STANDBY RECEIVER Turning On and Standby The onscreen setup menus appear only on a TV that is connected to be made ...
If your system up , and the STANDBY indicator goes off , press the [ON/STANDBY] button, or press the ...PR tively. The AV receiver will enter Standby mode. These settings only need to the HDMI OUT. If you connect an Onkyo MD recorder, CD recorder, or RI Dock? OUT IN TAPE MD recorder, CD recorder, RI Dock 41 Up and Running...LISTENING MODE DISPLAY DIGITAL INPUT RT/PTY/TP MEMORY TUNING MODE CLEAR SETUP MIC AUX INPUT VIDEO L AUDIO R AV RECEIVER HT-R960 ON/STANDBY RECEIVER Turning On and Standby The onscreen setup menus appear only on a TV that is connected to be made ...
Owner Manual
Page 42
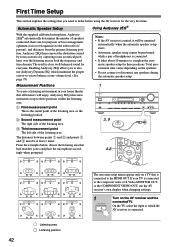
...HT-R960 3, 9 4-8 TV TV TV TV TV TV TV TV TV The onscreen setup menus appear only on a TV that all listeners will be unmuted automatically when the automatic speaker setup starts. • Automatic speaker setup cannot be at up to make before using the AV receiver for everyone. If your home theater... that is clear, well-balanced sound for the very first time. First Time Setup This section explains the settings that best matches yours and place the microphone accordingly when ...
...HT-R960 3, 9 4-8 TV TV TV TV TV TV TV TV TV The onscreen setup menus appear only on a TV that all listeners will be unmuted automatically when the automatic speaker setup starts. • Automatic speaker setup cannot be at up to make before using the AV receiver for everyone. If your home theater... that is clear, well-balanced sound for the very first time. First Time Setup This section explains the settings that best matches yours and place the microphone accordingly when ...
Owner Manual
Page 43
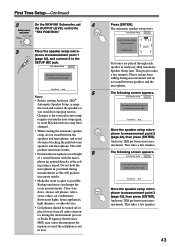
.... This takes a few minutes. Audyssey 2EQ performs more measurements. Push Enter : Next 5 Notes: • Before starting the automatic speaker setup, do not stand between speakers and microphone. Do not hold the microphone in use). Close windows, silence cell phones, televisions, radios, air... conditioners, fluorescent lights, home appliances, light dimmers, or other devices. • Cell phones should be turned off or placed away from talking during measurements and...
.... This takes a few minutes. Audyssey 2EQ performs more measurements. Push Enter : Next 5 Notes: • Before starting the automatic speaker setup, do not stand between speakers and microphone. Do not hold the microphone in use). Close windows, silence cell phones, televisions, radios, air... conditioners, fluorescent lights, home appliances, light dimmers, or other devices. • Cell phones should be turned off or placed away from talking during measurements and...


