Owner Manual
Page 2
... SERVICING TO QUALIFIED SERVICE PERSONNEL. Read these instructions. 3. Do not block any way, such as vases shall be set 10 cm (4") away from the wall outlet and refer servicing to its normal operation, E. Adjust only those controls that produce heat. 9. CAUTION: TO REDUCE THE RISK OF ELECTRIC SHOCK, DO NOT REMOVE COVER (OR BACK). NO USER-SERVICEABLE PARTS INSIDE. Do not use...
... SERVICING TO QUALIFIED SERVICE PERSONNEL. Read these instructions. 3. Do not block any way, such as vases shall be set 10 cm (4") away from the wall outlet and refer servicing to its normal operation, E. Adjust only those controls that produce heat. 9. CAUTION: TO REDUCE THE RISK OF ELECTRIC SHOCK, DO NOT REMOVE COVER (OR BACK). NO USER-SERVICEABLE PARTS INSIDE. Do not use...
Owner Manual
Page 3
... COMPLIES WITH CANADIAN ICES-003. For American Models Pressing the [STANDBY/ON] button to operate the equipment. Recording Copyright-Unless it checked by the party responsible for help. Although no guarantee that the plug is used in humid climates. AC Fuse-The AC fuse inside this unit or its power cord while your Onkyo dealer. 6. Never Touch this Unit with Wet Hands...
... COMPLIES WITH CANADIAN ICES-003. For American Models Pressing the [STANDBY/ON] button to operate the equipment. Recording Copyright-Unless it checked by the party responsible for help. Although no guarantee that the plug is used in humid climates. AC Fuse-The AC fuse inside this unit or its power cord while your Onkyo dealer. 6. Never Touch this Unit with Wet Hands...
Owner Manual
Page 4
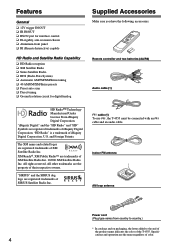
... AM/FM/XM/Sirius tuning ❑ 40 AM/FM/XM/Sirius presets ❑ Preset auto scan ❑ Direct tuning ❑ Ground isolation circuit for digital/analog Supplied Accessories Make sure you have the following accessories: Remote controller and two batteries (AA/R6) Audio cable (1) HD Radio™ Technology Manufactured Under License From iBiquity Digital Corporation. "HD Radio" is a trademark of the T-4555. All other trademarks are...
... AM/FM/XM/Sirius tuning ❑ 40 AM/FM/XM/Sirius presets ❑ Preset auto scan ❑ Direct tuning ❑ Ground isolation circuit for digital/analog Supplied Accessories Make sure you have the following accessories: Remote controller and two batteries (AA/R6) Audio cable (1) HD Radio™ Technology Manufactured Under License From iBiquity Digital Corporation. "HD Radio" is a trademark of the T-4555. All other trademarks are...
Owner Manual
Page 5
... T-4555 6 Front Panel 6 Display 7 Rear Panel 8 Remote Controller 9 Remote Controller 9 Before Using the T-4555 10 Connecting the Supplied Power Cord ..10 Installing the Batteries 10 Aiming the Remote Controller 10 Connections Connecting Antennas 11 Connecting the Indoor FM Antenna .....11 Connecting the AM Loop Antenna .......11 Connecting the T-4555 13 Connecting to an Amplifier 13 About the System Functions 13 Connecting the 12V Trigger Jacks .......14 Controlling Components That Are Out of Range 15 Enjoying Audio Sources Turning On and Listening to AM and FM Radio 16 Turning...
... T-4555 6 Front Panel 6 Display 7 Rear Panel 8 Remote Controller 9 Remote Controller 9 Before Using the T-4555 10 Connecting the Supplied Power Cord ..10 Installing the Batteries 10 Aiming the Remote Controller 10 Connections Connecting Antennas 11 Connecting the Indoor FM Antenna .....11 Connecting the AM Loop Antenna .......11 Connecting the T-4555 13 Connecting to an Amplifier 13 About the System Functions 13 Connecting the 12V Trigger Jacks .......14 Controlling Components That Are Out of Range 15 Enjoying Audio Sources Turning On and Listening to AM and FM Radio 16 Turning...
Owner Manual
Page 6
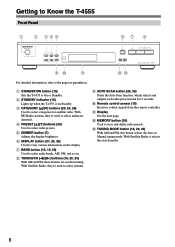
... channels. I AUTO SCAN button (29, 30) Starts the Auto Scan function, which selects and outputs each radio preset in parentheses. H TUNING/CH [ ]/[ ] buttons (16, 20, 24) With AM and FM, these buttons are used to view various information on . A STANDBY/ON button (16) Sets the T-4555 to store and delete radio presets. C CATEGORY [ ]/[ ] buttons (20, 24, 29) Used to select radio bands, AM, FM, and so on the display. J Remote control sensor (10) Receives control signals from the remote controller. E DIMMER button (7) Adjusts...
... channels. I AUTO SCAN button (29, 30) Starts the Auto Scan function, which selects and outputs each radio preset in parentheses. H TUNING/CH [ ]/[ ] buttons (16, 20, 24) With AM and FM, these buttons are used to view various information on . A STANDBY/ON button (16) Sets the T-4555 to store and delete radio presets. C CATEGORY [ ]/[ ] buttons (20, 24, 29) Used to select radio bands, AM, FM, and so on the display. J Remote control sensor (10) Receives control signals from the remote controller. E DIMMER button (7) Adjusts...
Owner Manual
Page 7
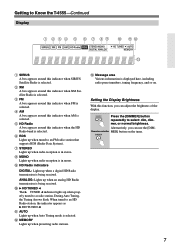
... Tuning Arrows flash. K AUTO Lights up when tuned to an FM radio station that supports RDS (Radio Data System). C FM A box appears around this function, you can adjust the brightness of the display. F RDS Lights up when Auto Tuning mode is selected. Press the [DIMMER] button repeatedly to an HD Radio station, the indicator appears as HD TUNED . H MONO Lights up when radio reception is displayed here, including radio preset numbers, tuning frequency, and so on the tuner...
... Tuning Arrows flash. K AUTO Lights up when tuned to an FM radio station that supports RDS (Radio Data System). C FM A box appears around this function, you can adjust the brightness of the display. F RDS Lights up when Auto Tuning mode is selected. Press the [DIMMER] button repeatedly to an HD Radio station, the indicator appears as HD TUNED . H MONO Lights up when radio reception is displayed here, including radio preset numbers, tuning frequency, and so on the tuner...
Owner Manual
Page 8
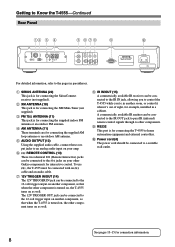
... 12V TRIGGER IN jack can be connected to the jacks on , the other component is for interactive control. B XM ANTENNA (18) This jack is turned on your amp. E AUDIO OUTPUT (13) Using the supplied audio cable, connect these output jacks to the 12-volt trigger input on your other components. The 12V TRIGGER OUT jack can be connected to an analog audio input on another component, so that when the T-4555 is for connecting the supplied indoor...
... 12V TRIGGER IN jack can be connected to the jacks on , the other component is for interactive control. B XM ANTENNA (18) This jack is turned on your amp. E AUDIO OUTPUT (13) Using the supplied audio cable, connect these output jacks to the 12-volt trigger input on your other components. The 12V TRIGGER OUT jack can be connected to an analog audio input on another component, so that when the T-4555 is for connecting the supplied indoor...
Owner Manual
Page 9
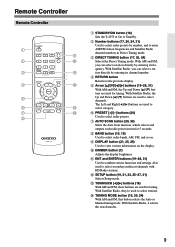
... Down [ ]/[ ] buttons are used to On or Standby. B Number buttons (17, 20, 24, 31) Used to select radio presets by entering its frequency. J DIMMER button (7) Adjusts the display brightness. Remote Controller Remote Controller 1 9 2 J 3 K 4 L 5 6 M 7 N 8 A STANDBY/ON button (16) Sets the T-4555 to select secondary multicast channels with HD Radio stations. With AM and FM, you can select a station directly by entering its channel number. N TUNING MODE button (16, 20, 24) With AM and FM, this button selects the Auto or Manual tuning mode. Also used for...
... Down [ ]/[ ] buttons are used to On or Standby. B Number buttons (17, 20, 24, 31) Used to select radio presets by entering its frequency. J DIMMER button (7) Adjusts the display brightness. Remote Controller Remote Controller 1 9 2 J 3 K 4 L 5 6 M 7 N 8 A STANDBY/ON button (16) Sets the T-4555 to select secondary multicast channels with HD Radio stations. With AM and FM, you can select a station directly by entering its channel number. N TUNING MODE button (16, 20, 24) With AM and FM, this button selects the Auto or Manual tuning mode. Also used for...
Owner Manual
Page 10
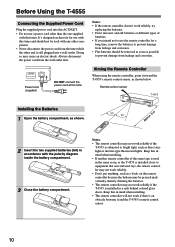
... the Remote Controller When using the remote controller, point it and the T-4555's remote control sensor. 10 Keep this tuner. Before Using the T-4555 Connecting the Supplied Power Cord Plug the supplied power cord into a wall outlet. Remote control sensor T-4555 Installing the Batteries 1 Open the battery compartment, as a book, on the remote controller because the buttons may be used in the same room, or the T-4555 is installed in mind when installing. • If another remote controller of batteries...
... the Remote Controller When using the remote controller, point it and the T-4555's remote control sensor. 10 Keep this tuner. Before Using the T-4555 Connecting the Supplied Power Cord Plug the supplied power cord into a wall outlet. Remote control sensor T-4555 Installing the Batteries 1 Open the battery compartment, as a book, on the remote controller because the buttons may be used in the same room, or the T-4555 is installed in mind when installing. • If another remote controller of batteries...
Owner Manual
Page 13
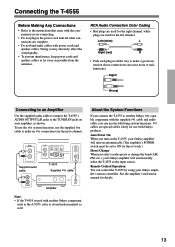
... audio cable to connect the T-4555's AUDIO OUTPUT L/R jacks to the TUNER IN jacks on automatically. (The amplifier's POWER switch must be set to ON for the left channel. To use the system functions, use with power cords and speaker cables. Auto Power On When you turn on the T-4555, your Onkyo amplifier will turn on your Onkyo amplifier will automatically select the T-4555 as possible from the antennas. Remote Control Operation You can use the following system functions...
... audio cable to connect the T-4555's AUDIO OUTPUT L/R jacks to the TUNER IN jacks on automatically. (The amplifier's POWER switch must be set to ON for the left channel. To use the system functions, use with power cords and speaker cables. Auto Power On When you turn on the T-4555, your Onkyo amplifier will turn on your Onkyo amplifier will automatically select the T-4555 as possible from the antennas. Remote Control Operation You can use the following system functions...
Owner Manual
Page 14
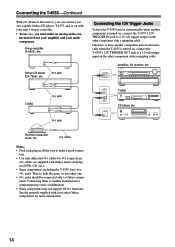
... receiver, etc. Remote Interactive Dock, etc. nents. See the manuals supplied with your other component with your amp's remote controller. • To use either one. • jacks should be connected only to Onkyo compo- STANDBY/ON STANDBY READY ZONE 2 ZONE 3 PURE AUDIO AUDIO SEL DVD VCR/DVR CBL/SAT GAME/TV AUX 1 AUX 2 TAPE TUNER CD PHONO MASTER VOLUME DISPLAY PUSH TO OPEN jack T-4555 jack T-4555 12V TRIGGER IN CD player, etc. Onkyo CD player jack (DX-7555), etc. cables are supplied with Onkyo tuners and players (DVD...
... receiver, etc. Remote Interactive Dock, etc. nents. See the manuals supplied with your other component with your amp's remote controller. • To use either one. • jacks should be connected only to Onkyo compo- STANDBY/ON STANDBY READY ZONE 2 ZONE 3 PURE AUDIO AUDIO SEL DVD VCR/DVR CBL/SAT GAME/TV AUX 1 AUX 2 TAPE TUNER CD PHONO MASTER VOLUME DISPLAY PUSH TO OPEN jack T-4555 jack T-4555 12V TRIGGER IN CD player, etc. Onkyo CD player jack (DX-7555), etc. cables are supplied with Onkyo tuners and players (DVD...
Owner Manual
Page 18
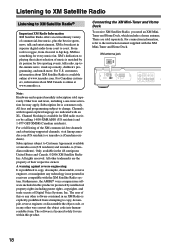
... commercial-free music, plus the best in the 48 contiguous United States and Canada. ©2006 XM Satellite Radio Inc. XM is broadcast in this product. Channels with the XM Mini-Tuner and Home Dock. All other way convert the object code into humanreadable form. These are sold separately. For U.S. XM's dedication to change. Other fees and taxes, including a one-time...
... commercial-free music, plus the best in the 48 contiguous United States and Canada. ©2006 XM Satellite Radio Inc. XM is broadcast in this product. Channels with the XM Mini-Tuner and Home Dock. All other way convert the object code into humanreadable form. These are sold separately. For U.S. XM's dedication to change. Other fees and taxes, including a one-time...

Owner Manual
Page 19
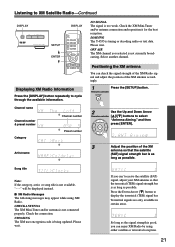
... Radio will transmit a special signal to the T-4555 to select "RADIO ID." Write it below 1 Use the Up and Down Arrow Remote controller [ ]/[ ] buttons to activate the full channel lineup. Remote controller Selecting XM Satellite Radio 1 Press the [BAND] button repeat- Remote controller Tuner is displayed. On the XM Mini-Tuner 2. ID: 2 To sign up to XM Satellite Radio-Continued BAND SETUP ENTER /// BAND Setting the Satellite Radio Mode 1 Press the [SETUP] button. Your XM Satellite Radio ID number is connected...
... Radio will transmit a special signal to the T-4555 to select "RADIO ID." Write it below 1 Use the Up and Down Arrow Remote controller [ ]/[ ] buttons to activate the full channel lineup. Remote controller Selecting XM Satellite Radio 1 Press the [BAND] button repeat- Remote controller Tuner is displayed. On the XM Mini-Tuner 2. ID: 2 To sign up to XM Satellite Radio-Continued BAND SETUP ENTER /// BAND Setting the Satellite Radio Mode 1 Press the [SETUP] button. Your XM Satellite Radio ID number is connected...
Owner Manual
Page 21
... [SETUP] button. OFF AIR The XM channel you can check the signal strength of the XM Radio signal and adjust the position of the XM antenna so that the terrestrial (TER) signal strength bar is tuning or decoding audio or text data. CHECK ANTENNA The XM Mini-Tuner and/or antenna is not currently broadcasting. Channel name Channel number & preset number Category Channel number Preset number Positioning the XM antenna You can 't receive the satellite (SAT) signal, adjust...
... [SETUP] button. OFF AIR The XM channel you can check the signal strength of the XM Radio signal and adjust the position of the XM antenna so that the terrestrial (TER) signal strength bar is tuning or decoding audio or text data. CHECK ANTENNA The XM Mini-Tuner and/or antenna is not currently broadcasting. Channel name Channel number & preset number Category Channel number Preset number Positioning the XM antenna You can 't receive the satellite (SAT) signal, adjust...
Owner Manual
Page 22
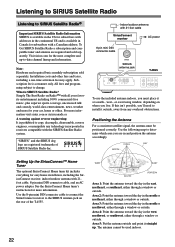
... 21-foot cable SiriusConnect receiver AC power 8-pin mini DIN connector cable SIRIUS antenna jack T-4555 To use the included antenna indoors, you are in the north or northeast, either through a window or outside . See the SiriusConnect Home tuner's instructions for easy home installation, including the SiriusConnect receiver, indoor/outdoor antenna with the SIRIUS Satellite Radio system. SKY NORTH Setting Up the SiriusConnect™ Home Tuner The optional SiriusConnect Home tuner kit includes...
... 21-foot cable SiriusConnect receiver AC power 8-pin mini DIN connector cable SIRIUS antenna jack T-4555 To use the included antenna indoors, you are in the north or northeast, either through a window or outside . See the SiriusConnect Home tuner's instructions for easy home installation, including the SiriusConnect receiver, indoor/outdoor antenna with the SIRIUS Satellite Radio system. SKY NORTH Setting Up the SiriusConnect™ Home Tuner The optional SiriusConnect Home tuner kit includes...
Owner Manual
Page 25
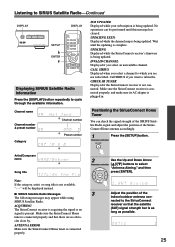
... indoor/outdoor antenna con- Call SIRIUS if you select an unavailable channel. ANTENNA ERROR Make sure the SiriusConnect Home tuner is connected properly and that the satellite (SAT) signal strength bar is as long as possible. 25 UPDATING XXX% Displayed while the channel map is plugged in. Channel name Channel number & preset number Category Channel number Preset number SUB UPDATED Displayed while your subscription is being updated. UPDATING Displayed while the SiriusConnect receiver's firmware is being updated. Remote controller Artist/Composer...
... indoor/outdoor antenna con- Call SIRIUS if you select an unavailable channel. ANTENNA ERROR Make sure the SiriusConnect Home tuner is connected properly and that the satellite (SAT) signal strength bar is as long as possible. 25 UPDATING XXX% Displayed while the channel map is plugged in. Channel name Channel number & preset number Category Channel number Preset number SUB UPDATED Displayed while your subscription is being updated. UPDATING Displayed while the SiriusConnect receiver's firmware is being updated. Remote controller Artist/Composer...
Owner Manual
Page 28
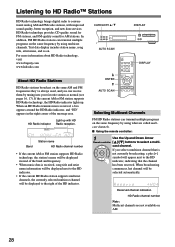
... displayed next to the HD indicator. • If the current HD Radio station supports multicast channels, the currently selected multicast channel will be selected automatically. If you can transmit multiple programs on the same frequency by tuning into your favorite station as normal (see pages 16, 17). Reserved channel indication HD Radio channel number Note: Multicast channels are called multicast channels. ■ Using the remote controller: 1 Use the Up and Down Arrow Remote controller [ ]/[ ] buttons...
... displayed next to the HD indicator. • If the current HD Radio station supports multicast channels, the currently selected multicast channel will be selected automatically. If you can transmit multiple programs on the same frequency by tuning into your favorite station as normal (see pages 16, 17). Reserved channel indication HD Radio channel number Note: Multicast channels are called multicast channels. ■ Using the remote controller: 1 Use the Up and Down Arrow Remote controller [ ]/[ ] buttons...
Owner Manual
Page 29
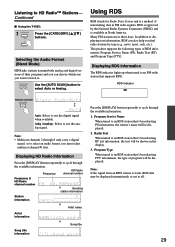
Selecting the Audio Format (Blend Mode) HD Radio stations transmit both analog and digital versions of program will be displayed. 2. Program Type When tuned to . Listening to use the analog signal. Anlg (Analog): Select to HD Radio™ Stations- Note: • Multicast channels 2 through 8 only carry a digital signal, so to an RDS station that 's broadcasting PTY information, the type of their programs and you can also help you find radio stations by the National Radio Systems Committee...
Selecting the Audio Format (Blend Mode) HD Radio stations transmit both analog and digital versions of program will be displayed. 2. Program Type When tuned to . Listening to use the analog signal. Anlg (Analog): Select to HD Radio™ Stations- Note: • Multicast channels 2 through 8 only carry a digital signal, so to an RDS station that 's broadcasting PTY information, the type of their programs and you can also help you find radio stations by the National Radio Systems Committee...
Owner Manual
Page 31
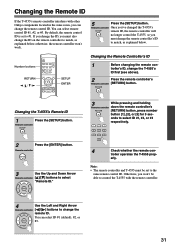
... remote ID. You can select ID #1 (default), #2, or #3. 31 If you change the remote control ID. Number buttons RETURN /// SETUP ENTER Changing the Remote Controller's ID 1 Before changing the remote con- onds to match, as explained below , otherwise, the remote controller won 't be set to #1. Otherwise, you can change the ID, you must be able to control the T-4555 with other Onkyo components located in the same room, you won 't work. 5 Press the [SETUP] button. Remote controller 3 Use...
... remote ID. You can select ID #1 (default), #2, or #3. 31 If you change the remote control ID. Number buttons RETURN /// SETUP ENTER Changing the Remote Controller's ID 1 Before changing the remote con- onds to match, as explained below , otherwise, the remote controller won 't be set to #1. Otherwise, you can change the ID, you must be able to control the T-4555 with other Onkyo components located in the same room, you won 't work. 5 Press the [SETUP] button. Remote controller 3 Use...
Owner Manual
Page 32
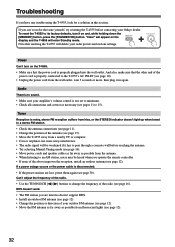
..., make sure that resetting the T-4555 will enter Standby mode. To reset the T-4555 to change the frequency of the radio. • Use the TUNING/CH [ ]/[ ] buttons to its factory defaults, turn on the display and the T-4555 will delete your Onkyo dealer. Can't adjust the frequency of the radio (see page 10). • Unplug the power cord from the antenna. • When listening to 15). Troubleshooting If you have any trouble using the T-4555, look for a solution...
..., make sure that resetting the T-4555 will enter Standby mode. To reset the T-4555 to change the frequency of the radio. • Use the TUNING/CH [ ]/[ ] buttons to its factory defaults, turn on the display and the T-4555 will delete your Onkyo dealer. Can't adjust the frequency of the radio (see page 10). • Unplug the power cord from the antenna. • When listening to 15). Troubleshooting If you have any trouble using the T-4555, look for a solution...


