
Owner Manual
Page 1
En-18 Appendix Troubleshooting En-51 Specifications En-54 En Please retain this manual for purchasing an Onkyo Network Stereo Receiver. Following the instructions in this manual thoroughly before making connections and plugging in the unit. Enjoying Audio Sources...... Network Stereo Receiver TX-8050 Instruction Manual Contents Introduction En-2 Connections En-10 Thank you to obtain optimum performance and listening enjoyment from your new Stereo Receiver. Please read this manual will enable you for future reference.
En-18 Appendix Troubleshooting En-51 Specifications En-54 En Please retain this manual for purchasing an Onkyo Network Stereo Receiver. Following the instructions in this manual thoroughly before making connections and plugging in the unit. Enjoying Audio Sources...... Network Stereo Receiver TX-8050 Instruction Manual Contents Introduction En-2 Connections En-10 Thank you to obtain optimum performance and listening enjoyment from your new Stereo Receiver. Please read this manual will enable you for future reference.
Owner Manual
Page 4
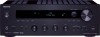
... Technology) ❑ Discrete Amplifier with an appropriate fuse. Fit a suitable fuse in compliance with safety and regulatory standards. Please note that the ONKYO product described in this instruction manual is marked with the letter L or coloured red. Windows and the Windows logo are proprietary trademarks of iBiquity Digital Corporation. If the power...
... Technology) ❑ Discrete Amplifier with an appropriate fuse. Fit a suitable fuse in compliance with safety and regulatory standards. Please note that the ONKYO product described in this instruction manual is marked with the letter L or coloured red. Windows and the Windows logo are proprietary trademarks of iBiquity Digital Corporation. If the power...

Owner Manual
Page 14
... audio. The audio quality is the same as coaxial. Right! Blu-ray Disc/ DVD player Game console • Before making any AV connections, read the manuals supplied with your AV components. • Don't connect the power cord until you've completed and double-checked all AV connections. • Push plugs in...
... audio. The audio quality is the same as coaxial. Right! Blu-ray Disc/ DVD player Game console • Before making any AV connections, read the manuals supplied with your AV components. • Don't connect the power cord until you've completed and double-checked all AV connections. • Push plugs in...
Owner Manual
Page 15
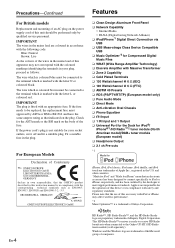
... box, etc. Game console, RI dock TV, cassette tape deck, RI dock CD player, Turntable Turntable Notes: • Refer to the connected component's instruction manual for details. • Do not connect the receiver's USB port to a USB port on your computer cannot be sure to connect the main stereo output...-ray Disc/DVD player VCR or DVD recorder/digital video recorder, RI dock Satellite/cable set -top box, RI dock, etc. If your turntable's manual for video recording ( page 22). you 'll need a commercially available MC head amp or MC transformer to connect to PHONO IN with the ...
... box, etc. Game console, RI dock TV, cassette tape deck, RI dock CD player, Turntable Turntable Notes: • Refer to the connected component's instruction manual for details. • Do not connect the receiver's USB port to a USB port on your computer cannot be sure to connect the main stereo output...-ray Disc/DVD player VCR or DVD recorder/digital video recorder, RI dock Satellite/cable set -top box, RI dock, etc. If your turntable's manual for video recording ( page 22). you 'll need a commercially available MC head amp or MC transformer to connect to PHONO IN with the ...
Owner Manual
Page 16
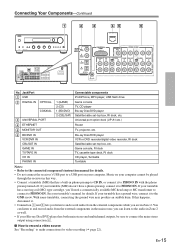
... 2 Make the connection (see the illustration). You can use the receiver's remote controller to the manuals supplied with your other -capable Onkyo components, pointing the remote controller at the receiver's remote control sensor instead of the component. Connecting Your Components-.... ■ Direct Change When playback is started on a component connected via , the receiver automatically selects that each Onkyo component is connected with Onkyo players (CD, etc.). • Some components have two jacks. The other manufacturer's components may cause a ...
... 2 Make the connection (see the illustration). You can use the receiver's remote controller to the manuals supplied with your other -capable Onkyo components, pointing the remote controller at the receiver's remote control sensor instead of the component. Connecting Your Components-.... ■ Direct Change When playback is started on a component connected via , the receiver automatically selects that each Onkyo component is connected with Onkyo players (CD, etc.). • Some components have two jacks. The other manufacturer's components may cause a ...

Owner Manual
Page 17
Recording is connected to a composite video input, the recording VCR must be recorded only via composite video outputs. See the manuals supplied with other electrical equipment on , no video signal is a problem, plug the receiver into a different branch circuit. Connecting Your Components-Continued Connecting a Recording Component ...
Recording is connected to a composite video input, the recording VCR must be recorded only via composite video outputs. See the manuals supplied with other electrical equipment on , no video signal is a problem, plug the receiver into a different branch circuit. Connecting Your Components-Continued Connecting a Recording Component ...

Owner Manual
Page 22
... SELECTOR buttons to select the component that it's ready for recording. • If necessary, adjust the recording level on the recorder. • See the recorder's manual for recording. 3 Press the remote controller's [GAME] INPUT SELECTOR button. 4 Press the remote controller's [CD] INPUT SELECTOR button. Recording Audio and Video from different sources...
... SELECTOR buttons to select the component that it's ready for recording. • If necessary, adjust the recording level on the recorder. • See the recorder's manual for recording. 3 Press the remote controller's [GAME] INPUT SELECTOR button. 4 Press the remote controller's [CD] INPUT SELECTOR button. Recording Audio and Video from different sources...

Owner Manual
Page 23
... American model) for FM, and 9 kHz (or 10 kHz) steps for AM. In this mode, you will receive the broadcast in stereo sound. Manual Tuning The frequency stops changing when you will receive the broadcast in monaural sound. AUTO indicator The frequency changes in 0.05 MHz steps (or 0.05...off the "AUTO" indicator. Press the buttons repeatedly to select AM or FM. In this mode, you release the button. Manual Tuning To activate this case, switch to Manual Tuning mode and listen to turn on the country.) 2 Press the [TUNING MODE] button so that the AUTO indicator appears or...
... American model) for FM, and 9 kHz (or 10 kHz) steps for AM. In this mode, you will receive the broadcast in stereo sound. Manual Tuning The frequency stops changing when you will receive the broadcast in monaural sound. AUTO indicator The frequency changes in 0.05 MHz steps (or 0.05...off the "AUTO" indicator. Press the buttons repeatedly to select AM or FM. In this mode, you release the button. Manual Tuning To activate this case, switch to Manual Tuning mode and listen to turn on the country.) 2 Press the [TUNING MODE] button so that the AUTO indicator appears or...
Owner Manual
Page 29
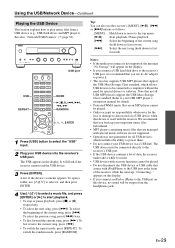
..., press []. • To switch the repeat mode, press [REPEAT]. Refer to your USB MP3 player's instruction manual for details. • Protected WMA music files on an MP3 player cannot be played. • Onkyo accepts no sound will be played. • Do not disconnect the USB device or USB cable that are...
..., press []. • To switch the repeat mode, press [REPEAT]. Refer to your USB MP3 player's instruction manual for details. • Protected WMA music files on an MP3 player cannot be played. • Onkyo accepts no sound will be played. • Do not disconnect the USB device or USB cable that are...

Owner Manual
Page 31
... not able to 40 Internet radio stations. En-31 To go back to the previous display, press [RETURN]. 4 Use to them directly. See the instruction manual of the current song []: (hold down to fast reverse) Select the next song (hold down to fast forward) (These operations are available depending on...
... not able to 40 Internet radio stations. En-31 To go back to the previous display, press [RETURN]. 4 Use to them directly. See the instruction manual of the current song []: (hold down to fast reverse) Select the next song (hold down to fast forward) (These operations are available depending on...

Owner Manual
Page 34
... K modem, ISDN) will not provide satisfactory results, so a broadband connection is recommended. If you want to configure these settings manually, see the Microsoft web site. Network/USB Features Connecting to the Network The following diagram shows how you can connect the receiver to... unsure. Internet radio Modem Router Computer or media server Network Requirements ■ Ethernet Network For the best results, a 100 Base-TX switched Ethernet network is strongly recommended (e.g., cable modem, xDSL modem, etc). NAT allows several networked computers to use specific routers. ...
... K modem, ISDN) will not provide satisfactory results, so a broadband connection is recommended. If you want to configure these settings manually, see the Microsoft web site. Network/USB Features Connecting to the Network The following diagram shows how you can connect the receiver to... unsure. Internet radio Modem Router Computer or media server Network Requirements ■ Ethernet Network For the best results, a 100 Base-TX switched Ethernet network is strongly recommended (e.g., cable modem, xDSL modem, etc). NAT allows several networked computers to use specific routers. ...
Owner Manual
Page 36
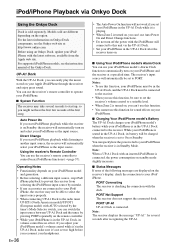
... set to PORT. PORT UP-A1 UP-A1 Dock is checking the connection with the dock. For the latest information on Onkyo Dock components, see the instruction manual of the following messages are different depending on your Apple iPod/iPhone through the receiver and enjoy great sound. Note: The... use your iPod/iPhone model's Alarm Clock function to automatically turn on your iPod/iPhone and the receiver at : http://www.onkyo.com Before using an Onkyo Dock, update your iPod/ iPhone with the latest software, available from selecting the iPod/iPhone input source by pressing PORT repeatedly ...
... set to PORT. PORT UP-A1 UP-A1 Dock is checking the connection with the dock. For the latest information on Onkyo Dock components, see the instruction manual of the following messages are different depending on your Apple iPod/iPhone through the receiver and enjoy great sound. Note: The... use your iPod/iPhone model's Alarm Clock function to automatically turn on your iPod/iPhone and the receiver at : http://www.onkyo.com Before using an Onkyo Dock, update your iPod/ iPhone with the latest software, available from selecting the iPod/iPhone input source by pressing PORT repeatedly ...
Owner Manual
Page 37
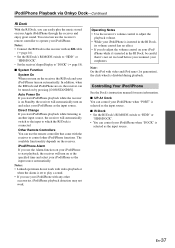
...you reconnect your iPod/iPhone with video and iPod nano (1st generation), the click wheel is connected. Controlling Your iPod/iPhone See the Dock's instruction manual for more information. ■ UP-A1 Dock You can control your iPod/iPhone when "PORT" is selected as the input source. Notes: •... Connect the RI Dock to the receiver with the receiver to which the RI Dock is disabled during playback. iPod/iPhone Playback via Onkyo Dock-Continued RI Dock With the RI Dock, you can easily play a sound. • If you use the receiver's remote controller to start ...
...you reconnect your iPod/iPhone with video and iPod nano (1st generation), the click wheel is connected. Controlling Your iPod/iPhone See the Dock's instruction manual for more information. ■ UP-A1 Dock You can control your iPod/iPhone when "PORT" is selected as the input source. Notes: •... Connect the RI Dock to the receiver with the receiver to which the RI Dock is disabled during playback. iPod/iPhone Playback via Onkyo Dock-Continued RI Dock With the RI Dock, you can easily play a sound. • If you use the receiver's remote controller to start ...
Owner Manual
Page 38
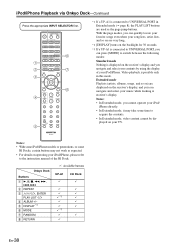
...( page 8), the PLAY LIST buttons are displayed on the receiver's display and you cannot operate your iPod/iPhone, please refer to the instruction manual of your TV. Onkyo Dock Buttons 1 , 2 REPEAT 3 ENTER PLAY LIST / 4 ALBUM +/- 5 DISPLAY *2 6 MODE 7 RANDOM 8... : Available buttons UP-A1 1 3 Dock En-38 iPod/iPhone Playback via Onkyo Dock-Continued Press the appropriate INPUT SELECTOR first. 6 1 2 7 3 8 4 5 *1 If a UP-A1 is connected to UNIVERSAL PORT in this mode.
...( page 8), the PLAY LIST buttons are displayed on the receiver's display and you cannot operate your iPod/iPhone, please refer to the instruction manual of your TV. Onkyo Dock Buttons 1 , 2 REPEAT 3 ENTER PLAY LIST / 4 ALBUM +/- 5 DISPLAY *2 6 MODE 7 RANDOM 8... : Available buttons UP-A1 1 3 Dock En-38 iPod/iPhone Playback via Onkyo Dock-Continued Press the appropriate INPUT SELECTOR first. 6 1 2 7 3 8 4 5 *1 If a UP-A1 is connected to UNIVERSAL PORT in this mode.
Owner Manual
Page 42
... automatically configure themselves on the amp in your Web En-42 browser, before accessing the site, your ISP. "49152" to configure the receiver's network settings manually. Default setting: Fixed Z2 Bass With this setting, you 're for example using a Web proxy, enter a proxy port number here. The output can boost or...
... automatically configure themselves on the amp in your Web En-42 browser, before accessing the site, your ISP. "49152" to configure the receiver's network settings manually. Default setting: Fixed Z2 Bass With this setting, you 're for example using a Web proxy, enter a proxy port number here. The output can boost or...

Owner Manual
Page 49
... 2. • Stop playback of contents from your PC and connect it is being updated. • It takes about 5 minutes to access the receiver from the Onkyo web site. Before you may be able to the USB port on the receiver. 5 Make sure the receiver is turned on the receiver. Contact your.../ any data in the USB device, remove it first. 2 Download the firmware file from your PC while it to access the network. See the instruction manual of input sources, turn off and on . If you do not need to the USB device. If the receiver is in the USB device, remove...
... 2. • Stop playback of contents from your PC and connect it is being updated. • It takes about 5 minutes to access the receiver from the Onkyo web site. Before you may be able to the USB port on the receiver. 5 Make sure the receiver is turned on the receiver. Contact your.../ any data in the USB device, remove it first. 2 Download the firmware file from your PC while it to access the network. See the instruction manual of input sources, turn off and on . If you do not need to the USB device. If the receiver is in the USB device, remove...

