Owner Manual
Page 4
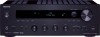
.../channel @ 6 Ω (FTC) ❑ AM/FM 40 Presets ❑ RDS (PS/PTY/RT/TP) (European model only) ❑ Pure Audio Mode ❑ Direct Mode ❑ Anti-vibration Oval Chassis ❑ Phono Equalizer ❑ Input ❑ 1 IR Input and 1 Output ❑ Universal Port for the Dock for iPod®/ iPhone®*1/HD Radio™*2 tuner module (North American model)/DAB+ tuner module (European model) ❑ Headphone Output ❑ 2.1 ch Pre-outs *1 iPhone, iPod, iPod classic, iPod nano, iPod...
.../channel @ 6 Ω (FTC) ❑ AM/FM 40 Presets ❑ RDS (PS/PTY/RT/TP) (European model only) ❑ Pure Audio Mode ❑ Direct Mode ❑ Anti-vibration Oval Chassis ❑ Phono Equalizer ❑ Input ❑ 1 IR Input and 1 Output ❑ Universal Port for the Dock for iPod®/ iPhone®*1/HD Radio™*2 tuner module (North American model)/DAB+ tuner module (European model) ❑ Headphone Output ❑ 2.1 ch Pre-outs *1 iPhone, iPod, iPod classic, iPod nano, iPod...
Owner Manual
Page 5
... the Speaker Cables 10 Connecting a Powered Subwoofer 11 Connecting a Power Amplifier 11 Configuring the Speaker Impedance 12 Connecting Antennas 13 Connecting Your Components 14 About AV Connections 14 Connecting Onkyo Components 16 Connecting a Recording Component 17 Connecting the Power Cord 17 Turning On the Receiver 18 Turning On and Standby 18 Changing the Input Display 18 Enjoying Audio Sources 19 Muting the Receiver (remote controller only 19 Using Headphones 19 Setting the Display Brightness 20 Using the Sleep Timer (remote controller only 20 Using the Tone...
... the Speaker Cables 10 Connecting a Powered Subwoofer 11 Connecting a Power Amplifier 11 Configuring the Speaker Impedance 12 Connecting Antennas 13 Connecting Your Components 14 About AV Connections 14 Connecting Onkyo Components 16 Connecting a Recording Component 17 Connecting the Power Cord 17 Turning On the Receiver 18 Turning On and Standby 18 Changing the Input Display 18 Enjoying Audio Sources 19 Muting the Receiver (remote controller only 19 Using Headphones 19 Setting the Display Brightness 20 Using the Sleep Timer (remote controller only 20 Using the Tone...
Owner Manual
Page 8
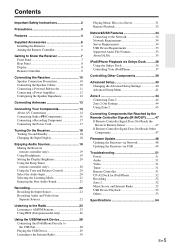
..., 31) j MUTING indicator (51) k Volume level (19) l USB indicator (28, 29) m SLEEP indicator (20, 41) n Audio input indicators Display abc 45 6 7 8 For detailed information, see the pages in parentheses. a REMOTE CONTROL jack (16) b UNIVERSAL PORT jack (15) c ETHERNET port (15) d MONITOR OUT jack (15) e PRE OUT jacks (11) f ZONE 2 PRE OUT jacks (44) g IR IN/OUT jacks (47) h FM ANTENNA jack and AM ANTENNA terminal (13) i DIGITAL IN COAXIAL and OPTICAL jacks (15) j PHONO IN (MM) and GND...
..., 31) j MUTING indicator (51) k Volume level (19) l USB indicator (28, 29) m SLEEP indicator (20, 41) n Audio input indicators Display abc 45 6 7 8 For detailed information, see the pages in parentheses. a REMOTE CONTROL jack (16) b UNIVERSAL PORT jack (15) c ETHERNET port (15) d MONITOR OUT jack (15) e PRE OUT jacks (11) f ZONE 2 PRE OUT jacks (44) g IR IN/OUT jacks (47) h FM ANTENNA jack and AM ANTENNA terminal (13) i DIGITAL IN COAXIAL and OPTICAL jacks (15) j PHONO IN (MM) and GND...
Owner Manual
Page 10
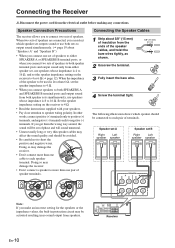
... receiver allows you connect two sets of speakers to both speaker sets simultaneously, use speakers whose impedance is 4 to 16 Ω, and set , use speakers whose impedance is 8 to short the positive and negative wires. In other words, connect positive (+) terminals only to positive (+) terminals, and negative (-) terminals only to speaker wiring polarity. If you make an incorrect setting for the speakers or the impedance values, the built-in no sound output...
... receiver allows you connect two sets of speakers to both speaker sets simultaneously, use speakers whose impedance is 4 to 16 Ω, and set , use speakers whose impedance is 8 to short the positive and negative wires. In other words, connect positive (+) terminals only to positive (+) terminals, and negative (-) terminals only to speaker wiring polarity. If you make an incorrect setting for the speakers or the impedance values, the built-in no sound output...
Owner Manual
Page 11
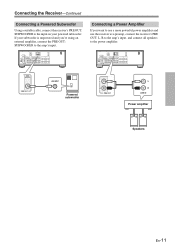
If your powered subwoofer. Connecting the Receiver-Continued Connecting a Powered Subwoofer Using a suitable cable, connect the receiver's PRE OUT: SUBWOOFER to the amp's input. Connecting a Power Amplifier If you 're using an external amplifier, connect the PRE OUT: SUBWOOFER to the input on your subwoofer is unpowered and you want to use a more powerful power amplifier and use the receiver as a preamp, connect the receiver's PRE OUT: L, R to the amp's input, and connect all speakers to the power amplifier. Powered subwoofer LINE IN Power amplifier -+-+ Speakers En-11
If your powered subwoofer. Connecting the Receiver-Continued Connecting a Powered Subwoofer Using a suitable cable, connect the receiver's PRE OUT: SUBWOOFER to the amp's input. Connecting a Power Amplifier If you 're using an external amplifier, connect the PRE OUT: SUBWOOFER to the input on your subwoofer is unpowered and you want to use a more powerful power amplifier and use the receiver as a preamp, connect the receiver's PRE OUT: L, R to the amp's input, and connect all speakers to the power amplifier. Powered subwoofer LINE IN Power amplifier -+-+ Speakers En-11

Owner Manual
Page 12
... "Speaker Connection Precautions" on page 10 carefully before configuring the speaker impedance. 1 Press the [] button to turn on the power. 2 Press the [SETUP] button on the remote controller to less than 6 Ω, or choose the 6 Ω setting if each speaker's impedance is 8 to the previous menu. Connecting the Receiver-Continued Configuring the Speaker Impedance On the receiver, the factory default for speaker impedance is 6 Ω or more. Setting example : If you need to select "3. If you 're using...
... "Speaker Connection Precautions" on page 10 carefully before configuring the speaker impedance. 1 Press the [] button to turn on the power. 2 Press the [SETUP] button on the remote controller to less than 6 Ω, or choose the 6 Ω setting if each speaker's impedance is 8 to the previous menu. Connecting the Receiver-Continued Configuring the Speaker Impedance On the receiver, the factory default for speaker impedance is 6 Ω or more. Setting example : If you need to select "3. If you 're using...
Owner Manual
Page 15
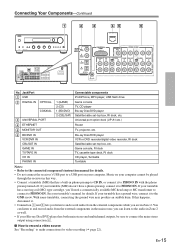
... external components in Zone 2 as well. • If your turntable has a ground wire, connect it to and record audio from the external components while you listen to PHONO IN with the phono preamp turned off. Blu-ray Disc/DVD player VCR or DVD recorder/digital video recorder, RI dock Satellite/cable set -top box, RI dock, etc. If your computer cannot be sure to connect the main stereo output using connection 6. ■ How to record a video source See...
... external components in Zone 2 as well. • If your turntable has a ground wire, connect it to and record audio from the external components while you listen to PHONO IN with the phono preamp turned off. Blu-ray Disc/DVD player VCR or DVD recorder/digital video recorder, RI dock Satellite/cable set -top box, RI dock, etc. If your computer cannot be sure to connect the main stereo output using connection 6. ■ How to record a video source See...
Owner Manual
Page 19
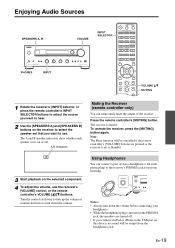
... the USB port on or off . • If you want to hear. 2 Use the [SPEAKERS A] and [SPEAKERS B] buttons on the receiver to select the speaker set to Standby. 3 Start playback on the selected component. 4 To adjust the volume, use . En-19 Note: The Mute function will be cancelled if the remote controller's [VOLUME] buttons are turned off . Notes: • Always turn down the volume before connecting your headphones. • While the headphones plug is muted. A,B Indicators Muting the Receiver (remote controller...
... the USB port on or off . • If you want to hear. 2 Use the [SPEAKERS A] and [SPEAKERS B] buttons on the receiver to select the speaker set to Standby. 3 Start playback on the selected component. 4 To adjust the volume, use . En-19 Note: The Mute function will be cancelled if the remote controller's [VOLUME] buttons are turned off . Notes: • Always turn down the volume before connecting your headphones. • While the headphones plug is muted. A,B Indicators Muting the Receiver (remote controller...
Owner Manual
Page 20
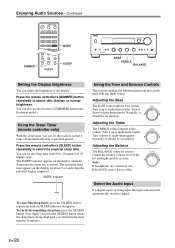
... Tone and Balance Controls This section explains the following functions that it turns off automatically after a specified period. Press the remote controller's [DIMMER] button repeatedly to select the required sleep time. Press the remote controller's [SLEEP] button repeatedly to select: dim, dimmer, or normal brightness. You can also use the receiver's [DIMMER] button (not European model). Adjusting the Bass The BASS control adjusts bass sounds. Adjusting the Treble The TREBLE control adjusts treble sounds. Select the Audio Input If a digital source is being displayed...
... Tone and Balance Controls This section explains the following functions that it turns off automatically after a specified period. Press the remote controller's [DIMMER] button repeatedly to select the required sleep time. Press the remote controller's [SLEEP] button repeatedly to select: dim, dimmer, or normal brightness. You can also use the receiver's [DIMMER] button (not European model). Adjusting the Bass The BASS control adjusts bass sounds. Adjusting the Treble The TREBLE control adjusts treble sounds. Select the Audio Input If a digital source is being displayed...
Owner Manual
Page 21
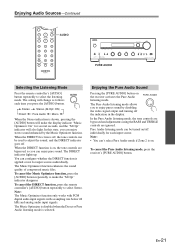
...; You can't select Pure Audio mode if Zone 2 is off, the tone controls can enjoy stereo sound enhanced by disabling the video signal output and turning off . En-21 When the DIRECT function is on , the tone controls are ignored. The DIRECT indicator lights up. The Music Optimizer is disabled when the Direct or Pure Audio listening mode is on . Enjoying Audio Sources-Continued AUDIO PURE AUDIO Selecting the Listening Mode Press the remote controller's [AUDIO] button repeatedly to make the display indicate "Music Optimizer: On...
...; You can't select Pure Audio mode if Zone 2 is off, the tone controls can enjoy stereo sound enhanced by disabling the video signal output and turning off . En-21 When the DIRECT function is on , the tone controls are ignored. The DIRECT indicator lights up. The Music Optimizer is disabled when the Direct or Pure Audio listening mode is on . Enjoying Audio Sources-Continued AUDIO PURE AUDIO Selecting the Listening Mode Press the remote controller's [AUDIO] button repeatedly to make the display indicate "Music Optimizer: On...
Owner Manual
Page 32
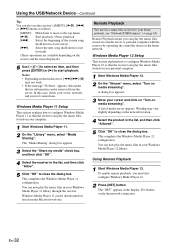
... "Library" menu, select "Media Sharing". You can play the music files stored on your home network, see "Network/USB Features" ( page 34) Remote Playback means you must first configure Windows Media Player 12. 2 Press [NET] button. Using the USB/Network Device-Continued Tip: You can play the music files stored on a media server or personal computer with the receiver by operating the controller device in the home network. Remote Playback You...
... "Library" menu, select "Media Sharing". You can play the music files stored on your home network, see "Network/USB Features" ( page 34) Remote Playback means you must first configure Windows Media Player 12. 2 Press [NET] button. Using the USB/Network Device-Continued Tip: You can play the music files stored on a media server or personal computer with the receiver by operating the controller device in the home network. Remote Playback You...
Owner Manual
Page 36
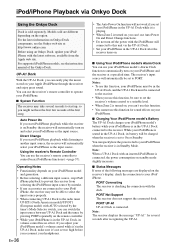
...; The Auto Power On function will not work if you set the receiver's volume control to a suitable level. • When Zone 2 is turned on, you can't use this function. • You cannot use this unit via Onkyo Dock Using the Onkyo Dock Dock is checking the connection with AUTO selected by the tuner's Mode Selector switch, you can use your iPod/iPhone model's Alarm Clock function to your iPod/iPhone and the receiver at : http://www.onkyo.com Before using an Onkyo Dock, update your Apple iPod/iPhone...
...; The Auto Power On function will not work if you set the receiver's volume control to a suitable level. • When Zone 2 is turned on, you can't use this function. • You cannot use this unit via Onkyo Dock Using the Onkyo Dock Dock is checking the connection with AUTO selected by the tuner's Mode Selector switch, you can use your iPod/iPhone model's Alarm Clock function to your iPod/iPhone and the receiver at : http://www.onkyo.com Before using an Onkyo Dock, update your Apple iPod/iPhone...
Owner Manual
Page 41
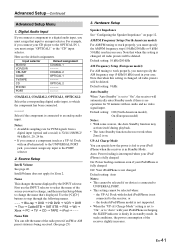
.... Input selector Default assignment BD/DVD COAXIAL 1 VCR/DVR ----- Source Setup Intelli Volume See page 40. First use this Setup Menu to change the name that when this setting is set to the PORT selector. 2. Name Edit You can specify how the power is fed to an analog audio input. Hardware Setup Speaker Impedance See "Configuring the Speaker Impedance" on . UP-A1 Charge Mode You can edit the name of the radio preset if an FM or AM preset station...
.... Input selector Default assignment BD/DVD COAXIAL 1 VCR/DVR ----- Source Setup Intelli Volume See page 40. First use this Setup Menu to change the name that when this setting is set to the PORT selector. 2. Name Edit You can specify how the power is fed to an analog audio input. Hardware Setup Speaker Impedance See "Configuring the Speaker Impedance" on . UP-A1 Charge Mode You can edit the name of the radio preset if an FM or AM preset station...
Owner Manual
Page 43
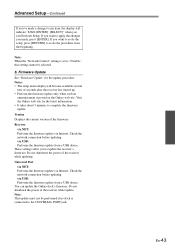
... Network Setup. Universal Port via NET: Performs the firmware update via USB: Performs the firmware update from a USB device. If you want to re-do the setup, press [RETURN] to re-do the procedure from a USB device. Receiver via NET: Performs the firmware update via USB: Performs the firmware update from the beginning. via Internet. Do not shutdown the power of the receiver while update. Note: When the "Network Control" setting is posted on the Onkyo...
... Network Setup. Universal Port via NET: Performs the firmware update via USB: Performs the firmware update from a USB device. If you want to re-do the setup, press [RETURN] to re-do the procedure from a USB device. Receiver via NET: Performs the firmware update via USB: Performs the firmware update from the beginning. via Internet. Do not shutdown the power of the receiver while update. Note: When the "Network Control" setting is posted on the Onkyo...
Owner Manual
Page 44
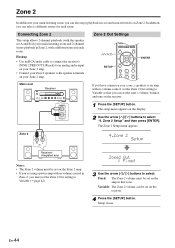
... Zone 2 amp. • Connect your Zone 2 speakers to select "4. Zone 2 In addition to your main listening room, you can also enjoy playback in that you can set the zone's volume, balance, and tone on the receiver. 4 Press the [SETUP] button. Variable: The Zone 2 volume can select a different source for each room. Hookup • Use an RCA audio cable to connect the receiver's ZONE 2 PRE OUT L/R jacks to an analog audio input on your main listening room and 2-channel stereo playback in Zone 2, with no volume control in Zone...
... Zone 2 amp. • Connect your Zone 2 speakers to select "4. Zone 2 In addition to your main listening room, you can also enjoy playback in that you can set the zone's volume, balance, and tone on the receiver. 4 Press the [SETUP] button. Variable: The Zone 2 volume can select a different source for each room. Hookup • Use an RCA audio cable to connect the receiver's ZONE 2 PRE OUT L/R jacks to an analog audio input on your main listening room and 2-channel stereo playback in Zone 2, with no volume control in Zone...

Owner Manual
Page 47
...) such as one listed below . When the IR emitter is connected, only the signal input to the IR IN terminal is located inside a cabinet or other side of the component or facing it. from Mini plug cable connecting block Receiver If Remote Controller Signal Does Not Reach Other Components Effective Sensor Layout In this situation, you will need to use the remote controller to control the receiver from a remote location, you place...
...) such as one listed below . When the IR emitter is connected, only the signal input to the IR IN terminal is located inside a cabinet or other side of the component or facing it. from Mini plug cable connecting block Receiver If Remote Controller Signal Does Not Reach Other Components Effective Sensor Layout In this situation, you will need to use the remote controller to control the receiver from a remote location, you place...

Owner Manual
Page 49
... access the receiver from Internet Radio, iPod/ iPhone, USB or servers, etc. • If there is any data in standby mode, press [ON/ STANDBY] on the front display are denoted by your ISP. Case 3: If an error occurs during the update process. • Do not attempt to access the network. Updating the Firmware via Ethernet cable. • Turn off Zone 2. • Stop playback of input sources, turn off...
... access the receiver from Internet Radio, iPod/ iPhone, USB or servers, etc. • If there is any data in standby mode, press [ON/ STANDBY] on the front display are denoted by your ISP. Case 3: If an error occurs during the update process. • Do not attempt to access the network. Updating the Firmware via Ethernet cable. • Turn off Zone 2. • Stop playback of input sources, turn off...

Owner Manual
Page 50
... been updated. During the update process, you can also be displayed on the remote controller. En-50 Do not turn off the receiver and do not need to Onkyo SUPPORT site. Make sure the USB flash memory or USB cable is displayed. Firmware Update-Continued 6 Select the USB input source. If the USB storage device has its own power supply, use [] on the front display of the USB device is properly connected to power the USB device...
... been updated. During the update process, you can also be displayed on the remote controller. En-50 Do not turn off the receiver and do not need to Onkyo SUPPORT site. Make sure the USB flash memory or USB cable is displayed. Firmware Update-Continued 6 Select the USB input source. If the USB storage device has its own power supply, use [] on the front display of the USB device is properly connected to power the USB device...
Owner Manual
Page 51
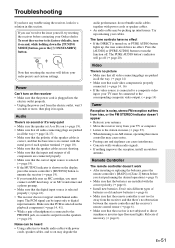
... of headphones is output from the receiver, and that there's no obstruction between the remote controller and the receiver's remote control sensor ( page 6). • Make sure that resetting the receiver will go off . do not bundle audio cables together with power cords, speaker cables, and so on and, while holding down the [TUNING MODE] button, press the [ON/STANDBY] button. The tone controls have no picture • Make sure that all video connecting plugs...
... of headphones is output from the receiver, and that there's no obstruction between the remote controller and the receiver's remote control sensor ( page 6). • Make sure that resetting the receiver will go off . do not bundle audio cables together with power cords, speaker cables, and so on and, while holding down the [TUNING MODE] button, press the [ON/STANDBY] button. The tone controls have no picture • Make sure that all video connecting plugs...
Owner Manual
Page 52
... input source is selected, and the volume is turned up and running and compatible with the receiver. • If you download or copy large files on your iPod/iPhone model's Play button. The receiver's remote controller doesn't control your iPod/iPhone • Make sure your receiver. • If you've connected the UP-A1 Dock to the UP-DT1 radio tuner with the tuner's Mode Selector switch set to the Dock. If playback is not paused, the Direct Change function...
... input source is selected, and the volume is turned up and running and compatible with the receiver. • If you download or copy large files on your iPod/iPhone model's Play button. The receiver's remote controller doesn't control your iPod/iPhone • Make sure your receiver. • If you've connected the UP-A1 Dock to the UP-DT1 radio tuner with the tuner's Mode Selector switch set to the Dock. If playback is not paused, the Direct Change function...


