
Owner Manual
Page 5
... Connecting a Power Amplifier 48 Connecting an RI Dock 49 Connecting the Power Cords of Other Components (North American model only 49 Connecting Onkyo V Components 50 Connecting the Power Cord 50 Turning On the AV Receiver 51 Turning On and Standby 51 First Time Setup 52 Monitor Setup 52 Selecting the Language used for the onscreen setup menus 53 Using the Onscreen Setup Menus 54 Monitor Out Setup 55 Video Input Setup 56 Digital Audio Input Setup 59 Analog Audio Input Setup 60 Speaker Settings 61 TV Format Setup (not North American models) .......62 AM Frequency Step Setup...
... Connecting a Power Amplifier 48 Connecting an RI Dock 49 Connecting the Power Cords of Other Components (North American model only 49 Connecting Onkyo V Components 50 Connecting the Power Cord 50 Turning On the AV Receiver 51 Turning On and Standby 51 First Time Setup 52 Monitor Setup 52 Selecting the Language used for the onscreen setup menus 53 Using the Onscreen Setup Menus 54 Monitor Out Setup 55 Video Input Setup 56 Digital Audio Input Setup 59 Analog Audio Input Setup 60 Speaker Settings 61 TV Format Setup (not North American models) .......62 AM Frequency Step Setup...

Owner Manual
Page 6
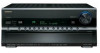
... DSP Chips • Neural Surround*4, THX-Neural • Theater-Dimensional*5 virtual surround sound • DSD Direct • Re-EQ*6 function Connections • 4 HDMI*7 Inputs and 2 Outputs • Onkyo for System Control • 6 Digital Inputs (3 Optical / 3 Coaxial), 1 Output (Optical) • 5 S-Video Inputs / 2 Outputs • Component Video Switching (3 Inputs/1 Output) • Banana Plug-Compatible Speaker Posts*8 • Powered Zone 2 and Zone 2 and Zone 3 Pre Out • IR Input/Output and 12 V Trigger • RS232 Port for Interface Control • Bi-Amping...
... DSP Chips • Neural Surround*4, THX-Neural • Theater-Dimensional*5 virtual surround sound • DSD Direct • Re-EQ*6 function Connections • 4 HDMI*7 Inputs and 2 Outputs • Onkyo for System Control • 6 Digital Inputs (3 Optical / 3 Coaxial), 1 Output (Optical) • 5 S-Video Inputs / 2 Outputs • Component Video Switching (3 Inputs/1 Output) • Banana Plug-Compatible Speaker Posts*8 • Powered Zone 2 and Zone 2 and Zone 3 Pre Out • IR Input/Output and 12 V Trigger • RS232 Port for Interface Control • Bi-Amping...

Owner Manual
Page 9
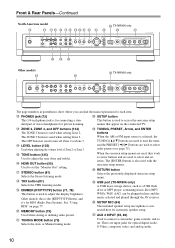
... lights up when Zone 3 is selected. B ON/STANDBY button (51) Sets the AV receiver to On or Standby. See "Volume Setup" on page 11. The page numbers in parentheses show where you can also be displayed as an absolute value. F Remote-control sensor (15) Receives control signals from the remote controller. J PURE AUDIO button and indicator (81) Selects the Pure Audio listening mode. L Input selector buttons (70) Select the following input sources: DVD, VCR/DVR, CBL/SAT, GAME/TV, AUX 1, AUX 2, TAPE, TUNER, CD, PHONO...
... lights up when Zone 3 is selected. B ON/STANDBY button (51) Sets the AV receiver to On or Standby. See "Volume Setup" on page 11. The page numbers in parentheses show where you can also be displayed as an absolute value. F Remote-control sensor (15) Receives control signals from the remote controller. J PURE AUDIO button and indicator (81) Selects the Pure Audio listening mode. L Input selector buttons (70) Select the following input sources: DVD, VCR/DVR, CBL/SAT, GAME/TV, AUX 1, AUX 2, TAPE, TUNER, CD, PHONO...
Owner Manual
Page 10
... PRESET [F]/[S] buttons are used with the onscreen setup menus. Other models, this is also used to set items. The [ENTER] button is the [RT/PTY/TP] button, and it's for RDS (Radio Data System). See "Using RDS" on the connected TV. O LEVEL button (135) Used when adjusting the volume level of stereo headphones for optical digital audio, S-Video, composite video, and analog audio. 10 When the onscreen setup menus are input jacks for private listening. R STEREO button (81) Selects the Stereo listening mode. Q HDMI OUT button...
... PRESET [F]/[S] buttons are used with the onscreen setup menus. Other models, this is also used to set items. The [ENTER] button is the [RT/PTY/TP] button, and it's for RDS (Radio Data System). See "Using RDS" on the connected TV. O LEVEL button (135) Used when adjusting the volume level of stereo headphones for optical digital audio, S-Video, composite video, and analog audio. 10 When the onscreen setup menus are input jacks for private listening. R STEREO button (81) Selects the Stereo listening mode. Q HDMI OUT button...

Owner Manual
Page 11
... adjust the tone, and the volume and balance of headphones are plugged into the PHONES jack. bk bl bm bn G Tuning indicators (73) HD (North American model only) (76): Lights up when Auto Tuning mode is displayed for bridged front speaker operation. TUNED (73): Lights up when tuned to No or None. Lights up when the Sleep function has been set is being used by the current input source. : A box is selected for speakers that supports RDS (Radio...
... adjust the tone, and the volume and balance of headphones are plugged into the PHONES jack. bk bl bm bn G Tuning indicators (73) HD (North American model only) (76): Lights up when Auto Tuning mode is displayed for bridged front speaker operation. TUNED (73): Lights up when tuned to No or None. Lights up when the Sleep function has been set is being used by the current input source. : A box is selected for speakers that supports RDS (Radio...
Owner Manual
Page 13
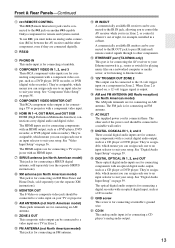
... player's analog audio output. 13 T DIGITAL OPTICAL IN 1, 2, and OUT These optical digital audio inputs are connected digitally. They're assignable, which means you can assign each one to an input selector to a video input on a TV in a cabinet. The HDMI outputs are for connecting an AM antenna. R AC INLET The supplied power cord is for example, installed in Zone 2. See "Digital Audio Input Setup" on North American model) The AM push terminals are for connecting a TV or projector with an HDMI input. F COMPONENT VIDEO MONITOR...
... player's analog audio output. 13 T DIGITAL OPTICAL IN 1, 2, and OUT These optical digital audio inputs are connected digitally. They're assignable, which means you can assign each one to an input selector to a video input on a TV in a cabinet. The HDMI outputs are for connecting an AM antenna. R AC INLET The supplied power cord is for example, installed in Zone 2. See "Digital Audio Input Setup" on North American model) The AM push terminals are for connecting a TV or projector with an HDMI input. F COMPONENT VIDEO MONITOR...
Owner Manual
Page 16
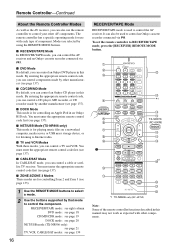
... PLAY MODE PURE A DIRECT THX ALL ST TEST TONE CH SEL OPEN/CLOSE VIDEO OFF AUDIO SEL VCR LEVEL- By entering the appropriate remote control code, you can control components made by using the REMOTE MODE buttons. ■ RECEIVER/TAPE Mode In RECEIVER/TAPE mode, you can control an Onkyo DVD player in an Onkyo RI Dock. TAPE TUNER CD 7 8 9 PHONO NET/USB D. Remote Controller-Continued About the Remote Controller Modes As well as expected with each type of component. It can also be used to RECEIVER/TAPE mode, press the [RECEIVER] REMOTE MODE button. 1 2 3 4 RECEIVER TAPE/AMP...
... PLAY MODE PURE A DIRECT THX ALL ST TEST TONE CH SEL OPEN/CLOSE VIDEO OFF AUDIO SEL VCR LEVEL- By entering the appropriate remote control code, you can control components made by using the REMOTE MODE buttons. ■ RECEIVER/TAPE Mode In RECEIVER/TAPE mode, you can control an Onkyo DVD player in an Onkyo RI Dock. TAPE TUNER CD 7 8 9 PHONO NET/USB D. Remote Controller-Continued About the Remote Controller Modes As well as expected with each type of component. It can also be used to RECEIVER/TAPE mode, press the [RECEIVER] REMOTE MODE button. 1 2 3 4 RECEIVER TAPE/AMP...
Owner Manual
Page 28
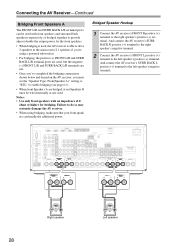
... room (2.1 speakers if you're using a powered subwoofer). • For bridging, the positive (+) FRONT L/R and SURR BACK L/R terminal posts are used, but the negative (-) FRONT L/R and SURR BACK L/R terminals are not. • Once you've completed the bridging connections shown below and turned on the AV receiver, you must set the "Speaker Type: Front(Speaker A)" setting to "BTL" to the right speaker's positive...
... room (2.1 speakers if you're using a powered subwoofer). • For bridging, the positive (+) FRONT L/R and SURR BACK L/R terminal posts are used, but the negative (-) FRONT L/R and SURR BACK L/R terminals are not. • Once you've completed the bridging connections shown below and turned on the AV receiver, you must set the "Speaker Type: Front(Speaker A)" setting to "BTL" to the right speaker's positive...
Owner Manual
Page 30
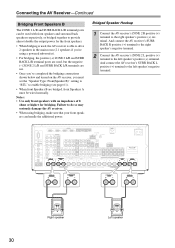
... connections shown below and turned on the AV receiver, you must set the "Speaker Type: Front(Speaker B)" setting to "BTL" to enable bridging (see page 61). • When front Speakers B are bridged, front Speakers A must be wired normally. Right speaker 30 Left speaker Notes: • Use only front speakers with front speakers and surround back speakers respectively, or bridged together to provide almost double the output power for bridging. Connecting...
... connections shown below and turned on the AV receiver, you must set the "Speaker Type: Front(Speaker B)" setting to "BTL" to enable bridging (see page 61). • When front Speakers B are bridged, front Speakers A must be wired normally. Right speaker 30 Left speaker Notes: • Use only front speakers with front speakers and surround back speakers respectively, or bridged together to provide almost double the output power for bridging. Connecting...
Owner Manual
Page 42
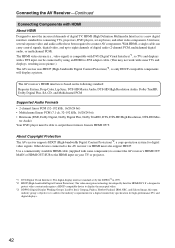
... industry group's objective is based on your TV or projector. *1 DVI (Digital Visual Interface): The digital display interface standard set -top boxes, and other video components. Use a commercially available HDMI cable (supplied with some components) to connect the AV receiver's HDMI OUT MAIN or HDMI OUT SUB to address the industry's requirements for a digital connectivity specification for digital video signals. ter Audio) Your DVD player must also support HDCP. With HDMI, a single cable can be able to...
... industry group's objective is based on your TV or projector. *1 DVI (Digital Visual Interface): The digital display interface standard set -top boxes, and other video components. Use a commercially available HDMI cable (supplied with some components) to connect the AV receiver's HDMI OUT MAIN or HDMI OUT SUB to address the industry's requirements for a digital connectivity specification for digital video signals. ter Audio) Your DVD player must also support HDCP. With HDMI, a single cable can be able to...
Owner Manual
Page 43
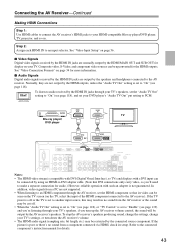
... 1: Use HDMI cables to connect the AV receiver's HDMI jacks to your TV. Composite video, S-Video, and component video sources can be seen on the TV screen (on the TV, select the input of the HDMI component connected to an HDMI component through your TV's settings, or turn up the AV receiver volume control, the sound will be connected by the HDMI outputs, unless the "Audio TV Out" setting is set to "On" (see page 119) and you're listening through your DVD player's "Audio...
... 1: Use HDMI cables to connect the AV receiver's HDMI jacks to your TV. Composite video, S-Video, and component video sources can be seen on the TV screen (on the TV, select the input of the HDMI component connected to an HDMI component through your TV's settings, or turn up the AV receiver volume control, the sound will be connected by the HDMI outputs, unless the "Audio TV Out" setting is set to "On" (see page 119) and you're listening through your DVD player's "Audio...

Owner Manual
Page 50
... turn on and select that component as the input source. Connecting other V-capable Onkyo components. If this is a problem, plug the AV receiver into a suitable wall outlet. • Turning on , the Auto Power On/Standby and Direct Change V functions do not work with an analog audio cable (RCA). Refer to the AV receiver's AC INLET. • Plug the other jack is on the AV receiver may not support all channels (see page 63). You must enter the appropriate remote control code...
... turn on and select that component as the input source. Connecting other V-capable Onkyo components. If this is a problem, plug the AV receiver into a suitable wall outlet. • Turning on , the Auto Power On/Standby and Direct Change V functions do not work with an analog audio cable (RCA). Refer to the AV receiver's AC INLET. • Plug the other jack is on the AV receiver may not support all channels (see page 63). You must enter the appropriate remote control code...

Owner Manual
Page 70
... REPEAT AUDIO SUBTITLE PLAY MODE 2 Use the AV receiver's input selector buttons to the AV receiver's COMPONENT VIDEO MONITOR OUT, HDMI OUT MAIN, HDMI OUT SUB, or MONITOR OUT. When you select DVD or another video component, on your TV, you may need to select the video input that's connected to select an input source. The AV receiver is designed for home theater enjoyment. Select a listening mode and enjoy! See "Using the Listening Modes" on the digital audio output. Basic Operations Selecting the Input Source 1 AV receiver Remote controller 4 1 1 ON STANDBY TV INPUT DVD 1 VCR...
... REPEAT AUDIO SUBTITLE PLAY MODE 2 Use the AV receiver's input selector buttons to the AV receiver's COMPONENT VIDEO MONITOR OUT, HDMI OUT MAIN, HDMI OUT SUB, or MONITOR OUT. When you select DVD or another video component, on your TV, you may need to select the video input that's connected to select an input source. The AV receiver is designed for home theater enjoyment. Select a listening mode and enjoy! See "Using the Listening Modes" on the digital audio output. Basic Operations Selecting the Input Source 1 AV receiver Remote controller 4 1 1 ON STANDBY TV INPUT DVD 1 VCR...
Owner Manual
Page 71
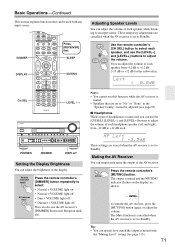
... DIMMER DVD TV DIMMER + REMOTE MODE VCR CD ZONE2 CDR/MD/DOCK CABLE SAT TOP MENU NET/USB RECEIVER TAPE/AMP SLEEP MENU [RECEIVER] first SLEEP DISPLAY CH DISC ALBUM - You can adjust the brightness of headphones is connected, you can use this function while the AV receiver is set to Standby. Press the remote controller's [MUTING] button. Remote controller AV receiver Press the remote controller's [DIMMER] button repeatedly to select: • Normal + VOLUME light on the display, as shown. TAPE TUNER CD 7 8 9 PHONO NET...
... DIMMER DVD TV DIMMER + REMOTE MODE VCR CD ZONE2 CDR/MD/DOCK CABLE SAT TOP MENU NET/USB RECEIVER TAPE/AMP SLEEP MENU [RECEIVER] first SLEEP DISPLAY CH DISC ALBUM - You can adjust the brightness of headphones is connected, you can use this function while the AV receiver is set to Standby. Press the remote controller's [MUTING] button. Remote controller AV receiver Press the remote controller's [DIMMER] button repeatedly to select: • Normal + VOLUME light on the display, as shown. TAPE TUNER CD 7 8 9 PHONO NET...

Owner Manual
Page 72
... the Stereo, Direct, Pure Audio, and Mono listening modes can be used with headphones (the listening modes available also depend on the display for Speakers A or Speakers B. If the input signal is digital but not PCM, the signal format and the number of headphones, the listening mode is selected. 1 Press the AV receiver's [TONE] button repeatedly to +10 dB in the headphones. 72 Adjusting the Bass & Treble You can boost or cut high-frequency sounds output...
... the Stereo, Direct, Pure Audio, and Mono listening modes can be used with headphones (the listening modes available also depend on the display for Speakers A or Speakers B. If the input signal is digital but not PCM, the signal format and the number of headphones, the listening mode is selected. 1 Press the AV receiver's [TONE] button repeatedly to +10 dB in the headphones. 72 Adjusting the Bass & Treble You can boost or cut high-frequency sounds output...
Owner Manual
Page 80
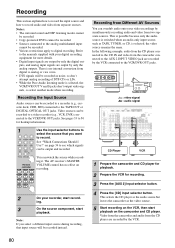
... start playback. Notes: • The surround sound and DSP listening modes cannot be recorded. • Copy-protected DVDs cannot be recorded. • Sources connected to the analog multichannel input cannot be recorded as TAPE, TUNER, or CD, is selected, the VCR/DVR OUT V and S jacks don't output video signals, so select another mode when recording. Remote controller DVD 1 VCR/DVR CBL/SAT 2 3 GAME/TV AUX1 AUX2 4 5 6 TAPE TUNER CD 7 8 9 PHONO +10 NET/USB 0 You can...
... start playback. Notes: • The surround sound and DSP listening modes cannot be recorded. • Copy-protected DVDs cannot be recorded. • Sources connected to the analog multichannel input cannot be recorded as TAPE, TUNER, or CD, is selected, the VCR/DVR OUT V and S jacks don't output video signals, so select another mode when recording. Remote controller DVD 1 VCR/DVR CBL/SAT 2 3 GAME/TV AUX1 AUX2 4 5 6 TAPE TUNER CD 7 8 9 PHONO +10 NET/USB 0 You can...
Owner Manual
Page 100
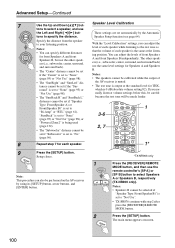
.... 3-6 2, 7 DVD TV DIMMER + CH DISC ALBUM - PREV CH DISPLAY REMOTE MODE VCR CD ZONE2 CDR/MD/DOCK CABLE SAT TOP MENU NET/USB RECEIVER TAPE/AMP SLEEP MENU ENTER VOL GUIDE SETUP EXIT RETURN MUTING 1 REC PLAYLIST RANDOM STEREO SP A SP B LISTENING MODE SURR REPEAT AUDIO SUBTITLE PLAY MODE PURE A DIRECT THX ALL ST 1* *TX-NR906 only 1 Press the [RECEIVER] REMOTE MODE button, and then use the Left and Right [F]/[S] but - With the "Level Calibration" settings, you...
.... 3-6 2, 7 DVD TV DIMMER + CH DISC ALBUM - PREV CH DISPLAY REMOTE MODE VCR CD ZONE2 CDR/MD/DOCK CABLE SAT TOP MENU NET/USB RECEIVER TAPE/AMP SLEEP MENU ENTER VOL GUIDE SETUP EXIT RETURN MUTING 1 REC PLAYLIST RANDOM STEREO SP A SP B LISTENING MODE SURR REPEAT AUDIO SUBTITLE PLAY MODE PURE A DIRECT THX ALL ST 1* *TX-NR906 only 1 Press the [RECEIVER] REMOTE MODE button, and then use the Left and Right [F]/[S] but - With the "Level Calibration" settings, you...

Owner Manual
Page 118
... can check the amount of sync due to the connected component's instruction man- Notes: • This function works only if your TV's settings, or turn up the AV receiver's volume control, the sound will be guaranteed. • Set to "On", or "TV Control" is the name of the HDMI standard. Analog Multich ■ Subwoofer Input Sensitivity Some DVD players output the LFE channel from an HDMI component through your TV's speakers (see page 110). ■ x.v.Color...
... can check the amount of sync due to the connected component's instruction man- Notes: • This function works only if your TV's settings, or turn up the AV receiver's volume control, the sound will be guaranteed. • Set to "On", or "TV Control" is the name of the HDMI standard. Analog Multich ■ Subwoofer Input Sensitivity Some DVD players output the LFE channel from an HDMI component through your TV's speakers (see page 110). ■ x.v.Color...

Owner Manual
Page 142
... damaged. Power Can't turn it 's turned on the AV receiver • Make sure that the power cord is correct, and that the bare wires are configured correctly (page 95). Audio There's no sound • When the Stereo or Mono listening mode is output by the surround speakers. VCR/DVR Note that support DVD, the default setting is off as soon as an AM radio station or mono TV program, the sound is...
... damaged. Power Can't turn it 's turned on the AV receiver • Make sure that the power cord is correct, and that the bare wires are configured correctly (page 95). Audio There's no sound • When the Stereo or Mono listening mode is output by the surround speakers. VCR/DVR Note that support DVD, the default setting is off as soon as an AM radio station or mono TV program, the sound is...

Owner Manual
Page 143
... as a genuine DTS signal. mation in the LFE channel, the subwoofer produces no sound. • Make sure the speakers are connected to an analog input. There's no sound with a certain signal format • Check the digital audio output setting on the AV receiver. On some DVD-Video discs, you need to select an audio format from DTS to PCM, because the AV receiver does not switch formats immediately, you switch your player from a menu or with the [AUDIO] button on your...
... as a genuine DTS signal. mation in the LFE channel, the subwoofer produces no sound. • Make sure the speakers are connected to an analog input. There's no sound with a certain signal format • Check the digital audio output setting on the AV receiver. On some DVD-Video discs, you need to select an audio format from DTS to PCM, because the AV receiver does not switch formats immediately, you switch your player from a menu or with the [AUDIO] button on your...

