
Owner Manual
Page 3
.... Before you turn on the unit's rear panel (e.g., AC 230-240 V, 50 Hz or AC 120 V, 60 Hz). DIGITAL IN COA XIAL OPTICAL 1 COMPONENT VIDEO VIDEO 2 IN VIDEO 1 IN DVD IN OUT Y PB 2 PR 3 REMOTE CONTROL IN OUT IN L L R CD R TAPE ANTENNA AM FM 75 SURROUND BACK SPEAKERS L SURROUND SPEAKERS FRONT SPEAKERS A L CENTER SPEAKER VIDEO 2 V VOLTAGE VIDEO 1 DVD MONITOR OUT R S IN IN SELECTOR OUT OUT IN IN IN FRONT SURROUND CENTER SURR BACK PRE OUT L 120V SUB WOOFER R VIDEO 2 VIDEO 1 SUB WOOFER DVD R FRONT SPEAKERS B L R VOLTAGE...
.... Before you turn on the unit's rear panel (e.g., AC 230-240 V, 50 Hz or AC 120 V, 60 Hz). DIGITAL IN COA XIAL OPTICAL 1 COMPONENT VIDEO VIDEO 2 IN VIDEO 1 IN DVD IN OUT Y PB 2 PR 3 REMOTE CONTROL IN OUT IN L L R CD R TAPE ANTENNA AM FM 75 SURROUND BACK SPEAKERS L SURROUND SPEAKERS FRONT SPEAKERS A L CENTER SPEAKER VIDEO 2 V VOLTAGE VIDEO 1 DVD MONITOR OUT R S IN IN SELECTOR OUT OUT IN IN IN FRONT SURROUND CENTER SURR BACK PRE OUT L 120V SUB WOOFER R VIDEO 2 VIDEO 1 SUB WOOFER DVD R FRONT SPEAKERS B L R VOLTAGE...

Owner Manual
Page 7
...Modes 50 Using the Late Night Function 52 Using the CinemaFILTER 52 Using the Audio Adjust Settings 52 Advanced Operation Recording 54 Advanced Setup 55 Advanced Speaker Settings 55 Digital Input Signal Formats 57 Correcting Sound and Picture Sync 58 Controlling Other Components 59 Entering Remote Control Codes 59 Remote Control Codes for Onkyo Components Connected via 60 Resetting REMOTE MODE Buttons 60 Resetting the Remote Controller 60 Troubleshooting 62 If you can't resolve an issue, try resetting the AV receiver by holding down the [VIDEO 1] button and pressing the [STANDBY...
...Modes 50 Using the Late Night Function 52 Using the CinemaFILTER 52 Using the Audio Adjust Settings 52 Advanced Operation Recording 54 Advanced Setup 55 Advanced Speaker Settings 55 Digital Input Signal Formats 57 Correcting Sound and Picture Sync 58 Controlling Other Components 59 Entering Remote Control Codes 59 Remote Control Codes for Onkyo Components Connected via 60 Resetting REMOTE MODE Buttons 60 Resetting the Remote Controller 60 Troubleshooting 62 If you can't resolve an issue, try resetting the AV receiver by holding down the [VIDEO 1] button and pressing the [STANDBY...

Owner Manual
Page 8
...) Lights up when the AV receiver is on Standby and flashes while a signal is for connecting a standard pair of the AV receiver to On or Standby. C Remote-control sensor (11) Receives control signals from the remote controller. Getting to Know the AV Receiver Front Panel North American Model 12 3 45 6 7 STANDBY/ON STANDBY PHONES TUNING PRESET MULTI CH DVD VIDEO 1 VIDEO 2 VIDEO 3 TAPE TUNER C D ENTER RETURN SETUP SPEAKERS A B VCR TONE STEREO LISTENING MODE DIGITAL DISPLAY INPUT TUNING DIMMER MEMORY MODE CLEAR MASTER VOLUME VIDEO 3 INPUT VIDEO L AUDIO...
...) Lights up when the AV receiver is on Standby and flashes while a signal is for connecting a standard pair of the AV receiver to On or Standby. C Remote-control sensor (11) Receives control signals from the remote controller. Getting to Know the AV Receiver Front Panel North American Model 12 3 45 6 7 STANDBY/ON STANDBY PHONES TUNING PRESET MULTI CH DVD VIDEO 1 VIDEO 2 VIDEO 3 TAPE TUNER C D ENTER RETURN SETUP SPEAKERS A B VCR TONE STEREO LISTENING MODE DIGITAL DISPLAY INPUT TUNING DIMMER MEMORY MODE CLEAR MASTER VOLUME VIDEO 3 INPUT VIDEO L AUDIO...

Owner Manual
Page 9
... (50) Show the selected listening mode and the format of digital input signals. P MEMORY button (39) Used when storing or deleting radio presets. Selects the Pure Audio listening mode. M DISPLAY button (37) Displays various information about the selected input source. 9 O DIMMER or RT/PTY/TP button (41, 46) Adjusts the display brightness. Q TUNING MODE button (38) Selects the Auto or Manual tuning mode for composite video and analog audio. R RETURN button Selects the previously displayed setup menu. FM STEREO (38): Lights up when tuned to connect a camcorder, games...
... (50) Show the selected listening mode and the format of digital input signals. P MEMORY button (39) Used when storing or deleting radio presets. Selects the Pure Audio listening mode. M DISPLAY button (37) Displays various information about the selected input source. 9 O DIMMER or RT/PTY/TP button (41, 46) Adjusts the display brightness. Q TUNING MODE button (38) Selects the Auto or Manual tuning mode for composite video and analog audio. R RETURN button Selects the previously displayed setup menu. FM STEREO (38): Lights up when tuned to connect a camcorder, games...

Owner Manual
Page 12
...LEVEL+ PLAY MODE DISPLAY L NIGHT VCR DVD CINE FLTR HDD RC-647M P Q Buttons 1, 2, 3, and 4 are selected by using the six REMOTE MODE buttons. ■ RECEIVER/TAPE Mode In RECEIVER/TAPE mode, you can control RECEIVER the AV receiver and an Onkyo cassette TAPE recorder connected via . 1 2 3 1 4 2 5 36 7 4 8 9 J ON/STANDBY REMOTE MODE RECEIVER DVD TAPE INPUT SELECTOR 1 2 3 V1 V2 V3 M D/CDR C D HDD 4 5 6 TV MULTI CH DVD 7 8 9 VCR TAPE TUNER 10 11 +10 0 C D 12 CABLE CLR SAT D TUN --/--- Remote Controller-Continued Using the Remote Controller...
...LEVEL+ PLAY MODE DISPLAY L NIGHT VCR DVD CINE FLTR HDD RC-647M P Q Buttons 1, 2, 3, and 4 are selected by using the six REMOTE MODE buttons. ■ RECEIVER/TAPE Mode In RECEIVER/TAPE mode, you can control RECEIVER the AV receiver and an Onkyo cassette TAPE recorder connected via . 1 2 3 1 4 2 5 36 7 4 8 9 J ON/STANDBY REMOTE MODE RECEIVER DVD TAPE INPUT SELECTOR 1 2 3 V1 V2 V3 M D/CDR C D HDD 4 5 6 TV MULTI CH DVD 7 8 9 VCR TAPE TUNER 10 11 +10 0 C D 12 CABLE CLR SAT D TUN --/--- Remote Controller-Continued Using the Remote Controller...
Owner Manual
Page 13
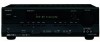
... select radio presets. 3 Arrow and ENTER buttons For AM and FM, the Up and Down [ ]/[ ] buttons are used for the currently selected mode lights up. P CINE FLTR button (52) Used with the Sleep function. button (39) Used to select AM and FM radio stations and XM radio channels directly. 2 CH +/- Play [ ] button Starts playback. A ON/STANDBY button (32) Sets the AV receiver to select the input sources. D DIMMER button (46) Adjusts the display brightness. E SP A/B button (6, 36) Used to select and adjust settings. F Arrow and ENTER buttons Used to turn speaker sets...
... select radio presets. 3 Arrow and ENTER buttons For AM and FM, the Up and Down [ ]/[ ] buttons are used for the currently selected mode lights up. P CINE FLTR button (52) Used with the Sleep function. button (39) Used to select AM and FM radio stations and XM radio channels directly. 2 CH +/- Play [ ] button Starts playback. A ON/STANDBY button (32) Sets the AV receiver to select the input sources. D DIMMER button (46) Adjusts the display brightness. E SP A/B button (6, 36) Used to select and adjust settings. F Arrow and ENTER buttons Used to turn speaker sets...

Owner Manual
Page 14
... play modes. 14 LEVEL+ PLAY MODE DISPLAY L NIGHT VCR DVD CINE FLTR HDD RC-647M DVD K L M N O P Q A ON/STANDBY button Sets the DVD player to On or Standby. K CLR button Cancels functions and clears entered numbers. button Selects discs on a VCR/DVD recorder with selectable play modes on . To select your DVD player as the input source, press: RECEIVER 6 DVD or 5 MULTI CH 1 2 3 4 5 6 7 8 9 J ON/STANDBY REMOTE MODE RECEIVER DVD TAPE INPUT SELECTOR 1 2 3 V1 V2 V3 M D/CDR C D HDD 4 5 6 TV MULTI CH DVD 7 8 9 VCR TAPE TUNER 10 11 +10 0 C D 12 CABLE...
... play modes. 14 LEVEL+ PLAY MODE DISPLAY L NIGHT VCR DVD CINE FLTR HDD RC-647M DVD K L M N O P Q A ON/STANDBY button Sets the DVD player to On or Standby. K CLR button Cancels functions and clears entered numbers. button Selects discs on a VCR/DVD recorder with selectable play modes on . To select your DVD player as the input source, press: RECEIVER 6 DVD or 5 MULTI CH 1 2 3 4 5 6 7 8 9 J ON/STANDBY REMOTE MODE RECEIVER DVD TAPE INPUT SELECTOR 1 2 3 V1 V2 V3 M D/CDR C D HDD 4 5 6 TV MULTI CH DVD 7 8 9 VCR TAPE TUNER 10 11 +10 0 C D 12 CABLE...

Owner Manual
Page 21
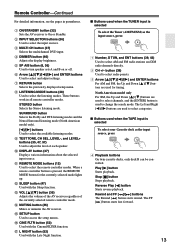
... range of AV equipment. Video Connection Formats Audio Connection Formats When choosing a connection format, bear in mind that the AV receiver doesn't convert between formats. Audio Signal Flow Chart CD player, etc. For example, audio signals connected to an OPTICAL or COAXIAL digital input are not output by the analog TAPE OUT, so if you choose will output the signal. Speakers (see page 17 for hookup details) TV, projector, etc. Connecting Your Components-Continued Connecting Audio and Video Signals to...
... range of AV equipment. Video Connection Formats Audio Connection Formats When choosing a connection format, bear in mind that the AV receiver doesn't convert between formats. Audio Signal Flow Chart CD player, etc. For example, audio signals connected to an OPTICAL or COAXIAL digital input are not output by the analog TAPE OUT, so if you choose will output the signal. Speakers (see page 17 for hookup details) TV, projector, etc. Connecting Your Components-Continued Connecting Audio and Video Signals to...
Owner Manual
Page 22
... use a and b , or a and c .) Connection A B C a b c AV receiver COMPONENT VIDEO OUT MONITOR OUT S MONITOR OUT V VIDEO 2 IN L/R DIGITAL IN COAXIAL DIGITAL IN OPTICAL 2 Signal flow TV Component video input S-Video input Composite video input Analog audio L/R output Digital coaxial output Digital optical output Picture quality Best Better Standard b c A XM DIGITAL IN COA XIAL OPTICAL 1 COMPONENT VIDEO VIDEO 2 IN VIDEO 1 IN DVD IN OUT Y PB 2 PR 3 REMOTE CONTROL IN OUT IN L L R CD R TAPE ANTENNA AM FM 75 SURROUND BACK SPEAKERS L VIDEO 2 V VIDEO 1 DVD MONITOR...
... use a and b , or a and c .) Connection A B C a b c AV receiver COMPONENT VIDEO OUT MONITOR OUT S MONITOR OUT V VIDEO 2 IN L/R DIGITAL IN COAXIAL DIGITAL IN OPTICAL 2 Signal flow TV Component video input S-Video input Composite video input Analog audio L/R output Digital coaxial output Digital optical output Picture quality Best Better Standard b c A XM DIGITAL IN COA XIAL OPTICAL 1 COMPONENT VIDEO VIDEO 2 IN VIDEO 1 IN DVD IN OUT Y PB 2 PR 3 REMOTE CONTROL IN OUT IN L L R CD R TAPE ANTENNA AM FM 75 SURROUND BACK SPEAKERS L VIDEO 2 V VIDEO 1 DVD MONITOR...
Owner Manual
Page 25
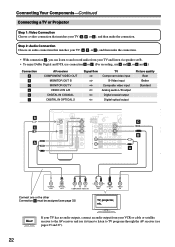
... VIDEO VIDEO 2 IN VIDEO 1 IN DVD IN OUT Y PB 2 PR 3 REMOTE CONTROL IN OUT IN L L R CD R TAPE ANTENNA AM FM 75 SURROUND BACK SPEAKERS L VIDEO 2 V VIDEO 1 DVD MONITOR OUT C R S IN OUT IN IN B IN OUT IN FRONT SURROUND CENTER SURR BACK L R VIDEO 2 VIDEO 1 SUB WOOFER DVD a SURROUND SPEAKERS FRONT SPEAKERS A PRE OUT SUB WOOFER FRONT SPEAKER L R COAXIAL OUT OPTICAL OUT Y PB PR COMPONENT VIDEO OUT L R AUDIO OUT S VIDEO OUT Connect one or the other Connection b must connect the AV receiver to your favorite TV programs via the AV receiver, useful...
... VIDEO VIDEO 2 IN VIDEO 1 IN DVD IN OUT Y PB 2 PR 3 REMOTE CONTROL IN OUT IN L L R CD R TAPE ANTENNA AM FM 75 SURROUND BACK SPEAKERS L VIDEO 2 V VIDEO 1 DVD MONITOR OUT C R S IN OUT IN IN B IN OUT IN FRONT SURROUND CENTER SURR BACK L R VIDEO 2 VIDEO 1 SUB WOOFER DVD a SURROUND SPEAKERS FRONT SPEAKERS A PRE OUT SUB WOOFER FRONT SPEAKER L R COAXIAL OUT OPTICAL OUT Y PB PR COMPONENT VIDEO OUT L R AUDIO OUT S VIDEO OUT Connect one or the other Connection b must connect the AV receiver to your favorite TV programs via the AV receiver, useful...

Owner Manual
Page 31
...IN DVD IN OUT Y PB 2 PR 3 REMOTE CONTROL IN OUT IN L L R CD R TAPE ANTENNA AM FM 75 SURROUND BACK SPEAKERS L VIDEO 2 V VIDEO 1 DVD MONITOR OUT R S IN IN L OUT OUT IN IN IN FRONT SURROUND CENTER SURR BACK R VIDEO 2 VIDEO 1 SUB WOOFER DVD IN L R CD FRONT L R DVD e.g., CD player e.g., DVD player R L ANALOG AUDIO OUT R L ANALOG AUDIO OUT Connecting the Power Cord • Connect the AV receiver's power cord to the AV receiver. Notes: • Before connecting the power cord, connect all functions. If your speakers and AV components. • Turning...
...IN DVD IN OUT Y PB 2 PR 3 REMOTE CONTROL IN OUT IN L L R CD R TAPE ANTENNA AM FM 75 SURROUND BACK SPEAKERS L VIDEO 2 V VIDEO 1 DVD MONITOR OUT R S IN IN L OUT OUT IN IN IN FRONT SURROUND CENTER SURR BACK R VIDEO 2 VIDEO 1 SUB WOOFER DVD IN L R CD FRONT L R DVD e.g., CD player e.g., DVD player R L ANALOG AUDIO OUT R L ANALOG AUDIO OUT Connecting the Power Cord • Connect the AV receiver's power cord to the AV receiver. Notes: • Before connecting the power cord, connect all functions. If your speakers and AV components. • Turning...

Owner Manual
Page 32
... SETUP SPEAKERS A B VCR TONE STEREO LISTENING MODE DIGITAL DISPLAY INPUT TUNING DIMMER MEMORY MODE CLEAR VIDEO 3 INPUT VIDEO L AUDIO R Turning On and Standby ON/STANDBY RECEIVER ON/STANDBY REMOTE MODE RECEIVER DVD TAPE INPUT SELECTOR M D/CDR 1 2 3 C D HDD V1 V2 V3 4 5 6 TV MULTI CH DVD 7 8 9 VCR TAPE TUNER 10 11 +10 0 C D 12 CABLE CLR SAT D TUN --/--- Alternatively, press the remote controller's [RECEIVER] button, followed by the [ON/STANDBY] button. Smooth Operation in a Few Easy Steps To ensure smooth operation, here's a few easy steps to help...
... SETUP SPEAKERS A B VCR TONE STEREO LISTENING MODE DIGITAL DISPLAY INPUT TUNING DIMMER MEMORY MODE CLEAR VIDEO 3 INPUT VIDEO L AUDIO R Turning On and Standby ON/STANDBY RECEIVER ON/STANDBY REMOTE MODE RECEIVER DVD TAPE INPUT SELECTOR M D/CDR 1 2 3 C D HDD V1 V2 V3 4 5 6 TV MULTI CH DVD 7 8 9 VCR TAPE TUNER 10 11 +10 0 C D 12 CABLE CLR SAT D TUN --/--- Alternatively, press the remote controller's [RECEIVER] button, followed by the [ON/STANDBY] button. Smooth Operation in a Few Easy Steps To ensure smooth operation, here's a few easy steps to help...
Owner Manual
Page 36
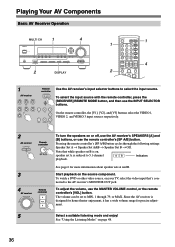
...2 Remote controller RECEIVER VIDEO 3 C D VCR TAPE TUNER 1 2 V1 V2 7 TAPE 8 TUNER 3 V3 6 DVD 9 C D Use the AV receiver's input selector buttons to the AV receiver's MONITOR OUT jack. Playing Your AV Components Basic AV Receiver Operation MULTI CH 1 4 STANDBY/ON STANDBY PHONES TUNING PRESET MULTI CH DVD VIDEO 1 VIDEO 2 VIDEO 3 TAPE TUNER C D ENTER RETURN SETUP SPEAKERS A B VCR TONE STEREO LISTENING MODE DIGITAL DISPLAY INPUT TUNING DIMMER MEMORY MODE CLEAR MASTER VOLUME VIDEO 3 INPUT VIDEO L AUDIO R 2 DISPLAY 1 2 ON/STANDBY REMOTE MODE RECEIVER DVD...
...2 Remote controller RECEIVER VIDEO 3 C D VCR TAPE TUNER 1 2 V1 V2 7 TAPE 8 TUNER 3 V3 6 DVD 9 C D Use the AV receiver's input selector buttons to the AV receiver's MONITOR OUT jack. Playing Your AV Components Basic AV Receiver Operation MULTI CH 1 4 STANDBY/ON STANDBY PHONES TUNING PRESET MULTI CH DVD VIDEO 1 VIDEO 2 VIDEO 3 TAPE TUNER C D ENTER RETURN SETUP SPEAKERS A B VCR TONE STEREO LISTENING MODE DIGITAL DISPLAY INPUT TUNING DIMMER MEMORY MODE CLEAR MASTER VOLUME VIDEO 3 INPUT VIDEO L AUDIO R 2 DISPLAY 1 2 ON/STANDBY REMOTE MODE RECEIVER DVD...
Owner Manual
Page 37
... can typically be used , the band, preset number, and frequency are . DISPLAY LISTENING MODE STEREO SURROUND AUDIO SUBTITLE RANDOM REPEAT TEST TONE CH SEL LEVEL- Note: • The listening mode is displayed only when speaker set A is displayed. If there's surround back channel information, this number will now be displayed: Input source & volume*1 Signal format*2 or sampling frequency Input source & listening mode *1 When AM or FM radio is displayed for the DVD input source. Playing Your AV Components-Continued MULTI CH ON/STANDBY REMOTE MODE RECEIVER DVD TAPE INPUT SELECTOR...
... can typically be used , the band, preset number, and frequency are . DISPLAY LISTENING MODE STEREO SURROUND AUDIO SUBTITLE RANDOM REPEAT TEST TONE CH SEL LEVEL- Note: • The listening mode is displayed only when speaker set A is displayed. If there's surround back channel information, this number will now be displayed: Input source & volume*1 Signal format*2 or sampling frequency Input source & listening mode *1 When AM or FM radio is displayed for the DVD input source. Playing Your AV Components-Continued MULTI CH ON/STANDBY REMOTE MODE RECEIVER DVD TAPE INPUT SELECTOR...
Owner Manual
Page 42
... OPTICAL 1 COMPONENT VIDEO VIDEO 2 IN VIDEO 1 IN DVD IN OUT Y PB 2 PR 3 REMOTE CONTROL IN OUT IN L L R CD R TAPE ANTENNA AM FM 75 SURROUND BACK SPEAKERS L VIDEO 2 V VIDEO 1 DVD MONITOR OUT R S IN IN L OUT OUT IN IN IN FRONT SURROUND CENTER SURR BACK R VIDEO 2 VIDEO 1 SUB WOOFER DVD SURROUND SPEAKERS FRONT SPEAKERS A L CENTER SPEAKER R PRE OUT SUB WOOFER FRONT SPEAKERS B L R AV RECEIVER AC OUTLET AC 120V 60Hz SWITCHED TOTAL 120W 1A MAX. Installation costs and other region outside the continental U.S. All fees and programming subject to select...
... OPTICAL 1 COMPONENT VIDEO VIDEO 2 IN VIDEO 1 IN DVD IN OUT Y PB 2 PR 3 REMOTE CONTROL IN OUT IN L L R CD R TAPE ANTENNA AM FM 75 SURROUND BACK SPEAKERS L VIDEO 2 V VIDEO 1 DVD MONITOR OUT R S IN IN L OUT OUT IN IN IN FRONT SURROUND CENTER SURR BACK R VIDEO 2 VIDEO 1 SUB WOOFER DVD SURROUND SPEAKERS FRONT SPEAKERS A L CENTER SPEAKER R PRE OUT SUB WOOFER FRONT SPEAKERS B L R AV RECEIVER AC OUTLET AC 120V 60Hz SWITCHED TOTAL 120W 1A MAX. Installation costs and other region outside the continental U.S. All fees and programming subject to select...
Owner Manual
Page 48
...connected to the AV receiver with a digital audio connection (coaxial or optical). • Listening mode availability depends on the AV Receiver STANDBY/ON STANDBY PURE AUDIO PHONES TUNING PRESET MASTER VOLUME MULTI CH DVD VIDEO 1 VIDEO 2 VIDEO 3 TAPE TUNER C D ENTER RETURN SETUP SPEAKERS A B VCR TONE STEREO LISTENING MODE DIGITAL DISPLAY INPUT TUNING RT/PTY/TP MEMORY MODE CLEAR VIDEO 3 INPUT VIDEO L AUDIO R PURE AUDIO STEREO LISTENING MODE ■ [PURE AUDIO] button (not North American model) This button selects the Pure Audio listening mode. LEVEL+ PLAY MODE...
...connected to the AV receiver with a digital audio connection (coaxial or optical). • Listening mode availability depends on the AV Receiver STANDBY/ON STANDBY PURE AUDIO PHONES TUNING PRESET MASTER VOLUME MULTI CH DVD VIDEO 1 VIDEO 2 VIDEO 3 TAPE TUNER C D ENTER RETURN SETUP SPEAKERS A B VCR TONE STEREO LISTENING MODE DIGITAL DISPLAY INPUT TUNING RT/PTY/TP MEMORY MODE CLEAR VIDEO 3 INPUT VIDEO L AUDIO R PURE AUDIO STEREO LISTENING MODE ■ [PURE AUDIO] button (not North American model) This button selects the Pure Audio listening mode. LEVEL+ PLAY MODE...
Owner Manual
Page 53
... function off center. When set to 5 (default value is output by half (-6 dB), giving the impression that your DVD player. You can be adjusted from 0 to create a phantom center). Sub: The sub channel is 3. The default value is output. Conversely, if the stereo image feels like it backward. It can select Pro Logic IIx Movie, Pro Logic IIx Music, Dolby Digital, or Dolby Digital EX. Using the Listening Modes-Continued 4 SETUP Press the [SETUP] button. Normally, the center channel sound is 2). Manual...
... function off center. When set to 5 (default value is output by half (-6 dB), giving the impression that your DVD player. You can be adjusted from 0 to create a phantom center). Sub: The sub channel is 3. The default value is output. Conversely, if the stereo image feels like it backward. It can select Pro Logic IIx Movie, Pro Logic IIx Music, Dolby Digital, or Dolby Digital EX. Using the Listening Modes-Continued 4 SETUP Press the [SETUP] button. Normally, the center channel sound is 2). Manual...

Owner Manual
Page 60
... at the AV receiver, and operate the component. Resetting REMOTE MODE Buttons You can reset the remote controller to its default remote control code. 1 REMOTE MODE DVD M D/CDR C D HDD While holding down the REMOTE MODE button that you to control an Onkyo component that are preprogrammed VCR with an cable and an analog audio cable (RCA). The REMOTE MODE button lights up . 2 RECEIVER Press the [RECEIVER] REMOTE MODE button again. This allows you want to control components that 's not connected via are controlled by pointing the remote controller directly at it 's been...
... at the AV receiver, and operate the component. Resetting REMOTE MODE Buttons You can reset the remote controller to its default remote control code. 1 REMOTE MODE DVD M D/CDR C D HDD While holding down the REMOTE MODE button that you to control an Onkyo component that are preprogrammed VCR with an cable and an analog audio cable (RCA). The REMOTE MODE button lights up . 2 RECEIVER Press the [RECEIVER] REMOTE MODE button again. This allows you want to control components that 's not connected via are controlled by pointing the remote controller directly at it 's been...

Owner Manual
Page 62
... digital input source is selected properly (page 33). On some DVD-Video discs, you need to select an audio format from the wall outlet immediately. Troubleshooting If you have a phono preamp built-in, you must connect an MC head amp, or an MC transformer and a phono preamp. • Specify the speaker distances and adjust the individual speaker levels (pages 56, 57). • The input signal format is set to PCM or DTS. Power Can't turn...
... digital input source is selected properly (page 33). On some DVD-Video discs, you need to select an audio format from the wall outlet immediately. Troubleshooting If you have a phono preamp built-in, you must connect an MC head amp, or an MC transformer and a phono preamp. • Specify the speaker distances and adjust the individual speaker levels (pages 56, 57). • The input signal format is set to PCM or DTS. Power Can't turn...
Owner Manual
Page 63
... player may be produced by the surround back speakers with power cords, speaker cables, and so on your antenna. • Move the AV receiver away from a menu. nected device. or 7.1-channel playback • While speaker set B is on, speaker set B is reduced to a digital input on . The Late Night function doesn't work • Check the multichannel DVD input connections (page 24). • To select the multichannel DVD input, press the [MULTI CH] input selector button. • Check the audio output settings...
... player may be produced by the surround back speakers with power cords, speaker cables, and so on your antenna. • Move the AV receiver away from a menu. nected device. or 7.1-channel playback • While speaker set B is on, speaker set B is reduced to a digital input on . The Late Night function doesn't work • Check the multichannel DVD input connections (page 24). • To select the multichannel DVD input, press the [MULTI CH] input selector button. • Check the audio output settings...

