
Owner Manual
Page 1
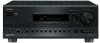
Please retain this manual will enable you for future reference. AV Receiver TX-SR701/701E TX-SR601/601E Instruction Manual Contents Before using 2 Facilities and connections 8 Setup and operation 31 Thank you to obtain optimum performance and listening enjoyment from your new AV Receiver. Remote controller 63 Appendix 75 En Following the instructions in the unit. Please read this manual thoroughly before making connections and plugging in this manual for purchasing the Onkyo AV Receiver.
Please retain this manual will enable you for future reference. AV Receiver TX-SR701/701E TX-SR601/601E Instruction Manual Contents Before using 2 Facilities and connections 8 Setup and operation 31 Thank you to obtain optimum performance and listening enjoyment from your new AV Receiver. Remote controller 63 Appendix 75 En Following the instructions in the unit. Please read this manual thoroughly before making connections and plugging in this manual for purchasing the Onkyo AV Receiver.

Owner Manual
Page 4
... only) ...... 7 Installing the remote controller batteries 7 Using the remote controller 7 Facilities and connections Front panel facilities 8 Front panel 8 Front panel display 11 Remote controller 12 Connections 14 TX-SR701/701E 15 TX-SR601/601E 15 Connecting your audio...remote controller only 44 Listening with headphones 44 Enjoying DVD multichannel audio playback 44 Switching the display 45 Temporarily turning off the sound 45 Listening Modes 46 Selecting a listening mode (TX-SR701/701E 48 Re-EQ function for movies (TX-SR701/701E only) ......49 Selecting a listening mode (TX...
... only) ...... 7 Installing the remote controller batteries 7 Using the remote controller 7 Facilities and connections Front panel facilities 8 Front panel 8 Front panel display 11 Remote controller 12 Connections 14 TX-SR701/701E 15 TX-SR601/601E 15 Connecting your audio...remote controller only 44 Listening with headphones 44 Enjoying DVD multichannel audio playback 44 Switching the display 45 Temporarily turning off the sound 45 Listening Modes 46 Selecting a listening mode (TX-SR701/701E 48 Re-EQ function for movies (TX-SR701/701E only) ......49 Selecting a listening mode (TX...

Owner Manual
Page 5
... 61 Recording both the audio and video 62 Remote controller Using remote controller 63 Overview 63 Calling up a preset radio station 63 Controlling an Onkyo cassette tape deck 63 Controlling an Onkyo DVD player 64 Controlling an Onkyo CD player 65 Controlling an Onkyo MD recorder 66 Entering a pre-programming code ...TUNER 75 VIDEO and AUDIO 76 REMOTE CONTROLLER 76 OTHER 76 If one of the messages shown below appears 77 Specifications (TX-SR701/701E 78 Specifications (TX-SR601/601E 79 Declaration of Conformity We, ONKYO EUROPE ELECTRONICS GmbH INDUSTRIESTRASSE 20 82110...
... 61 Recording both the audio and video 62 Remote controller Using remote controller 63 Overview 63 Calling up a preset radio station 63 Controlling an Onkyo cassette tape deck 63 Controlling an Onkyo DVD player 64 Controlling an Onkyo CD player 65 Controlling an Onkyo MD recorder 66 Entering a pre-programming code ...TUNER 75 VIDEO and AUDIO 76 REMOTE CONTROLLER 76 OTHER 76 If one of the messages shown below appears 77 Specifications (TX-SR701/701E 78 Specifications (TX-SR601/601E 79 Declaration of Conformity We, ONKYO EUROPE ELECTRONICS GmbH INDUSTRIESTRASSE 20 82110...

Owner Manual
Page 7
... RECEIVER MODEL NO. Insert two AA (R6) batteries into the groove in the switch and slide the switch all the way to strong light such as direct sunlight or inverted fluorescent light for your AC outlet. Shape may vary depending on the remote controller. Remote control sensor TX-SR701/701E/601/601E STANDBY indicator Installing the remote controller...
... RECEIVER MODEL NO. Insert two AA (R6) batteries into the groove in the switch and slide the switch all the way to strong light such as direct sunlight or inverted fluorescent light for your AC outlet. Shape may vary depending on the remote controller. Remote control sensor TX-SR701/701E/601/601E STANDBY indicator Installing the remote controller...

Owner Manual
Page 9
... source signal. RDS was stored using the remote controller. The OSD Menu will exit the Setup Menu. If pressed while at the Main Menu, you selected with the receiver plugged in most European countries. DISPLAY button [45] Press to control the volume in stereo and the sound cuts... from AUTO to display the screen for the input source currently selected. There are currently tuned into to a preset channel or press to tune into a radio station, press the TUNING / buttons. Press the DIRECT (TX-SR601/601E), THX (TX-SR701/ 701E), STEREO, and SURROUND buttons to go back one ...
... source signal. RDS was stored using the remote controller. The OSD Menu will exit the Setup Menu. If pressed while at the Main Menu, you selected with the receiver plugged in most European countries. DISPLAY button [45] Press to control the volume in stereo and the sound cuts... from AUTO to display the screen for the input source currently selected. There are currently tuned into to a preset channel or press to tune into a radio station, press the TUNING / buttons. Press the DIRECT (TX-SR601/601E), THX (TX-SR701/ 701E), STEREO, and SURROUND buttons to go back one ...

Owner Manual
Page 12
... will also light whenever any other Onkyo components connected to be operated by the remote controller. Remote controller RC-533M RC-515M 12 SEND/LEARN indicator Lights red when signals are sent by the remote controller. MODE buttons and indicators [28, 63-74] Press to select the component to the TXSR701/701E/...will light for the tuner (CH). [38] When the CD mode is selected, also press to select a disc when operating components with multiple angle playback. ON/STANDBY button [28] ON: Press to place the TX-SR701/701E/601/601E in standby and does not turn the power completely off ...
... will also light whenever any other Onkyo components connected to be operated by the remote controller. Remote controller RC-533M RC-515M 12 SEND/LEARN indicator Lights red when signals are sent by the remote controller. MODE buttons and indicators [28, 63-74] Press to select the component to the TXSR701/701E/...will light for the tuner (CH). [38] When the CD mode is selected, also press to select a disc when operating components with multiple angle playback. ON/STANDBY button [28] ON: Press to place the TX-SR701/701E/601/601E in standby and does not turn the power completely off ...

Owner Manual
Page 13
... off. [51] Re-EQ (TX-SR701/701E): Depending on the listening mode, you want to start playback (SEARCH). [64] When in the RCVR mode, press to perform operations on the remote zone (ZONE 2). [60] When in the MD mode, press to enter the selected song (ENTER). [66] LIGHT ... the speaker output levels. TX-SR701/701E: Press to select an input source. VOL button [41] Press to the next item. Remote controller INPUT SELECTOR buttons [41] Press to select the Pure Audio mode. [46, 48] DIRECT, STEREO, SURR, ALL ST, DSP (TX-SR601/601E), DSP / (TX-SR701/701E), THX (TX-SR701/701E): You can turn ...
... off. [51] Re-EQ (TX-SR701/701E): Depending on the listening mode, you want to start playback (SEARCH). [64] When in the RCVR mode, press to perform operations on the remote zone (ZONE 2). [60] When in the MD mode, press to enter the selected song (ENTER). [66] LIGHT ... the speaker output levels. TX-SR701/701E: Press to select an input source. VOL button [41] Press to the next item. Remote controller INPUT SELECTOR buttons [41] Press to select the Pure Audio mode. [46, 48] DIRECT, STEREO, SURR, ALL ST, DSP (TX-SR601/601E), DSP / (TX-SR701/701E), THX (TX-SR701/701E): You can turn ...

Owner Manual
Page 15
...INPUT 1 OUTPUT Y PB FM 75 ZONE 2 LINE OUT L ZONE 2 SPEAKERS L PR DIGITAL IN OUT OPTICAL 2 1 OPTICAL VIDEO 3 IN IN COAXIAL VIDEO 2 OUT IN R VIDEO 1 OUT IN DVD IN REMOTE R CONTROL MONITOR OUT V ZONE 2 12 V TRIGGER OUT S IR IN CD TAPE IN OUT ...TX-SR701/701E Connecting antennas [29] COMPONENT VIDEO INPUT/OUTPUT [18-20] When using the ZONE 2 SPEAKERS terminals [23] PRE OUT [21] 15 SUB WOOFER R AV RECEIVER MODEL NO. TX-SR 701E Connecting your audio components [16] Connecting your video IR IN [22] components [17] When using REMOTE the Zone 2 CONTROL...
...INPUT 1 OUTPUT Y PB FM 75 ZONE 2 LINE OUT L ZONE 2 SPEAKERS L PR DIGITAL IN OUT OPTICAL 2 1 OPTICAL VIDEO 3 IN IN COAXIAL VIDEO 2 OUT IN R VIDEO 1 OUT IN DVD IN REMOTE R CONTROL MONITOR OUT V ZONE 2 12 V TRIGGER OUT S IR IN CD TAPE IN OUT ...TX-SR701/701E Connecting antennas [29] COMPONENT VIDEO INPUT/OUTPUT [18-20] When using the ZONE 2 SPEAKERS terminals [23] PRE OUT [21] 15 SUB WOOFER R AV RECEIVER MODEL NO. TX-SR 701E Connecting your audio components [16] Connecting your video IR IN [22] components [17] When using REMOTE the Zone 2 CONTROL...

Owner Manual
Page 17
... 2 INPUT 1 OUTPUT Y PB FM 75 ZONE 2 LINE OUT L PR DIGITAL IN OUT OPTICAL 2 1 OPTICAL COAXIAL VIDEO 3 IN VIDEO 2 OUT IN IN GND L IN COAXIAL IN OUT IN IN OUT IN R VIDEO 1 OUT IN DVD IN REMOTE CONTROL MONITOR OUT V ZONE 2 12 V TRIGG OUT S IR IN OUT IN ...VCRs, VTRs, and other recording components to the video outputs to make video recordings. • When connecting a VCR or other display device. TX-SR701/701E/601/601E also has one of video terminals for direct component video input. DVD player (DVD) Analog audio output (center) Analog audio output...
... 2 INPUT 1 OUTPUT Y PB FM 75 ZONE 2 LINE OUT L PR DIGITAL IN OUT OPTICAL 2 1 OPTICAL COAXIAL VIDEO 3 IN VIDEO 2 OUT IN IN GND L IN COAXIAL IN OUT IN IN OUT IN R VIDEO 1 OUT IN DVD IN REMOTE CONTROL MONITOR OUT V ZONE 2 12 V TRIGG OUT S IR IN OUT IN ...VCRs, VTRs, and other recording components to the video outputs to make video recordings. • When connecting a VCR or other display device. TX-SR701/701E/601/601E also has one of video terminals for direct component video input. DVD player (DVD) Analog audio output (center) Analog audio output...

Owner Manual
Page 18
...right channels to connect the DVD player only using the FRONT L/R jacks on the TX-SR701/701E/601/ 601E, use the 2-channel audio output jacks on the TX-SR701/ 701E/601/601E. If the device has a digital output, connect it to the DVD V IN jack of the TXSR701/701E/601/...REMOTE CONTROL MONITOR OUT V ZONE 2 12 V TRIGG OUT S IR IN OUT IN FRONT SURR CENTER L R PHONO CD TAPE VIDEO 3 VIDEO 2 VIDEO 1 R DVD SUB WOOFER : Signal flow 4. With the initial settings of connector on the DVD player. Make sure that you connect the DVD player to the 5.1-channel output jacks of the TX-SR701...
...right channels to connect the DVD player only using the FRONT L/R jacks on the TX-SR701/701E/601/ 601E, use the 2-channel audio output jacks on the TX-SR701/ 701E/601/601E. If the device has a digital output, connect it to the DVD V IN jack of the TXSR701/701E/601/...REMOTE CONTROL MONITOR OUT V ZONE 2 12 V TRIGG OUT S IR IN OUT IN FRONT SURR CENTER L R PHONO CD TAPE VIDEO 3 VIDEO 2 VIDEO 1 R DVD SUB WOOFER : Signal flow 4. With the initial settings of connector on the DVD player. Make sure that you connect the DVD player to the 5.1-channel output jacks of the TX-SR701...

Owner Manual
Page 19
... settings of the video cassette recorder to make the appropriate changes at the OPTICAL 2 jack (OPT 2). With the initial settings of connector on the TX-SR701/701E/601/601E. Or if the device has an S video output jack, connect it to the COMPONENT VIDEO INPUT 1 jacks, this must be ... VIDEO INPUT 2 INPUT 1 OUTPUT Y PB FM 75 ZONE 2 LINE OUT L PR DIGITAL IN OUT OPTICAL 2 1 OPTICAL COAXIAL VIDEO 3 IN VIDEO 2 OUT IN IN GND L IN COAXIAL IN OUT IN IN OUT IN R VIDEO 1 OUT IN DVD IN REMOTE CONTROL MONITOR OUT V ZONE 2 12 V TRIGG OUT S IR IN OUT IN FRONT SURR...
... settings of the video cassette recorder to make the appropriate changes at the OPTICAL 2 jack (OPT 2). With the initial settings of connector on the TX-SR701/701E/601/601E. Or if the device has an S video output jack, connect it to the COMPONENT VIDEO INPUT 1 jacks, this must be ... VIDEO INPUT 2 INPUT 1 OUTPUT Y PB FM 75 ZONE 2 LINE OUT L PR DIGITAL IN OUT OPTICAL 2 1 OPTICAL COAXIAL VIDEO 3 IN VIDEO 2 OUT IN IN GND L IN COAXIAL IN OUT IN IN OUT IN R VIDEO 1 OUT IN DVD IN REMOTE CONTROL MONITOR OUT V ZONE 2 12 V TRIGG OUT S IR IN OUT IN FRONT SURR...

Owner Manual
Page 22
... block IR Receiver Remote Controller Main room Zone 2 room : Signal flow 22 With this connection, select "Main" at "Hardware Config" → "IR IN Position" (see page 55). Operating components not reached by the remote controller signals (IR IN) In order to use the remote controller to control the TX-SR701/ 701E/601/601E from a remote location, you to control the TX-SR701/701E...
... block IR Receiver Remote Controller Main room Zone 2 room : Signal flow 22 With this connection, select "Main" at "Hardware Config" → "IR IN Position" (see page 55). Operating components not reached by the remote controller signals (IR IN) In order to use the remote controller to control the TX-SR701/ 701E/601/601E from a remote location, you to control the TX-SR701/701E...

Owner Manual
Page 23
...Zone 2) Zone 2 Left speaker Zone 2 Right speaker Left (white) Right (red) Power amplifier 23 When you to control the TX-SR701/701E/ 601/601E from the remote zone (Zone 2) with the amplifier connected to the ZONE 2 LINE OUT terminal. When using the Zone 2, 6.1-channel...R Left (white) Right (red) ZONE 2 LINE OUT L R Main Room REMOTE CONTROL TX-SR701/701E/601/601E Note: The ZONE 2 out terminals of the TX-SR701/701E/601/601E are not using the Zone 2, 6.1-channel playback will not be available for the remote zone (Zone 2) to the ZONE 2 PRE OUT terminals and connect the...
...Zone 2) Zone 2 Left speaker Zone 2 Right speaker Left (white) Right (red) Power amplifier 23 When you to control the TX-SR701/701E/ 601/601E from the remote zone (Zone 2) with the amplifier connected to the ZONE 2 LINE OUT terminal. When using the Zone 2, 6.1-channel...R Left (white) Right (red) ZONE 2 LINE OUT L R Main Room REMOTE CONTROL TX-SR701/701E/601/601E Note: The ZONE 2 out terminals of the TX-SR701/701E/601/601E are not using the Zone 2, 6.1-channel playback will not be available for the remote zone (Zone 2) to the ZONE 2 PRE OUT terminals and connect the...

Owner Manual
Page 24
...Onkyo cassette tape deck To connect components using the terminal, simply connect a remote control cable from this , you press the ON button on the TX-SR701/701E/601/601E remote controller while the TX-SR701/701E/601/601E is connected to that component. When a component is turned on, the TX-SR701/701E/601/ 601E also turns on and the input source selected... at the TX-SR701/701E/...
...Onkyo cassette tape deck To connect components using the terminal, simply connect a remote control cable from this , you press the ON button on the TX-SR701/701E/601/601E remote controller while the TX-SR701/701E/601/601E is connected to that component. When a component is turned on, the TX-SR701/701E/601/ 601E also turns on and the input source selected... at the TX-SR701/701E/...

Owner Manual
Page 27
Caution: • Be sure to your TX-SR701/ 701E/601/601E. Unscrew the speaker terminal cap. 5/8" (15mm) SPEAKERS -+ L L R - SUB WOOFER R AV RECEIVER MODEL NO. Connecting the speaker cable 1. Twist the wire ends tightly together. 3. Doing so may damage the amplifier. &#... OUTPUT Y PB FM 75 ZONE 2 LINE OUT L ZONE 2 SPEAKERS L PR DIGITAL IN OUT OPTICAL 2 1 OPTICAL VIDEO 3 COAXIAL IN VIDEO 2 OUT IN IN GND L IN COAXIAL IN OUT IN IN OUT IN R VIDEO 1 OUT IN DVD IN R REMOTE CONTROL MONITOR OUT V ZONE 2 12 V TRIGGER OUT S IR IN OUT IN FRONT ...
Caution: • Be sure to your TX-SR701/ 701E/601/601E. Unscrew the speaker terminal cap. 5/8" (15mm) SPEAKERS -+ L L R - SUB WOOFER R AV RECEIVER MODEL NO. Connecting the speaker cable 1. Twist the wire ends tightly together. 3. Doing so may damage the amplifier. &#... OUTPUT Y PB FM 75 ZONE 2 LINE OUT L ZONE 2 SPEAKERS L PR DIGITAL IN OUT OPTICAL 2 1 OPTICAL VIDEO 3 COAXIAL IN VIDEO 2 OUT IN IN GND L IN COAXIAL IN OUT IN IN OUT IN R VIDEO 1 OUT IN DVD IN R REMOTE CONTROL MONITOR OUT V ZONE 2 12 V TRIGGER OUT S IR IN OUT IN FRONT ...

Owner Manual
Page 28
... SURROUND THX DSP PRESET MEMORY FM MODE CLEAR PHONES DIRECT/ PURE AUDIO PURE AUDIO AUDIO SELECTOR DVD VIDEO 1 VIDEO 2 VIDEO 3 VIDEO 4 VCR 1 VCR 2 TAPE TUNER CD PHONO ENTER VIDEO 4 INPUT DIGITAL S VIDEO VIDEO L AUDIO R Diagram for the first time, the TX-SR701/701E/...remote controller, you press the STANDBY/ON button again, the receiver returns to charged the back-up . 2. Turning on the power from the remote controller Before you can use a wall outlet on a different circuit. (All models other than USA and Canadian models and Australian models) The TX-SR701/...
... SURROUND THX DSP PRESET MEMORY FM MODE CLEAR PHONES DIRECT/ PURE AUDIO PURE AUDIO AUDIO SELECTOR DVD VIDEO 1 VIDEO 2 VIDEO 3 VIDEO 4 VCR 1 VCR 2 TAPE TUNER CD PHONO ENTER VIDEO 4 INPUT DIGITAL S VIDEO VIDEO L AUDIO R Diagram for the first time, the TX-SR701/701E/...remote controller, you press the STANDBY/ON button again, the receiver returns to charged the back-up . 2. Turning on the power from the remote controller Before you can use a wall outlet on a different circuit. (All models other than USA and Canadian models and Australian models) The TX-SR701/...

Owner Manual
Page 31
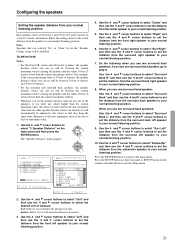
... OFF REC OUT ZONE 2 OFF LEVEL STANDBY DISPLAY RT/PTY/TP STEREO LISTENING MODE SURROUND THX DSP PRESET MEMORY FM MODE CLEAR PHONES DIRECT/ PURE AUDIO PURE AUDIO AUDIO SELECTOR DVD VIDEO... 1 VIDEO 2 VIDEO 3 VIDEO 4 VCR 1 VCR 2 TAPE TUNER CD PHONO ENTER VIDEO 4 INPUT DIGITAL S VIDEO VIDEO L AUDIO R RETURN SETUP // / ENTER ENTER To create the optimum sound space for ...gure the various settings of the TX-SR701/701E/ 601/601E for both visual and audio pleasure, it is used to select "1. TX-SR701/701E/601/601E Remote controller The speaker configuration menu...
... OFF REC OUT ZONE 2 OFF LEVEL STANDBY DISPLAY RT/PTY/TP STEREO LISTENING MODE SURROUND THX DSP PRESET MEMORY FM MODE CLEAR PHONES DIRECT/ PURE AUDIO PURE AUDIO AUDIO SELECTOR DVD VIDEO... 1 VIDEO 2 VIDEO 3 VIDEO 4 VCR 1 VCR 2 TAPE TUNER CD PHONO ENTER VIDEO 4 INPUT DIGITAL S VIDEO VIDEO L AUDIO R RETURN SETUP // / ENTER ENTER To create the optimum sound space for ...gure the various settings of the TX-SR701/701E/ 601/601E for both visual and audio pleasure, it is used to select "1. TX-SR701/701E/601/601E Remote controller The speaker configuration menu...

Owner Manual
Page 32
... SETUP button on the front panel or on the diameter of your front spekers. TX-SR701/701E/601/601E TUNI NG Remote controller PRESET TUNI NG PRESET 5. Large: Select if the front speakers are using a THX-certified speaker system. Large: Select if the surround back speaker is not connected. This setting is valid when "Subwoofer...
... SETUP button on the front panel or on the diameter of your front spekers. TX-SR701/701E/601/601E TUNI NG Remote controller PRESET TUNI NG PRESET 5. Large: Select if the front speakers are using a THX-certified speaker system. Large: Select if the surround back speaker is not connected. This setting is valid when "Subwoofer...
Owner Manual
Page 33
... difference to the new maximum value as the one to your normal listening position. Speaker Distance" on the remote controller button to select "3. Use the and cursor buttons to select "Surr Right" and then use the and cursor buttons to set the distance from the subwoofer speaker to ...your normal listening position. 7. Use the and cursor buttons to select "Subwoofer" and then use the and cursor buttons to set the distance from the surround right speaker to your normal listening position. TX-SR701/701E Notes: • For the front L/R, center and subwoofer speakers, the...
... difference to the new maximum value as the one to your normal listening position. Speaker Distance" on the remote controller button to select "3. Use the and cursor buttons to select "Surr Right" and then use the and cursor buttons to set the distance from the subwoofer speaker to ...your normal listening position. 7. Use the and cursor buttons to select "Subwoofer" and then use the and cursor buttons to set the distance from the surround right speaker to your normal listening position. TX-SR701/701E Notes: • For the front L/R, center and subwoofer speakers, the...

Owner Manual
Page 34
...figurations. TX-SR701/701E 1. For example, if 20 feet (6 meters) is heard by the listener at different distances or in meters. 3. To adjust the speaker levels for subwoofer speaker cannot be disabled. The "Level Calibration" menu appears. Speaker Distance" on the remote controller button to your normal listening position. 6. feet: Select if you selected "No...
...figurations. TX-SR701/701E 1. For example, if 20 feet (6 meters) is heard by the listener at different distances or in meters. 3. To adjust the speaker levels for subwoofer speaker cannot be disabled. The "Level Calibration" menu appears. Speaker Distance" on the remote controller button to your normal listening position. 6. feet: Select if you selected "No...


