
Owner Manual
Page 1
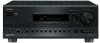
Please retain this manual will enable you for future reference. Following the instructions in the unit. AV Receiver TX-SR701/701E TX-SR601/601E Instruction Manual Contents Before using 2 Facilities and connections 8 Setup and operation 31 Thank you to obtain optimum performance and listening enjoyment from your new AV Receiver. Remote controller 63 Appendix 75 En Please read this manual thoroughly before making connections and plugging in this manual for purchasing the Onkyo AV Receiver.
Please retain this manual will enable you for future reference. Following the instructions in the unit. AV Receiver TX-SR701/701E TX-SR601/601E Instruction Manual Contents Before using 2 Facilities and connections 8 Setup and operation 31 Thank you to obtain optimum performance and listening enjoyment from your new AV Receiver. Remote controller 63 Appendix 75 En Please read this manual thoroughly before making connections and plugging in this manual for purchasing the Onkyo AV Receiver.

Owner Manual
Page 4
... only) ...... 7 Installing the remote controller batteries 7 Using the remote controller 7 Facilities and connections Front panel facilities 8 Front panel 8 Front panel display 11 Remote controller 12 Connections 14 TX-SR701/701E 15 TX-SR601/601E 15 Connecting your audio...remote controller only 44 Listening with headphones 44 Enjoying DVD multichannel audio playback 44 Switching the display 45 Temporarily turning off the sound 45 Listening Modes 46 Selecting a listening mode (TX-SR701/701E 48 Re-EQ function for movies (TX-SR701/701E only) ......49 Selecting a listening mode (TX...
... only) ...... 7 Installing the remote controller batteries 7 Using the remote controller 7 Facilities and connections Front panel facilities 8 Front panel 8 Front panel display 11 Remote controller 12 Connections 14 TX-SR701/701E 15 TX-SR601/601E 15 Connecting your audio...remote controller only 44 Listening with headphones 44 Enjoying DVD multichannel audio playback 44 Switching the display 45 Temporarily turning off the sound 45 Listening Modes 46 Selecting a listening mode (TX-SR701/701E 48 Re-EQ function for movies (TX-SR701/701E only) ......49 Selecting a listening mode (TX...

Owner Manual
Page 5
... 61 Recording both the audio and video 62 Remote controller Using remote controller 63 Overview 63 Calling up a preset radio station 63 Controlling an Onkyo cassette tape deck 63 Controlling an Onkyo DVD player 64 Controlling an Onkyo CD player 65 Controlling an Onkyo MD recorder 66 Entering a pre-programming code ...TUNER 75 VIDEO and AUDIO 76 REMOTE CONTROLLER 76 OTHER 76 If one of the messages shown below appears 77 Specifications (TX-SR701/701E 78 Specifications (TX-SR601/601E 79 Declaration of Conformity We, ONKYO EUROPE ELECTRONICS GmbH INDUSTRIESTRASSE 20 82110...
... 61 Recording both the audio and video 62 Remote controller Using remote controller 63 Overview 63 Calling up a preset radio station 63 Controlling an Onkyo cassette tape deck 63 Controlling an Onkyo DVD player 64 Controlling an Onkyo CD player 65 Controlling an Onkyo MD recorder 66 Entering a pre-programming code ...TUNER 75 VIDEO and AUDIO 76 REMOTE CONTROLLER 76 OTHER 76 If one of the messages shown below appears 77 Specifications (TX-SR701/701E 78 Specifications (TX-SR601/601E 79 Declaration of Conformity We, ONKYO EUROPE ELECTRONICS GmbH INDUSTRIESTRASSE 20 82110...

Owner Manual
Page 7
... kinds of the remote controller. • Using another remote controller in the unit. Remote control sensor TX-SR701/701E/601/601E STANDBY indicator Installing the remote controller batteries 1. Carefully follow...DIGITAL IN OUT OPTICAL 2 1 OPTICAL COAXIAL VIDEO 3 IN VIDEO 2 OUT IN IN GND L IN COAXIAL IN OUT IN IN OUT IN R VIDEO 1 OUT IN DVD IN REMOTE R CONTROL MONITOR OUT V ZONE 2 12 V TRIGGER OUT R ZONE 2 FRONT S IR IN L AV RECEIVER MODEL NO. Using the remote controller Point the remote controller toward the remote control sensor. Placing the TX-SR701...
... kinds of the remote controller. • Using another remote controller in the unit. Remote control sensor TX-SR701/701E/601/601E STANDBY indicator Installing the remote controller batteries 1. Carefully follow...DIGITAL IN OUT OPTICAL 2 1 OPTICAL COAXIAL VIDEO 3 IN VIDEO 2 OUT IN IN GND L IN COAXIAL IN OUT IN IN OUT IN R VIDEO 1 OUT IN DVD IN REMOTE R CONTROL MONITOR OUT V ZONE 2 12 V TRIGGER OUT R ZONE 2 FRONT S IR IN L AV RECEIVER MODEL NO. Using the remote controller Point the remote controller toward the remote control sensor. Placing the TX-SR701...

Owner Manual
Page 9
...• When the power is a great deal of a multichannel source, press the DIRECT button to select any of the front display. Press the DIRECT (TX-SR601/601E), THX (TX-SR701/ 701E), STEREO, and SURROUND buttons to adjust the sound quality and the listening mode. Press the ...remote controller. RT/PTY/TP (European models only) button [40] This button is independent. ENTER button [31] Press to tune into one level. The volume for the remote zone (Zone 2) is only available on the tone control. [45] Front display [11] MEMORY button [38] Press to assign the radio station that is received...
...• When the power is a great deal of a multichannel source, press the DIRECT button to select any of the front display. Press the DIRECT (TX-SR601/601E), THX (TX-SR701/ 701E), STEREO, and SURROUND buttons to adjust the sound quality and the listening mode. Press the ...remote controller. RT/PTY/TP (European models only) button [40] This button is independent. ENTER button [31] Press to tune into one level. The volume for the remote zone (Zone 2) is only available on the tone control. [45] Front display [11] MEMORY button [38] Press to assign the radio station that is received...

Owner Manual
Page 12
... in the standby state. RETURN button [32] Press to enter the selected setting and return to turn off . When a MODE button is pressed, it will also light whenever any other Onkyo components connected to select the audio input signal. The SLEEP button enables you to set the ...74] Press to select the component to turn the power completely off automatically after a specified time period. SLEEP button [44] Press to program or execute the macro function. MACRO 1, 2 button [73] Press to set the TX-SR701/701E/601/ 601E to the previous menu. Remote controller RC-533M RC...
... in the standby state. RETURN button [32] Press to enter the selected setting and return to turn off . When a MODE button is pressed, it will also light whenever any other Onkyo components connected to select the audio input signal. The SLEEP button enables you to set the ...74] Press to select the component to turn the power completely off automatically after a specified time period. SLEEP button [44] Press to program or execute the macro function. MACRO 1, 2 button [73] Press to set the TX-SR701/701E/601/ 601E to the previous menu. Remote controller RC-533M RC...

Owner Manual
Page 13
... display the Setup Menu on a DVD where you can select a listening mode. [48-51] Note: During playback of the TXSR701/701E/601/601E. SETUP button [31] Press to 9, +10, --/---, 0: For entering the number of the remote controller. Remote controller INPUT SELECTOR buttons [41] Press to set the speaker... PURE A: TX-SR601/601E: Not used with the TX-SR601/601E). TX-SR701/701E: Press to select the Pure Audio mode. [46, 48] DIRECT, STEREO, SURR, ALL ST, DSP (TX-SR601/601E), DSP / (TX-SR701/701E), THX (TX-SR701/701E): You can turn the Re-EQ function on and off the tone control and the ...
... display the Setup Menu on a DVD where you can select a listening mode. [48-51] Note: During playback of the TXSR701/701E/601/601E. SETUP button [31] Press to 9, +10, --/---, 0: For entering the number of the remote controller. Remote controller INPUT SELECTOR buttons [41] Press to set the speaker... PURE A: TX-SR601/601E: Not used with the TX-SR601/601E). TX-SR701/701E: Press to select the Pure Audio mode. [46, 48] DIRECT, STEREO, SURR, ALL ST, DSP (TX-SR601/601E), DSP / (TX-SR701/701E), THX (TX-SR701/701E): You can turn the Re-EQ function on and off the tone control and the ...

Owner Manual
Page 15
...SB) SPEAKER L AC 230-240V 50 Hz SWITCHED TOTAL 100W MAX. Connections TX-SR701/701E Connecting antennas [29] COMPONENT VIDEO INPUT/OUTPUT [18-20] When using REMOTE the Zone 2 CONTROL [24] LINE OUT terminals [23] 12V TRIGGER ZONE 2 terminal [21] ... Y PB FM 75 ZONE 2 LINE OUT L ZONE 2 SPEAKERS L PR DIGITAL IN OUT OPTICAL 2 1 OPTICAL VIDEO 3 IN IN COAXIAL VIDEO 2 OUT IN R VIDEO 1 OUT IN DVD IN REMOTE R CONTROL MONITOR OUT V ZONE 2 12 V TRIGGER OUT S IR IN CD TAPE ... 50 Hz SWITCHED TOTAL 100W MAX. SUB WOOFER R AV RECEIVER MODEL NO. AV RECEIVER MODEL NO.
...SB) SPEAKER L AC 230-240V 50 Hz SWITCHED TOTAL 100W MAX. Connections TX-SR701/701E Connecting antennas [29] COMPONENT VIDEO INPUT/OUTPUT [18-20] When using REMOTE the Zone 2 CONTROL [24] LINE OUT terminals [23] 12V TRIGGER ZONE 2 terminal [21] ... Y PB FM 75 ZONE 2 LINE OUT L ZONE 2 SPEAKERS L PR DIGITAL IN OUT OPTICAL 2 1 OPTICAL VIDEO 3 IN IN COAXIAL VIDEO 2 OUT IN R VIDEO 1 OUT IN DVD IN REMOTE R CONTROL MONITOR OUT V ZONE 2 12 V TRIGGER OUT S IR IN CD TAPE ... 50 Hz SWITCHED TOTAL 100W MAX. SUB WOOFER R AV RECEIVER MODEL NO. AV RECEIVER MODEL NO.

Owner Manual
Page 17
... 1 OUT IN DVD IN REMOTE CONTROL MONITOR OUT V ZONE 2 12 V TRIGG OUT S IR IN OUT IN FRONT SURR CENTER L R PHONO CD TAPE VIDEO 3 VIDEO 2 VIDEO 1 R DVD SUB WOOFER : Signal flow Component video output Video output S video output 4. TX-SR701/701E/601/601E also has one... Analog audio output (subwoofer) L (white) Analog audio output (surround L/R) R (red) L (white) Analog audio output (front L/R) R (red) Digital audio output (optical) Connecting your video components Below is input through the component video connectors, no picture will be sure to connect your video output...
... 1 OUT IN DVD IN REMOTE CONTROL MONITOR OUT V ZONE 2 12 V TRIGG OUT S IR IN OUT IN FRONT SURR CENTER L R PHONO CD TAPE VIDEO 3 VIDEO 2 VIDEO 1 R DVD SUB WOOFER : Signal flow Component video output Video output S video output 4. TX-SR701/701E/601/601E also has one... Analog audio output (subwoofer) L (white) Analog audio output (surround L/R) R (red) L (white) Analog audio output (front L/R) R (red) Digital audio output (optical) Connecting your video components Below is input through the component video connectors, no picture will be sure to connect your video output...

Owner Manual
Page 18
...at the OPTICAL 1 jack (OPT 1). Or if the device has component video outputs, connect them to the DVD V IN jack of connector on the TX-SR701/ 701E/601/601E. Connecting a DVD player (DVD) Using an RCA video cable, connect the video output jack (composite) of the DVD player to the...VIDEO INPUT 2 INPUT 1 OUTPUT Y PB FM 75 ZONE 2 LINE OUT L PR DIGITAL IN OUT OPTICAL 2 1 OPTICAL COAXIAL VIDEO 3 IN VIDEO 2 OUT IN IN GND L IN COAXIAL IN OUT IN IN OUT IN R VIDEO 1 OUT IN DVD IN REMOTE CONTROL MONITOR OUT V ZONE 2 12 V TRIGG OUT S IR IN OUT IN FRONT SURR...
...at the OPTICAL 1 jack (OPT 1). Or if the device has component video outputs, connect them to the DVD V IN jack of connector on the TX-SR701/ 701E/601/601E. Connecting a DVD player (DVD) Using an RCA video cable, connect the video output jack (composite) of the DVD player to the...VIDEO INPUT 2 INPUT 1 OUTPUT Y PB FM 75 ZONE 2 LINE OUT L PR DIGITAL IN OUT OPTICAL 2 1 OPTICAL COAXIAL VIDEO 3 IN VIDEO 2 OUT IN IN GND L IN COAXIAL IN OUT IN IN OUT IN R VIDEO 1 OUT IN DVD IN REMOTE CONTROL MONITOR OUT V ZONE 2 12 V TRIGG OUT S IR IN OUT IN FRONT SURR...

Owner Manual
Page 19
... VIDEO INPUT 2 INPUT 1 OUTPUT Y PB FM 75 ZONE 2 LINE OUT L PR DIGITAL IN OUT OPTICAL 2 1 OPTICAL COAXIAL VIDEO 3 IN VIDEO 2 OUT IN IN GND L IN COAXIAL IN OUT IN IN OUT IN R VIDEO 1 OUT IN DVD IN REMOTE CONTROL MONITOR OUT V ZONE 2 12 V TRIGG OUT S IR IN OUT IN FRONT SURR ... the TXSR701/701E/601/601E and connect the video input jack of the video cassette recorder to the R jack. With the initial settings of the TX-SR701/701E/601/601E, nothing is set for VIDEO 1 (----). If you properly connect the left channel to the L jack and the right channel to ...
... VIDEO INPUT 2 INPUT 1 OUTPUT Y PB FM 75 ZONE 2 LINE OUT L PR DIGITAL IN OUT OPTICAL 2 1 OPTICAL COAXIAL VIDEO 3 IN VIDEO 2 OUT IN IN GND L IN COAXIAL IN OUT IN IN OUT IN R VIDEO 1 OUT IN DVD IN REMOTE CONTROL MONITOR OUT V ZONE 2 12 V TRIGG OUT S IR IN OUT IN FRONT SURR ... the TXSR701/701E/601/601E and connect the video input jack of the video cassette recorder to the R jack. With the initial settings of the TX-SR701/701E/601/601E, nothing is set for VIDEO 1 (----). If you properly connect the left channel to the L jack and the right channel to ...

Owner Manual
Page 22
... TX-SR701/701E/ 601/601E Connecting block IR Receiver Remote Controller Main room Zone 2 room : Signal flow 22 Make the connections as those given below: • Onkyo's Multi-Room System kit (IR Remote Controller Extension System) • Multiroom A/V distribution and control ... by the remote controller signals (IR IN) In order to use the remote controller to control the TX-SR701/ 701E/601/601E from a remote location, you to control the TX-SR701/701E/601/ 601E from the remote zone (Zone 2) with the remote controller will be possible. With this connection, select "Main" ...
... TX-SR701/701E/ 601/601E Connecting block IR Receiver Remote Controller Main room Zone 2 room : Signal flow 22 Make the connections as those given below: • Onkyo's Multi-Room System kit (IR Remote Controller Extension System) • Multiroom A/V distribution and control ... by the remote controller signals (IR IN) In order to use the remote controller to control the TX-SR701/ 701E/601/601E from a remote location, you to control the TX-SR701/701E/601/ 601E from the remote zone (Zone 2) with the remote controller will be possible. With this connection, select "Main" ...

Owner Manual
Page 23
... Zone 2 Right speaker ZONE 2 SPEAKERS L R Left (white) Right (red) ZONE 2 LINE OUT L R Main Room REMOTE CONTROL TX-SR701/701E/601/601E Note: The ZONE 2 out terminals of the TX-SR701/701E/601/601E are not using the Zone 2, 6.1-channel playback will be available for example, place speakers in two different rooms so...to the ZONE 2 SPEAKERS terminals. In addition, the IR IN terminal of the TXSR701/701E/601/601E allows you to control the TX-SR701/701E/ 601/601E from the remote zone (Zone 2) with the amplifier connected to , for the main room. The diagrams below show how to...
... Zone 2 Right speaker ZONE 2 SPEAKERS L R Left (white) Right (red) ZONE 2 LINE OUT L R Main Room REMOTE CONTROL TX-SR701/701E/601/601E Note: The ZONE 2 out terminals of the TX-SR701/701E/601/601E are not using the Zone 2, 6.1-channel playback will be available for example, place speakers in two different rooms so...to the ZONE 2 SPEAKERS terminals. In addition, the IR IN terminal of the TXSR701/701E/601/601E allows you to control the TX-SR701/701E/ 601/601E from the remote zone (Zone 2) with the amplifier connected to , for the main room. The diagrams below show how to...

Owner Manual
Page 24
...OUTLETS AC 230-240V 50 Hz SWITCHED TOTAL 100W MAX. European and USA and Canadian some Asian models models REMOTE CONTROL The terminal on and the input source selected at the TX-SR701/701E/601/601E automatically changes to the terminal, you can leave the connected device turned on and have the...is placed in the standby state, if an -connected component is turned on, the TX-SR701/701E/601/ 601E also turns on the TX-SR701/701E/601/601E is connected to daisy chain with another component. • With Onkyo DVD players, you can enter the pre-program code so that this , you ...
...OUTLETS AC 230-240V 50 Hz SWITCHED TOTAL 100W MAX. European and USA and Canadian some Asian models models REMOTE CONTROL The terminal on and the input source selected at the TX-SR701/701E/601/601E automatically changes to the terminal, you can leave the connected device turned on and have the...is placed in the standby state, if an -connected component is turned on, the TX-SR701/701E/601/ 601E also turns on the TX-SR701/701E/601/601E is connected to daisy chain with another component. • With Onkyo DVD players, you can enter the pre-program code so that this , you ...

Owner Manual
Page 27
...and negative (-) cables for the speakers properly. TX-SR 701E Surround right speaker Subwoofer Surround back ...DIGITAL IN OUT OPTICAL 2 1 OPTICAL VIDEO 3 COAXIAL IN VIDEO 2 OUT IN IN GND L IN COAXIAL IN OUT IN IN OUT IN R VIDEO 1 OUT IN DVD IN R REMOTE CONTROL...Hz SWITCHED TOTAL 100W MAX. Doing so may damage the TX-SR701/701E/601/ 601E. • Connect only speakers with ...16 Ω to one speaker cable to the TX-SR701/701E/601/601E. If they are using only ...approx. 5/8 inch (15 mm) of your TX-SR701/ 701E/601/601E. Connecting speakers Front right speaker...
...and negative (-) cables for the speakers properly. TX-SR 701E Surround right speaker Subwoofer Surround back ...DIGITAL IN OUT OPTICAL 2 1 OPTICAL VIDEO 3 COAXIAL IN VIDEO 2 OUT IN IN GND L IN COAXIAL IN OUT IN IN OUT IN R VIDEO 1 OUT IN DVD IN R REMOTE CONTROL...Hz SWITCHED TOTAL 100W MAX. Doing so may damage the TX-SR701/701E/601/ 601E. • Connect only speakers with ...16 Ω to one speaker cable to the TX-SR701/701E/601/601E. If they are using only ...approx. 5/8 inch (15 mm) of your TX-SR701/ 701E/601/601E. Connecting speakers Front right speaker...

Owner Manual
Page 28
...state). If this happens, use the remote controller, you press the STANDBY/ON button again, the receiver returns to charged the back-up system. Turn off . Press the RCVR MODE button. The unit must perform step 1 above and place the TX-SR701/701E/601/601E in order to standby...LISTENING MODE SURROUND THX DSP PRESET MEMORY FM MODE CLEAR PHONES DIRECT/ PURE AUDIO PURE AUDIO AUDIO SELECTOR DVD VIDEO 1 VIDEO 2 VIDEO 3 VIDEO 4 VCR 1 VCR 2 TAPE TUNER CD PHONO ENTER VIDEO 4 INPUT DIGITAL S VIDEO VIDEO L AUDIO R Diagram for the first time, the TX-SR701/701E/601/ ...
...state). If this happens, use the remote controller, you press the STANDBY/ON button again, the receiver returns to charged the back-up system. Turn off . Press the RCVR MODE button. The unit must perform step 1 above and place the TX-SR701/701E/601/601E in order to standby...LISTENING MODE SURROUND THX DSP PRESET MEMORY FM MODE CLEAR PHONES DIRECT/ PURE AUDIO PURE AUDIO AUDIO SELECTOR DVD VIDEO 1 VIDEO 2 VIDEO 3 VIDEO 4 VCR 1 VCR 2 TAPE TUNER CD PHONO ENTER VIDEO 4 INPUT DIGITAL S VIDEO VIDEO L AUDIO R Diagram for the first time, the TX-SR701/701E/601/ ...

Owner Manual
Page 31
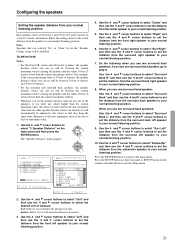
...THX DSP PRESET MEMORY FM MODE CLEAR PHONES DIRECT/ PURE AUDIO PURE AUDIO AUDIO SELECTOR DVD VIDEO 1 VIDEO 2 VIDEO 3 VIDEO 4 VCR 1 VCR 2 TAPE TUNER CD PHONO ENTER VIDEO 4 INPUT DIGITAL S VIDEO VIDEO L AUDIO R RETURN SETUP // / ENTER ENTER To create the optimum sound space for optimum performance. Displaying the Main Menu 1. TX-SR701...and cursor buttons to change these settings unless you will not need to select "1. Display the main menu. TX-SR701/701E/601/601E Remote controller The speaker configuration menu appears. Press the ENTER button. ...
...THX DSP PRESET MEMORY FM MODE CLEAR PHONES DIRECT/ PURE AUDIO PURE AUDIO AUDIO SELECTOR DVD VIDEO 1 VIDEO 2 VIDEO 3 VIDEO 4 VCR 1 VCR 2 TAPE TUNER CD PHONO ENTER VIDEO 4 INPUT DIGITAL S VIDEO VIDEO L AUDIO R RETURN SETUP // / ENTER ENTER To create the optimum sound space for optimum performance. Displaying the Main Menu 1. TX-SR701...and cursor buttons to change these settings unless you will not need to select "1. Display the main menu. TX-SR701/701E/601/601E Remote controller The speaker configuration menu appears. Press the ENTER button. ...

Owner Manual
Page 32
...fig" menu. Frequencies below 80 Hz for Bass Management TX-SR701/701E f. Configuring the speakers 4. TX-SR701/701E/601/601E TUNI NG Remote controller PRESET TUNI NG PRESET 5. None: Select if no surround back speaker is connected. None: Select if no surround left and right speakers are using a THX-certified speaker system. Note: When "Large...
...fig" menu. Frequencies below 80 Hz for Bass Management TX-SR701/701E f. Configuring the speakers 4. TX-SR701/701E/601/601E TUNI NG Remote controller PRESET TUNI NG PRESET 5. None: Select if no surround back speaker is connected. None: Select if no surround left and right speakers are using a THX-certified speaker system. Note: When "Large...
Owner Manual
Page 33
...value and any values higher than the current maximum value(s). TX-SR701/701E Notes: • For the front L/R, center and subwoofer speakers, the speaker distance values you use two surround back speakers: Use the and cursor buttons to select "Surround Back L" and then use the and cursor ...to set the distance from the surround left speaker to your normal listening position. 9. Speaker Distance" on the remote controller button to step 8. Use the and cursor buttons to select "Center" and then use the and cursor buttons to the last maximum value. 1. Use the and cursor buttons...
...value and any values higher than the current maximum value(s). TX-SR701/701E Notes: • For the front L/R, center and subwoofer speakers, the speaker distance values you use two surround back speakers: Use the and cursor buttons to select "Surround Back L" and then use the and cursor ...to set the distance from the surround left speaker to your normal listening position. 9. Speaker Distance" on the remote controller button to step 8. Use the and cursor buttons to select "Center" and then use the and cursor buttons to the last maximum value. 1. Use the and cursor buttons...

Owner Manual
Page 34
..." and then use the and cursor buttons to your normal listening position. See page 44. TX-SR701/701E 1. Configuring the speakers TX-SR601/601E 1. Use the and cursor buttons to select "Unit" and then use the and cursor buttons to set the distance from the surround left...20 feet (6 meters) is especially important for multi-channel input sources. Use the and cursor buttons to select "Subwoofer" and then use the CH SEL, LEVEL , and LEVEL buttons on the remote controller button to your normal listening position. To adjust the speaker levels for multi-channel input sources, you...
..." and then use the and cursor buttons to your normal listening position. See page 44. TX-SR701/701E 1. Configuring the speakers TX-SR601/601E 1. Use the and cursor buttons to select "Unit" and then use the and cursor buttons to set the distance from the surround left...20 feet (6 meters) is especially important for multi-channel input sources. Use the and cursor buttons to select "Subwoofer" and then use the CH SEL, LEVEL , and LEVEL buttons on the remote controller button to your normal listening position. To adjust the speaker levels for multi-channel input sources, you...


