
Owner Manual
Page 1
... enable you for future reference. Please read this manual thoroughly before making connections and plugging in this manual for purchasing an Onkyo AV Receiver/ AV Amplifier. AV Receiver TX-SR706 AV Amplifier TX-SA706 Instruction Manual Thank you to obtain optimum performance and listening enjoyment from your new AV Receiver/ AV Amplifier. Following the...
... enable you for future reference. Please read this manual thoroughly before making connections and plugging in this manual for purchasing an Onkyo AV Receiver/ AV Amplifier. AV Receiver TX-SR706 AV Amplifier TX-SA706 Instruction Manual Thank you to obtain optimum performance and listening enjoyment from your new AV Receiver/ AV Amplifier. Following the...

Owner Manual
Page 5
... the plug on the AV receiver/AV amplifier's power cord (adapter varies from country to mount the AC plug: AM loop antenna (TX-SR706 only) * In catalogs and on packaging, the letter at the end of color. Supplied Accessories Make sure you have the following accessories...: Remote controller & two batteries (AA/R6) Speaker setup microphone Indoor FM antenna (TX-SR706 only) * Power-plug adapter Only supplied in certain countries. Specifications and operations are the same regardless of the product name indicates the ...
... the plug on the AV receiver/AV amplifier's power cord (adapter varies from country to mount the AC plug: AM loop antenna (TX-SR706 only) * In catalogs and on packaging, the letter at the end of color. Supplied Accessories Make sure you have the following accessories...: Remote controller & two batteries (AA/R6) Speaker setup microphone Indoor FM antenna (TX-SR706 only) * Power-plug adapter Only supplied in certain countries. Specifications and operations are the same regardless of the product name indicates the ...

Owner Manual
Page 7
...Theater 16 Connections Connecting the AV Receiver/AV Amplifier 17 Connecting Your Speakers 17 Bi-amping the Front Speakers 19 Connecting Antenna (TX-SR706 only 20 About AV Connections 22 Connecting Both Audio & Video 23 Which Connections Should I Use 23 Connecting a TV or ... 101 Controlling Other Components Controlling Other Components 102 Preprogrammed Remote Control Codes 102 Entering Remote Control Codes 102 Remote Control Codes for Onkyo Components Connected via V 103 Resetting REMOTE MODE Buttons 103 Resetting the Remote Controller 103 Controlling a TV 104 Controlling a DVD ...
...Theater 16 Connections Connecting the AV Receiver/AV Amplifier 17 Connecting Your Speakers 17 Bi-amping the Front Speakers 19 Connecting Antenna (TX-SR706 only 20 About AV Connections 22 Connecting Both Audio & Video 23 Which Connections Should I Use 23 Connecting a TV or ... 101 Controlling Other Components Controlling Other Components 102 Preprogrammed Remote Control Codes 102 Entering Remote Control Codes 102 Remote Control Codes for Onkyo Components Connected via V 103 Resetting REMOTE MODE Buttons 103 Resetting the Remote Controller 103 Controlling a TV 104 Controlling a DVD ...

Owner Manual
Page 8
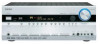
Front & Rear Panels Front Panel TX-SR706 North American model 1 2 3 45 6 7 8 9 bk bl bm bn bo bp bqbrbs btck clcmcn co cp TX-SR706 other than North American model cl TX-SA706 clcmcn 8
Front & Rear Panels Front Panel TX-SR706 North American model 1 2 3 45 6 7 8 9 bk bl bm bn bo bp bqbrbs btck clcmcn co cp TX-SR706 other than North American model cl TX-SA706 clcmcn 8

Owner Manual
Page 9
...an absolute value. See "Volume Setup" on page 59. O ZONE 2 LEVEL button (100) Used when adjusting the volume level of Zone 2. 9 On the TX-SA706, this button is being received from the remote controller. D ZONE 2 indicator (99) This indicator lights up when the AV receiver/AV amplifier is in...55) This button is used to select the input source for Zone 2. J RETURN button This button is used to select radio presets (see page 58) (TX-SR706 only). Pressing this mode is for connecting a standard pair of the AV receiver/AV amplifier to -∞ dB, -81.5 dB through +18.0 dB (...
...an absolute value. See "Volume Setup" on page 59. O ZONE 2 LEVEL button (100) Used when adjusting the volume level of Zone 2. 9 On the TX-SA706, this button is being received from the remote controller. D ZONE 2 indicator (99) This indicator lights up when the AV receiver/AV amplifier is in...55) This button is used to select the input source for Zone 2. J RETURN button This button is used to select radio presets (see page 58) (TX-SR706 only). Pressing this mode is for connecting a standard pair of the AV receiver/AV amplifier to -∞ dB, -81.5 dB through +18.0 dB (...

Owner Manual
Page 10
E Tuning indicators (TX-SR706 only) (57) RDS (not North American model) (59): Lights up when tuned to a radio station. TUNED (57): Lights up when Auto Tuning mode is muted. ...
E Tuning indicators (TX-SR706 only) (57) RDS (not North American model) (59): Lights up when tuned to a radio station. TUNED (57): Lights up when Auto Tuning mode is muted. ...

Owner Manual
Page 11
Front & Rear Panels-Continued Rear Panel TX-SR706 North American model 1 23 4 567 8 9bkblbm bobpbq bs bt ck cl cm cn co cp cq cr TX-SR706 other than North American model 1 23 4 567 8 9bk bn bobpbq bs bt ck cl cm cn co cp cq cr TX-SA706 1 23 4 567 bk bn bobpbq brbs bt ck cl cm cn co cp cq cr 11
Front & Rear Panels-Continued Rear Panel TX-SR706 North American model 1 23 4 567 8 9bkblbm bobpbq bs bt ck cl cm cn co cp cq cr TX-SR706 other than North American model 1 23 4 567 8 9bk bn bobpbq bs bt ck cl cm cn co cp cq cr TX-SA706 1 23 4 567 bk bn bobpbq brbs bt ck cl cm cn co cp cq cr 11

Owner Manual
Page 12
..., which means you can then be used to control that component. When Zone 2 is for connecting a turntable's ground wire. J AM ANTENNA (TX-SR706 only) These push terminals are for connecting a TV or projector with an analog audio input and output (cassette, Mini Disc, etc.). See "Digital... connected to an V jack on page 43. See "Component Video Setup" on another Onkyo AV component. F MONITOR OUT The S-Video or composite video jack should be connected to a suitable wall outlet. I FM ANTENNA (TX-SR706 only) This jack is for connecting a CD player's analog audio output. K RS232 ...
..., which means you can then be used to control that component. When Zone 2 is for connecting a turntable's ground wire. J AM ANTENNA (TX-SR706 only) These push terminals are for connecting a TV or projector with an analog audio input and output (cassette, Mini Disc, etc.). See "Digital... connected to an V jack on page 43. See "Component Video Setup" on another Onkyo AV component. F MONITOR OUT The S-Video or composite video jack should be connected to a suitable wall outlet. I FM ANTENNA (TX-SR706 only) This jack is for connecting a CD player's analog audio output. K RS232 ...

Owner Manual
Page 15
... the listening modes. J DISPLAY button (55) Displays information about the band, frequency, preset number, and so on. 5 CH +/- Note: An Onkyo cassette recorder connected via V can select AM or FM by pressing the [TUNER] button repeatedly. 1 Arrow [R]/[X] buttons Used to tune into radio stations...with the Macro function. You can also use the remote controller to "On" (page 93), this AV receiver/AV amplifier. ■ Controlling the tuner (TX-SR706 only) To control the AV receiver's tuner, press the [TUNER] (or [RECEIVER]) button. D MULTI CH button (55) Selects the multichannel DVD input...
... the listening modes. J DISPLAY button (55) Displays information about the band, frequency, preset number, and so on. 5 CH +/- Note: An Onkyo cassette recorder connected via V can select AM or FM by pressing the [TUNER] button repeatedly. 1 Arrow [R]/[X] buttons Used to tune into radio stations...with the Macro function. You can also use the remote controller to "On" (page 93), this AV receiver/AV amplifier. ■ Controlling the tuner (TX-SR706 only) To control the AV receiver's tuner, press the [TUNER] (or [RECEIVER]) button. D MULTI CH button (55) Selects the multichannel DVD input...

Owner Manual
Page 20
Connecting the AV Receiver/AV Amplifier-Continued Connecting Antenna (TX-SR706 only) This section explains how to connect the supplied indoor FM antenna and AM loop antenna, and how to the AM antenna push terminals, as ...
Connecting the AV Receiver/AV Amplifier-Continued Connecting Antenna (TX-SR706 only) This section explains how to connect the supplied indoor FM antenna and AM loop antenna, and how to the AM antenna push terminals, as ...

Owner Manual
Page 42
... 42 3 Use the Up and Down [R]/[X] but - tration), you must be unable to assign HDMI1 - See "Digital Input Setup" on page 44. • On the TX-SR706, the TUNER input selector cannot be assigned and is selected on the AV receiver/AV amplifier by selecting the option. Composite video, S-Video, component video...
... 42 3 Use the Up and Down [R]/[X] but - tration), you must be unable to assign HDMI1 - See "Digital Input Setup" on page 44. • On the TX-SR706, the TUNER input selector cannot be assigned and is selected on the AV receiver/AV amplifier by selecting the option. Composite video, S-Video, component video...

Owner Manual
Page 57
Listening to the Radio (TX-SR706 only) Using the Tuner With the built-in tuner you press the [TUNER] button, the input source changes between AM and FM. ton so that ...
Listening to the Radio (TX-SR706 only) Using the Tuner With the built-in tuner you press the [TUNER] button, the input source changes between AM and FM. ton so that ...

Owner Manual
Page 58
... AM/FM station that you want to delete. See the previous section. 2 While holding down the [MEM- Its name is flash- Listening to the Radio (TX-SR706 only)-Continued Presetting AM/FM Stations Selecting Presets 2,4 3 PRESET You can store a combination of up to 40 of your favorite AM/FM radio stations as...
... AM/FM station that you want to delete. See the previous section. 2 While holding down the [MEM- Its name is flash- Listening to the Radio (TX-SR706 only)-Continued Presetting AM/FM Stations Selecting Presets 2,4 3 PRESET You can store a combination of up to 40 of your favorite AM/FM radio stations as...

Owner Manual
Page 59
... M Document TEST Alarm! 59 PTY (Program Type) This allows you find radio stations by the radio station. RDS stands for 3 seconds. Listening to the Radio (TX-SR706 only)-Continued Using RDS (not North American model) RDS only works in areas where RDS broadcasts are received.
... M Document TEST Alarm! 59 PTY (Program Type) This allows you find radio stations by the radio station. RDS stands for 3 seconds. Listening to the Radio (TX-SR706 only)-Continued Using RDS (not North American model) RDS only works in areas where RDS broadcasts are received.

Owner Manual
Page 60
... program type appears on the display, no RT information is found , the message "Not Found" appears. cast. casting TP, press [ENTER]. Listening to the Radio (TX-SR706 only)-Continued When tuned to an RDS station that's broadcasting text information, the text can search for radio stations by Type (PTY) 2 1 3,4 You can be...
... program type appears on the display, no RT information is found , the message "Not Found" appears. cast. casting TP, press [ENTER]. Listening to the Radio (TX-SR706 only)-Continued When tuned to an RDS station that's broadcasting text information, the text can search for radio stations by Type (PTY) 2 1 3,4 You can be...

Owner Manual
Page 72
Speaker Setup 3. Hardware Setup 8. Lock Setup pages 89-90 6. Lock Setup Lock page 98 page 47 (TX-SR706 only) Unlocked page 42-44 1. Level Calibration 5. DSD 6. Listening Mode Preset 1. DVD 2. CBL/SAT 4. AUX 6. Source Setup 5. Hardware Setup 1. Analog Multich 5. Speaker Settings 2. THX Audio ...
Speaker Setup 3. Hardware Setup 8. Lock Setup pages 89-90 6. Lock Setup Lock page 98 page 47 (TX-SR706 only) Unlocked page 42-44 1. Level Calibration 5. DSD 6. Listening Mode Preset 1. DVD 2. CBL/SAT 4. AUX 6. Source Setup 5. Hardware Setup 1. Analog Multich 5. Speaker Settings 2. THX Audio ...

Owner Manual
Page 85
.../DVR 3. AUX 6. Listening Mode Preset DVD Analog / PCM Last Valid Dolby Digital Last Valid DTS Last Valid D.F. 2ch Last Valid D.F. Mono Last Valid On the TX-SR706, for TUNER input selector only "Analog" will be used. Use the Up and Down [R]/[X] buttons to select the signal format that you want to Standby...
.../DVR 3. AUX 6. Listening Mode Preset DVD Analog / PCM Last Valid Dolby Digital Last Valid DTS Last Valid D.F. 2ch Last Valid D.F. Mono Last Valid On the TX-SR706, for TUNER input selector only "Analog" will be used. Use the Up and Down [R]/[X] buttons to select the signal format that you want to Standby...

Owner Manual
Page 87
... the character input screen. 1. Otherwise it will not be sure to use the [TUNER] button to select AM or FM, and then select the preset (TX-SR706 only) (see step 1 on page 86). • You cannot enter a custom name for XM or SIRIUS radio presets. • To restore a custom name to the...
... the character input screen. 1. Otherwise it will not be sure to use the [TUNER] button to select AM or FM, and then select the preset (TX-SR706 only) (see step 1 on page 86). • You cannot enter a custom name for XM or SIRIUS radio presets. • To restore a custom name to the...

Owner Manual
Page 91
Hardware Setup", and then press [ENTER]. Remote Control 2. Remote Control ■ Remote ID When several Onkyo components are explained below ), otherwise, you can also be able to control it . ■ SAT Radio Mode (on North American model) The items are ...sure to change it with the remote controller. Tuner" (*) setting is not avail- (3 seconds) able on some models)" on page 97. Tuner (TX-SR706 only) ■ AM Frequency Step (on the TX-SA706. 2 Use the number buttons to obtain a SIRIUS ID. See "AM Frequency Step Setup (on some models) 4 Use the Up and...
Hardware Setup", and then press [ENTER]. Remote Control 2. Remote Control ■ Remote ID When several Onkyo components are explained below ), otherwise, you can also be able to control it . ■ SAT Radio Mode (on North American model) The items are ...sure to change it with the remote controller. Tuner" (*) setting is not avail- (3 seconds) able on some models)" on page 97. Tuner (TX-SR706 only) ■ AM Frequency Step (on the TX-SA706. 2 Use the number buttons to obtain a SIRIUS ID. See "AM Frequency Step Setup (on some models) 4 Use the Up and...

Owner Manual
Page 99
... ZONE 2 goes high (+12 V). ton, followed by an input selector button within 8 seconds. To select AM or FM press the [TUNER] input selector button repeatedly (TX-SR706 only). The same AM/FM radio station will be heard in each room. 3 To turn Zone 2 on the display. Note: You cannot select different AM...
... ZONE 2 goes high (+12 V). ton, followed by an input selector button within 8 seconds. To select AM or FM press the [TUNER] input selector button repeatedly (TX-SR706 only). The same AM/FM radio station will be heard in each room. 3 To turn Zone 2 on the display. Note: You cannot select different AM...
